TutorialUpdated: July 2, 2026
Human anatomy in drawing
In short
It would seem, what more can be said about human anatomy in drawing? But every time there are many valuable nuances.
2D artist (illustrator)
Did you know that we at Skills Up School are a bit like Maxim Gorky's character Danko and love to bring light to people? We try to find useful topics and interesting artists to bring you an educational spark and show you how much beauty exists in the world of digital and traditional art. It would seem that what more can be said about human anatomy? But every time there are many valuable nuances and tips that we want to share with you.
It makes sense to start studying anatomy with the bone structure. If you want to break it down step by step, watch our master class How to draw a human skeleton.
 Author: Founder of Skills Up School Azat Nurgaleev.
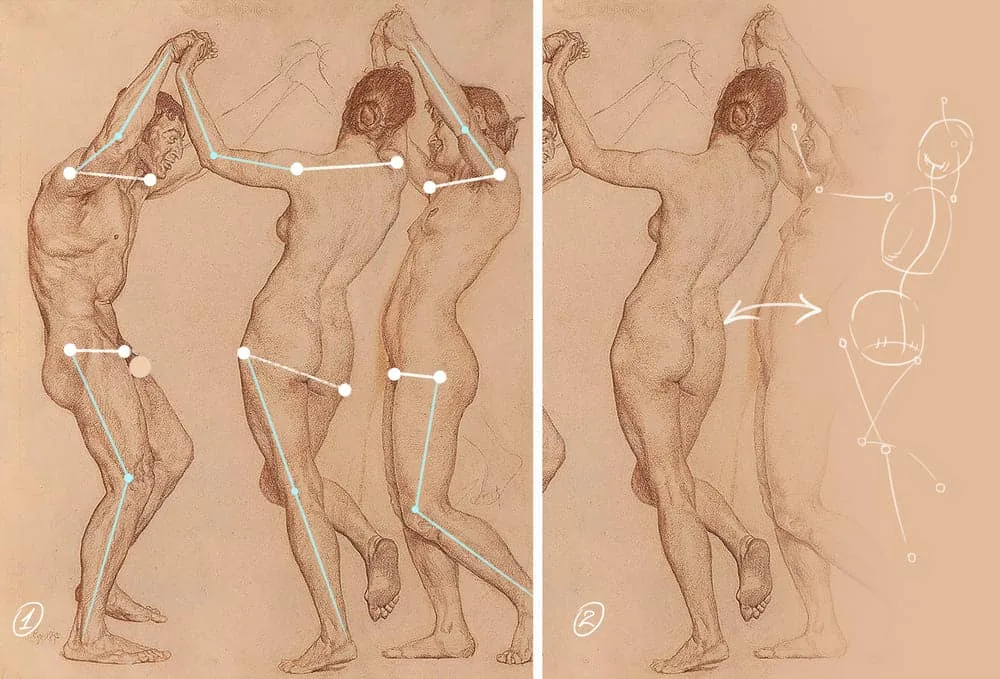
 Our mischievous characters, дружно взявшихся за руки, also have horizontal axes. We mark them in the shoulder and hip joints with white lines -1. They tell us the slope of these departments. For example, the central lady's shoulders and pelvis are tilted in different directions. At first glance, it is not always possible to notice such important details, but with axes life becomes simpler. Axes can and should be added to the limbs. They are marked with blue lines, so we clearly see which way the arms and legs are pointing. Before drawing the volume of the arm, use the axes to simply understand the direction and gesture (such a position of the limb will look convincing).
Author: Founder of Skills Up School Azat Nurgaleev.
What is important to know about human anatomy
When you get a telescope or a robot vacuum cleaner, you, of course, go to read the instructions and study how to use your new acquisition, how to set it up, what it consists of, what is important to change regularly. After all, do you read? At least the manufacturer hopes that the instructions will be read. It's the same with the human body. You can grab a pencil and rush to the sheet, hoping to draw everything perfectly the first time. Or you can approach this issue progressively: analyze the key parts of the body, their relationship, auxiliary techniques, consider the design of shape formation.The human body is symmetrical
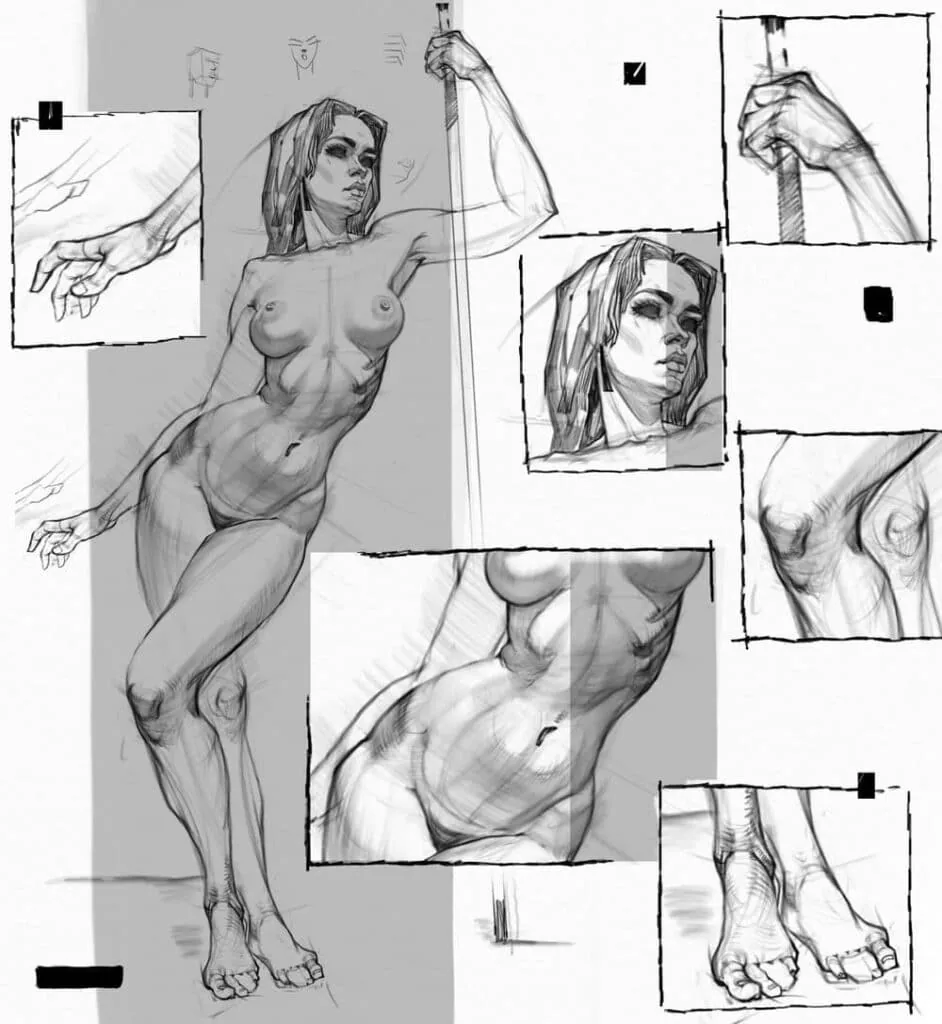
Most of our organs and parts are paired: two arms, two legs, two eyes. And the single parts of the face and body are centered along the vertical axis. When drawing, it is important to compare the lengths and widths of the limbs, the left and right halves of the body, so that your drawn person is not sewn together from the body parts of different people, like Frankenstein.The human body is mobile
All parts of the human body either bend at the joints or rotate around their axis. Try to twist your torso to the right and left, leaving the pelvis неподвижным, or rotate your shoulder. Use these features to convey the plasticity of the body.The principle of simplification
Imagine the parts of the body in the form of cubes, parallelepipeds, cylinders and balls. Do not draw fine details, generalize volumes to simple geometry. This technique helps to understand the structure of the body, the direction of the limbs, turns and bends of the body in space more easily.Parts of the body are proportional
The parts of the body form an integral system, there are no violations in it. The size of the head, the width of the pelvis, the height of the body and the size of the foot are interconnected. It is important to study anatomical proportions and use them in drawing. We will look at them a little later. And we also talked about them in our article about proportions.Axes of the human body in anatomy, drawing
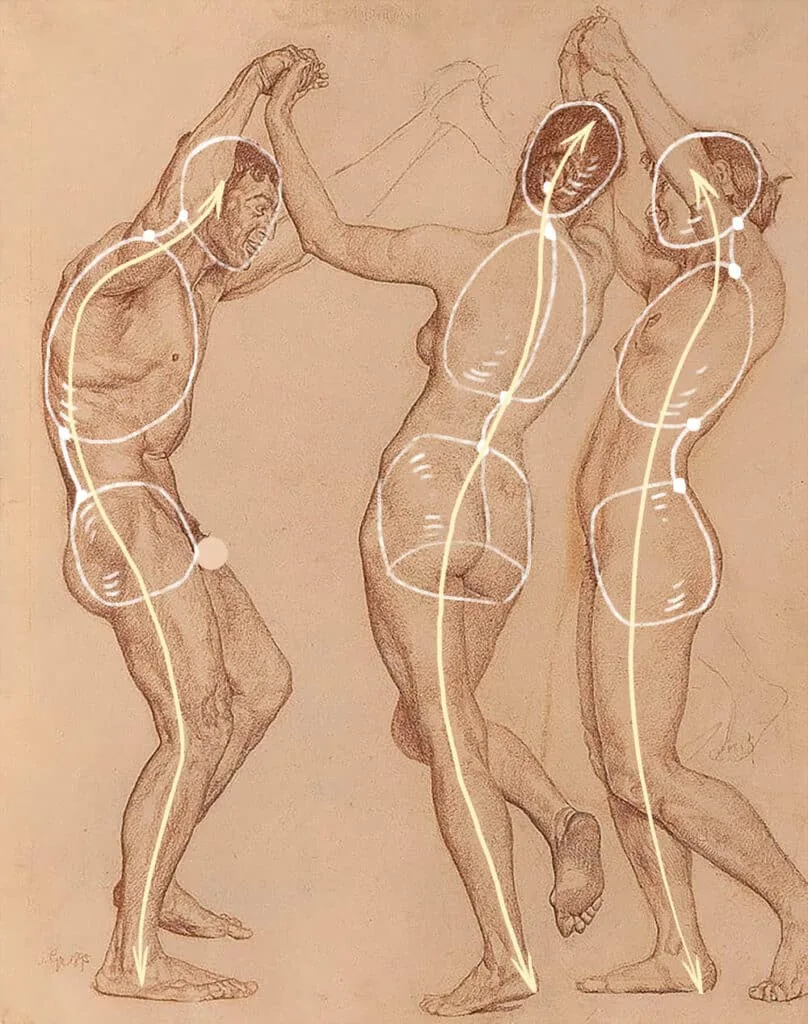
Why do we need axes? They show the direction of the body, the smoothness or sharpness of its bends. They are like trunks of trees: branches are attached to the trunk, and the rest of the decor in the form of leaves or needles is attached to the branches. The vertical axis of the human body coincides with the spine, the skull, the chest and the pelvis are strung on it like marshmallows on a skewer. In Otto Greiner's drawing, the outlines of the axes with the parts of the body are marked in white. But we can also put a generalized axis of the body with light yellow arrows, which suggests the general dynamics of the figures from the top of the head to the heels.
Our mischievous characters, дружно взявшихся за руки, also have horizontal axes. We mark them in the shoulder and hip joints with white lines -1. They tell us the slope of these departments. For example, the central lady's shoulders and pelvis are tilted in different directions. At first glance, it is not always possible to notice such important details, but with axes life becomes simpler. Axes can and should be added to the limbs. They are marked with blue lines, so we clearly see which way the arms and legs are pointing. Before drawing the volume of the arm, use the axes to simply understand the direction and gesture (such a position of the limb will look convincing).
Planes in human anatomy drawing
Related courses
All courses
from 3 900 ₽
-57%
Book illustration: The first page page
9 000 ₽3 900 ₽
Learn more

from 12 000 ₽
-20%
Векторная иллюстрация для начинающих
15 000 ₽12 000 ₽
Learn more

from 4 500 ₽
-55%
Character Concept: My First Hero
10 000 ₽4 500 ₽
Learn more
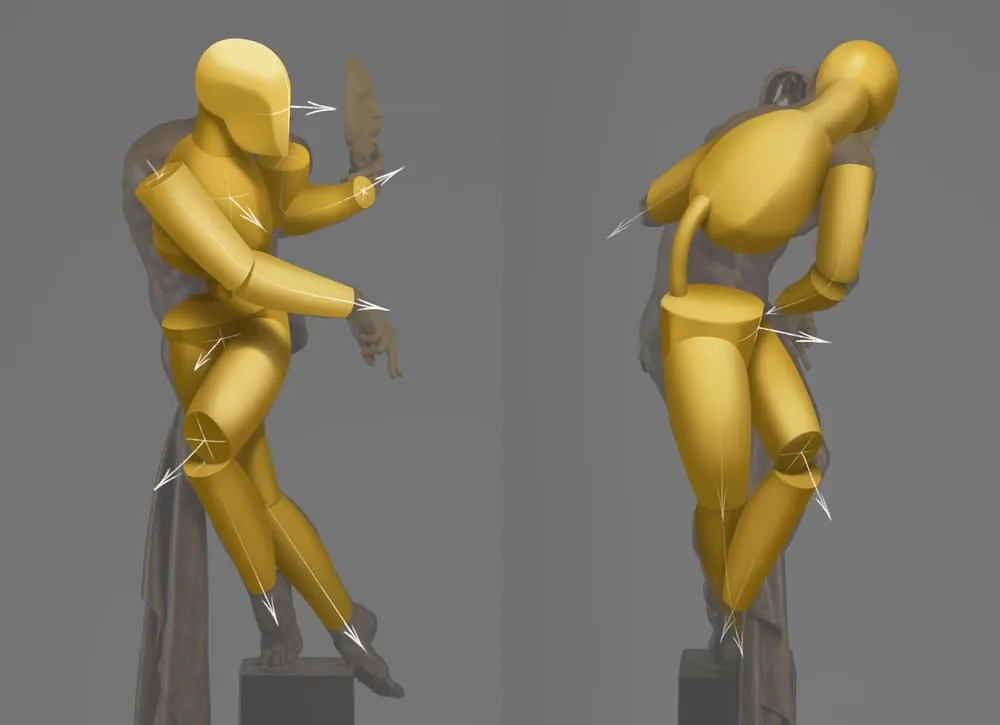
What do planes have to do with it, the person is volumetric, what absurdity is this? Now we will tell you everything and reveal the secrets. Each volumetric figure has faces: lateral, front, back, top and bottom. These planes show the orientation of the object, whether it stands upright, is tilted, or maybe even lies. For the convenience of understanding the human body, it is simplified and represented in the form of a combination of geometric figures: balls, cylinders and cubes. We mentioned that the human body is very mobile and flexible. Planes are very handy to show the direction of the parts of the body, its width, thickness and height. The good thing about sculptures is that they are motionless, you can walk around them and look at them from any convenient angle. Therefore, we will take and “feel” the sculpture of modern artist Cesar Orrico.
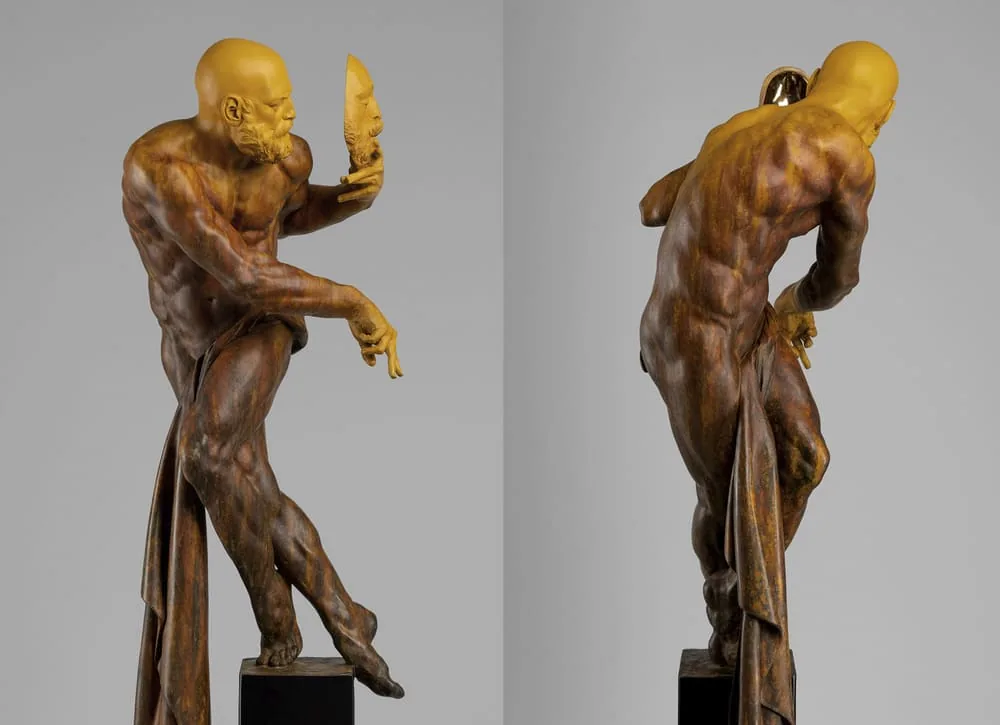 The man with the mask twisted in an incredibly strong movement, turns of the planes are clearly visible on him. But to make everything clear and obvious, we will apply the simplification method and in two steps we will find the desired surfaces. Recounting muscles, folds, выпуклостей, ямочек on the body is not of interest to us. We highlight the main thing: arms and legs - cylinders, chest - egg, head - a combination of a sphere and a cube, pelvis - a quadrangular cylinder. And the arrows will tell us their direction in space (someone is looking to the side, someone has turned away from us, and someone, on the contrary).
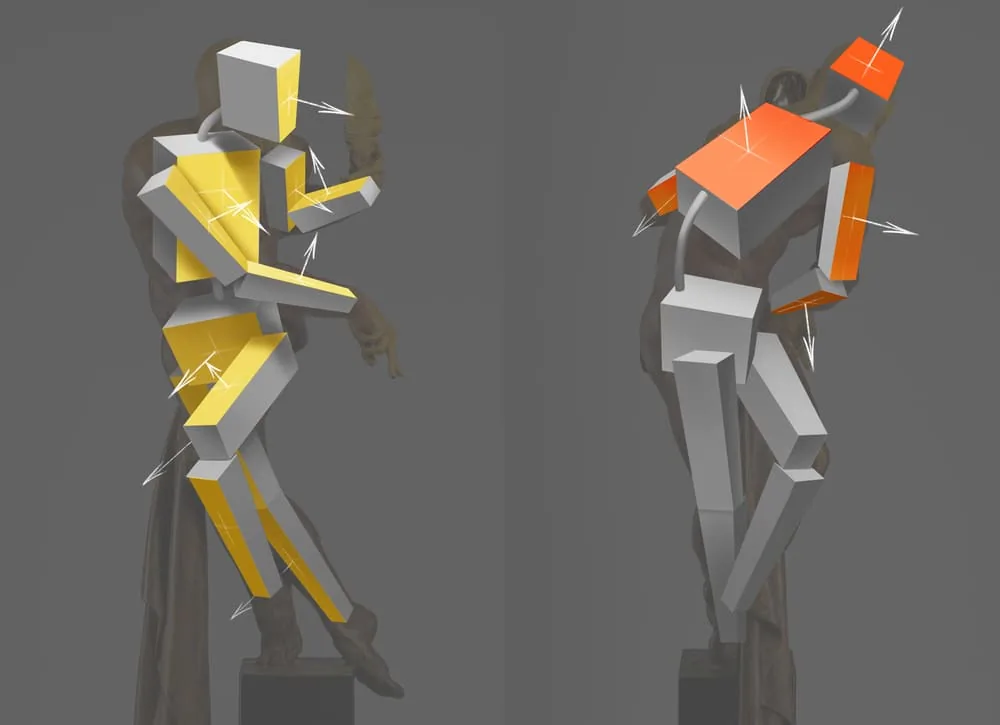
 Thanks to this technique, we can highlight only certain planes. For example, yellow is used to highlight frontal faces, and orange is used to highlight the rear ones. Naturally, in reality it is not possible to approach a person or statue and paint the back in a certain color. We are against vandalism and violence, but we can turn on an imaginary colored filter and highlight the planes you need! And additional arrows with directions are our assistants, suggesting the direction of each plane. You see how simple it all turns out to be, and a person is just a set of cubes, like a Lego constructor.
 Author: Elena Churkina
 Step 2
We mark the joint elements with circles: the volume of the shoulders, hands, feet, knees and elbows. We also mark the slope of the knees with a line. It will be similar to the slope of the pelvis.
Step 3
Now we move on to the most interesting: we begin to connect the parts of the body with lines and to increase the mass of the arms and legs. We add the volume of the head. Keep a very weak line pressure, because this is only a preliminary sketch, we will erase it in the future.
Step 2
We mark the joint elements with circles: the volume of the shoulders, hands, feet, knees and elbows. We also mark the slope of the knees with a line. It will be similar to the slope of the pelvis.
Step 3
Now we move on to the most interesting: we begin to connect the parts of the body with lines and to increase the mass of the arms and legs. We add the volume of the head. Keep a very weak line pressure, because this is only a preliminary sketch, we will erase it in the future.
 Step 4
And now, according to the light silhouette, we put more accurate lines of the pelvis, chest and legs. We add hints of feet and hands.
Step 5
We continue to clarify the silhouette and put the line of the arms, shoulders and shins. We mark the bust with a light hint of semicircles and put weak strokes of tone to emphasize the volume. and also erase the extra construction lines so that they do not create visual noise.
Step 4
And now, according to the light silhouette, we put more accurate lines of the pelvis, chest and legs. We add hints of feet and hands.
Step 5
We continue to clarify the silhouette and put the line of the arms, shoulders and shins. We mark the bust with a light hint of semicircles and put weak strokes of tone to emphasize the volume. and also erase the extra construction lines so that they do not create visual noise.
 Step 6
And now it's time for the head and limbs. Do not forget that the head fits into the height of the body 8 times, so we recheck this ratio. We collect similar silhouettes of feet, hands and head with simple lines. One hand the girl will rest on the sword, and the other will cover her eyes from the sun. Let's add a hairstyle to our girl. She is a warrior, so she will have a hairstyle with a shaved temple.
Step 7
Well, in the final the most delicious thing is drawing shadows. With very light wide strokes, similar to a growing stick, we put shadows on the right side of the body of our lady. I think you have noticed that our girl has acquired clothes: we will mark the edges of the T-shirt and shorts with simple strokes and arcs. These lines emphasize the volume of the body.
Step 6
And now it's time for the head and limbs. Do not forget that the head fits into the height of the body 8 times, so we recheck this ratio. We collect similar silhouettes of feet, hands and head with simple lines. One hand the girl will rest on the sword, and the other will cover her eyes from the sun. Let's add a hairstyle to our girl. She is a warrior, so she will have a hairstyle with a shaved temple.
Step 7
Well, in the final the most delicious thing is drawing shadows. With very light wide strokes, similar to a growing stick, we put shadows on the right side of the body of our lady. I think you have noticed that our girl has acquired clothes: we will mark the edges of the T-shirt and shorts with simple strokes and arcs. These lines emphasize the volume of the body.
 Step 8
Let's put a hand with a sword in the girl's hand. Let her right hand rest on the top of the handle. We draw the sword with a weaker pressure so that it does not overshadow the rest of the drawing. And in the final we put weak gray spots of falling shadows under the feet and the sword. This is how we will land our heroine and put her on the floor. We managed to draw a sketch of a girl with a slight movement.
Knowledge of the anatomical laws of the human body is an irreplaceable thing in any field. Whether you create characters for games or clothes for them, you need an understanding of proportions, combinatorics, subordination of elements and body transformation. Do not put off its study in the long box.
Who do artists hang out with, who do artists hang out with? And with the one who believes in them! And we believe in our students and always support them in classes and in our community. In our course on drawing a person “From scratch to figure” you will find the information necessary for an artist about anatomy, plasticity, rhythm, tone, distribution of light and shadow on the body. And that very friendly shoulder that everyone needs for every drawing person. And our curators will accompany you from beginning to end, warm you up, cheer you up and hug you. Well, sometimes they scold sometimes, how can you do without it.
Step 8
Let's put a hand with a sword in the girl's hand. Let her right hand rest on the top of the handle. We draw the sword with a weaker pressure so that it does not overshadow the rest of the drawing. And in the final we put weak gray spots of falling shadows under the feet and the sword. This is how we will land our heroine and put her on the floor. We managed to draw a sketch of a girl with a slight movement.
Knowledge of the anatomical laws of the human body is an irreplaceable thing in any field. Whether you create characters for games or clothes for them, you need an understanding of proportions, combinatorics, subordination of elements and body transformation. Do not put off its study in the long box.
Who do artists hang out with, who do artists hang out with? And with the one who believes in them! And we believe in our students and always support them in classes and in our community. In our course on drawing a person “From scratch to figure” you will find the information necessary for an artist about anatomy, plasticity, rhythm, tone, distribution of light and shadow on the body. And that very friendly shoulder that everyone needs for every drawing person. And our curators will accompany you from beginning to end, warm you up, cheer you up and hug you. Well, sometimes they scold sometimes, how can you do without it.
The man with the mask twisted in an incredibly strong movement, turns of the planes are clearly visible on him. But to make everything clear and obvious, we will apply the simplification method and in two steps we will find the desired surfaces. Recounting muscles, folds, выпуклостей, ямочек on the body is not of interest to us. We highlight the main thing: arms and legs - cylinders, chest - egg, head - a combination of a sphere and a cube, pelvis - a quadrangular cylinder. And the arrows will tell us their direction in space (someone is looking to the side, someone has turned away from us, and someone, on the contrary).
Thanks to this technique, we can highlight only certain planes. For example, yellow is used to highlight frontal faces, and orange is used to highlight the rear ones. Naturally, in reality it is not possible to approach a person or statue and paint the back in a certain color. We are against vandalism and violence, but we can turn on an imaginary colored filter and highlight the planes you need! And additional arrows with directions are our assistants, suggesting the direction of each plane. You see how simple it all turns out to be, and a person is just a set of cubes, like a Lego constructor.
Main mistakes
Neglecting theory
Theoretical knowledge of anatomy, like the base of a column: without a base, it will collapse along with all the decor of the entablature. Beautifully drawn eyes, fingers, knees, ribs will not save the figure from criticism, they will not be able to make it whole and convincing. Here you can't cheat and you can't cheat with a cheat sheet. The laws of anatomy must be known and applied always.Complication
Start with simple cubes and balls, and then gradually increase the level of complexity. Recounting everything at once in the human body can confuse you, and the drawing can be overloaded with unnecessary information. But this is not the worst thing, initial complication can lower the incentive to draw or destroy it completely. It will not work to depict a complex body structure the first time, expectations will not be met. And this can discourage you from continuing to draw. Act progressively and take care of motivation.Drawing one to one
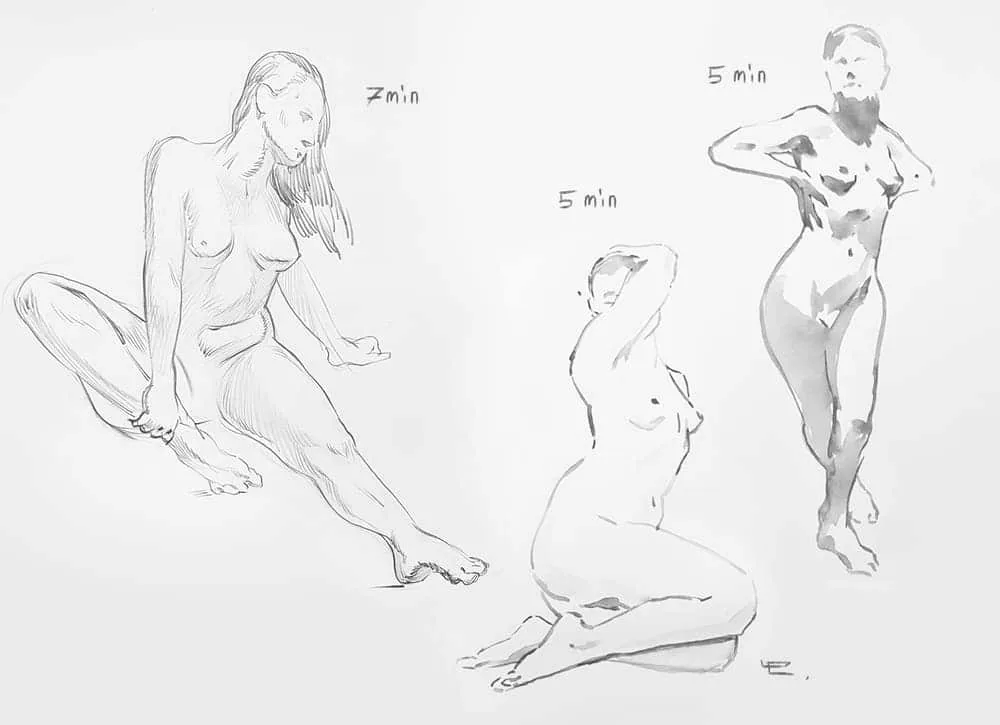
Accurate copying of reality on a sheet of paper is not always useful. The model moves all the time, it can turn to you unsuccessfully sideways and you will get an ugly angle. Or maybe the arm will seem short when bent, compared to the adjacent one. Therefore, try to observe proportions, the principle of symmetry and the principle of beauty: to show the best in the model, to show the beauty of the body, to show plasticity and even to enhance these qualities with the help of stylization and grotesque. And short sketching helps a lot in this. A limited amount of time does not allow you to copy for a long time, but pushes you to quickly explore the body, convey its movement and mood.
Author: Elena Churkina
Drawing from photos
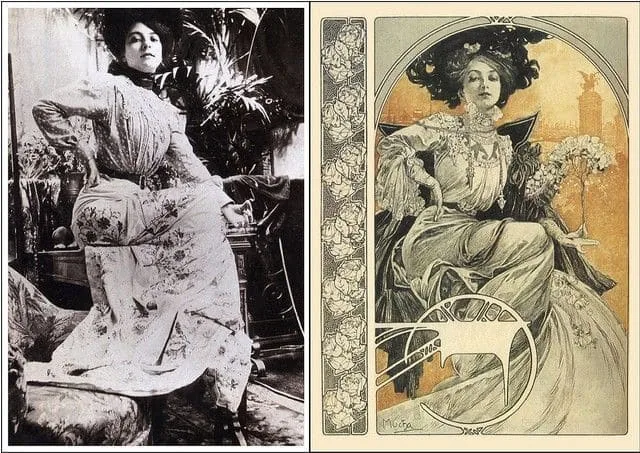
Drawing from photo references is a great activity, there is nothing wrong with it. Even great artists used and use this method. For example, Alfons Mucha used photographs to create amazing graphics with girls and floral motifs. But when you are at the beginning of the path, you need to understand the volume of a person from all sides in order to correctly understand the proportions of the details and the relationship of widths and heights. Go to live sketches, draw sculptures, ask friends to pose. Be sure to combine the use of photographs and a live model. This way you will quickly master the knowledge of anatomy.
Little practice
Any skill is born and закрепляется our body and mind only from constant training. This is the path of any specialist. It is not enough to know only the theory, it must be able to apply it in practice. Especially to teach your hands to draw what you need. Therefore, practice, practice, and practice again!Practical lesson: how to draw a person
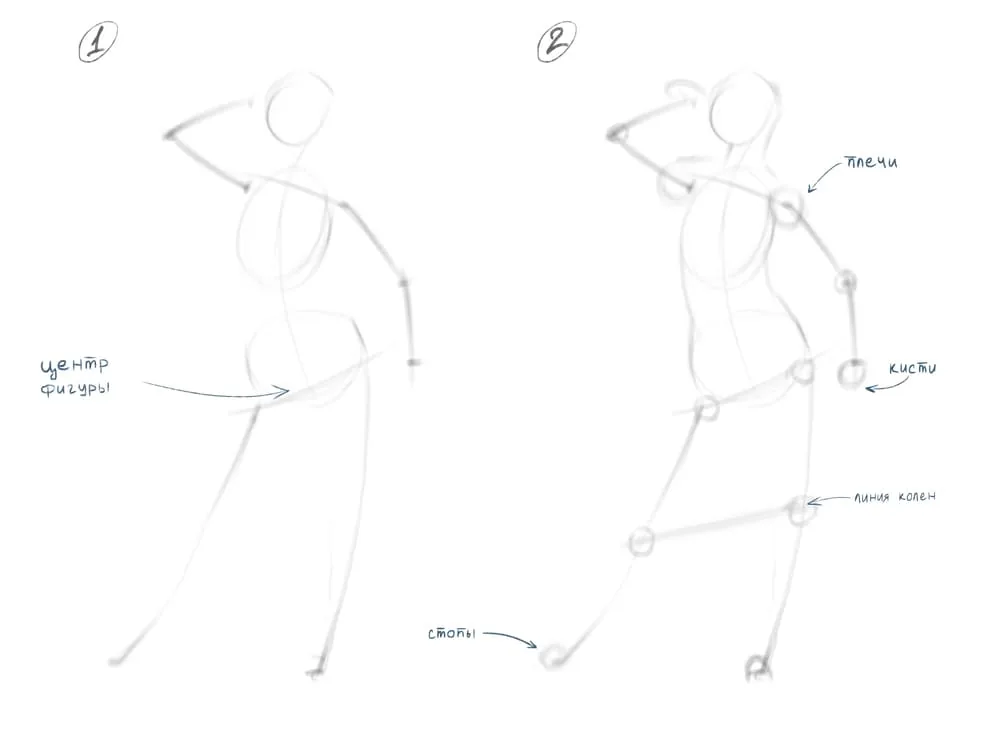
A long time ago we didn’t draw beautiful ladies with you! Let's create a sketch of a beautiful girl in a few simple steps. According to tradition, we start with our favorite - simplification! We start from simple circles that will help us create a very simple initial sketch of the body movement. It’s not for nothing that we simplified the sculpture of Cesar Orrico. Let's use this technique. Step 1 We mark the volume of the pelvis, chest and head with ovals. We mark the slope of the shoulders and pelvis with light lines. And we mark the arms and legs with simple lines. Remember that the swimsuit area is the center of the figure.
Step 2
We mark the joint elements with circles: the volume of the shoulders, hands, feet, knees and elbows. We also mark the slope of the knees with a line. It will be similar to the slope of the pelvis.
Step 3
Now we move on to the most interesting: we begin to connect the parts of the body with lines and to increase the mass of the arms and legs. We add the volume of the head. Keep a very weak line pressure, because this is only a preliminary sketch, we will erase it in the future.
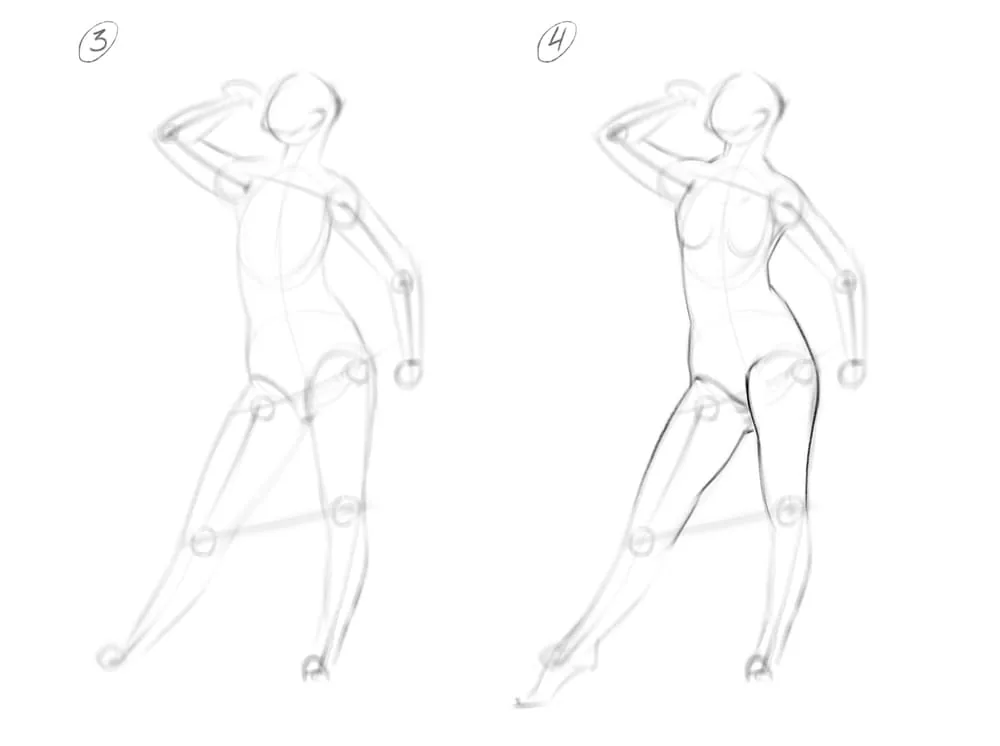
Step 4
And now, according to the light silhouette, we put more accurate lines of the pelvis, chest and legs. We add hints of feet and hands.
Step 5
We continue to clarify the silhouette and put the line of the arms, shoulders and shins. We mark the bust with a light hint of semicircles and put weak strokes of tone to emphasize the volume. and also erase the extra construction lines so that they do not create visual noise.
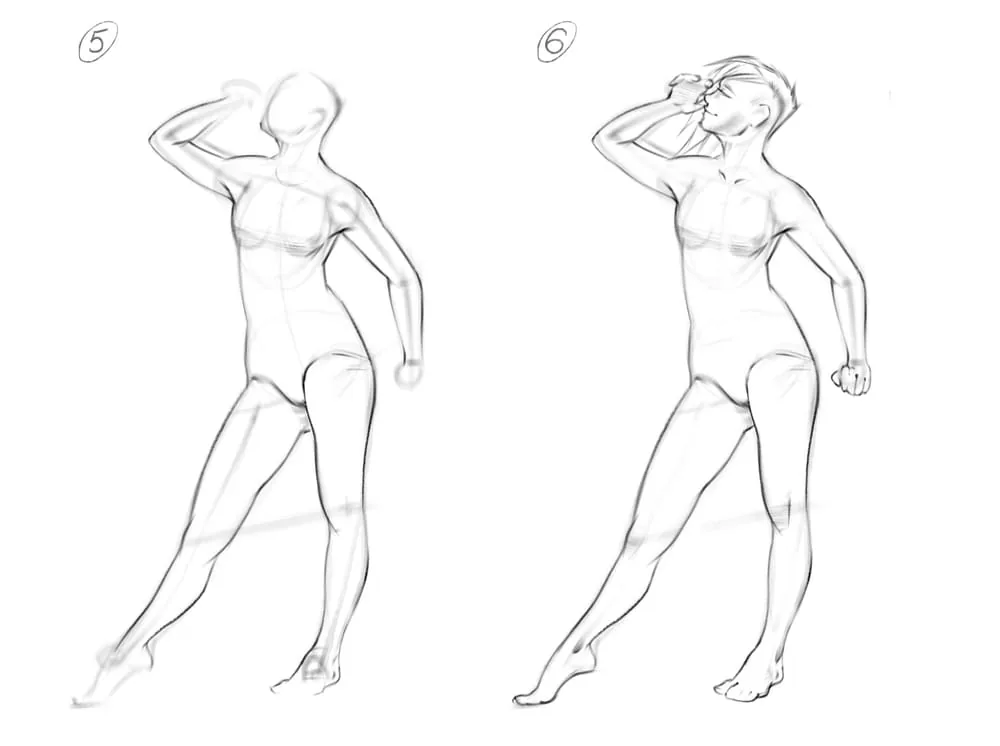
Step 6
And now it's time for the head and limbs. Do not forget that the head fits into the height of the body 8 times, so we recheck this ratio. We collect similar silhouettes of feet, hands and head with simple lines. One hand the girl will rest on the sword, and the other will cover her eyes from the sun. Let's add a hairstyle to our girl. She is a warrior, so she will have a hairstyle with a shaved temple.
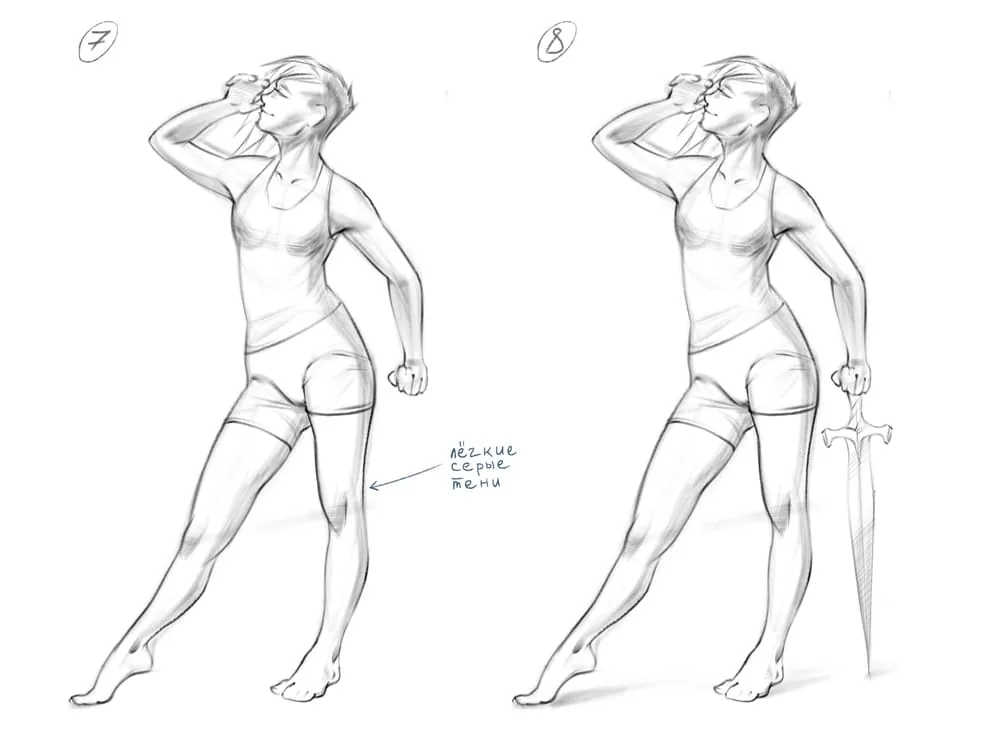
Step 7
Well, in the final the most delicious thing is drawing shadows. With very light wide strokes, similar to a growing stick, we put shadows on the right side of the body of our lady. I think you have noticed that our girl has acquired clothes: we will mark the edges of the T-shirt and shorts with simple strokes and arcs. These lines emphasize the volume of the body.
Step 8
Let's put a hand with a sword in the girl's hand. Let her right hand rest on the top of the handle. We draw the sword with a weaker pressure so that it does not overshadow the rest of the drawing. And in the final we put weak gray spots of falling shadows under the feet and the sword. This is how we will land our heroine and put her on the floor. We managed to draw a sketch of a girl with a slight movement.
Knowledge of the anatomical laws of the human body is an irreplaceable thing in any field. Whether you create characters for games or clothes for them, you need an understanding of proportions, combinatorics, subordination of elements and body transformation. Do not put off its study in the long box.
Who do artists hang out with, who do artists hang out with? And with the one who believes in them! And we believe in our students and always support them in classes and in our community. In our course on drawing a person “From scratch to figure” you will find the information necessary for an artist about anatomy, plasticity, rhythm, tone, distribution of light and shadow on the body. And that very friendly shoulder that everyone needs for every drawing person. And our curators will accompany you from beginning to end, warm you up, cheer you up and hug you. Well, sometimes they scold sometimes, how can you do without it.Related materials

Tutorial
Chiaroscuro in drawing
December 17, 2024
Article
Where is applied drawing used?
September 18, 2023

Tutorial
How to draw a human nose
August 15, 2024

Tutorial
How to learn to draw a person
January 18, 2024

Tutorial
How to draw a person's eyes
December 26, 2023

Article
Frontal perspective in drawing
October 1, 2025
News
Моделирование и текстурирование забавной скульптуры человека и милой рыбы-удильщика
June 11, 2026