TutorialUpdated: July 5, 2026
Chiaroscuro in drawing
In short
Chiaroscuro in drawing: study tonal relationships, light, shadow and reflections. Find out how to correctly convey volume, depth and realism in your works!
2D artist (illustrator)
Tone and tonal relationships in drawing
 In this article, we will try to understand the concepts of tone and chiaroscuro relationships, understand why it is so important to know the theory of chiaroscuro and be able to use tone. We always worry more about the tonal relationships of our students than about our own. We want them to be bright and lively, not dull and sad. Therefore, let's study how to apply the knowledge we have gained to make the image realistic, expressive and emotional. Let's get started!
In painting, tone and shape decide almost everything. See how it works on a live example in the master class How to draw a flower.
Tone is the degree of lightness or darkness of different parts of the image. It is one of the most important tools for an artist, with the help of which you can convey the volume of an object, the depth of space and enhance the emotional expressiveness of the drawing. Understanding and the ability to work with tone is an integral part of artistic skills when you use a pencil or other artistic materials to create a drawing.
In this article, we will try to understand the concepts of tone and chiaroscuro relationships, understand why it is so important to know the theory of chiaroscuro and be able to use tone. We always worry more about the tonal relationships of our students than about our own. We want them to be bright and lively, not dull and sad. Therefore, let's study how to apply the knowledge we have gained to make the image realistic, expressive and emotional. Let's get started!
In painting, tone and shape decide almost everything. See how it works on a live example in the master class How to draw a flower.
Tone is the degree of lightness or darkness of different parts of the image. It is one of the most important tools for an artist, with the help of which you can convey the volume of an object, the depth of space and enhance the emotional expressiveness of the drawing. Understanding and the ability to work with tone is an integral part of artistic skills when you use a pencil or other artistic materials to create a drawing.
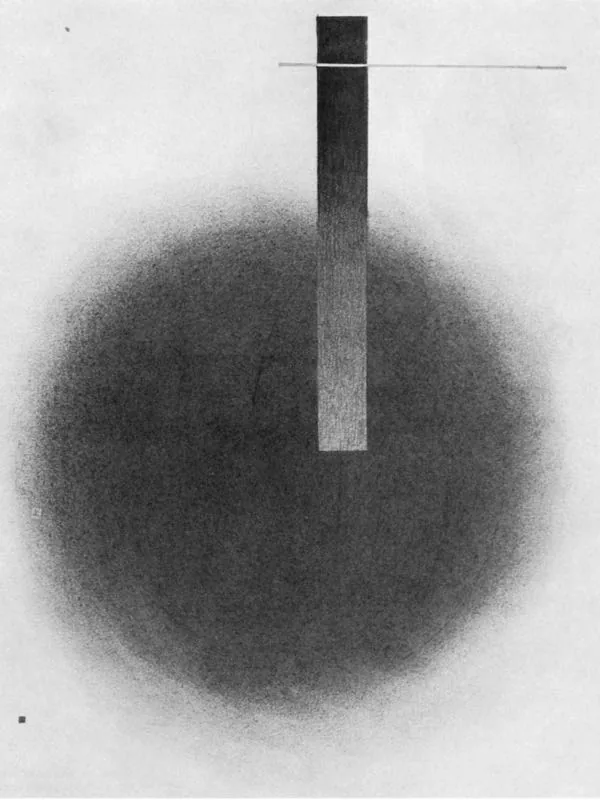
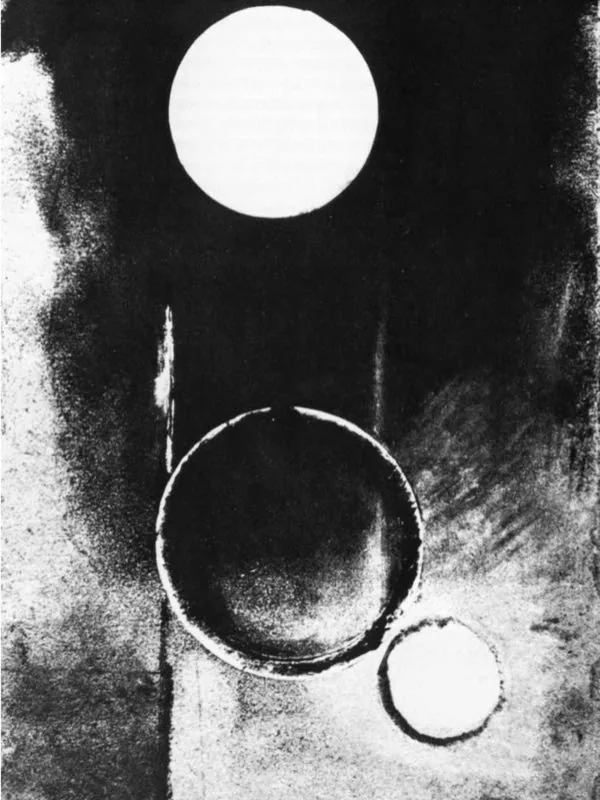 In the first composition, a more nuanced combination of gray tones is used, and in the second, on the contrary, enhanced contrasts. There are practically no intermediate gray gradients on it, only black and strongly light spots.
Tonal relationships are the difference in lightness and darkness between different areas within the image. You probably easily distinguish very light areas from very dark ones, but the most difficult thing will be to compare areas that are closer in tone to each other. In the first case, the contrast of light and dark spots is obvious, in the second you will have to strain and carefully control the halftones in the process of work. If the relationships of the spots to each other are depicted incorrectly, the drawing will visually become fractional, dirty, and the surfaces will become very crumpled where they should be smooth. Accurate transmission of chiaroscuro relationships, highlights, reflexes and shadows makes the image more convincing and natural.
In the first composition, a more nuanced combination of gray tones is used, and in the second, on the contrary, enhanced contrasts. There are practically no intermediate gray gradients on it, only black and strongly light spots.
Tonal relationships are the difference in lightness and darkness between different areas within the image. You probably easily distinguish very light areas from very dark ones, but the most difficult thing will be to compare areas that are closer in tone to each other. In the first case, the contrast of light and dark spots is obvious, in the second you will have to strain and carefully control the halftones in the process of work. If the relationships of the spots to each other are depicted incorrectly, the drawing will visually become fractional, dirty, and the surfaces will become very crumpled where they should be smooth. Accurate transmission of chiaroscuro relationships, highlights, reflexes and shadows makes the image more convincing and natural.
 Unlike constructive drawing, tonal drawing requires more time and effort to execute. Before you start working, it is important to assess your capabilities and available time. In some cases, it is enough to create a light linear sketch, paying special attention only to the contour. However, if your goal is to draw a realistic image with carefully elaborated details and shadows, more diligence and time will be required. You need to carefully look at your work, redrawing individual areas, highlighting or darkening them until the desired result is achieved. Such efforts will pay off in full, and you will be rewarded with an effective and complete drawing that will be the subject of your pride.
In real life, everything we see around us has chiaroscuro characteristics, color and texture. Color is very closely related to tone and tonal relationships, so even if you plan to engage only in painting and work mainly with color, you should still study the theory of tone well. In this article, the emphasis will be on the topic of light and shadow, but after reading and completing practical exercises, you will understand much more clearly how to draw colored images.
Unlike constructive drawing, tonal drawing requires more time and effort to execute. Before you start working, it is important to assess your capabilities and available time. In some cases, it is enough to create a light linear sketch, paying special attention only to the contour. However, if your goal is to draw a realistic image with carefully elaborated details and shadows, more diligence and time will be required. You need to carefully look at your work, redrawing individual areas, highlighting or darkening them until the desired result is achieved. Such efforts will pay off in full, and you will be rewarded with an effective and complete drawing that will be the subject of your pride.
In real life, everything we see around us has chiaroscuro characteristics, color and texture. Color is very closely related to tone and tonal relationships, so even if you plan to engage only in painting and work mainly with color, you should still study the theory of tone well. In this article, the emphasis will be on the topic of light and shadow, but after reading and completing practical exercises, you will understand much more clearly how to draw colored images.
Tonal gradient
You wouldn't jump from a 10-meter tower into the pool right away. You'd start with small cabinets, gradually increasing the height. Similarly, in drawing, it is important to gradually increase the complexity. Before drawing voluminous objects, it is worth practicing the smoothness of the stroke and the smoothness of tonal gradients. Exercise 1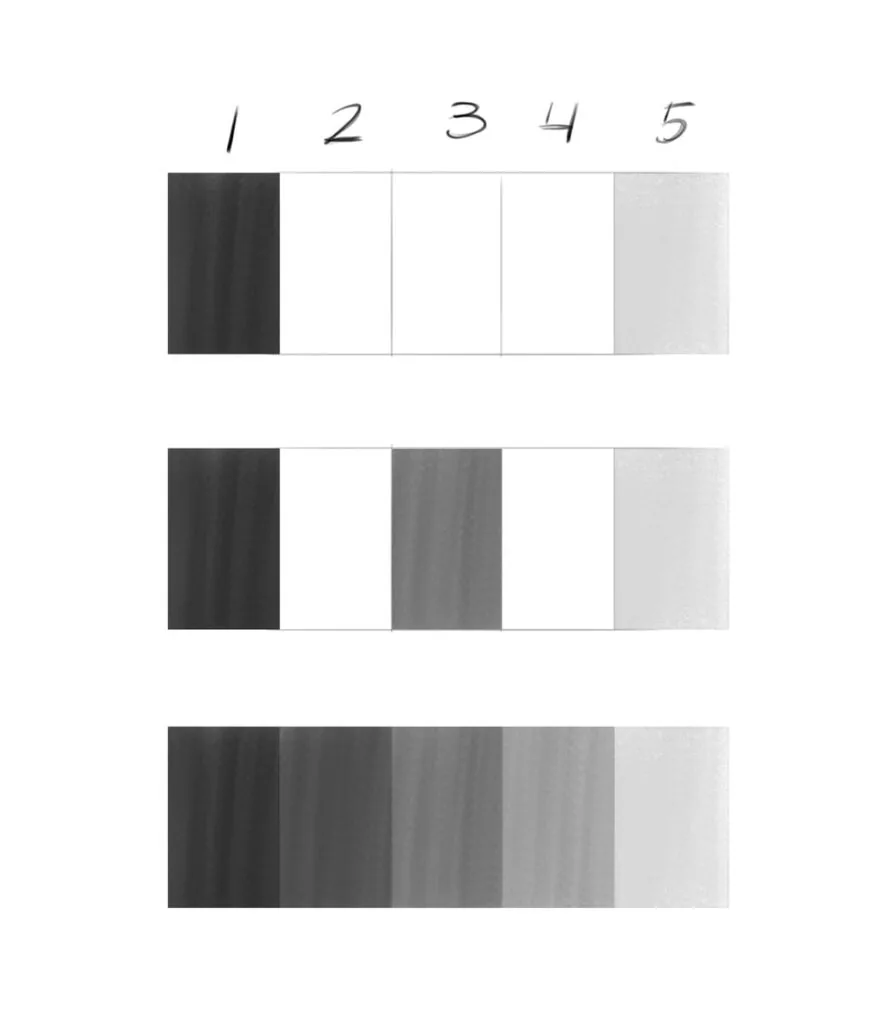 The first practical exercise will be the creation of a tonal gradient. We will create a smooth but stepped tone stretch by distributing the tone movement horizontally from the lightest to the darkest. First, make a strip dividing it into 5 equal segments. Paint the first section on the left with very dark gray. And the rightmost (5) section, paint with a light tone. In the range of these two tonal shades, we will create a stepped stretch. Now paint the section in the middle (3) with a gray shade of medium tone. And fill the remaining sections (2) and (4) with intermediate tones.
Exercise 2
The first practical exercise will be the creation of a tonal gradient. We will create a smooth but stepped tone stretch by distributing the tone movement horizontally from the lightest to the darkest. First, make a strip dividing it into 5 equal segments. Paint the first section on the left with very dark gray. And the rightmost (5) section, paint with a light tone. In the range of these two tonal shades, we will create a stepped stretch. Now paint the section in the middle (3) with a gray shade of medium tone. And fill the remaining sections (2) and (4) with intermediate tones.
Exercise 2
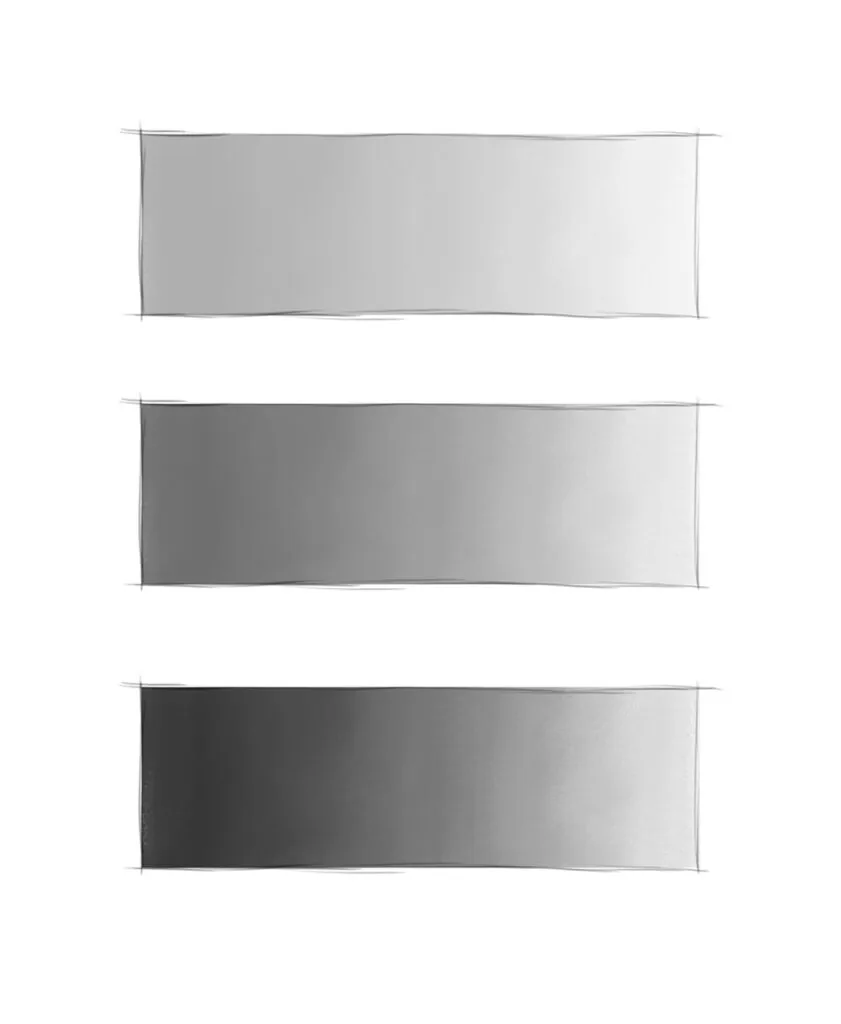 When you cope with the stepped stretch, proceed to the gradient, in which there will be no such changes. Draw the contours of such a wide strip, but do not divide it into sections. Guided by the previous exercise, fill the strip from left to right from dark to light. If you use a pencil to create a tonal stretch, you can make a gradient in several layers, gradually darkening the area closer to the left edge. Do not rush to paint and darken everything at once, we need to achieve a quality result. If some areas remain light and stand out, you need to go back and carefully shade them, and if somewhere you overdid it, you can use the tip of an eraser or formoplast to lighten the выбивающиеся sections to the desired tone.
Exercise 3
When you cope with the stepped stretch, proceed to the gradient, in which there will be no such changes. Draw the contours of such a wide strip, but do not divide it into sections. Guided by the previous exercise, fill the strip from left to right from dark to light. If you use a pencil to create a tonal stretch, you can make a gradient in several layers, gradually darkening the area closer to the left edge. Do not rush to paint and darken everything at once, we need to achieve a quality result. If some areas remain light and stand out, you need to go back and carefully shade them, and if somewhere you overdid it, you can use the tip of an eraser or formoplast to lighten the выбивающиеся sections to the desired tone.
Exercise 3
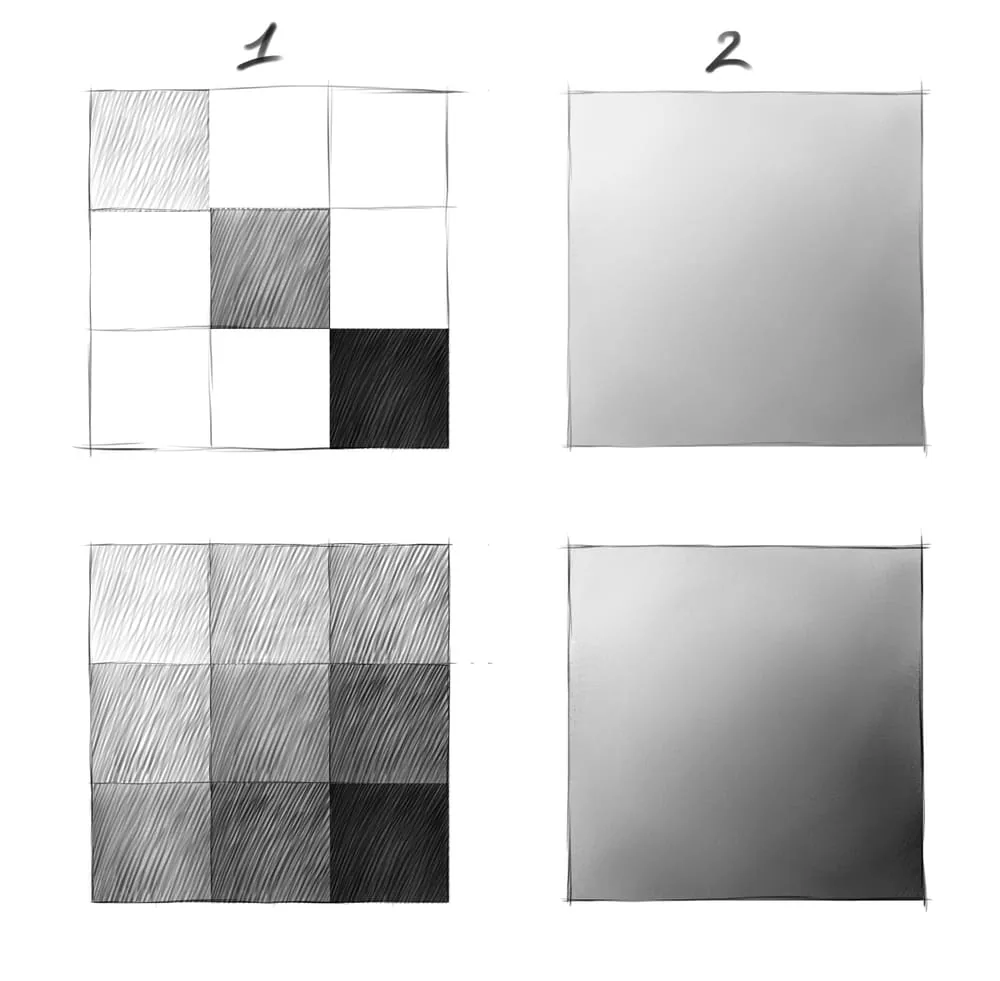 After the strip with a smooth gradient is ready, you can perform several more exercises developing the sense of tone and tonal relationships. Draw two large squares. Divide one (1) square into 9 small squares, and leave the second one whole. Fill the first divided square with a stepped gradient from the lightest tone located in the top left to the darkest one in the bottom right. For convenience, first fill in 3 small squares diagonally to get a stretch in three tones. Fill in the side squares with the appropriate shading to get one large gradient consisting of 9 stages.
The next square (2) needs to be filled with a smooth transition from a light to a dark area. You can use the method of layering the hatching on top of each other. Perfectly may not work out the first time, but you should not worry about it. First, make a lighter stretch, and then take the second step to set a light darkening to the lower right corner. On the other hand, we are just learning to work with tone, in order to make our drawings with a pencil more expressive, you should not strive for ideal execution. There are still many important components in the drawing process that cannot be overlooked. If you want to study these aspects and artistic laws in more depth, you can do it with us in the courses Drawing 2D Basic and Drawing 2D Middle.
After the strip with a smooth gradient is ready, you can perform several more exercises developing the sense of tone and tonal relationships. Draw two large squares. Divide one (1) square into 9 small squares, and leave the second one whole. Fill the first divided square with a stepped gradient from the lightest tone located in the top left to the darkest one in the bottom right. For convenience, first fill in 3 small squares diagonally to get a stretch in three tones. Fill in the side squares with the appropriate shading to get one large gradient consisting of 9 stages.
The next square (2) needs to be filled with a smooth transition from a light to a dark area. You can use the method of layering the hatching on top of each other. Perfectly may not work out the first time, but you should not worry about it. First, make a lighter stretch, and then take the second step to set a light darkening to the lower right corner. On the other hand, we are just learning to work with tone, in order to make our drawings with a pencil more expressive, you should not strive for ideal execution. There are still many important components in the drawing process that cannot be overlooked. If you want to study these aspects and artistic laws in more depth, you can do it with us in the courses Drawing 2D Basic and Drawing 2D Middle.
The basis of chiaroscuro in drawing
Related courses
All courses
from 3 900 ₽
-57%
Book illustration: The first page page
9 000 ₽3 900 ₽
Learn more

from 12 000 ₽
-20%
Векторная иллюстрация для начинающих
15 000 ₽12 000 ₽
Learn more

from 4 500 ₽
-55%
Character Concept: My First Hero
10 000 ₽4 500 ₽
Learn more
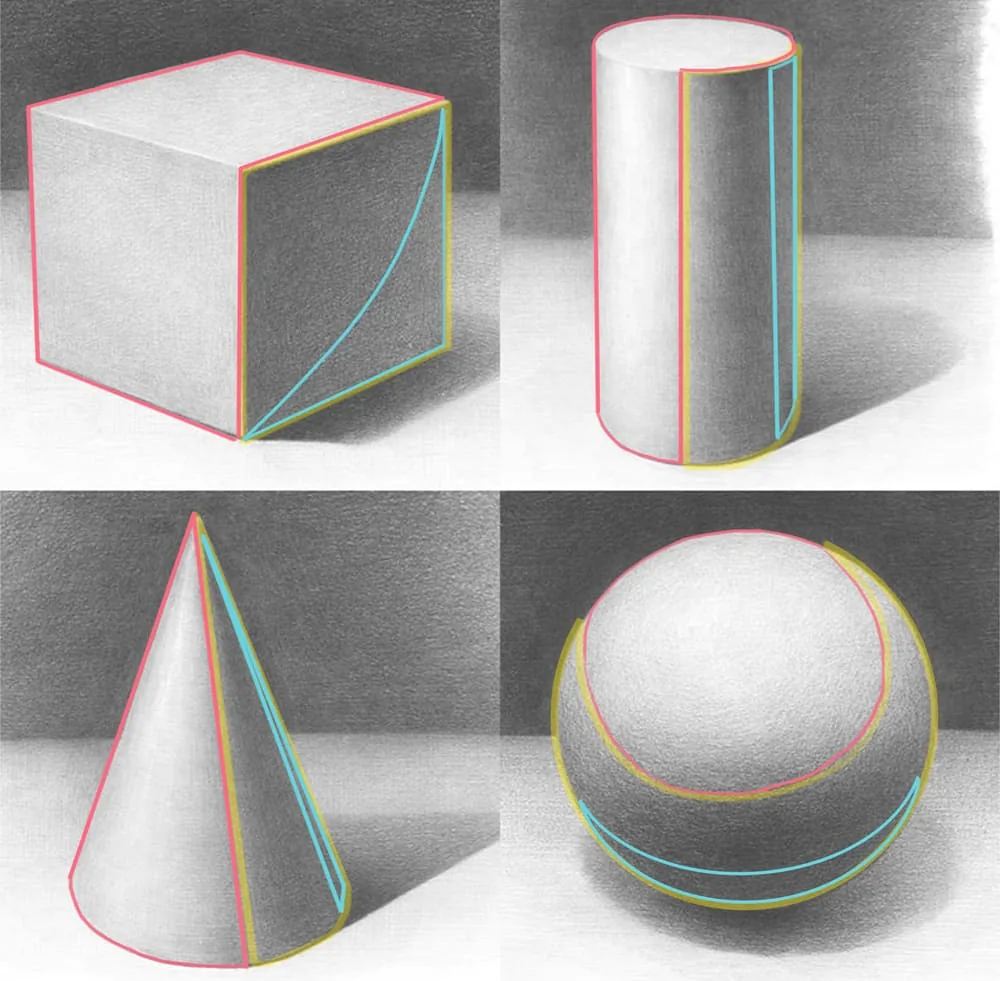 We marked the light with pink, the shadow with yellow, and the reflection with turquoise.
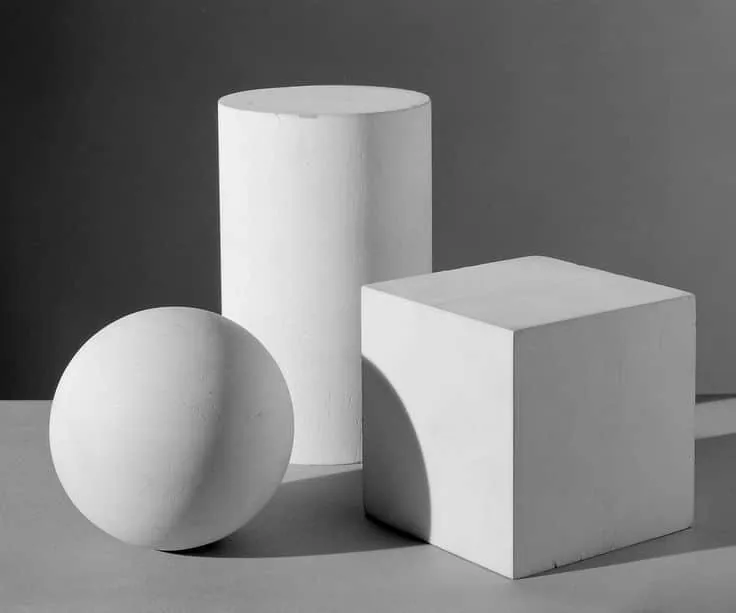
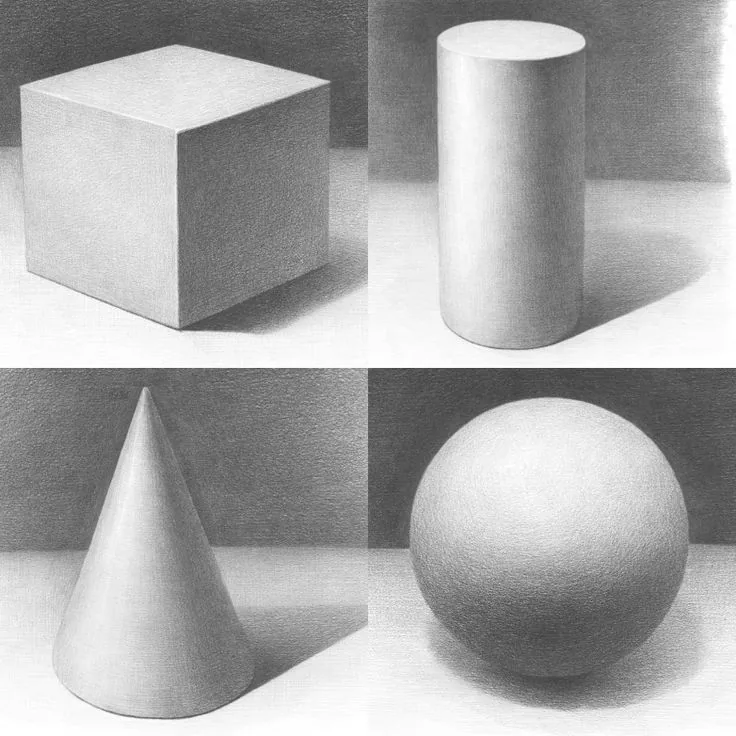
If you look at the objects that surround you, you will see the light and dark part of any object. For now, we need to imagine that objects do not have any color, and also not to focus on textures yet. For this, you can simply consider that the objects are white and have a matte surface.
The first examples will be simple geometric bodies — a cube, a ball and a cylinder. On the example of a cube, we see that its three sides differ significantly in lightness from each other.
On the example of a cylinder, you can see the light and dark side of the vertical surface. The reflex from the shadow side is also clearly visible. Reflex is the reflected light from the surfaces surrounding the target object. For example, the light from the surface on which the cylinder stands is reflected and illuminates the shadow part of the cylinder. Reflexes are an essential element in a realistic drawing, as they create a powerful three-dimensional effect and immerse the object in space. Reflexes should be very nuanced and not be brighter than the light part of the object, otherwise they can break the shape and the object will lose visual integrity.
On the example of the ball, you can also see the illuminated and shadow part, but here a smooth tonal stretch from light to shadow is clearly visible. Reflex also plays an important role in modeling the volume.
We marked the light with pink, the shadow with yellow, and the reflection with turquoise.
If you look at the objects that surround you, you will see the light and dark part of any object. For now, we need to imagine that objects do not have any color, and also not to focus on textures yet. For this, you can simply consider that the objects are white and have a matte surface.
The first examples will be simple geometric bodies — a cube, a ball and a cylinder. On the example of a cube, we see that its three sides differ significantly in lightness from each other.
On the example of a cylinder, you can see the light and dark side of the vertical surface. The reflex from the shadow side is also clearly visible. Reflex is the reflected light from the surfaces surrounding the target object. For example, the light from the surface on which the cylinder stands is reflected and illuminates the shadow part of the cylinder. Reflexes are an essential element in a realistic drawing, as they create a powerful three-dimensional effect and immerse the object in space. Reflexes should be very nuanced and not be brighter than the light part of the object, otherwise they can break the shape and the object will lose visual integrity.
On the example of the ball, you can also see the illuminated and shadow part, but here a smooth tonal stretch from light to shadow is clearly visible. Reflex also plays an important role in modeling the volume.
The laws of chiaroscuro in drawing
From the basics come the laws. Following these laws, you will be able to create beautiful and convincing drawings:- Light, half-shade, shadow, chiaroscuro border and reflex have different tonality. Using the same tone for shadow and light, you will create a flat drawing.
- Do not confuse the light area. Highlight and reflex. The brightest point on the object is the highlight, the light area is slightly darker than it, and the reflex is weaker than both of them.
- The tone of the background behind the object should help to see the object. If the object is light, then the background is dark, and vice versa.
- Try not to make the shadows black, use tonal gradients from dark to slightly lighter. Any monochromatic fill is a loss of volume.
Lesson on chiaroscuro
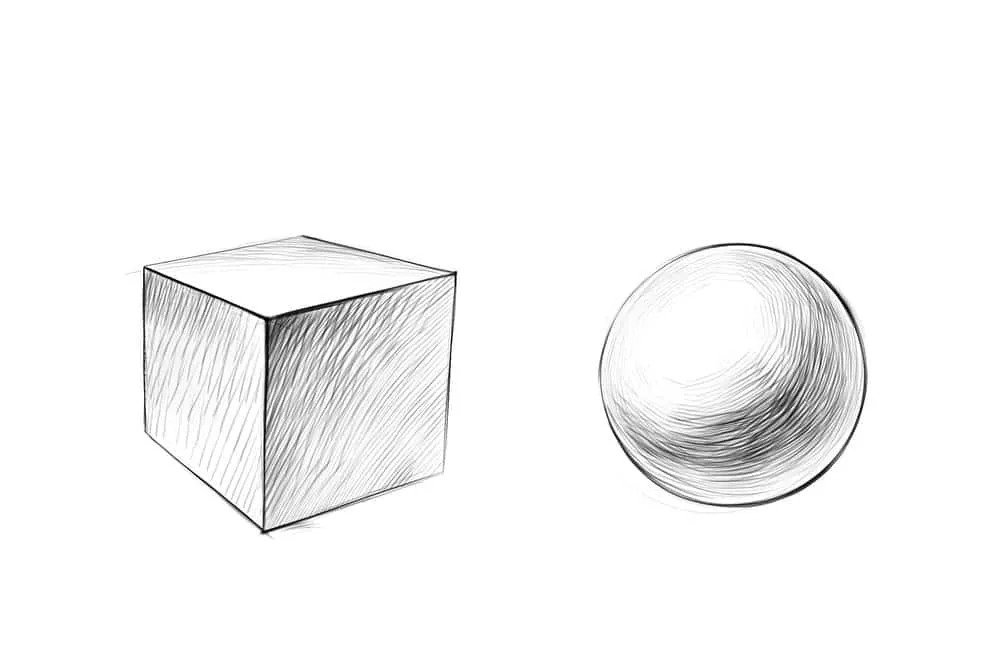
Stage 1 Let's draw two simple objects: a cube and a sphere to practice and assimilate the information received. Do not worry too much about the perspective and evenness of the circle, which we will turn into a volumetric sphere. Now we will concentrate our attention on tonal relationships and gradient. To complete the exercises, choose a material in advance: for more gentle gradients, choose a soft pencil or sanguine, which is easy to blend. And for a digital tablet, choose brushes like a pencil and softer brushes that imitate the blending effect.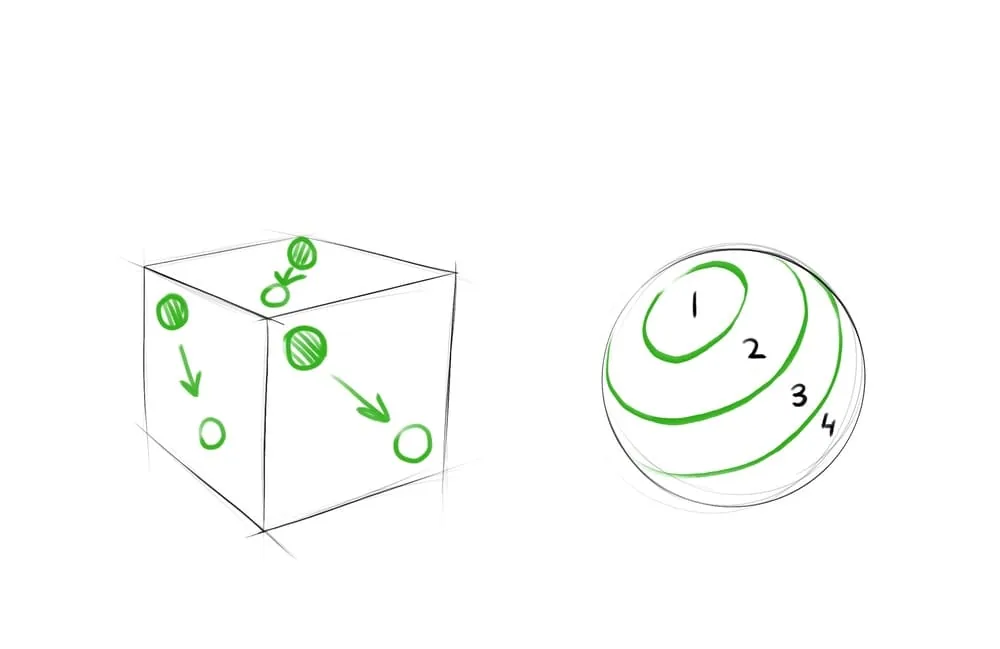 Stage 2
Look at the diagram — the gradients that we will use when shading the tone of each side are indicated on the cube. And on the sphere, the areas in which the tone will gradually darken are indicated. The lightest will be the area numbered 1, the darkest will be the area numbered 3. We will create an intermediate tone under number 2. And the area under number 4 is a reflex, which is a shadow, but a little lighter than the previous tone. Remember that where the light part of the object ends and the shadow begins, this is the darkest place in the shadow (the border between 2 and 3). Also on the diagram we will immediately put the lighting — from the top left and a little in front.
Stage 2
Look at the diagram — the gradients that we will use when shading the tone of each side are indicated on the cube. And on the sphere, the areas in which the tone will gradually darken are indicated. The lightest will be the area numbered 1, the darkest will be the area numbered 3. We will create an intermediate tone under number 2. And the area under number 4 is a reflex, which is a shadow, but a little lighter than the previous tone. Remember that where the light part of the object ends and the shadow begins, this is the darkest place in the shadow (the border between 2 and 3). Also on the diagram we will immediately put the lighting — from the top left and a little in front.
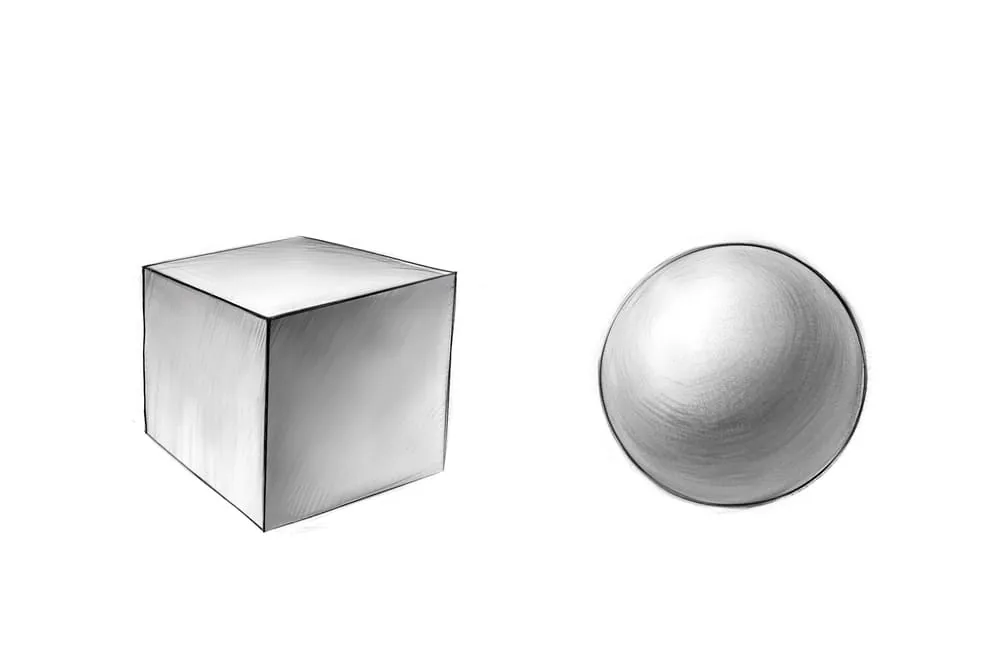
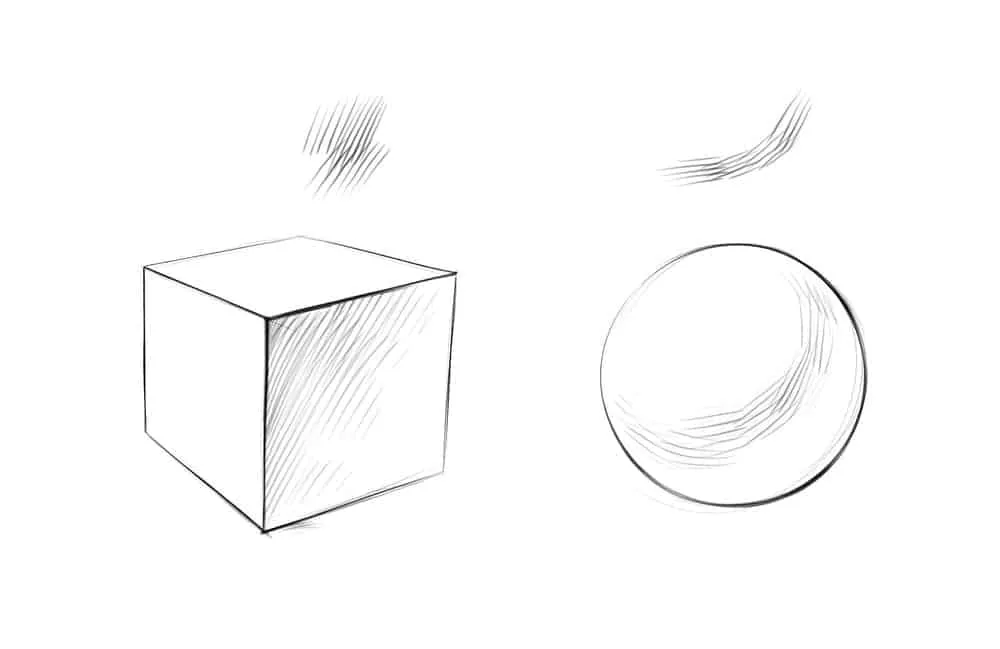 Start shading the shadow side of the cube from the nearest corner, spreading the tone gradually to the far lower corner. On the sphere, first darken the area that is the border of light and shadow. Strokes can be used not too long, but not too short either. накладывайте groups of hatching on top of each other and slightly change between them.
Stage 3
Start shading the shadow side of the cube from the nearest corner, spreading the tone gradually to the far lower corner. On the sphere, first darken the area that is the border of light and shadow. Strokes can be used not too long, but not too short either. накладывайте groups of hatching on top of each other and slightly change between them.
Stage 3
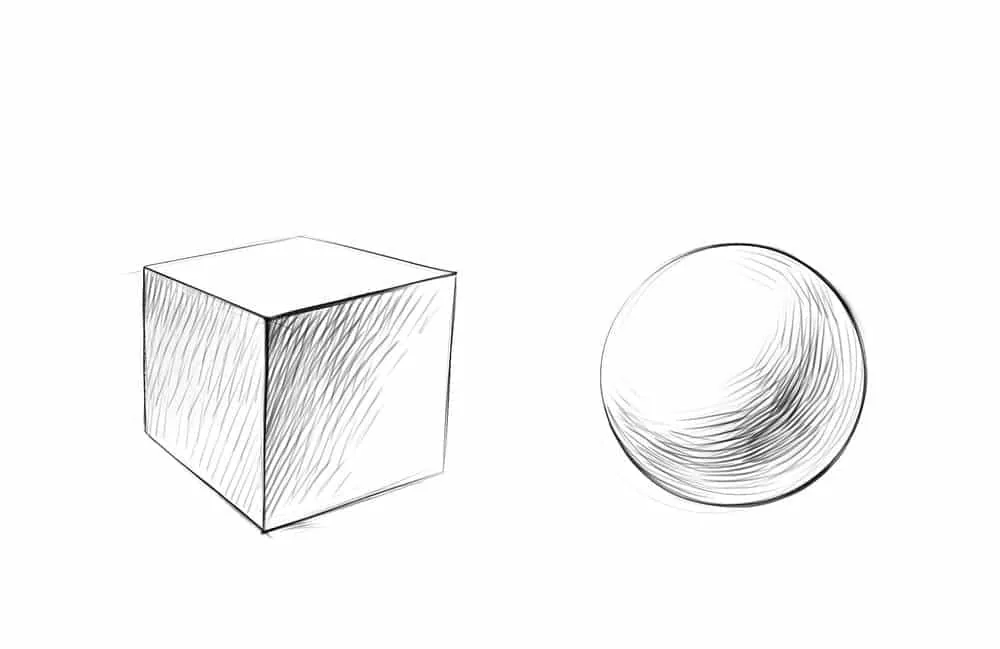 Fill in the tone gradually, applying the strokes in layers. On the other side wall of the cube, start adding tone and do not forget to create a gradient stretch.
Stage 4
Fill in the tone gradually, applying the strokes in layers. On the other side wall of the cube, start adding tone and do not forget to create a gradient stretch.
Stage 4
 The more you darken the drawing, the fewer completely light areas you should have left in the drawing. Therefore, the top plane of the cube should also be darkened, and the sphere should have a denser shading of the area between the shadow and the lightest place.
Stage 5
The more you darken the drawing, the fewer completely light areas you should have left in the drawing. Therefore, the top plane of the cube should also be darkened, and the sphere should have a denser shading of the area between the shadow and the lightest place.
Stage 5
 At a certain stage of hatching, too strong a texture of the drawing may appear, so if you want to continue to darken the drawing, you need to thicken the tone by shading the strokes. Next, you can continue to layer the hatching again, or leave the drawing in a soft realistic technique.
Stage 6
At a certain stage of hatching, too strong a texture of the drawing may appear, so if you want to continue to darken the drawing, you need to thicken the tone by shading the strokes. Next, you can continue to layer the hatching again, or leave the drawing in a soft realistic technique.
Stage 6
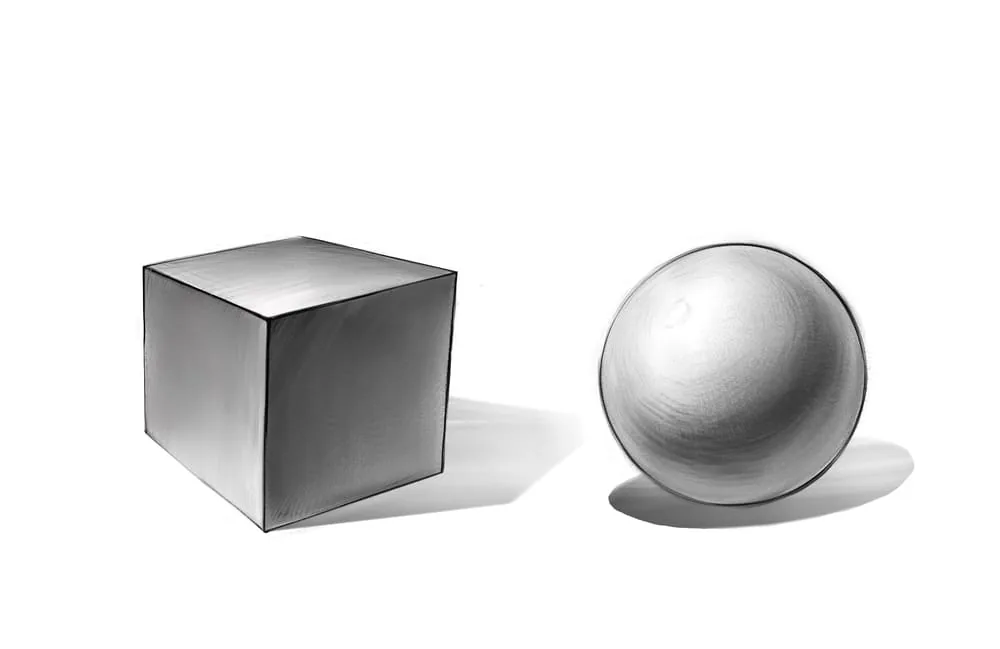 Add darker contrasts along the shadow edges, as well as falling shadows. Remember that falling and own shadows should not merge in tone. Otherwise, our objects will disappear in a gray haze. We managed to collect volumetric contrasting tonal sketches of a cube and a sphere!
Falling shadows
We should also talk about cast shadows. These are shadows that objects cast, and they should not be confused with self-shadows. Cast shadows often have a clear boundary, but within their boundaries, the cast shadow is uneven. The darkest part of the cast shadow is located at the closest distance from the object creating that shadow. As the shadow moves away from the object, it becomes weaker and, accordingly, lighter.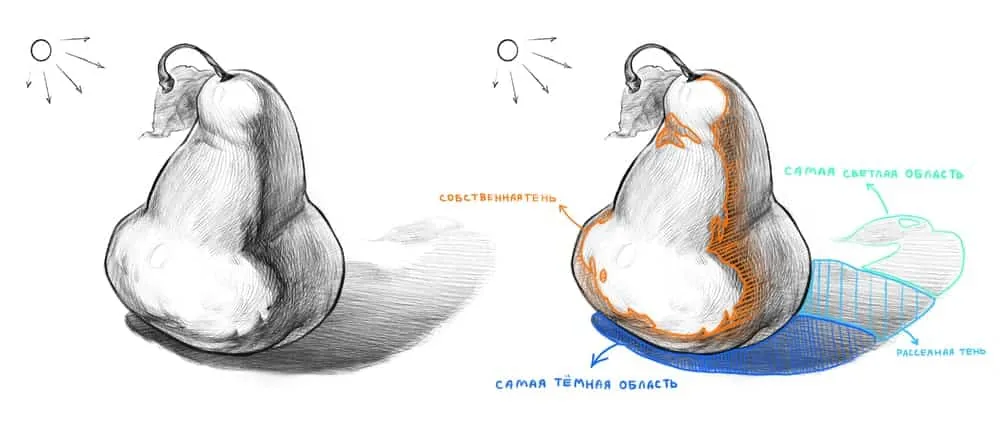 On our beautiful juicy pear, the difference between the self-shadow and the cast shadow is remarkably visible. The self-shadow repeats the irregularities of the body, wrinkles, pits, and выпуклости, its silhouette is heavily eroded. And the cast shadow is more distinct and darker than the self-shadow. Unlike the self-shadow, which beautifully follows the irregularities of the surface, emphasizing its relief, the cast shadow imitates the silhouette of the entire pear. It is like the shy twin sister of our fruit.
Now it is worth mentioning another important parameter in tonal drawing — aerial perspective. This is a technique that artists use to create the depth of space in an image, making the drawing even more realistic. This technique involves enhancing light and shadow contrasts, as well as more detailed drawing of the foreground. Conversely, the background becomes slightly soft, contrasts are softened, object boundaries blur and even "merge" with each other, that is, they are combined into general spots. This technique looks very impressive not only in landscape works, where the scale and depth of space are obvious, but also in still lifes, where the depth is not so significant.
Look at examples of artists' pencil drawings and analyze the tone, tonal relationships, and contrasts between different objects and the background.
On our beautiful juicy pear, the difference between the self-shadow and the cast shadow is remarkably visible. The self-shadow repeats the irregularities of the body, wrinkles, pits, and выпуклости, its silhouette is heavily eroded. And the cast shadow is more distinct and darker than the self-shadow. Unlike the self-shadow, which beautifully follows the irregularities of the surface, emphasizing its relief, the cast shadow imitates the silhouette of the entire pear. It is like the shy twin sister of our fruit.
Now it is worth mentioning another important parameter in tonal drawing — aerial perspective. This is a technique that artists use to create the depth of space in an image, making the drawing even more realistic. This technique involves enhancing light and shadow contrasts, as well as more detailed drawing of the foreground. Conversely, the background becomes slightly soft, contrasts are softened, object boundaries blur and even "merge" with each other, that is, they are combined into general spots. This technique looks very impressive not only in landscape works, where the scale and depth of space are obvious, but also in still lifes, where the depth is not so significant.
Look at examples of artists' pencil drawings and analyze the tone, tonal relationships, and contrasts between different objects and the background.
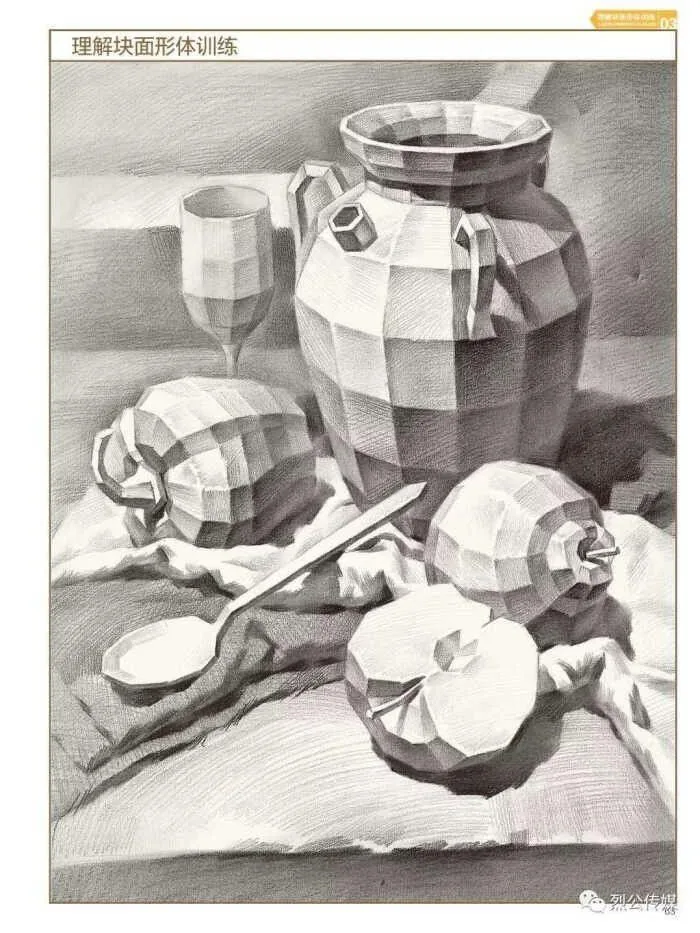
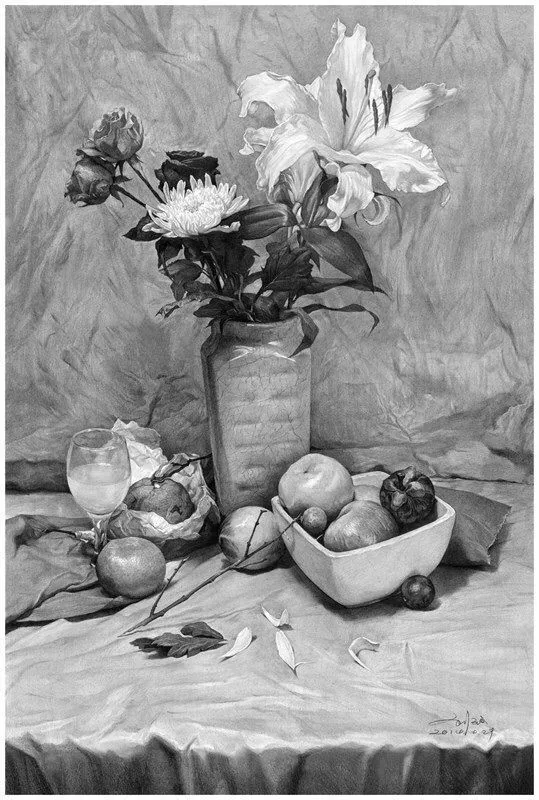
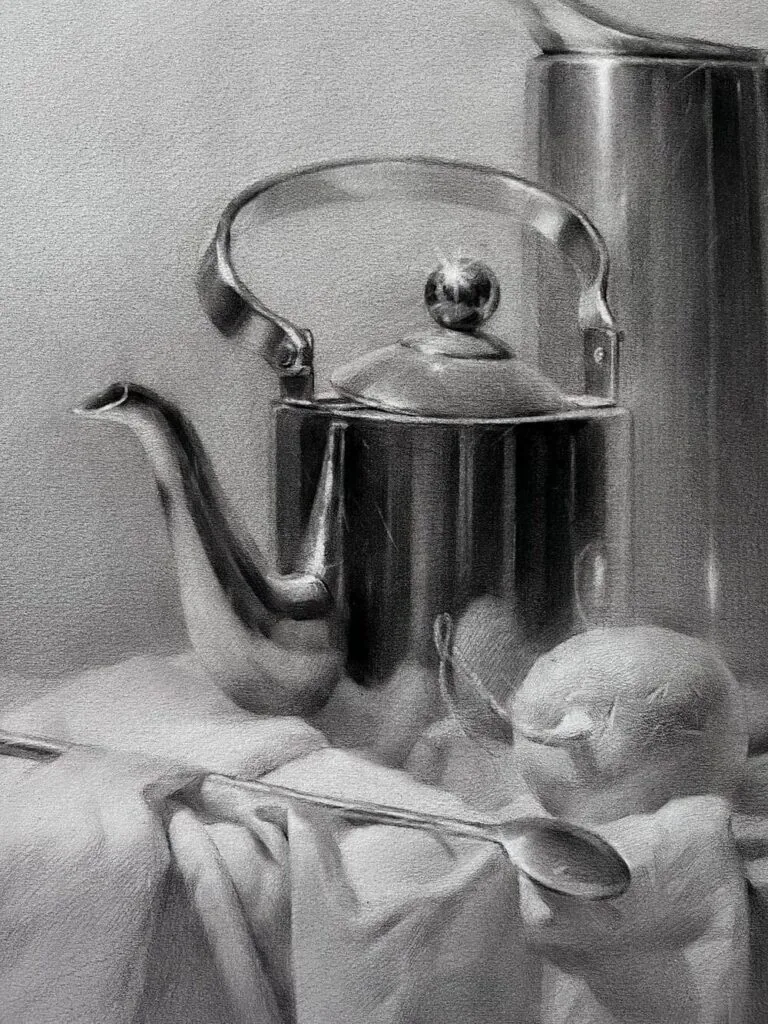
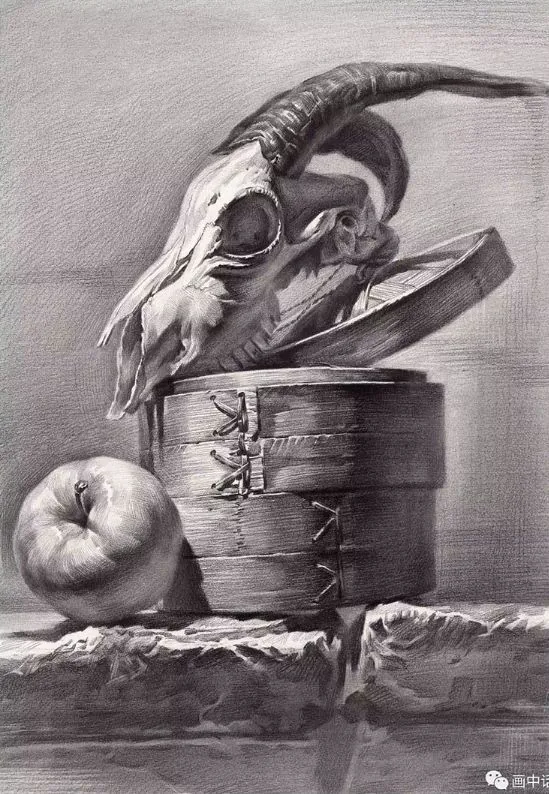 In the first drawing, the objects are specially depicted as low-poly 3D models. This makes it easier to analyze and convey volume and tonal transitions of the form. And in the two following still lifes, the drawing is smoother, but you can also see the places where the transition from light to dark occurs.
Try gradually increasing the complexity in pencil drawings. Convey not only volume, but also the texture and color of the object. After you feel more confident with tonal relationships, try a still life with several objects of different tones and textures. For example, create a composition with a white mug, a light green apple, and a dark square box. This way, you will have 3 objects of different shapes and scales, with 3 different tonalities and 3 different textures.
Remember that it is thanks to tone that we can see objects and perceive deep space. Approach drawing objects with respect and patience, do not upset Tone!
In the first drawing, the objects are specially depicted as low-poly 3D models. This makes it easier to analyze and convey volume and tonal transitions of the form. And in the two following still lifes, the drawing is smoother, but you can also see the places where the transition from light to dark occurs.
Try gradually increasing the complexity in pencil drawings. Convey not only volume, but also the texture and color of the object. After you feel more confident with tonal relationships, try a still life with several objects of different tones and textures. For example, create a composition with a white mug, a light green apple, and a dark square box. This way, you will have 3 objects of different shapes and scales, with 3 different tonalities and 3 different textures.
Remember that it is thanks to tone that we can see objects and perceive deep space. Approach drawing objects with respect and patience, do not upset Tone!Related materials

Tutorial
Human anatomy in drawing
November 9, 2024
Article
Texture and finish in the drawing
November 15, 2024

Article
Frontal perspective in drawing
October 1, 2025

News
Превращение 2D-рисунка в 3D-скульптуру с помощью ZBrush
February 4, 2026

Tutorial
How to draw a crystal. Step-by-step guide for artists
March 24, 2025

Tutorial
Learning to draw glow
March 21, 2025