TutorialUpdated: July 2, 2026
Blender 3D lessons for beginners
In short
Explore Blender 3D from scratch! Step-by-step lessons for beginners, including modeling, animation and textures. Easy instructions to get started.
Skills Up School
Online school of drawing and CG
Welcome to the world of Blender — a powerful and free tool that opens up endless possibilities for creativity in 3D modeling, animation, and visualization. Whether you are a beginner artist or an experienced professional, Blender offers a flexible and intuitive interface that allows you to bring your boldest ideas to life.
In this article, we will take a detailed look at the Blender interface through the eyes of a 3D modeler. You will learn about the key elements of the workspace, their functions, and how they help you effectively manage the process of creating three-dimensional models and animations. Let's begin our journey into the world of Blender!
 The number of windows and their types are not rigidly set; the user can customize the interface at their discretion. To add a new window, right-click on an empty space between the corners of the windows and choose the type of window section you want to make.
The second way is to drag the cursor with the left mouse button inside the window — a new window appears.
To hide unnecessary windows, use «Join Areas» or move the cursor along the window border and merge them.
The number of windows and their types are not rigidly set; the user can customize the interface at their discretion. To add a new window, right-click on an empty space between the corners of the windows and choose the type of window section you want to make.
The second way is to drag the cursor with the left mouse button inside the window — a new window appears.
To hide unnecessary windows, use «Join Areas» or move the cursor along the window border and merge them.
 Great — the cube has appeared! Now let's figure out how to interact with it. Click on it in the viewport or select it in Outliner.
Let's pay attention to the tools panel, it is on the left:
Great — the cube has appeared! Now let's figure out how to interact with it. Click on it in the viewport or select it in Outliner.
Let's pay attention to the tools panel, it is on the left:
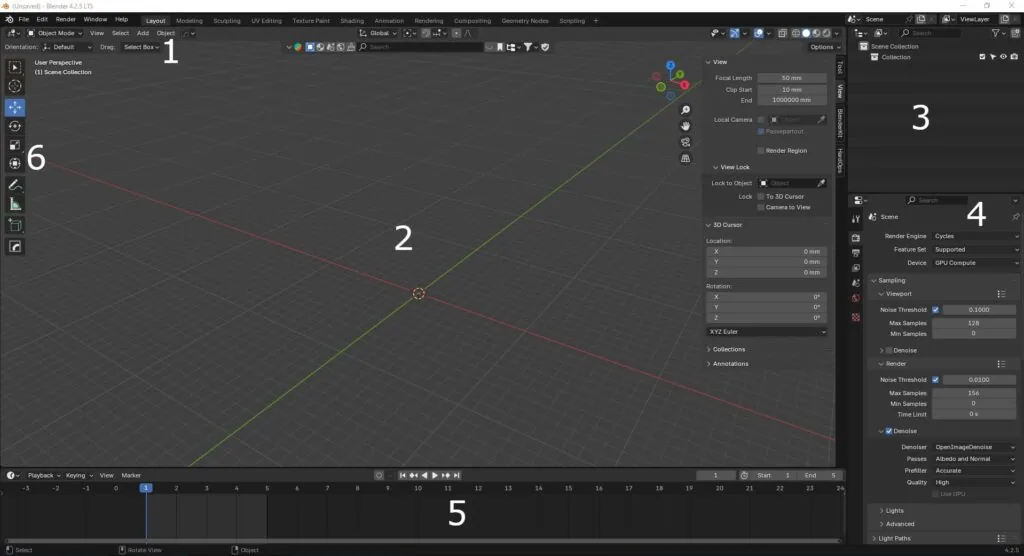
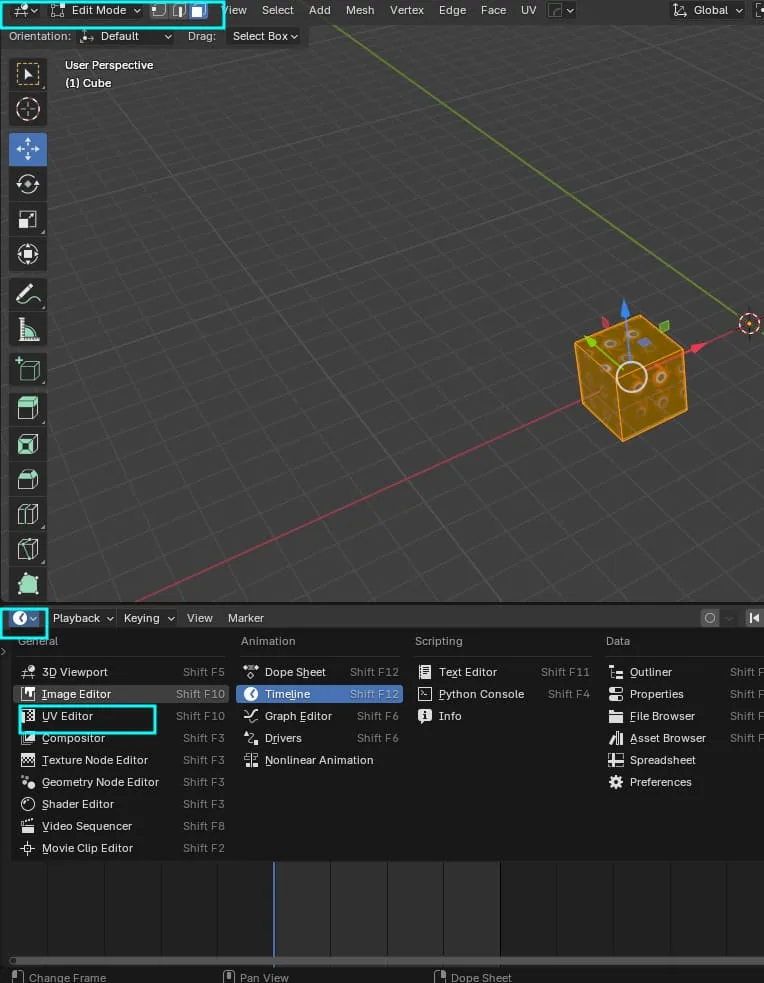
Interface in Object Mode and Working with Windows
By default, we are in object mode and greeted by a cube. Blender's interface consists of several key components:- Top Panel. Includes menus and basic tools. For example, File (creation, opening, and saving projects), Edit (settings and preferences), Render (rendering images and animations), Window (managing windows and workspaces), Help (accessing help information and documentation).
- 3D Viewport. The main window where modeling and animation take place. Here you can move and rotate objects, apply materials and textures, work with cameras and lighting.
- Outliner. A panel that displays the hierarchy of all objects in the scene. It helps to organize and manage objects, groups, and collections.
- Properties. A panel where settings for the selected object are located. Here you can change the parameters of materials, modifiers, physics, and animation.
- Timeline. Used for animation. Here you can add keyframes, edit animation curves, and manage the project's timeline.
- Tools Panel.
The number of windows and their types are not rigidly set; the user can customize the interface at their discretion. To add a new window, right-click on an empty space between the corners of the windows and choose the type of window section you want to make.
The second way is to drag the cursor with the left mouse button inside the window — a new window appears.
To hide unnecessary windows, use «Join Areas» or move the cursor along the window border and merge them.
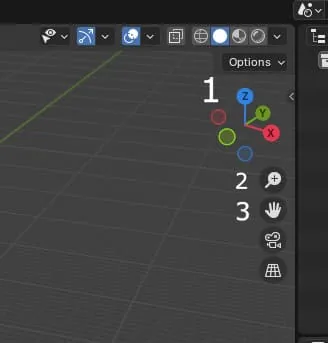
View Control Elements in the Viewport:
- Coordinate System. If you hold down the LMB on it, you can rotate in the viewport. You can also rotate in the viewport by holding down the mouse wheel.
- Zoom. If you hold down LMB and move the mouse to the right and left, you will approach or move away. The same result will happen if you scroll the mouse wheel.
- Dragging. If we hold down LMB on this icon, we can move in the viewport following the mouse. The same thing will happen if you hold down Shift and LMB at the same time.
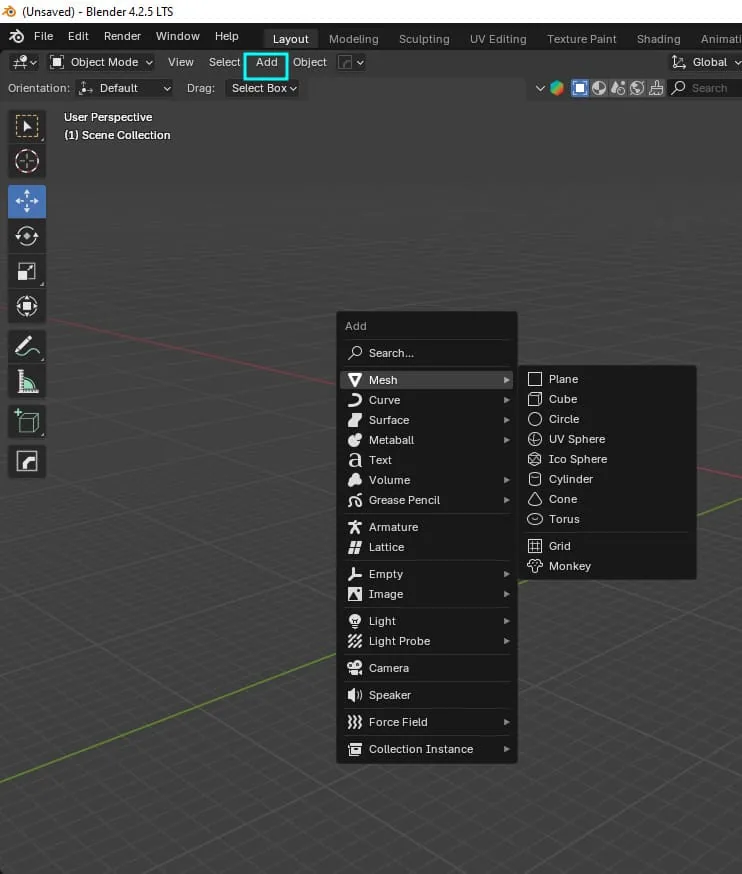
Creating Objects and Interacting with Them
To learn how to create objects, let's delete the cube that has been with us from the beginning. Select it in the viewport and press X or Deleted on the keyboard. To add a new object on the top panel, click Add-Mesh-Cube or hover the cursor in any place in the viewport and press Shift + A
Great — the cube has appeared! Now let's figure out how to interact with it. Click on it in the viewport or select it in Outliner.
Let's pay attention to the tools panel, it is on the left:
- You can also call the tools panel with the keys Shift+Space or T
- You will use it constantly while working in the program, so remember the hotkeys!
Related courses
All courses
from 4 500 ₽
-55%
Blender Basics
10 000 ₽4 500 ₽
Learn more

from 15 960 ₽
-80%
3D Blender Handpaint
79 800 ₽15 960 ₽
Learn more

from 15 960 ₽
-80%
3D illustration in Blender
79 800 ₽15 960 ₽
Learn more
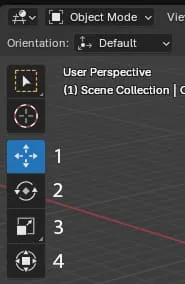 Let's break down this panel in more detail:
- Move(G) – moving the object
- Rotate (R).-rotation
- Scale(S) - scale (if you pull on one of the axes, you stretch it)
- Transform - move, rotate, and scale at once
3D Cursor and Modifiers
This is the 3D cursor. It is responsible for where the object will be created, and also helps to move Origins, rotate objects relative to it. To move Shift + RMB, and call the menu for working with the 3D cursor Shift+S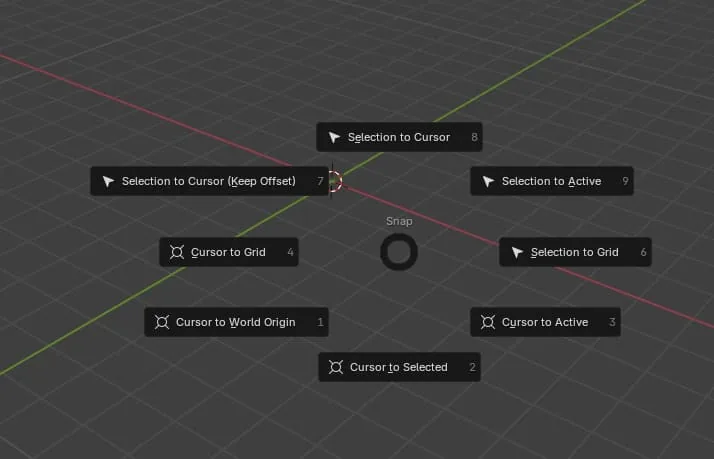 With the tools panel and cursor sorted out!
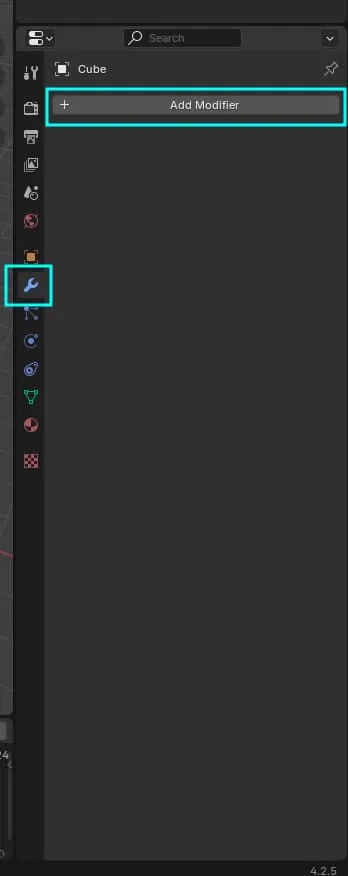
Now let's learn how to apply one of the most frequently used modifiers - «Mirror». To do this, select our cube and click on the spanner in the «Properties» panel, then click «Add modificators» and type «Mirror» in the search bar. The letters XYZ mean the axis along which the object will be reflected.
With the tools panel and cursor sorted out!
Now let's learn how to apply one of the most frequently used modifiers - «Mirror». To do this, select our cube and click on the spanner in the «Properties» panel, then click «Add modificators» and type «Mirror» in the search bar. The letters XYZ mean the axis along which the object will be reflected.
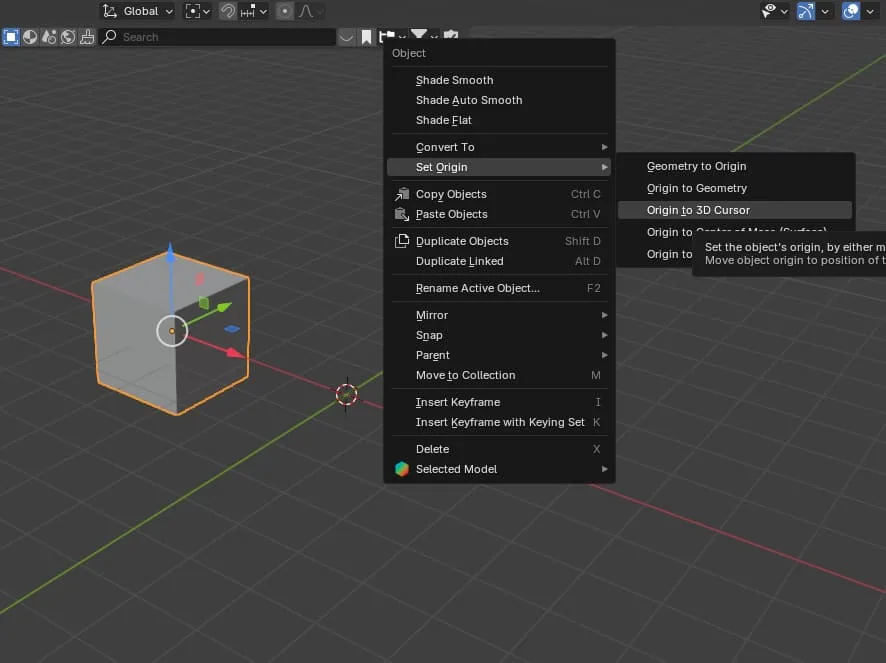
 Hmm. You don't see that the cube is reflected. Why? Probably because Origins (the orange dot in the center of the cube) is the center of our geometry and it turns out that it is now mirrored into itself.
Let's move it. To do this, move the cube to the side with the Move tool, then right-click on the cube, select Set Origins – Origins To 3D cursor.
Hmm. You don't see that the cube is reflected. Why? Probably because Origins (the orange dot in the center of the cube) is the center of our geometry and it turns out that it is now mirrored into itself.
Let's move it. To do this, move the cube to the side with the Move tool, then right-click on the cube, select Set Origins – Origins To 3D cursor.
 Is there a result?
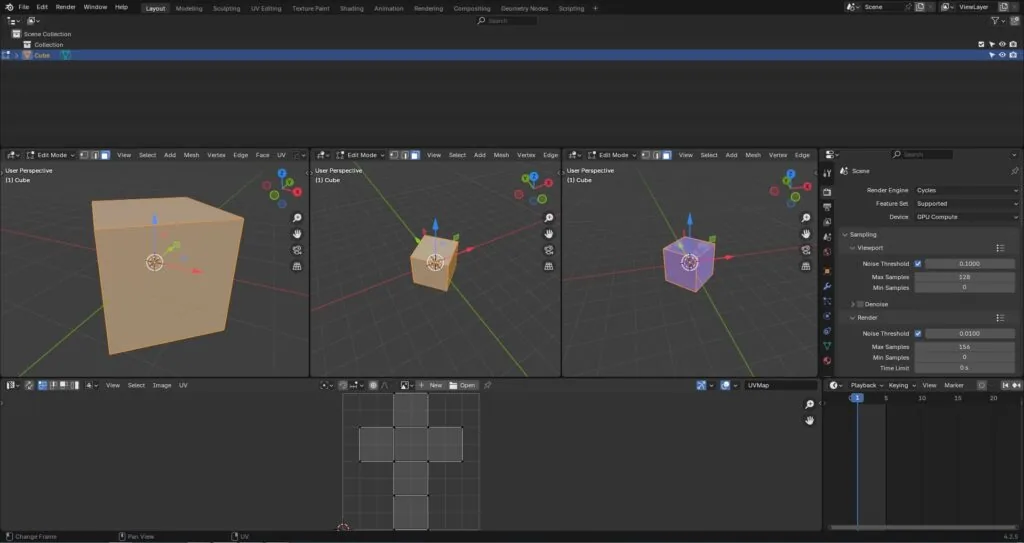
Materials and UV Unwrapping
If not, press Ctrl+A and select Rotation and Scale, this action resets the transformations, it is advisable to apply it after each interaction with the object in object mode (Object Mode). Next, we will go to Edit Mode (Edit Mode), but for now, while we are here, we will learn how to assign simple materials to objects. Press Z and select the «Material preview» tab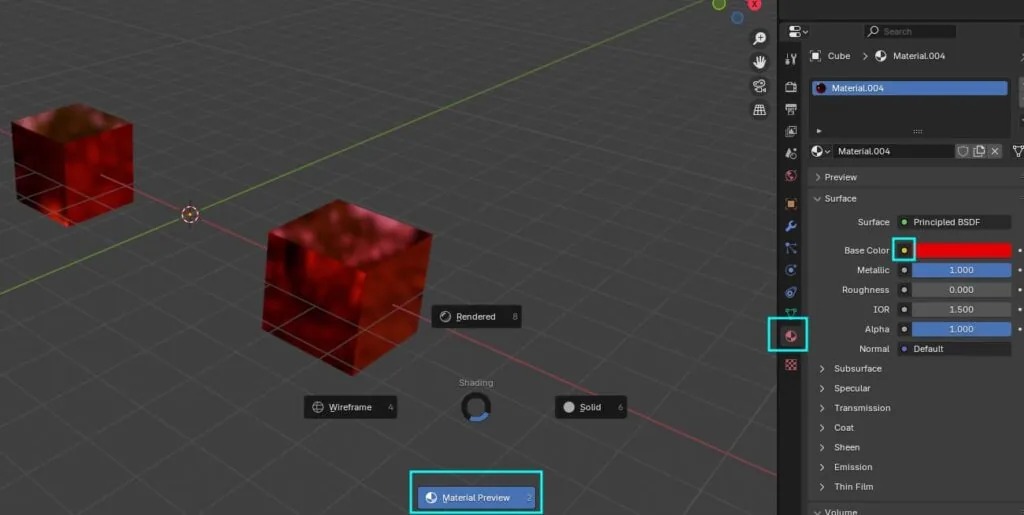 To do this, click on the «Materials» ball in the «Properties» window and click «new». Choose a color, you can change the «Roughness» values and metallicity. You can also assign textures by clicking on the yellow circle and selecting «Image Texture» in the drop-down list. To make the texture fit properly, you need to make a UV map, all standard objects have it by default, but if the object has been modified, press CTRL + A and apply all transformations.
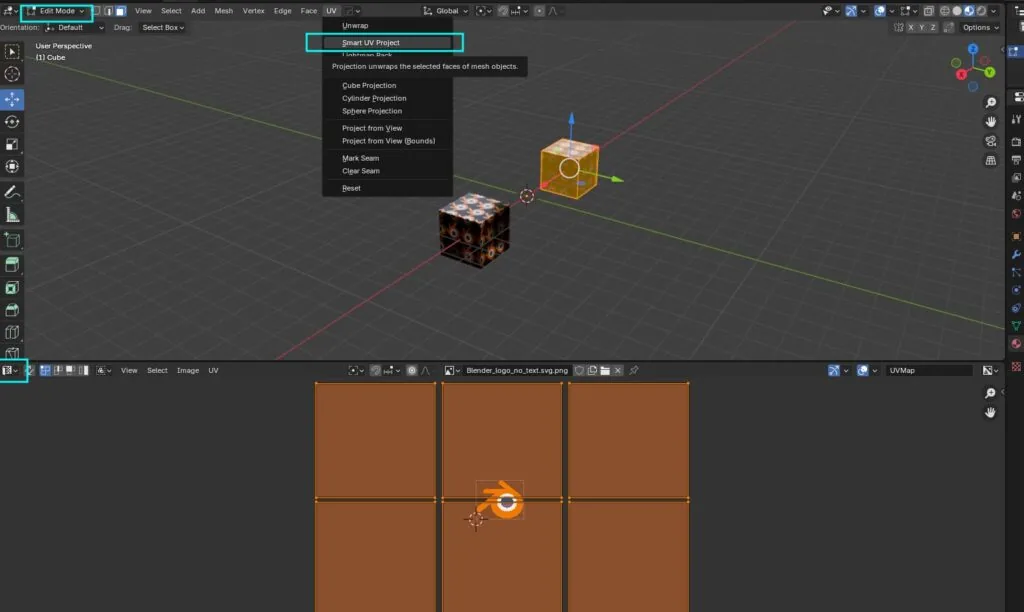
Now we need to go into edit mode, to do this, press Tab or select “Edit Mode” on the left top. Immediately switch to the unwrapping mode, now we will make an automatic unwrapping (Smart UV), because unwrapping is a separate topic. You can select one UV island by hovering the cursor and pressing L or all by pressing A. And scale it as needed by pressing S or selecting the appropriate tool on the side panel.
To do this, click on the «Materials» ball in the «Properties» window and click «new». Choose a color, you can change the «Roughness» values and metallicity. You can also assign textures by clicking on the yellow circle and selecting «Image Texture» in the drop-down list. To make the texture fit properly, you need to make a UV map, all standard objects have it by default, but if the object has been modified, press CTRL + A and apply all transformations.
Now we need to go into edit mode, to do this, press Tab or select “Edit Mode” on the left top. Immediately switch to the unwrapping mode, now we will make an automatic unwrapping (Smart UV), because unwrapping is a separate topic. You can select one UV island by hovering the cursor and pressing L or all by pressing A. And scale it as needed by pressing S or selecting the appropriate tool on the side panel.
Edit Mode
Please note that we are still in Edit Mode - this is the main mode in which a 3D artist works in Blender. Each object consists of vertices, edges, and faces. You can switch between them on the top panel by clicking on the corresponding icons. The main tools of the edit mode include: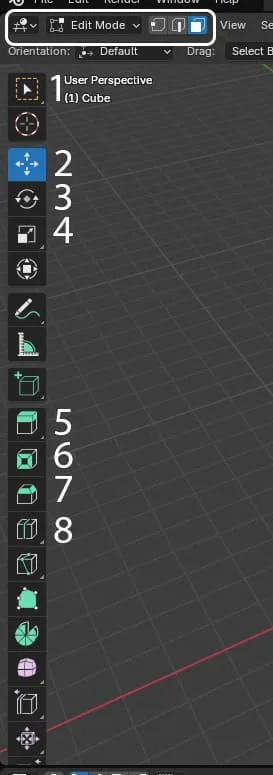
- Selection: Allows you to select individual vertices, edges, or faces for further processing. You can use the mouse or special commands such as «Box Select» (B), «Circle Select» (C) and others.
- Move (Move): Moves the selected elements along one or more axes of coordinates. This is done by dragging the mouse cursor after pressing the G key.
- Rotate (Rotate): Rotates the selected elements around the selected axis. Called by the R key.
- Scale (Scale): Changes the size of the selected elements relative to the center of transformation. Activated by the S key.
- Extrude (extrusion) is one of the most frequently used tools in Blender. It allows you to create a new volume by pulling selected vertices, edges, or faces. After selecting the desired elements, just press the E key and move the mouse cursor in the desired direction. This is an ideal way to add additional details to the model or create complex geometry.
- Insert (insert) is used to add new vertices or edges inside existing faces. To do this, select the face, press the I key, and specify the insertion point of the new vertex. This tool is convenient for quickly adding details without having to manually create new faces.
- Bevel (bevel) is used to round the corners and edges of the model. When selecting edges or vertices and pressing the Ctrl+B key, you can set the bevel radius and the number of segments. This tool is indispensable when creating realistic models where it is necessary to smooth out sharp edges.
- Loop Cut Adds a new ring of edges or vertices along the selected edge or face, allowing you to divide the object into smaller parts. Hot keys Ctrl+R
Conclusion
Congratulations! You have passed an important stage in mastering the basic Blender interface — one of the most powerful and popular tools for 3D modeling and animation. Now that you are familiar with the basics, endless opportunities for further creativity and development are opening up before you. Remember that every step forward brings you closer to creating unique works of art. And even if at first something may seem complicated, do not give up! After all, it is perseverance and the desire to learn that lead to real achievements. If you are ready to deepen your knowledge and skills, we invite you to continue exploring Blender in our course. There you will find many useful lessons, practical tasks, and tips from professionals that will help you become real masters of your craft. Want to develop your skills in Blender 3D and master professional approaches to 3D modeling? Check out the available courses on Blender 3D at this link. There you will find training that will help you go from basics to advanced techniques and create unique projects! Thank you for your attention and good luck on your creative journey!Related materials

Tutorial
How to learn to draw on a tablet. Tips and lessons for beginners
December 31, 2023
Tutorial
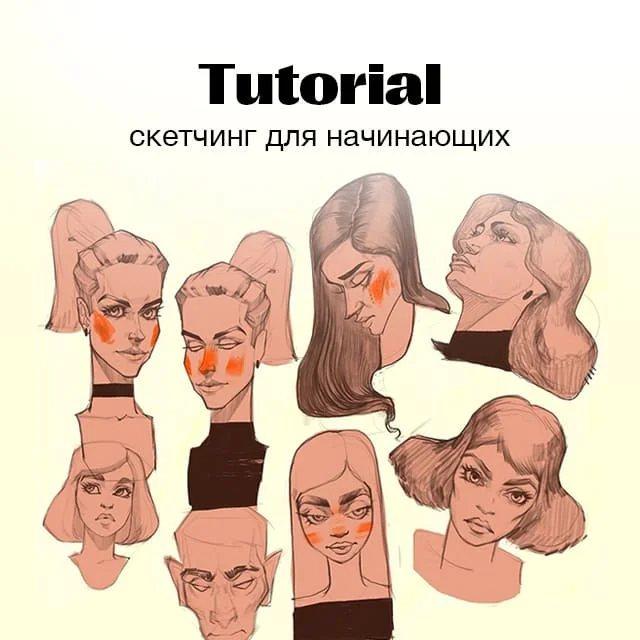
Sketching for beginners
January 30, 2024

Tutorial
Sculpting lessons in ZBrush for beginners: creating a 3D snowman model
September 18, 2023

Tutorial
Sculpting lessons in ZBrush for beginners: rendering a 3D snowman model
September 18, 2023

Tutorial
Zbrush lesson for beginners
December 23, 2024

Article
5 tips for a budding environmental artist
September 18, 2023
News
Создание сюрреалистического короткометражного фильма «Колыбель» с использованием UE5, Houdini и Blender
June 22, 2026