Sculpting lessons in ZBrush for beginners: creating a 3D snowman model
A lesson on modeling in ZBrush: creating a 3D snowman model. Part 1 of the sculpting guide by the curator of "Skills Up School".
Here before you is a guide to modeling in ZBrush, prepared by the artist and curator of Skills Up School, Darya Baydukova. We will create a snowman — after all, it's December!
This is the first part of the article. Continuation — Lessons in sculpting in ZBrush for beginners: rendering a 3D snowman model.
The tutorial is so detailed that even those who have just started studying 3D will be able to do it. Open ZBrush and sculpt following the instructions, and do not forget to sign up for a free online speedsculpting lesson.
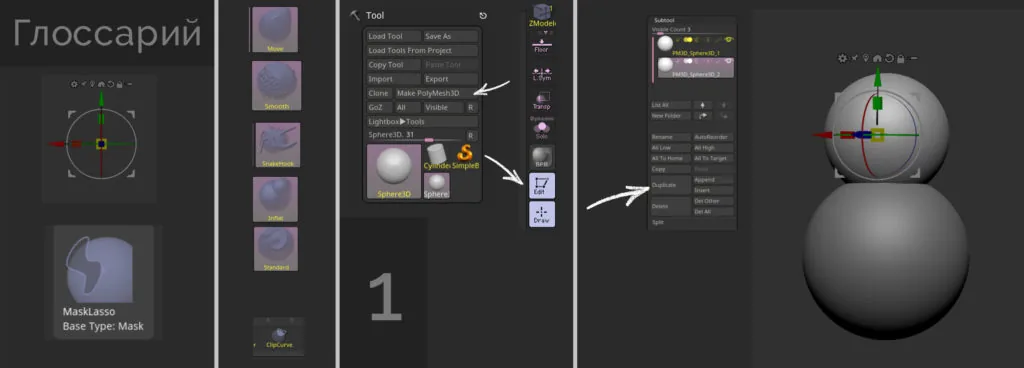
Glossary
Gizmo — turn on E, turn off Q.
Mask — hold down Ctrl.
DynaMesh — turns on in the Geometry tab, recalculate geometry — hold down Ctrl and drag over an empty place in the scene.
Brushes Move — BMV, Smooth — hold down Shift, SnakeHook — BSH, Inflat — BIN, Standart — BST. Call up the brush menu — B.
ClipCurve — Ctrl+Shift.
Stage 1
We create one sphere (subtool) and check that the scene is working — press Edit on the right side of the canvas and Make PolyMesh3D (Tool tab).
Duplicate the subtool using Ctrl+Shift+D or using the Duplicate button (Subtool tab).
Using Gizmo (E), transform the spheres, selecting the desired size and shape.
Oops, almost a snowman!
Do not forget to save at all stages!
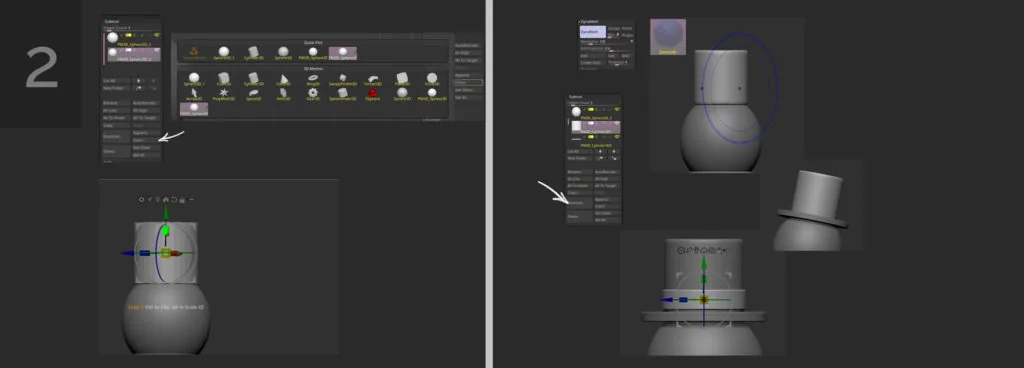
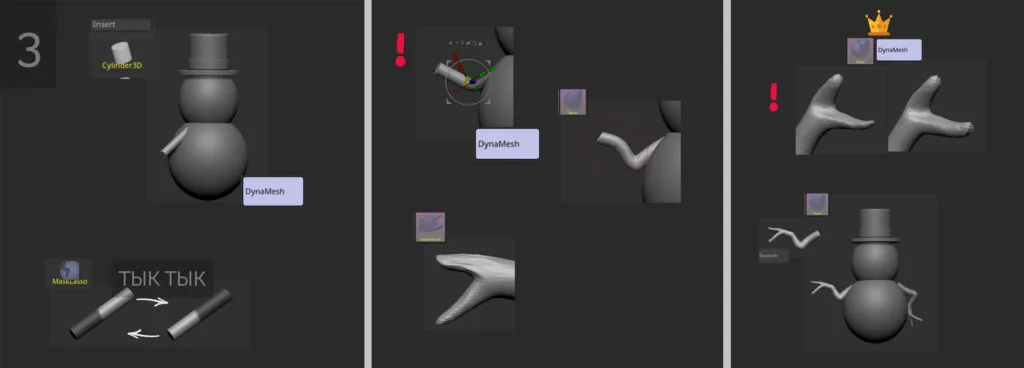
Stage 2
Add a cylinder:
- Open the menu with primitives (Insert button), click on the cylinder. Use Gizmo (E) again and adjust the height of the hat through Scale;
- Hide Gizmo (Q) and use DynaMesh (in the Geometry tab);
- Use the Smooth brush with symmetry enabled (X) to soften the edges of the cylinder;
- Duplicate the cylinder, as in step 1, and make fields for the hat using the same Gizmo;
- Duplicate the large cylinder and make a ribbon on the hat.
You can quickly switch between subtools using Alt+click on the mesh we need.
Related courses
All courses
Introduction to ZBrush
17 000 ₽3 400 ₽

Бесплатный курс «Погружение в магию 2D-художников»

Бесплатный курс «Основы портрета»
Stage 3
Let's start on the snowman's arms-twigs:
- Add a cylinder (Insert — Cylinder), which we will deform not only with Gizmo, but also with brushes;
- Using Gizmo, move the future branch to the sphere in place of the hand and use DynaMesh;
- Give it a more interesting shape — use the mask (Ctrl) and mask part of the subtool;
- To invert the mask, you need to click twice with Ctrl held down on an empty space;
- Put Gizmo on the edge of the mask, bend the условный локоть of the snowman's arm.
You can drag Gizmo freely around the scene with Alt held down.
Take a fairly large Move brush (BMV) and knead our branch a little. Let your imagination run wild — make the arm even more like a branch; you can stretch "fingers" with the SnakeHook brush (BSH).
Be sure to recalculate the geometry — use the golden rule: Inflat brush (BIN) and then DynaMesh.
Here is the branch we got, which we can duplicate and place using Gizmo on the other side, changing the position a little.
Stage 4
Add details. Let's start with the snowman's legs: we will make them from a sphere, which we will turn into a hemisphere with ClipCurve (Ctrl+Shift). Use Gizmo and select the size and shape to look like a conditional boot. Install it on one side and use the Mirror And Weld function (Tool — Geometry — Modify Topology)
How to choose ClipCurve? When you hold down the combination of buttons Ctrl+Shift, click on the brush itself and in the pop-up menu look for the tool we need.
We already have enough subtools that we can duplicate and use to make other details: for example, we make eyes and a mouth from a cylinder, changing the size of Gizmo. For the second eye, we use the Mirror And Weld function, move the mouth with the Move brush.
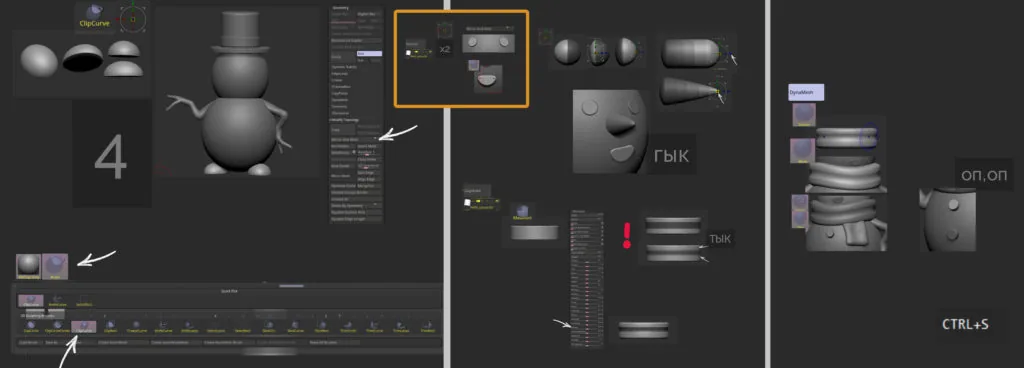
We make the nose from a sphere using Mask and Gizmo tools, the scarf from a cylinder. To do this, change its shape to flat, mask the middle, for the edges use Inflate (Deformation tab). You can also use DynaMesh, Smooth brush and a little Move to work with the shape. We make the edge of the scarf from another cylinder.
To make the edges of the mask softer (BlurMask), you need to click on the mesh with Ctrl held down.
There are buttons left, and the details are ready!
Stage 5
Check the shapes of our snowman once again. Do you like everything? Let's start painting!
To avoid seeing the polygon grid, you need to recalculate the polygon count using DynaMesh with increased Resolution. Here it went: on the body — 272, cylinder and scarf — 544, etc. The smaller the object, the higher the Resolution.
Having difficulties? Read the article Step-by-step guide to modeling in ZBrush: frequent problems and their solutions.
After that, you can use Polish a little (Deformation tab).
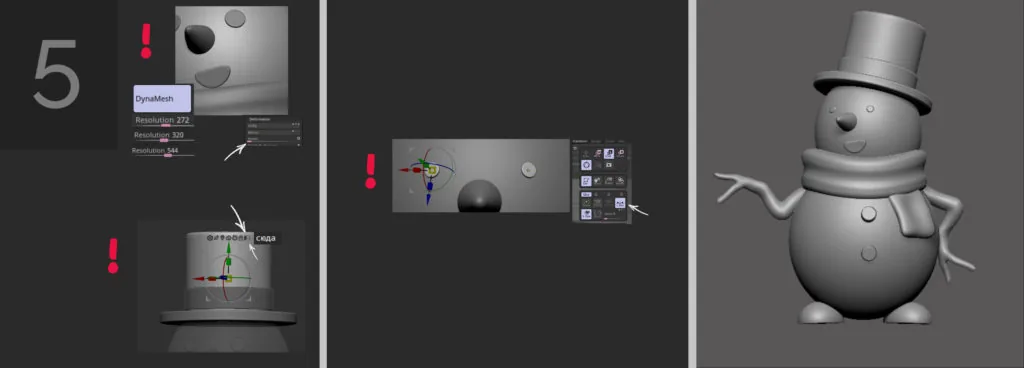
If you want to move several subtools at once, click on the checkered board (see the picture) and select the necessary subtools with Ctrl+Shift held down.
To move symmetric objects with Gizmo, you need to enable symmetry (X), as well as Local Symmetry (Transform tab).
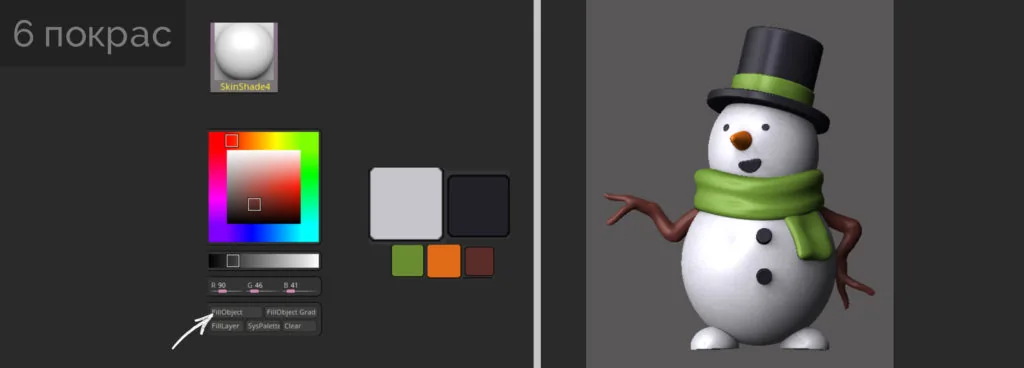
Stage 6
Change the material to SkinShade4 for better color perception and start quick painting: choose a color, choose a subtool — FillObject. This way we go through the whole model. Beauty!
In the next article, we will analyze and make a render of our snowman.
We remind you that Skills Up School is holding a series of free online speedsculpting classes. From December 21 to January 22, you will be greeted by four practical classes with school curators. Both curators and sculpting objects will be different!
Related materials

Sculpting lessons in ZBrush for beginners: rendering a 3D snowman model
Sketching for beginners

Blender 3D lessons for beginners

Zbrush lesson for beginners

How to learn to draw on a tablet. Tips and lessons for beginners

Step-by-step guide to modeling in ZBrush. Part 1