TutorialUpdated: July 2, 2026
How to learn to draw a person
In short
Step-by-step lessons on how to draw a person. We explain the proportions of the human figure, anatomical differences, video lessons!
Artist, founder and ideologist of Skills Up School
Discover the fascinating world of human body anatomy, where every line, bone, and muscle is a key to enhancing your artistic skills! Why is it so important to study anatomy in depth? Because it is not just the basis for creating realistic characters — it is the gateway to a world of endless creative possibilities.
In this free lesson, we will delve into the unique aspects of anatomy that will help you not only better understand the structure of the body but also develop your artistic индивидуальность. Are you ready to unlock the secrets of anatomy and soar to new heights in the art of drawing? Welcome to an exciting journey!
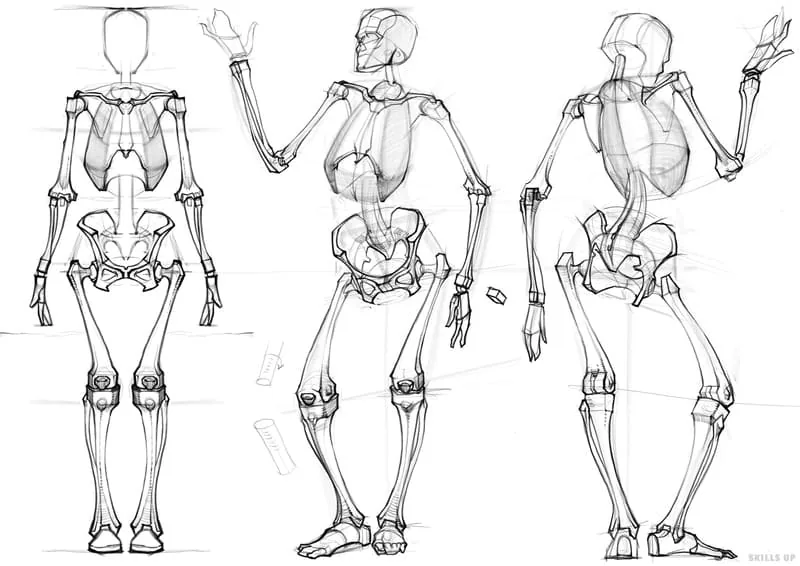
 The most important and large volumes are the chest and pelvis, most often the drawing of both the skeleton and the human figure begins with them. Then the cranium with the facial module is outlined, followed by the upper and lower extremities with hands and feet.
If we take the entire height of the human skeleton from the feet to the top of the head (parietal elevation), then dividing this length in half, we will find the place of pubic fusion of the pelvis. At this level, the greater trochanter of the femur is also located, which is the most extreme point of the skeleton in width.
The upper half of the skeleton from the top of the head to the pubic fusion is divided into 4 parts. The upper segment is equal to the height of the head (1/8 of the entire height of the skeleton). Having retreated from the pubic fusion by one segment upwards, we will find the upper edge of the iliac crests of the pelvis. The chest is located between the head and the pelvis, you just need to retreat a small distance from above and below (1/3 of the height of the head).
Now we divide the lower half of the skeleton in half and at this level we find the lower edge of the knee joint. From the hip joint to the knee goes the femur, which in the upper part has a large outgrowth called the greater trochanter and from which the femoral neck goes towards the pelvis. The lower part of the leg consists of two bones right away — the tibia and the fibula. These bones connect to the foot at the ankle joint. The foot has a height of 1/3 of the height of the head, and consists of a large number of bones, but in the drawing they should be combined into general blocks and depicted in a simple silhouette.
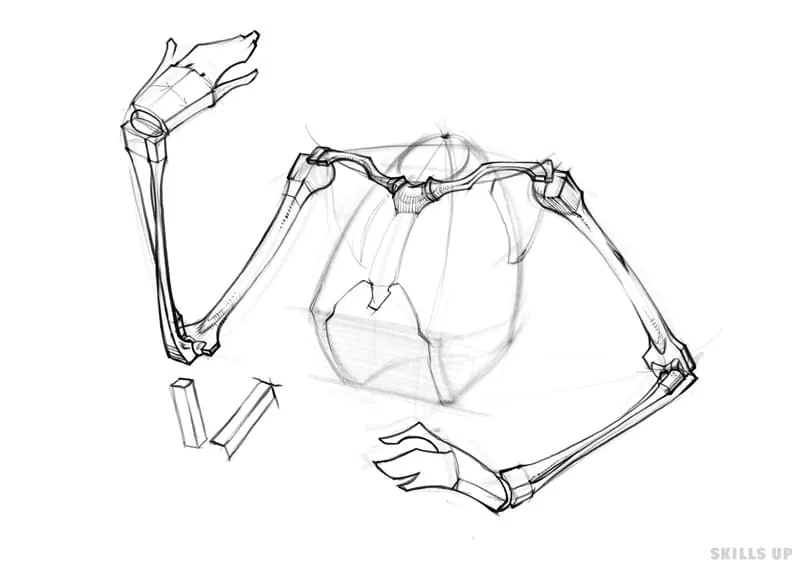
Next, we outline the arc of the shoulder girdle, which runs along the upper edge of the chest. The lower edges of this arc will determine the location of the shoulder joints. From the shoulder joint to the elbow goes the humerus, then from the elbow joint to the radiocarpal joint goes the forearm, consisting of the ulna and radius. The wrist is located at the level of the greater trochanters of the femur and, therefore, in the middle of the height of the entire skeleton.
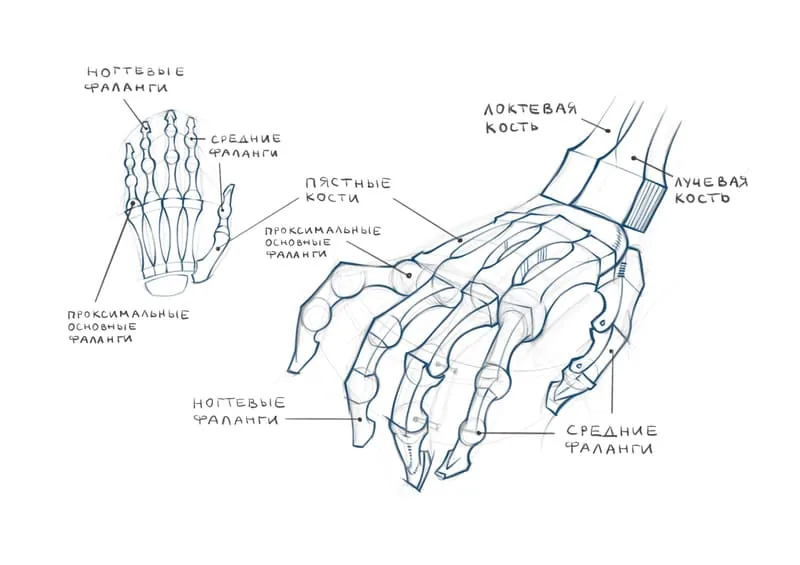
The hand is attached to the wrist, the end of which is located just above the middle of the femur. The hand is attached to the wrist and consists of a large number of bones. The palmar part consists of metacarpal bones, it should be drawn in a general block. Four fingers consisting of 3 bones called phalanges are attached to the palm, and the thumb consisting of only 2 phalanges is attached to the side of the palm.
The most important and large volumes are the chest and pelvis, most often the drawing of both the skeleton and the human figure begins with them. Then the cranium with the facial module is outlined, followed by the upper and lower extremities with hands and feet.
If we take the entire height of the human skeleton from the feet to the top of the head (parietal elevation), then dividing this length in half, we will find the place of pubic fusion of the pelvis. At this level, the greater trochanter of the femur is also located, which is the most extreme point of the skeleton in width.
The upper half of the skeleton from the top of the head to the pubic fusion is divided into 4 parts. The upper segment is equal to the height of the head (1/8 of the entire height of the skeleton). Having retreated from the pubic fusion by one segment upwards, we will find the upper edge of the iliac crests of the pelvis. The chest is located between the head and the pelvis, you just need to retreat a small distance from above and below (1/3 of the height of the head).
Now we divide the lower half of the skeleton in half and at this level we find the lower edge of the knee joint. From the hip joint to the knee goes the femur, which in the upper part has a large outgrowth called the greater trochanter and from which the femoral neck goes towards the pelvis. The lower part of the leg consists of two bones right away — the tibia and the fibula. These bones connect to the foot at the ankle joint. The foot has a height of 1/3 of the height of the head, and consists of a large number of bones, but in the drawing they should be combined into general blocks and depicted in a simple silhouette.
Next, we outline the arc of the shoulder girdle, which runs along the upper edge of the chest. The lower edges of this arc will determine the location of the shoulder joints. From the shoulder joint to the elbow goes the humerus, then from the elbow joint to the radiocarpal joint goes the forearm, consisting of the ulna and radius. The wrist is located at the level of the greater trochanters of the femur and, therefore, in the middle of the height of the entire skeleton.
The hand is attached to the wrist, the end of which is located just above the middle of the femur. The hand is attached to the wrist and consists of a large number of bones. The palmar part consists of metacarpal bones, it should be drawn in a general block. Four fingers consisting of 3 bones called phalanges are attached to the palm, and the thumb consisting of only 2 phalanges is attached to the side of the palm.
 The skeleton also has a spine — a group of bones connected to each other vertically. It serves as the support of the human skeleton and connects the upper part with the lower. The spine curves the thoracic region and has an S-shaped profile.
Separately, it should also be said about the clavicles and scapulae. Although they are not very large in size, we cannot afford not to draw them, as they have an expressive silhouette and beautiful plasticity. The clavicles are located in front in the upper part of the chest and have a slightly curved S-shaped silhouette. The scapulae are adjacent to the back of the chest and have a silhouette close to the shape of a triangle.
The skeleton also has a spine — a group of bones connected to each other vertically. It serves as the support of the human skeleton and connects the upper part with the lower. The spine curves the thoracic region and has an S-shaped profile.
Separately, it should also be said about the clavicles and scapulae. Although they are not very large in size, we cannot afford not to draw them, as they have an expressive silhouette and beautiful plasticity. The clavicles are located in front in the upper part of the chest and have a slightly curved S-shaped silhouette. The scapulae are adjacent to the back of the chest and have a silhouette close to the shape of a triangle.
 Watch lessons on our YouTube channel on the topic of drawing the human skeleton
Skeleton
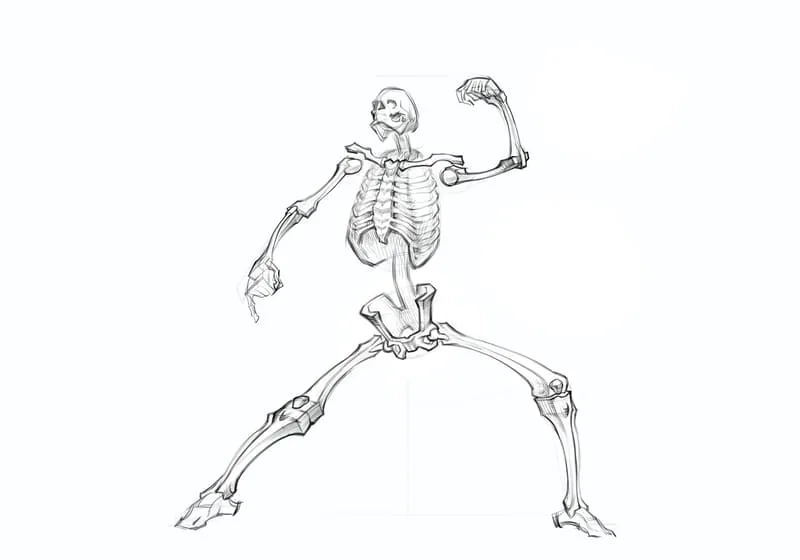
The study of anatomy should begin with the proportions of the skeleton. You need to understand how the skeleton is structured and what bones it consists of. Since the skeleton consists of bones that are quite complex in shape, an artist must be able to apply simplification of shape. Therefore, it is assumed that before you start drawing human anatomy, you have already mastered the basic approach in drawing and understand how to draw simple shapes, know how to simplify a complex shape and model volume to reveal the structure.Let's start studying the anatomy of the human skeleton
The most important and large volumes are the chest and pelvis, most often the drawing of both the skeleton and the human figure begins with them. Then the cranium with the facial module is outlined, followed by the upper and lower extremities with hands and feet.
If we take the entire height of the human skeleton from the feet to the top of the head (parietal elevation), then dividing this length in half, we will find the place of pubic fusion of the pelvis. At this level, the greater trochanter of the femur is also located, which is the most extreme point of the skeleton in width.
The upper half of the skeleton from the top of the head to the pubic fusion is divided into 4 parts. The upper segment is equal to the height of the head (1/8 of the entire height of the skeleton). Having retreated from the pubic fusion by one segment upwards, we will find the upper edge of the iliac crests of the pelvis. The chest is located between the head and the pelvis, you just need to retreat a small distance from above and below (1/3 of the height of the head).
Now we divide the lower half of the skeleton in half and at this level we find the lower edge of the knee joint. From the hip joint to the knee goes the femur, which in the upper part has a large outgrowth called the greater trochanter and from which the femoral neck goes towards the pelvis. The lower part of the leg consists of two bones right away — the tibia and the fibula. These bones connect to the foot at the ankle joint. The foot has a height of 1/3 of the height of the head, and consists of a large number of bones, but in the drawing they should be combined into general blocks and depicted in a simple silhouette.
Next, we outline the arc of the shoulder girdle, which runs along the upper edge of the chest. The lower edges of this arc will determine the location of the shoulder joints. From the shoulder joint to the elbow goes the humerus, then from the elbow joint to the radiocarpal joint goes the forearm, consisting of the ulna and radius. The wrist is located at the level of the greater trochanters of the femur and, therefore, in the middle of the height of the entire skeleton.
The hand is attached to the wrist, the end of which is located just above the middle of the femur. The hand is attached to the wrist and consists of a large number of bones. The palmar part consists of metacarpal bones, it should be drawn in a general block. Four fingers consisting of 3 bones called phalanges are attached to the palm, and the thumb consisting of only 2 phalanges is attached to the side of the palm.
The skeleton also has a spine — a group of bones connected to each other vertically. It serves as the support of the human skeleton and connects the upper part with the lower. The spine curves the thoracic region and has an S-shaped profile.
Separately, it should also be said about the clavicles and scapulae. Although they are not very large in size, we cannot afford not to draw them, as they have an expressive silhouette and beautiful plasticity. The clavicles are located in front in the upper part of the chest and have a slightly curved S-shaped silhouette. The scapulae are adjacent to the back of the chest and have a silhouette close to the shape of a triangle.
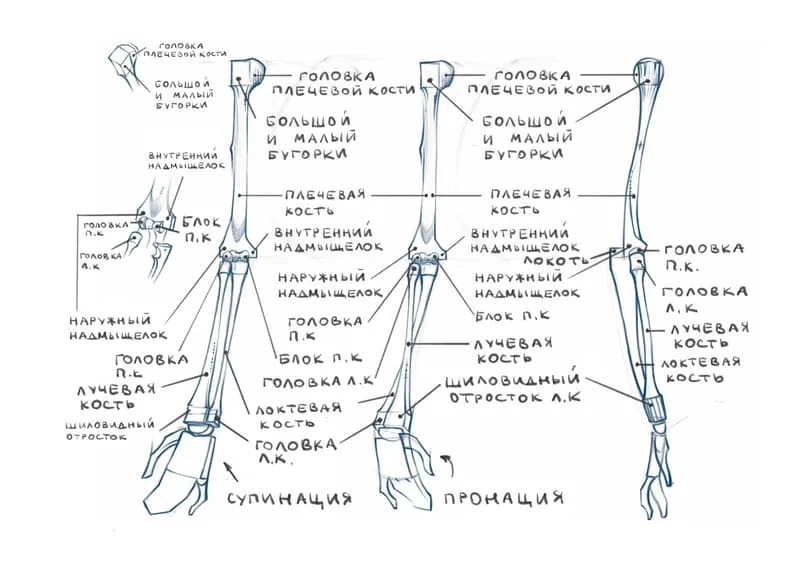
Pronation and supination
In order to draw hands plausibly, you also need to understand the elbow joint. The bones of the forearm are connected to the humerus in such a way that a person can turn the palm along its long axis both inward and outward. Pronation is called the crossed position of the ulna and radius, and supination is called the parallel arrangement of the bones.
Watch lessons on our YouTube channel on the topic of drawing the human skeleton
Video lesson — Drawing the HUMAN SKELETON. Frontal view
Pose
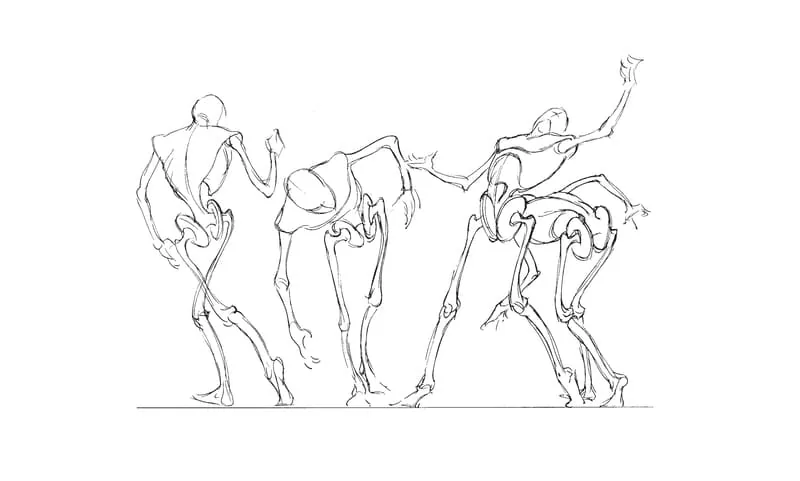
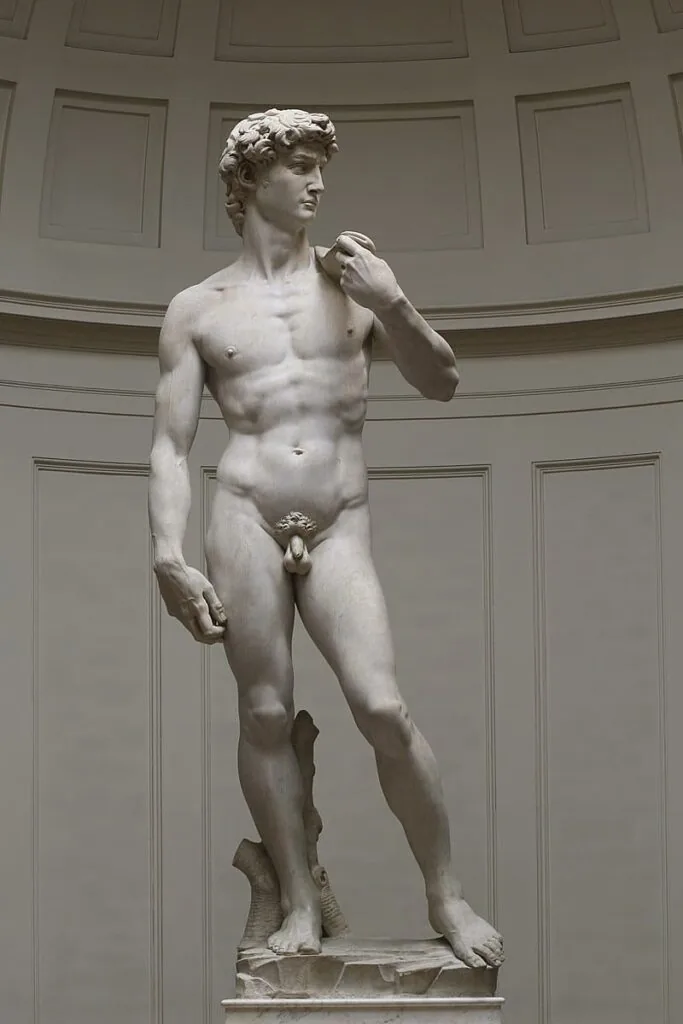
Before you start drawing a skeleton or human figure, you should figure out what pose they are best put in. If you have just recently started studying the topic of drawing the human figure, then it is better to choose simpler poses. Recommendation: study the cool free lesson «how to learn to draw a person». The classical pose for drawing a person is called contrapposto. In this pose, the weight of the body is transferred to one leg, creating a slight bend of the pelvis and shoulder girdle, which looks very aesthetically pleasing and impressive. Contrapposto is often associated with classical sculpture and painting and allows you to find balance, balance the parts of the body, give an interesting bend to the figure of a person and create a deeper image. There are also many other more complex interesting poses, but for starters it is better to focus on one to understand the anatomy and structure of the human figure.
Figure
Related courses
All courses
from 3 900 ₽
-57%
Book illustration: The first page page
9 000 ₽3 900 ₽
Learn more

from 12 000 ₽
-20%
Векторная иллюстрация для начинающих
15 000 ₽12 000 ₽
Learn more

from 4 500 ₽
-55%
Character Concept: My First Hero
10 000 ₽4 500 ₽
Learn more
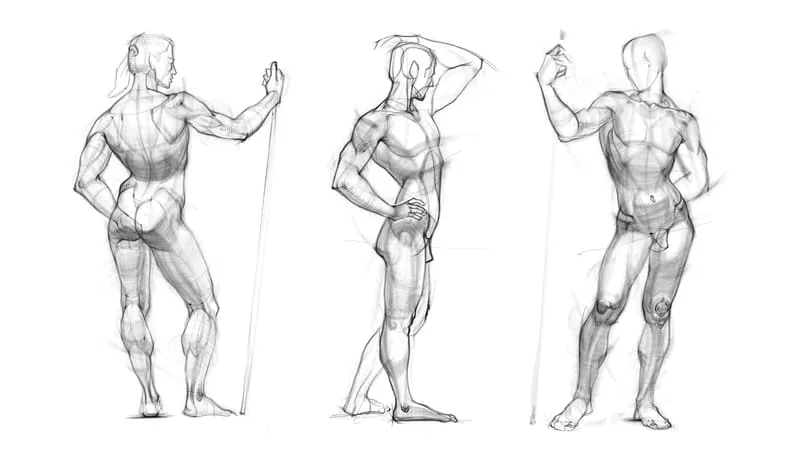
After we have looked at the skeleton a little, we can start studying the muscles of a person. Since the main proportions of the human figure are set by the skeleton structure, we will focus on individual parts of the figure and analyze them.
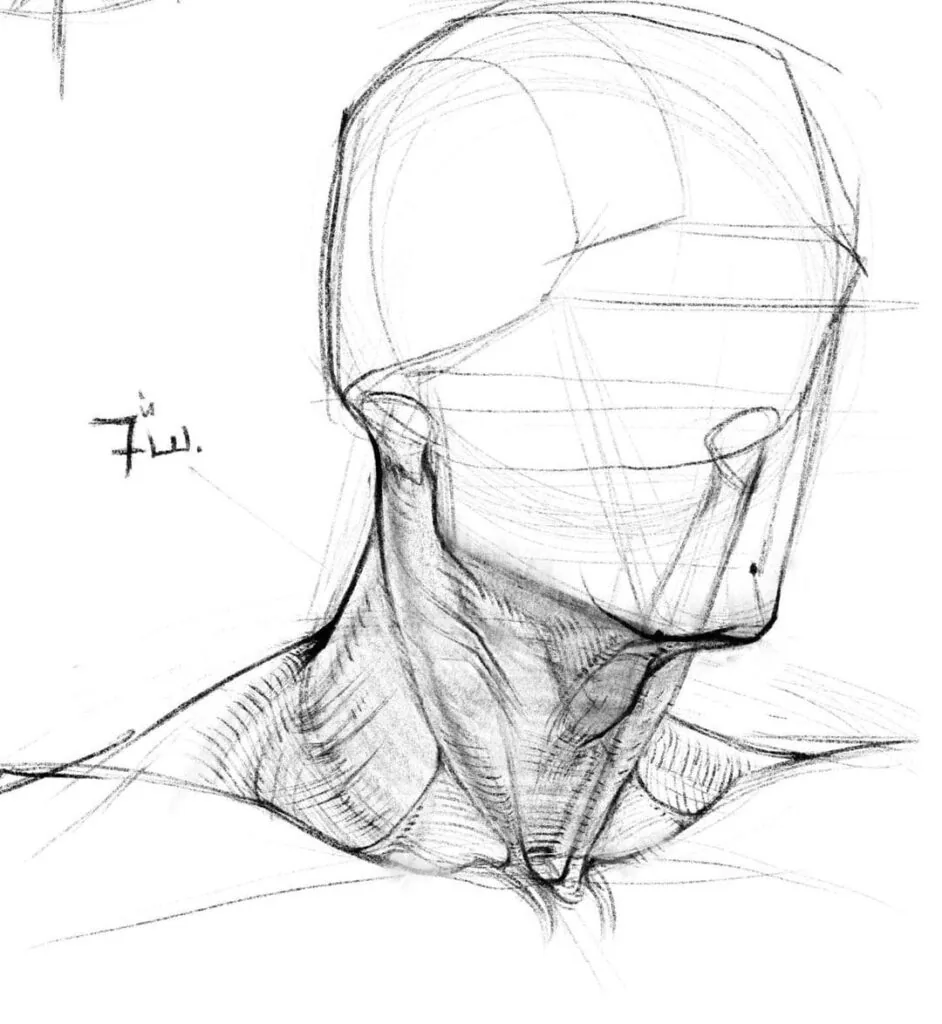
 You can also separately highlight the sternocleidomastoid muscle, it is located on the surface of the neck and is attached in the upper part to the mastoid processes on the cranium, and below to the sternum and clavicles.
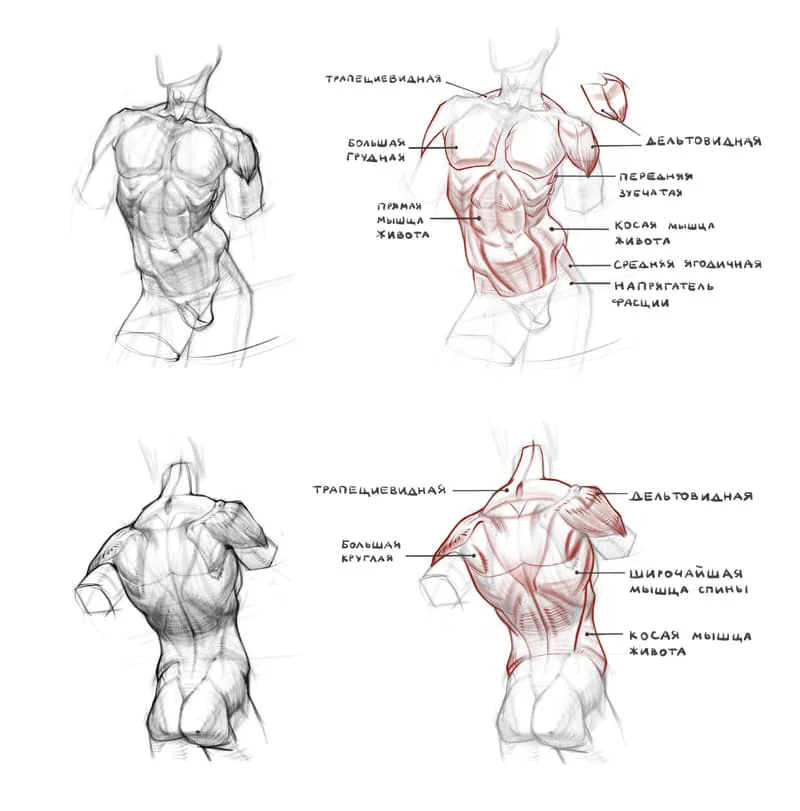
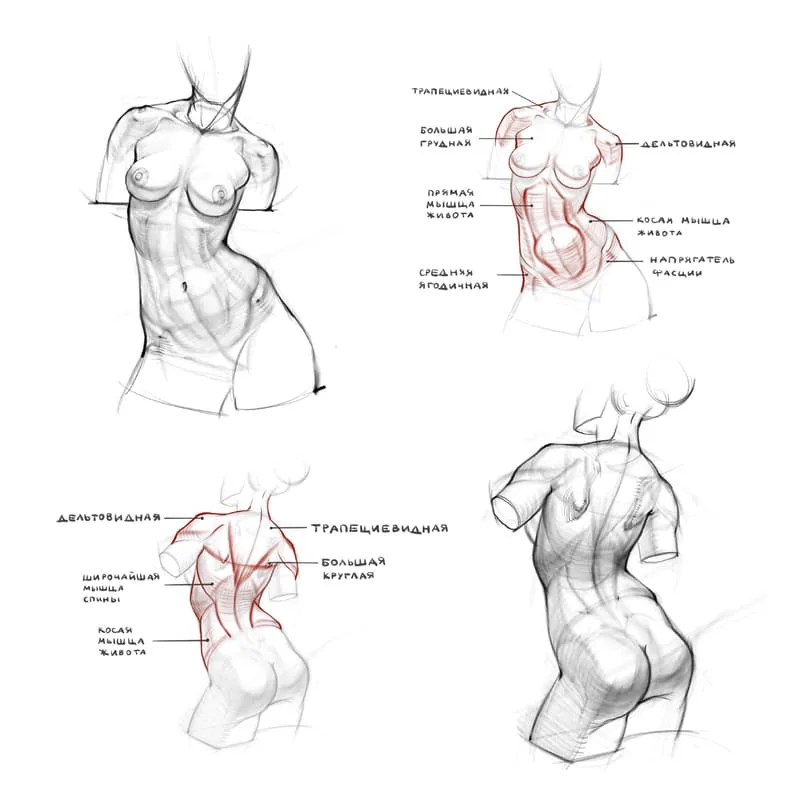
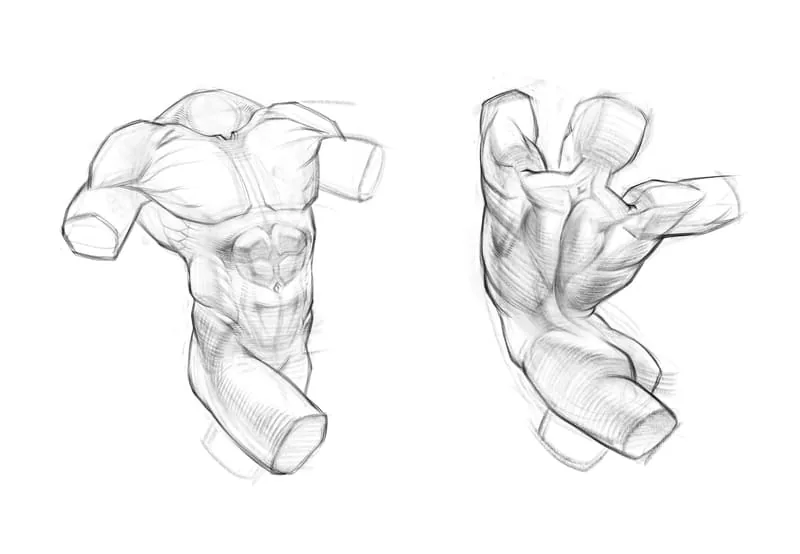
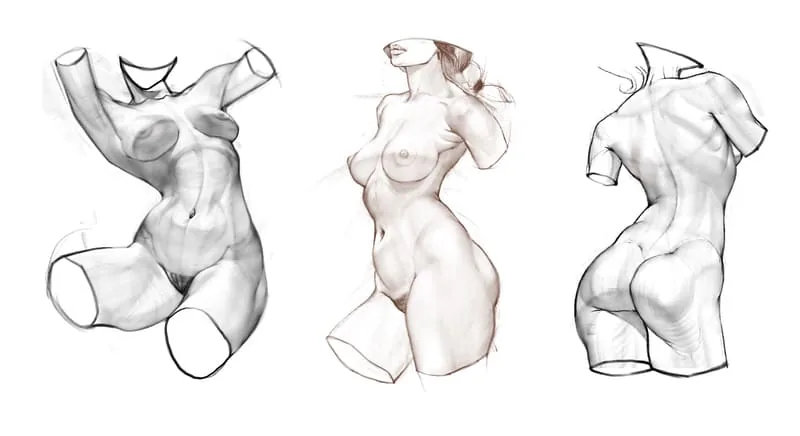
Torso
The chest and pelvis are the largest parts of the figure, so they are so important for the drawing process. When depicting these shapes, you only need to outline the silhouettes without unnecessary details and arrange them in relation to each other at a slight angle to show the plasticity of the pose. On the male torso, the pectoralis major muscle is most noticeable, it is located in the upper part of the chest and lies on its surface. The pectoralis major muscle is divided into two parts — right and left, and is attached at three points — in the center to the sternum, on top to the clavicles, the outer edge to the shoulder joint. The volume of this muscle should be drawn first in a single block and slightly curved upwards to show how it curves the volume of the chest. The shoulder joint is covered by the deltoid muscle, which is divided into three sections — anterior, middle and posterior delta. At first, the delta should be drawn as a whole volume, then in the process of detailing you can slightly highlight the sections of this muscle. Between the chest and the pelvis in front is the rectus abdominis muscle (abs) responsible for flexing the torso. In front it is attached to the ribs and xiphoid process, below to the pubic fusion. The muscle is divided into right and left sides, and is also divided by transverse bridges. Thus, you can see the «abs», usually there are 6 of them, but there can be more, depending on the development of the muscles. On the sides are the oblique muscles of the torso, which are attached from above to the chest, below to the iliac crests of the pelvis. The volume of this muscle is mainly visible closer to the pelvis, and slightly hangs over the pelvis and protrudes in the silhouette. Now let's look at the muscles that are mainly visible from the back. The largest and most noticeable is the latissimus dorsi. It starts from the bottom of the sacrum of the pelvis and the angles of the iliac crests, and rising higher it expands and covers the chest, as if hugging it. The upper border of this muscle is horizontal and is located approximately in the middle of the chest, and on the edges, having rounded the volume of the chest, it is attached to the humerus in the shoulder joint. The latissimus dorsi overlaps and presses the lower part of the scapula. Also attached to the lower edge of the scapula is the teres major muscle, the main volume of which can be seen above the upper edge of the latissimus dorsi. The upper part of the torso from the back is covered by the trapezius muscle, divided into several sections. The upper one adjoins the neck, the middle one is located between the shoulder blades, the lower one is located in the lower part of the shoulder blades. The female torso differs from the male one in that the muscles are not so pronounced, the shapes are more smooth and soft. Also, the female torso has mammary glands that lie on the pectoral muscles. Since the mammary glands and pectoral muscles are different volumes, they need to be drawn in separate forms.
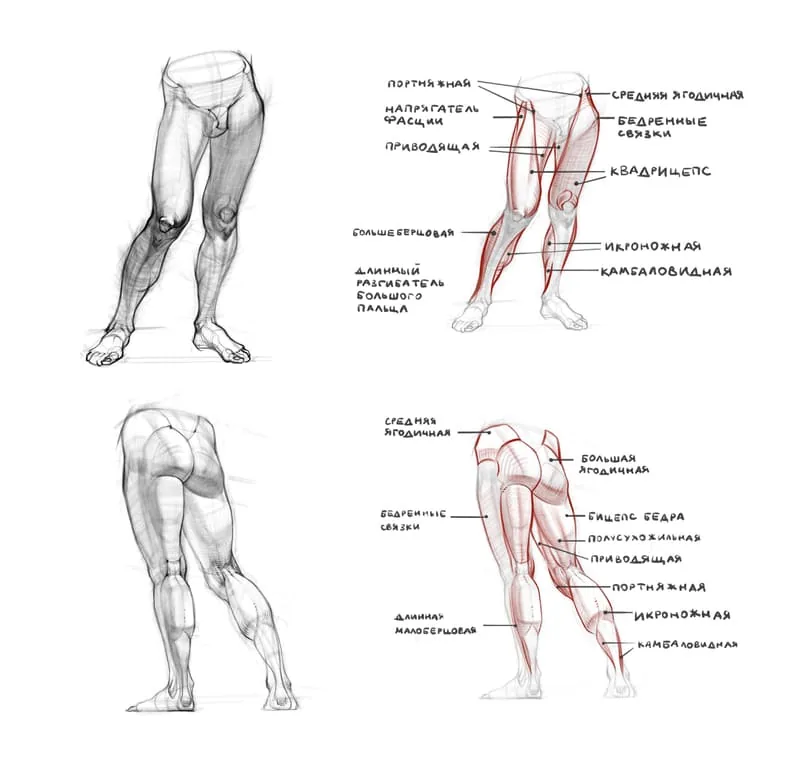
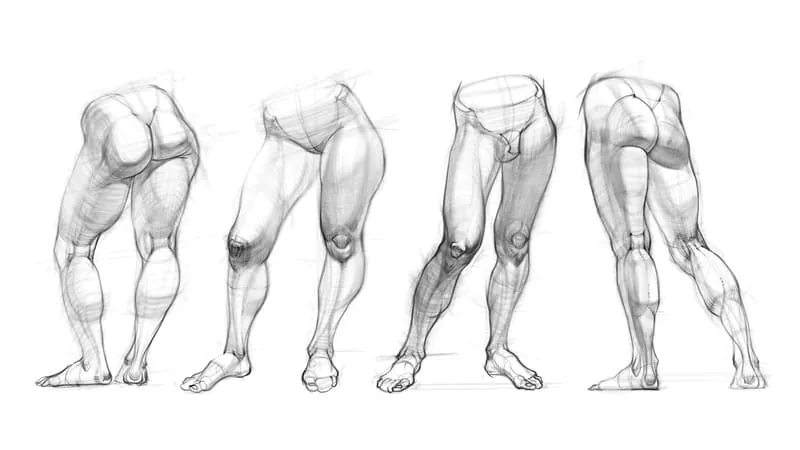
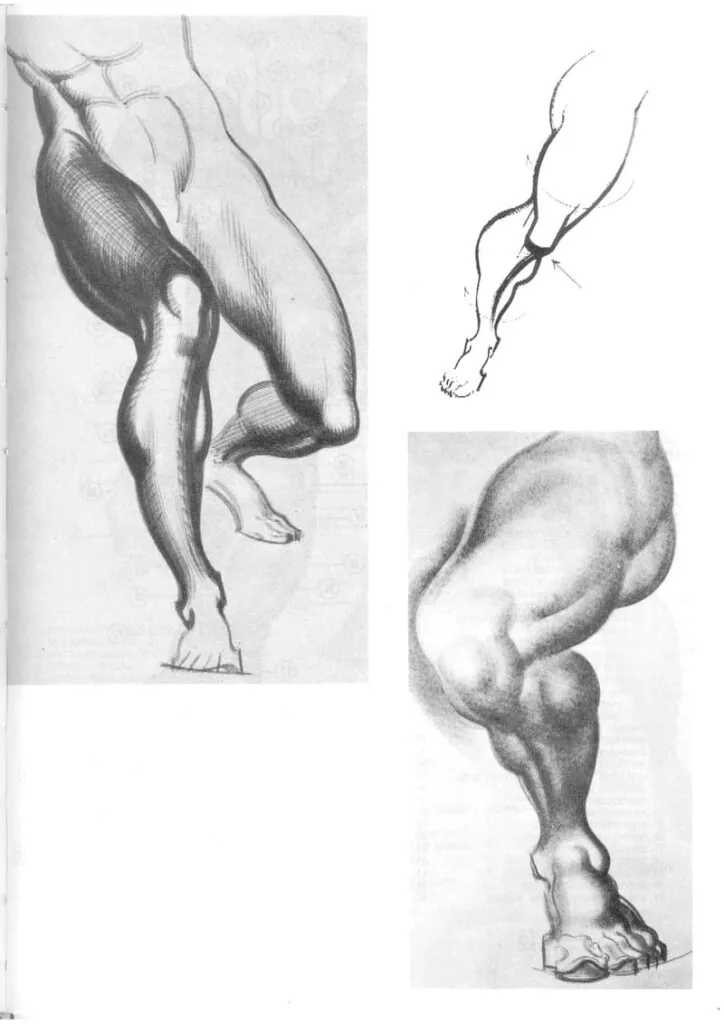
Legs
Let's start by analyzing the lower part of the human figure. The most noticeable muscle of the leg is the quadriceps (quadriceps femoris), as it is the largest muscle in the human body. The quadriceps is located on the front and sides of the thigh. The upper part of this muscle is attached to the pelvis and femur, the lower part to the knee joint. From the front angle of the iliac crest down to the inner side of the knee joint stretches the sartorius muscle. It has a small volume, but due to its tension it divides the volume of the thigh into two parts — the lower volume is mainly created by the quadriceps, and the upper volume is set by the adductor muscles of the thigh. Thus, interesting plasticity and silhouette of the thigh appear. On the lateral side of the pelvis is the gluteus medius muscle. Its volume can be almost invisible, but it can also manifest itself quite strongly, depending on the elaboration and tension of this muscle. Between the sartorius muscle and the gluteus medius, a small but often noticeable muscle — the tensor fasciae latae — is attached to the iliac crest. In the area of the greater trochanter it is connected to the fascia lata (tendon) on the outer side of the thigh. On the back side of the pelvis are the large gluteal muscles, which are attached to the sacrum of the pelvis in the center, and on the sides to the femur. Below the buttocks on the back side of the thigh is a muscle block consisting of the biceps femoris, semitendinosus and semimembranosus muscles. Since these muscles are not visible separately on the human figure, their volume should be depicted in a single block. The lower part of the leg on the back side is covered by the soleus muscle, on top of which the gastrocnemius muscle is attached. The gastrocnemius muscle consists of two parts — medial (on the inside) and lateral (on the outside). In the silhouette, the gastrocnemius muscle expands asymmetrically, on the inside of the silhouette the gastrocnemius bulges more in the lower part, the outside in the upper part. The silhouette of a person's legs is asymmetric, so you should carefully study the muscle blocks and understand how they affect the plasticity and character of the silhouette in order to draw the legs anatomical and graceful. It is important to practice drawing legs from nature in different perspectives and positions to quickly get into their complex shape.
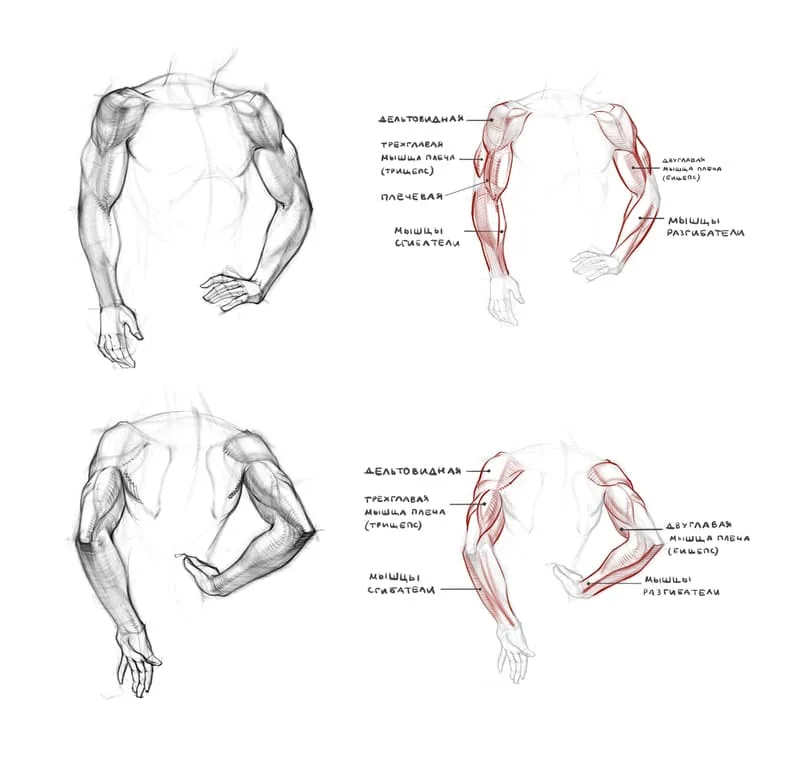
Arms
On the front side of the arm is the biceps (biceps brachii), it is attached to the shoulder joint under the volume of the delta, and from below to the radius in the area of the elbow joint. The lower part of the arm consists of the brachioradialis muscle and a group of flexors and extensors, which have their main mass closer to the elbow joint, and below they smoothly turn into tendons, which is why the volume of the forearm near the wrist decreases markedly. The back surface of the arm in the upper part is covered by the triceps (triceps brachii). The triceps is divided into two heads — one shorter (external), the other longer (internal). Between the triceps heads is a tendon connecting the triceps and the ulna on the back side of the joint.
Head
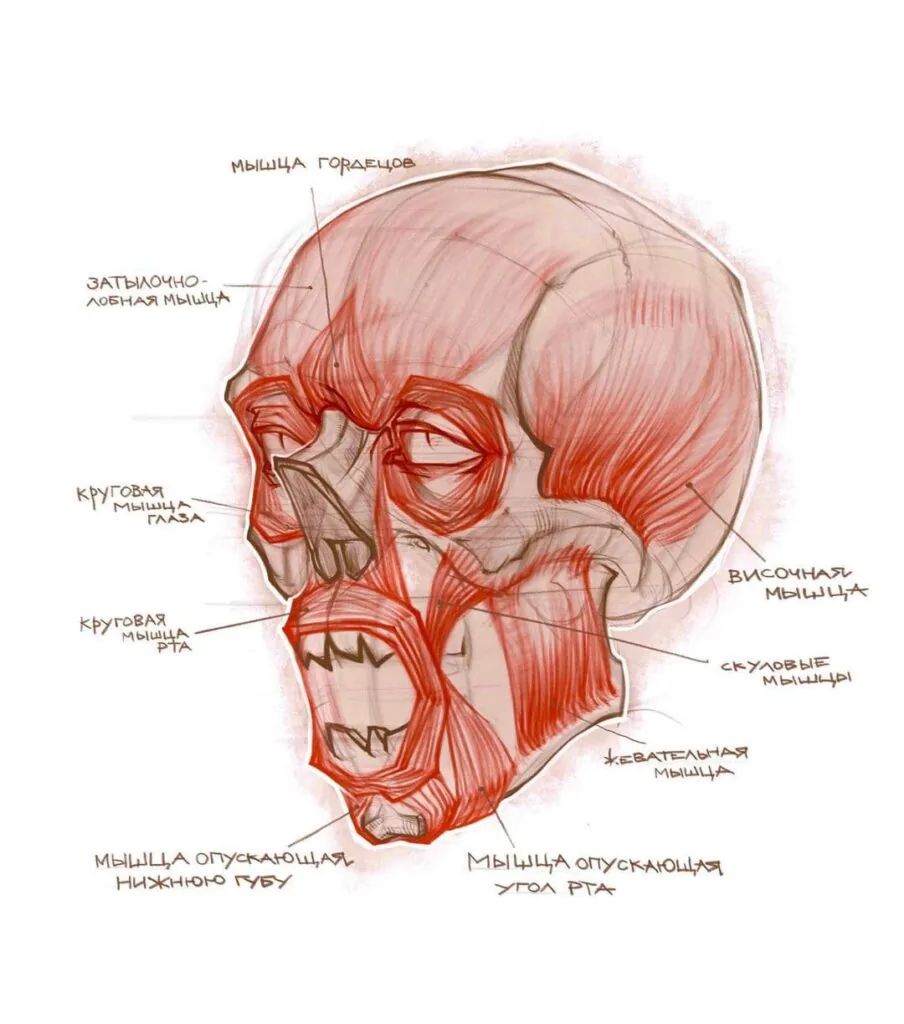
The head consists of a cranium, which is more visible in a lateral perspective, and a facial module from the frontal side having an elongated shape vertically. Basically, the entire volume of the head is created by the shape of the skull, so first you need to study its structure, and then start drawing individual parts of the face — nose, mouth, eyes and ears. Recommendation: study free lessons: «how to draw lips», «how to draw human eyes», «how to draw a human nose». Although the muscles do not play a major role here, they should also be studied in order to better understand the structure of the head. On the surface of the facial part of the skull there are orbicularis oculi, orbicularis oris, zygomatic, temporal, occipitofrontalis muscles, pride muscle, muscle depressing the lower lip, etc. You can separately highlight the masseter muscle, which is located on the lateral side of the lower jaw, it is especially noticeable on the male face.
You can also separately highlight the sternocleidomastoid muscle, it is located on the surface of the neck and is attached in the upper part to the mastoid processes on the cranium, and below to the sternum and clavicles.
Several video lessons on the topic of drawing the human figure
Video lesson — Drawing a male figure
Video lesson — How to draw a female figure
Video lesson — How to draw a female figure from behind
Video lesson — How to draw a human head correctly
Video lesson - How to draw sketches
We hope that this guide has illuminated you in the world of human body anatomy and inspired you to creative discoveries in the art of drawing. This is just the beginning of your path to mastery, and to continue this exciting process, we invite you to join our online course on drawing a person. Here you can delve deeper into the topic, receive personalized recommendations and support from experienced curators. Unlock your potential and discover new horizons in the world of creativity.Related materials

Tutorial
How to draw a human nose
August 15, 2024
Tutorial
How to draw a kerosene lamp
September 18, 2023

Tutorial
How to draw a person's eyes
December 26, 2023

Tutorial
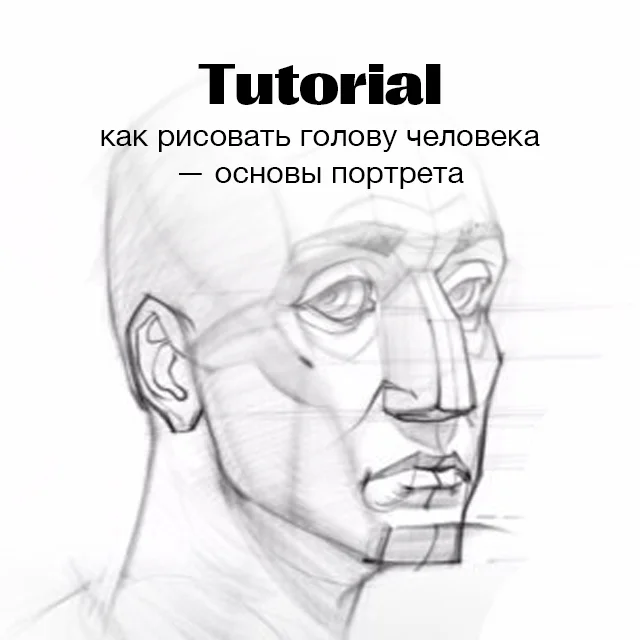
How to draw a person's face
December 22, 2023
Tutorial
How to draw a human head
September 18, 2023

Article
3 tips for a beginner character artist. How to draw emotions
September 18, 2023

News
Создание 3D-модели нарисованного вручную человека с роботизированной рукой
March 2, 2026