TutorialUpdated: June 20, 2026
How to learn to draw a person from scratch
In short
Learn how to draw a person from scratch! Step-by-step lessons on anatomy, proportions and silhouette. Master drawing a full-length figure today!
2D artist
We live among people, observe different types and characters. Sometimes you want to
For a full-length figure to look convincing, you need to understand the skeleton. We cover it in detail in the master class How to draw a human skeleton.take out a sketchbook and make a sketch of a charismatic man in the subway or a bright girl in the park. Or stretch a sheet on an A2 tablet and draw a nude figure life-size.
But where to start and how to approach such a task, especially if you are just starting your artistic journey?
 Simple search sketches by student of the online course Drawing Alevtina Plakhova — preparatory sketches made to find proportions, volumes, body movement. They are the most convenient to start with. The simpler they are, the better.
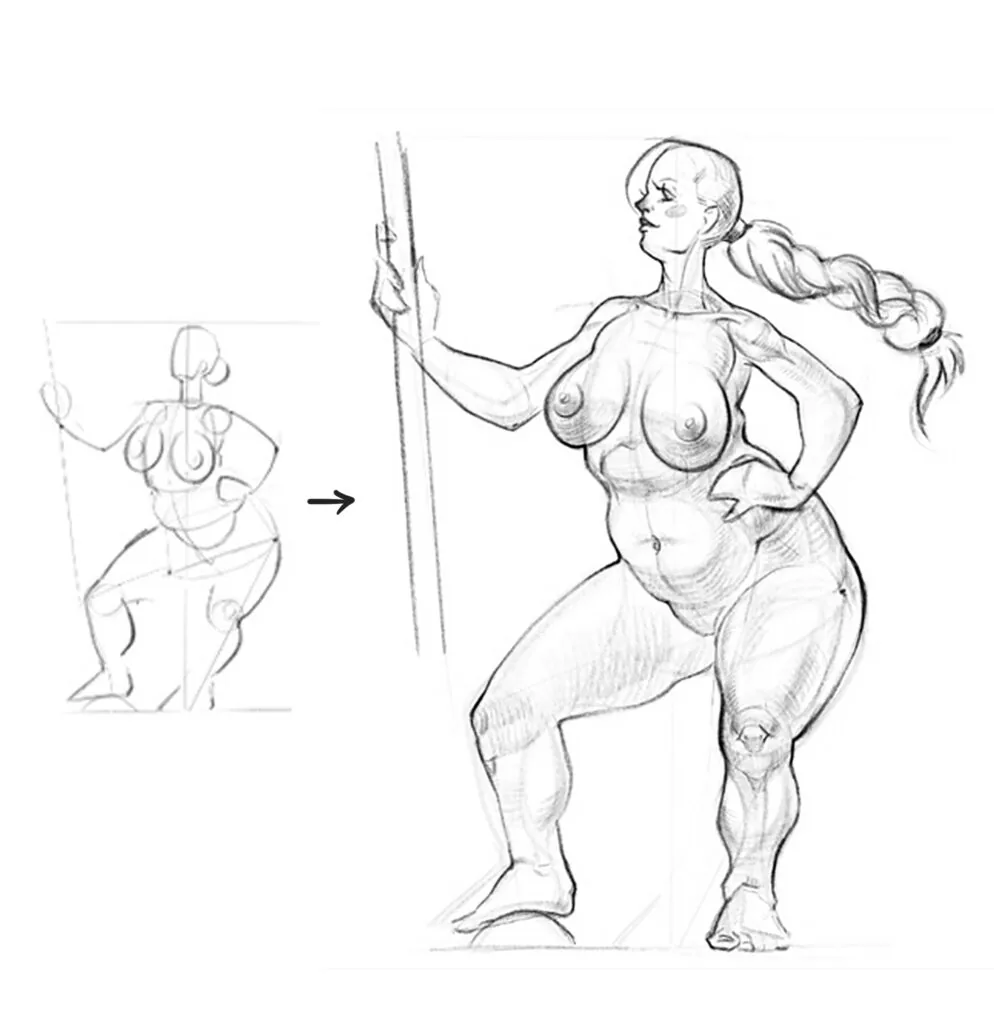 After approving the sketch, the volumes of the pelvis, torso, head, and limbs were added in the form of simple geometric primitives. On a large drawing, more accurate silhouette lines, light tone, and strokes along the body curves have already been added. Author: Alevtina Plakhova, online course Drawing.
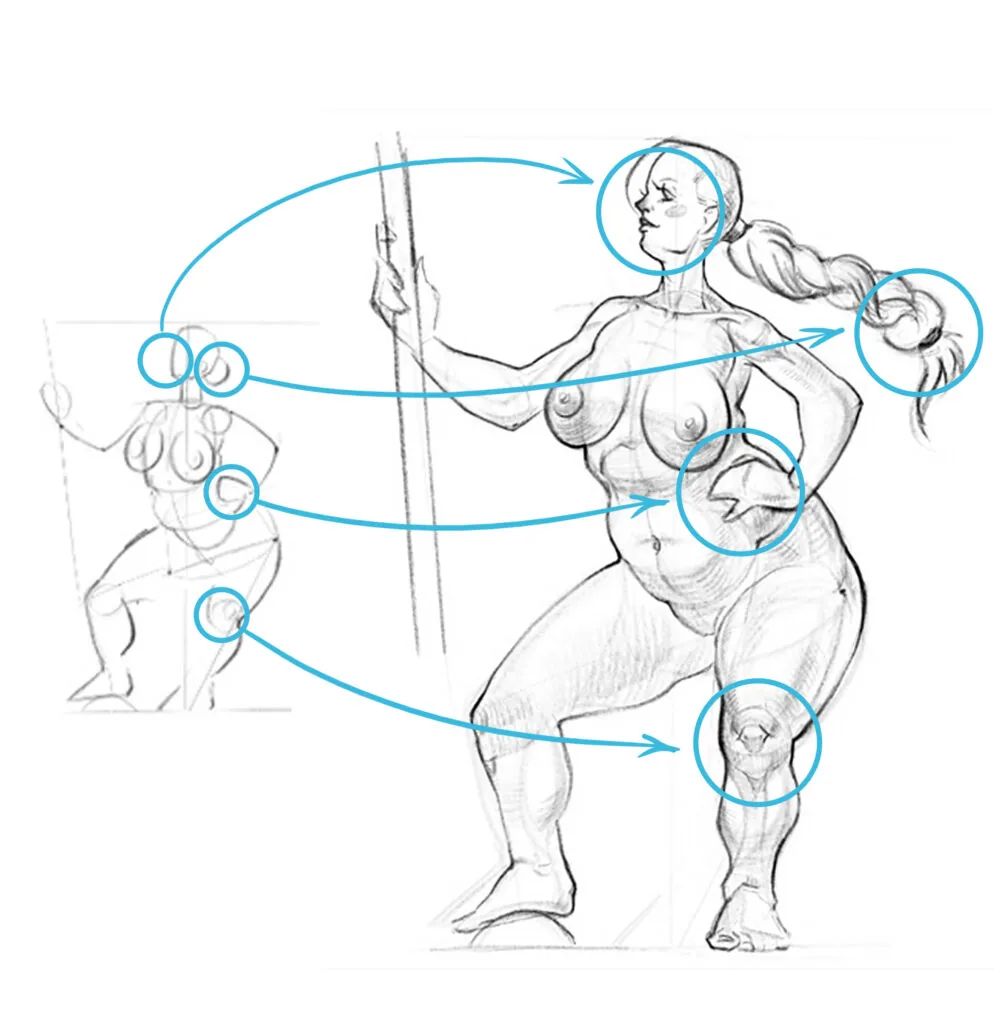 On the original sketch, the details were outlined in a generalized way. In the final, the author added interesting details: the structure of the knee joint, hand, face, braid — they are worked out with a light tone and contour lines, which create accents. Author: Alevtina Plakhova, online course Drawing.
In Skills Up School, a new mini-course “Drawing sketches from a spot” has appeared. On the course, you will get acquainted with various techniques and approaches to drawing sketches of figures and portraits and will be able to significantly improve your skills in working with composition, anatomy, and image. The author of the course is an artist and founder of Skills Up School Azat Nurgaleev.
Before you start drawing a figure, you need to know how to draw a silhouette and construction.
We recommend studying a free lesson: composition in drawing
On the original sketch, the details were outlined in a generalized way. In the final, the author added interesting details: the structure of the knee joint, hand, face, braid — they are worked out with a light tone and contour lines, which create accents. Author: Alevtina Plakhova, online course Drawing.
In Skills Up School, a new mini-course “Drawing sketches from a spot” has appeared. On the course, you will get acquainted with various techniques and approaches to drawing sketches of figures and portraits and will be able to significantly improve your skills in working with composition, anatomy, and image. The author of the course is an artist and founder of Skills Up School Azat Nurgaleev.
Before you start drawing a figure, you need to know how to draw a silhouette and construction.
We recommend studying a free lesson: composition in drawing
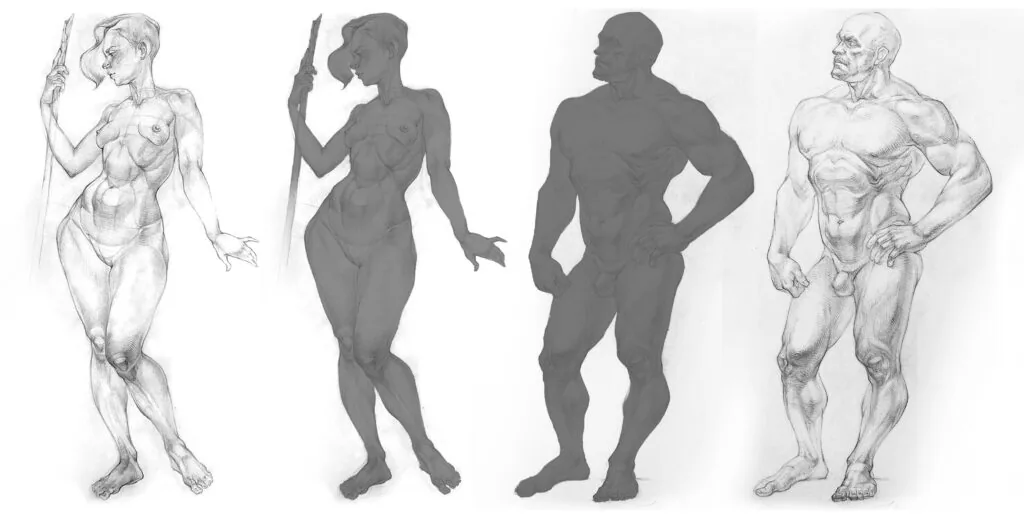 On graphic sheets, the silhouette very well emphasizes the features of the female and male nature. Even without shading and drawn anatomical elements, we well determine the gender of the sitters. Authors: Anna Vinokurova and Alexander Isaev
But not only the contours of the silhouette help to draw a person more accurately, poses also help. For example, women and men have different body plastics, so the poses of the figures should correspond to the chosen nature.
Of course, we can meet a female image in a fighting stance, as in Eugène Delacroix’s painting “Liberty Leading the People”. But often sharp, confident positions with a feeling of воинственности are characteristic of the male image, and for women — smooth, soft and elegant poses.
On graphic sheets, the silhouette very well emphasizes the features of the female and male nature. Even without shading and drawn anatomical elements, we well determine the gender of the sitters. Authors: Anna Vinokurova and Alexander Isaev
But not only the contours of the silhouette help to draw a person more accurately, poses also help. For example, women and men have different body plastics, so the poses of the figures should correspond to the chosen nature.
Of course, we can meet a female image in a fighting stance, as in Eugène Delacroix’s painting “Liberty Leading the People”. But often sharp, confident positions with a feeling of воинственности are characteristic of the male image, and for women — smooth, soft and elegant poses.
 The bathers of William Bouguereau and Heracles of Lysippus stand in static calm poses. However, the girl's body bends, consists of arcuate forms, and in Heracles we feel power and invincibility.
The gladiator and the girl before swimming are in motion, while the gladiator feels determination and aggression, and in the girl — softness and negativity.
When working with a silhouette, it is important to remember about its expressiveness. Several techniques will help us with this:
The bathers of William Bouguereau and Heracles of Lysippus stand in static calm poses. However, the girl's body bends, consists of arcuate forms, and in Heracles we feel power and invincibility.
The gladiator and the girl before swimming are in motion, while the gladiator feels determination and aggression, and in the girl — softness and negativity.
When working with a silhouette, it is important to remember about its expressiveness. Several techniques will help us with this:
 Female figures are drawn with smooth arcuate lines, and the poses are very smooth and soft, not зажатые. Authors: Nikita Orlov, Dmitry Nezhivov, online course Human figure
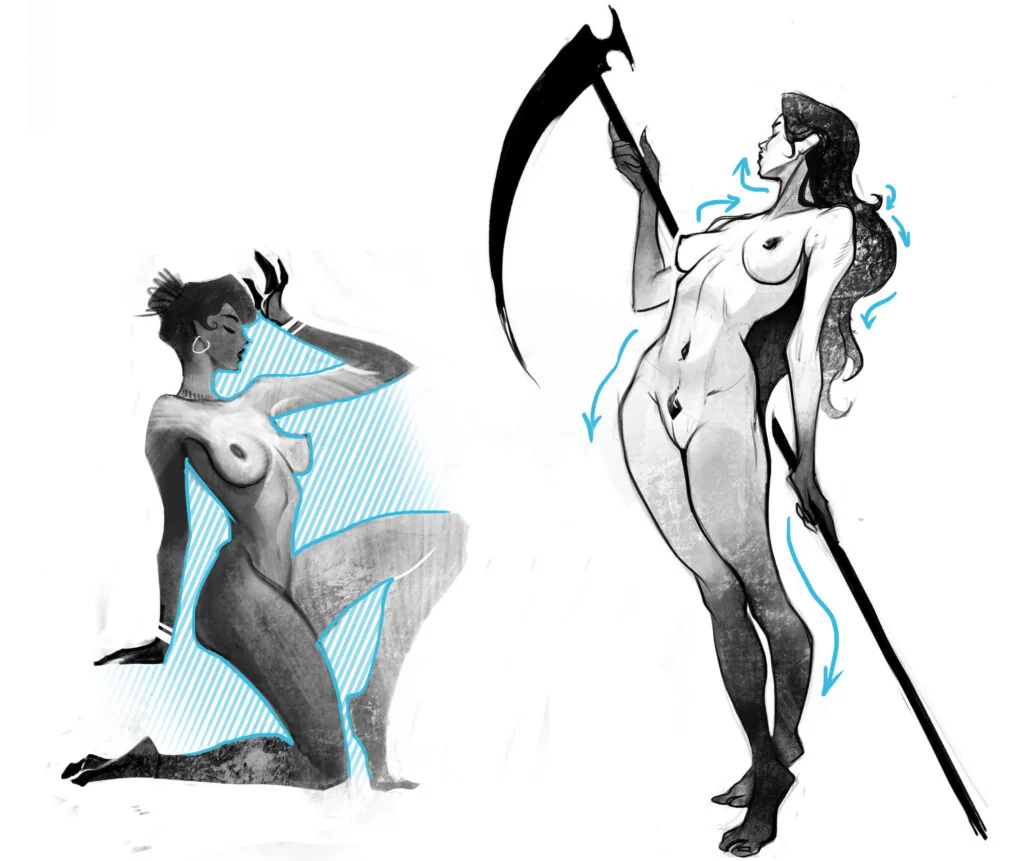 The silhouette of a sitting girl is cut by bays of free space, arms and legs are not glued to the body. In the silhouette of the girl with a braid, we see the bumps of small reliefs, long longitudinal arcs of smoother space, sharp curls of hair that disturb the calm smoothness of the hairstyle — эthese techniques saturate the drawing. Author: Sonya Smirnova, course Drawing Pro
 Girls against a red circle are made in a stylized manner. Stylization allows you to remove лишнее and save the main thing — a bright image, expressive movement and forms. Intensified emotion is felt in the movement of the heroine's hands in the foreground, the curves of the tail, the tension of the thigh muscles, and the turns of the body. Author: Irina Dolganova, online course Sketches.
We recommend studying a free lesson: how to draw silhouettes
Girls against a red circle are made in a stylized manner. Stylization allows you to remove лишнее and save the main thing — a bright image, expressive movement and forms. Intensified emotion is felt in the movement of the heroine's hands in the foreground, the curves of the tail, the tension of the thigh muscles, and the turns of the body. Author: Irina Dolganova, online course Sketches.
We recommend studying a free lesson: how to draw silhouettes
 Step 1
Let's start our analysis with the torso — we find the volume of the chest and pelvis. Mark them with an egg-shaped sphere and a cylinder, draw a light line of the axis that suggests the bend of the body. The chest is directed upwards, so we look at it from the bottom up, and the pelvis is opposed to it: we observe it in a tilt when we look from above. With light lines and strokes, we show the boundaries of the turns of the drawn figures.
Step 1
Let's start our analysis with the torso — we find the volume of the chest and pelvis. Mark them with an egg-shaped sphere and a cylinder, draw a light line of the axis that suggests the bend of the body. The chest is directed upwards, so we look at it from the bottom up, and the pelvis is opposed to it: we observe it in a tilt when we look from above. With light lines and strokes, we show the boundaries of the turns of the drawn figures.
 Step 2
The shoulder joints resemble hemispheres, similar to the shoulder pads of a knight's armor. Mark them with quarters of balls.
The pectoral muscles expand towards the shoulders, and the upper part of the chest is closed by the inclined contour of the shoulders, like the roof of a house. Add an “egg” of the chest with lines.
Step 3
Human arms are like cylinders. Without specifying the silhouette of the muscle relief, we mark the volume of the arms with simple geometry. The shoulder and forearm are almost equal in height, so our cylinders should be the same or similar in height.
Draw figures with bases to understand the tilt of the arms. Also, mark the boundaries of turns with light strokes.
Step 2
The shoulder joints resemble hemispheres, similar to the shoulder pads of a knight's armor. Mark them with quarters of balls.
The pectoral muscles expand towards the shoulders, and the upper part of the chest is closed by the inclined contour of the shoulders, like the roof of a house. Add an “egg” of the chest with lines.
Step 3
Human arms are like cylinders. Without specifying the silhouette of the muscle relief, we mark the volume of the arms with simple geometry. The shoulder and forearm are almost equal in height, so our cylinders should be the same or similar in height.
Draw figures with bases to understand the tilt of the arms. Also, mark the boundaries of turns with light strokes.
 Step 4
Complete the left hand with a brush. The main thing is to mark the bends of the hand along the phalanges of the fingers with lines. Mark the neck as a cylinder, and put the head on it. The head resembles a bob, in which the cranial box is a sphere, and the end of the face on the chin has a rounded corner.
Also, mark the three-quarter turn along the face and temple with the edge — such a scheme resembles the head of a crash test dummy. Mark the axes on the face with light lines, put a semicircle of the ear. Thus, we show the direction of the head and see that the body and head look in different directions.
Step 5
The lower extremities are similar to the arms, divide them into three cylindrical sections. The cylinders of the thigh and shin are approximately equal: in the straightened state, they are rhymed in one direction, and the knee is tilted in the other direction.
Step 4
Complete the left hand with a brush. The main thing is to mark the bends of the hand along the phalanges of the fingers with lines. Mark the neck as a cylinder, and put the head on it. The head resembles a bob, in which the cranial box is a sphere, and the end of the face on the chin has a rounded corner.
Also, mark the three-quarter turn along the face and temple with the edge — such a scheme resembles the head of a crash test dummy. Mark the axes on the face with light lines, put a semicircle of the ear. Thus, we show the direction of the head and see that the body and head look in different directions.
Step 5
The lower extremities are similar to the arms, divide them into three cylindrical sections. The cylinders of the thigh and shin are approximately equal: in the straightened state, they are rhymed in one direction, and the knee is tilted in the other direction.
 Step 6
Imagine that the feet are like boots without the details of veins, bones, joints, and even better, imagine them in the form of flippers. Feet are inclined parallelepipeds that narrow towards the fingers. And the heels are rounded cubes attached to them.
Step 7
Add tone fill to all the found geometric volumes — such simplification reveals the main volumes of the figure, and the details do not interfere with perceiving the form цельно.
Step 6
Imagine that the feet are like boots without the details of veins, bones, joints, and even better, imagine them in the form of flippers. Feet are inclined parallelepipeds that narrow towards the fingers. And the heels are rounded cubes attached to them.
Step 7
Add tone fill to all the found geometric volumes — such simplification reveals the main volumes of the figure, and the details do not interfere with perceiving the form цельно.
How to draw a person with a pencil from scratch for beginners
The human body is a complex system consisting of many parts and sections that are functionally rhymed with each other and proportionate. Without studying anatomy, the process of drawing and learning will be longer and more difficult. Knowing the anatomy of the human body, you can avoid mistakes and not draw лишнего: a sudden jagged muscle, a third knee, or an additional row of abdominal cubes. Let's look at the basic rules for drawing a human figure:- Choose simple poses. For beginners, the most convenient poses for studying the human figure are standing and sitting. In such positions, it is very effective to study the proportions of the body, the features of the muscles and skeleton structure.
- Choose a nude model. Anatomy is best studied on a nude figure, not a clothed one. Clothes hide key parts of the body and do not allow you to understand the hidden structure.
- Draw from a generalized form. Start from the big, then move to the small. It is important to remember that the human body is a union of many details of different scales. If you draw each one with special painstakingness, then most likely the drawing will “scatter” and will not be holistic. Moreover, it is very easy to get lost in this meditative process and not keep the proportionality of the details.
- Do not draw in a clean way. Start the drawing with a light sketch, use general axes and axes of the internal structure, lines of additional construction, measuring segments. Do not try to immediately expect perfect proportions and silhouette from the drawing. Imagine that you are a sculptor who cuts off the unnecessary from a block of marble until he finds that very form.
Simple search sketches by student of the online course Drawing Alevtina Plakhova — preparatory sketches made to find proportions, volumes, body movement. They are the most convenient to start with. The simpler they are, the better.
- Construction and proportions are the basis. Apply hatching and tone processing only after the construction stage. If there is disharmony in the drawing, then a beautiful stroke will not decorate it. We recommend studying a cool article: proportions in drawing
- Simple forms. Using the found proportions, we mark the torso, pelvis, shoulders, legs, arms, and head with simple geometry. At the construction stage, do not copy everything you see. Analyze the body as a connection of simple geometric shapes.
- Details. Check the proportionality of the parts of the figure again and move on to detailing. We discover the volumes of muscles, clarify the silhouette, easily outline fingers, face, hair.
After approving the sketch, the volumes of the pelvis, torso, head, and limbs were added in the form of simple geometric primitives. On a large drawing, more accurate silhouette lines, light tone, and strokes along the body curves have already been added. Author: Alevtina Plakhova, online course Drawing.
- Tone. Mark the volume of own and falling shadows with a light stroke. Work in one force, without shading. At this stage, the main thing is not to overdarken.
- Contrasts. After distributing generalized shadow, we move on to creating a stronger volume. Darken the boundaries of light and shadow, add tone along deeper falling shadows. Do not forget that very black shadows without gradient stretches will not create volume.
- Final touches. Arrange accents on the figure — it could be a hand gesture, a portrait, decorative elements in the form of jewelry/hat/drapery. Make sure that all parts of the body are not made with the same force. If this happens, then at the final stage it is worth simplifying the elements of the figure with generalizing hatching or an eraser.
On the original sketch, the details were outlined in a generalized way. In the final, the author added interesting details: the structure of the knee joint, hand, face, braid — they are worked out with a light tone and contour lines, which create accents. Author: Alevtina Plakhova, online course Drawing.
In Skills Up School, a new mini-course “Drawing sketches from a spot” has appeared. On the course, you will get acquainted with various techniques and approaches to drawing sketches of figures and portraits and will be able to significantly improve your skills in working with composition, anatomy, and image. The author of the course is an artist and founder of Skills Up School Azat Nurgaleev.
Before you start drawing a figure, you need to know how to draw a silhouette and construction.
We recommend studying a free lesson: composition in drawing
Silhouette of a person in full growth
Human vision has certain features of perception. We pay attention to color, lighting, gestures, distinctive elements and signs, such as clothing details or equipment. In ideal conditions, we can very easily recognize a person's gender, belonging to a certain race, or profession. But at a great distance, and especially in not the best weather conditions, many parameters cease to help us in recognition. For example, in fog on a cloudy day, only the silhouette remains of a person. That is why it is important when drawing a figure in statics or dynamics to create a well-readable silhouette. The viewer should understand who is depicted in the drawing: a man or a woman, a knight or an athlete, a musician or a waitress.
On graphic sheets, the silhouette very well emphasizes the features of the female and male nature. Even without shading and drawn anatomical elements, we well determine the gender of the sitters. Authors: Anna Vinokurova and Alexander Isaev
But not only the contours of the silhouette help to draw a person more accurately, poses also help. For example, women and men have different body plastics, so the poses of the figures should correspond to the chosen nature.
Of course, we can meet a female image in a fighting stance, as in Eugène Delacroix’s painting “Liberty Leading the People”. But often sharp, confident positions with a feeling of воинственности are characteristic of the male image, and for women — smooth, soft and elegant poses.
The bathers of William Bouguereau and Heracles of Lysippus stand in static calm poses. However, the girl's body bends, consists of arcuate forms, and in Heracles we feel power and invincibility.
The gladiator and the girl before swimming are in motion, while the gladiator feels determination and aggression, and in the girl — softness and negativity.
When working with a silhouette, it is important to remember about its expressiveness. Several techniques will help us with this:
- Strengthening the hidden dynamics of the form. Try to avoid using straight lines, use arcs and curves. The human body is very plastic and does not have straight rods inside, especially in the silhouette of the muscles.
- Relaxedness. Try to depict the figure in a slightly more voluminous format, do not make the figure зажатой — this will make the silhouette unreadable and deprive the outlines of rhythms, variability, and liveliness.
Female figures are drawn with smooth arcuate lines, and the poses are very smooth and soft, not зажатые. Authors: Nikita Orlov, Dmitry Nezhivov, online course Human figure
- Rhythms. Look for rhythms of bends of forms, body relief, folds of clothes, hair curls. A straight monotonous silhouette or a cluster of details of the same scale in any part of the body make the figure boring and incomprehensible.
- Vacuums. The human body is a very mobile structure, its parts can rotate relative to each other, the limbs can move in arbitrary directions, and the elements of clothing are not nailed down. Add air to the silhouette, do not try to press your elbows to the body, and your legs to each other. It is the voids between the limbs and the body that help to reveal the features of the body.
The silhouette of a sitting girl is cut by bays of free space, arms and legs are not glued to the body. In the silhouette of the girl with a braid, we see the bumps of small reliefs, long longitudinal arcs of smoother space, sharp curls of hair that disturb the calm smoothness of the hairstyle — эthese techniques saturate the drawing. Author: Sonya Smirnova, course Drawing Pro
- Dramaticness. A drawing is like actors in a theater: it plays a given role and portrays reality. Try to enhance the emotion of the figure or movement.
- Stylization. Stylization of the form also allows you to make a more attractive silhouette. Pointed angles of turns, more active body bends, slight deformation, the use of perspective will make the figure more dynamic, and the silhouette — memorable. We recommend studying an interesting article: stylization in drawing
Girls against a red circle are made in a stylized manner. Stylization allows you to remove лишнее and save the main thing — a bright image, expressive movement and forms. Intensified emotion is felt in the movement of the heroine's hands in the foreground, the curves of the tail, the tension of the thigh muscles, and the turns of the body. Author: Irina Dolganova, online course Sketches.
We recommend studying a free lesson: how to draw silhouettes
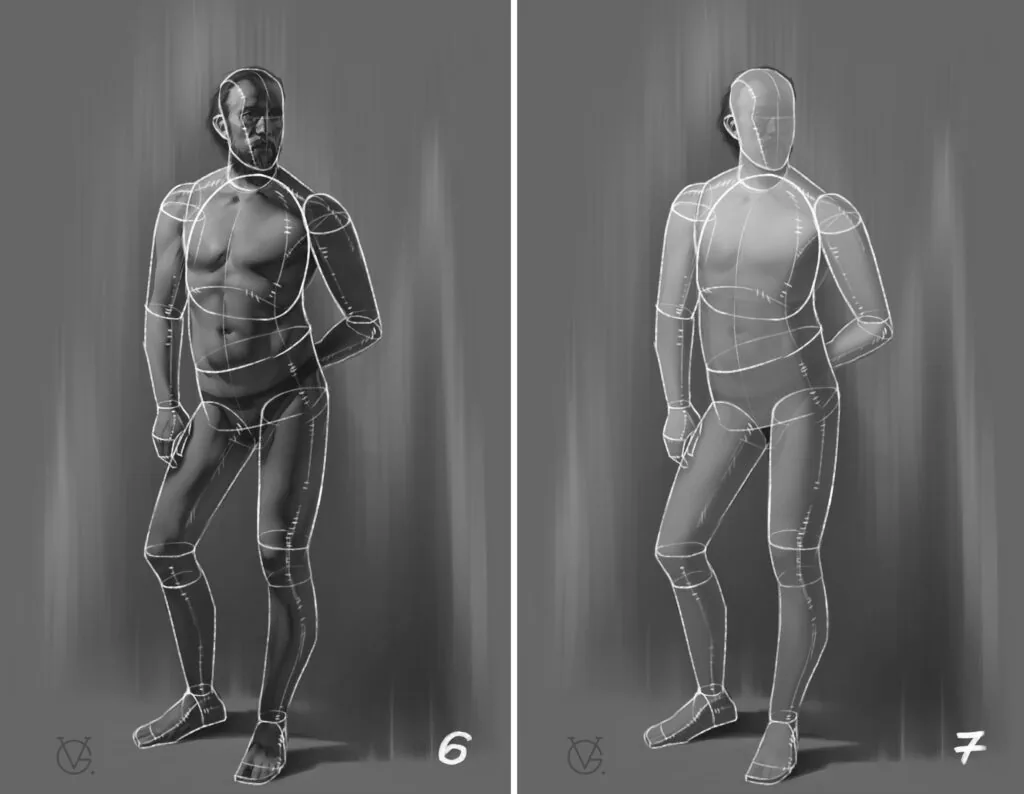
How to build an image of a person using geometric figures
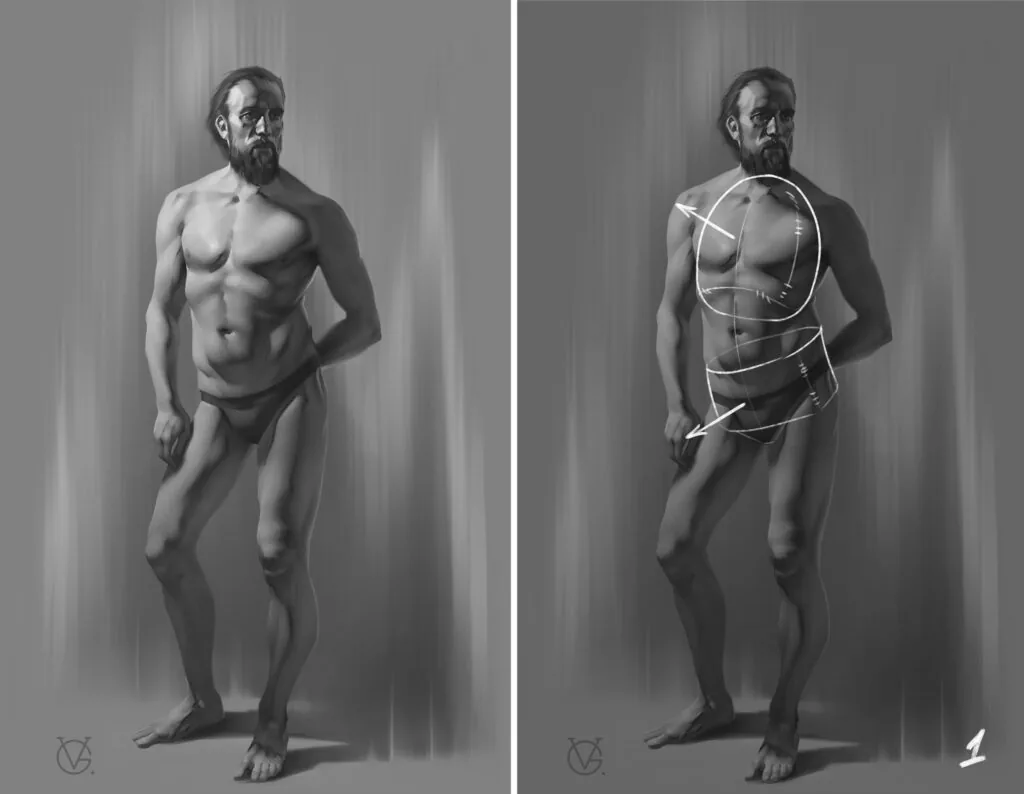
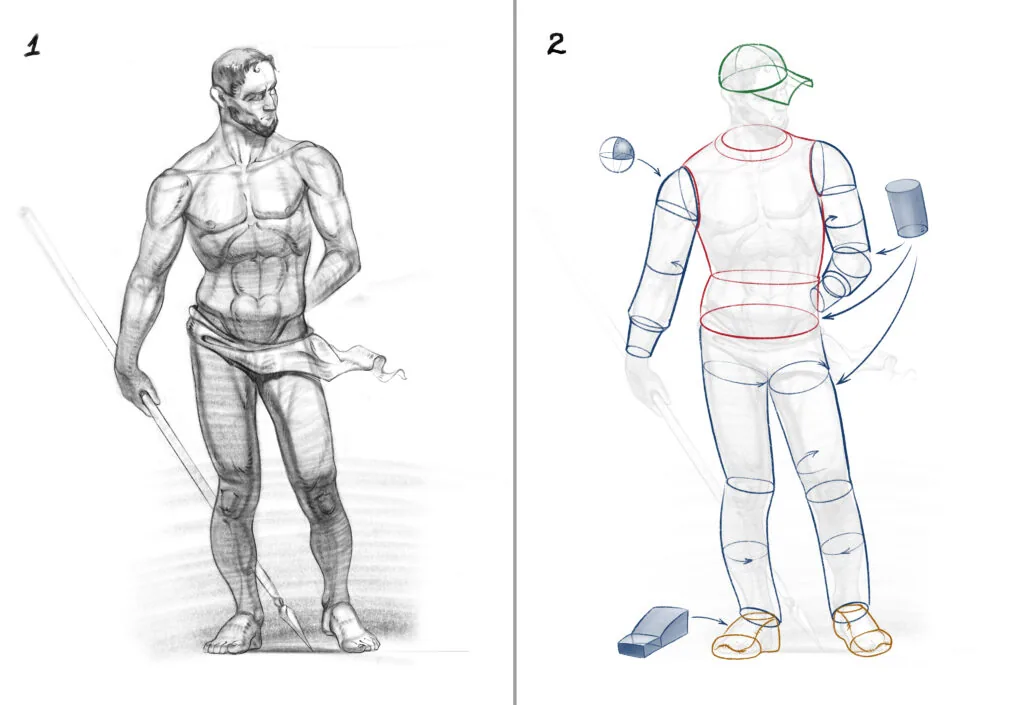
Any object consists of simple geometric figures: we just need to see them in household appliances or dishes. The human body is a kind of still life of complexly composed volumes. Let's try to explore the human body using the example of a digital drawing by Vladimir Gerasimov, made in the course Drawing Pro.
Step 1
Let's start our analysis with the torso — we find the volume of the chest and pelvis. Mark them with an egg-shaped sphere and a cylinder, draw a light line of the axis that suggests the bend of the body. The chest is directed upwards, so we look at it from the bottom up, and the pelvis is opposed to it: we observe it in a tilt when we look from above. With light lines and strokes, we show the boundaries of the turns of the drawn figures.
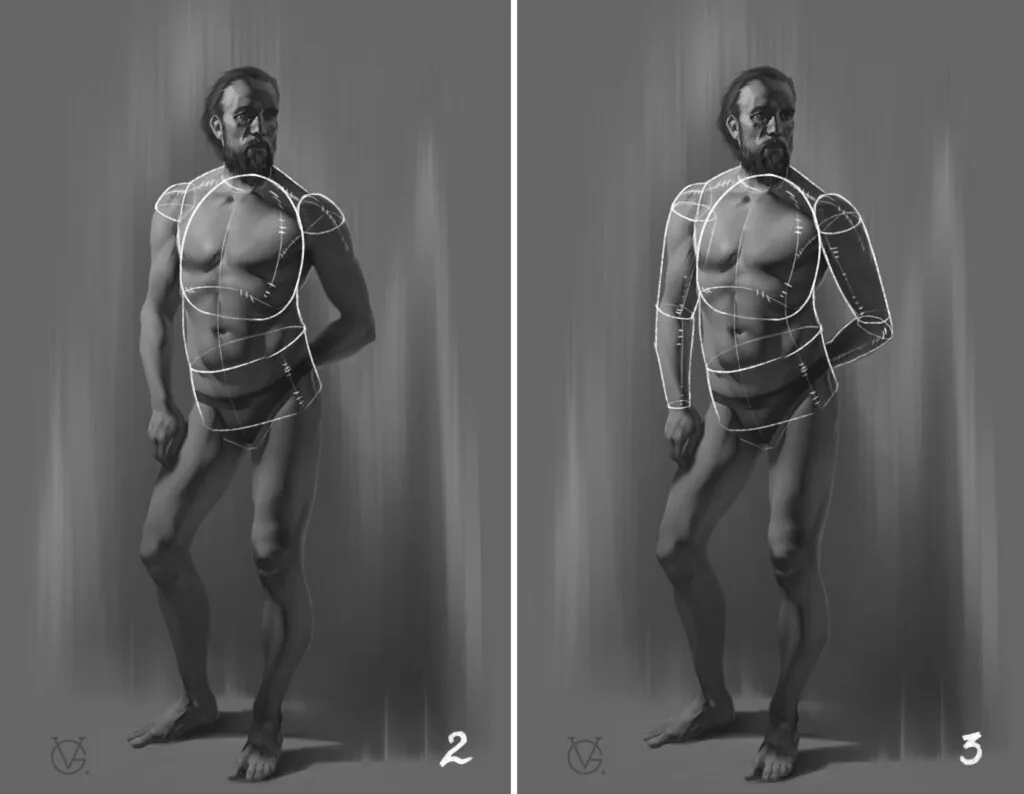
Step 2
The shoulder joints resemble hemispheres, similar to the shoulder pads of a knight's armor. Mark them with quarters of balls.
The pectoral muscles expand towards the shoulders, and the upper part of the chest is closed by the inclined contour of the shoulders, like the roof of a house. Add an “egg” of the chest with lines.
Step 3
Human arms are like cylinders. Without specifying the silhouette of the muscle relief, we mark the volume of the arms with simple geometry. The shoulder and forearm are almost equal in height, so our cylinders should be the same or similar in height.
Draw figures with bases to understand the tilt of the arms. Also, mark the boundaries of turns with light strokes.
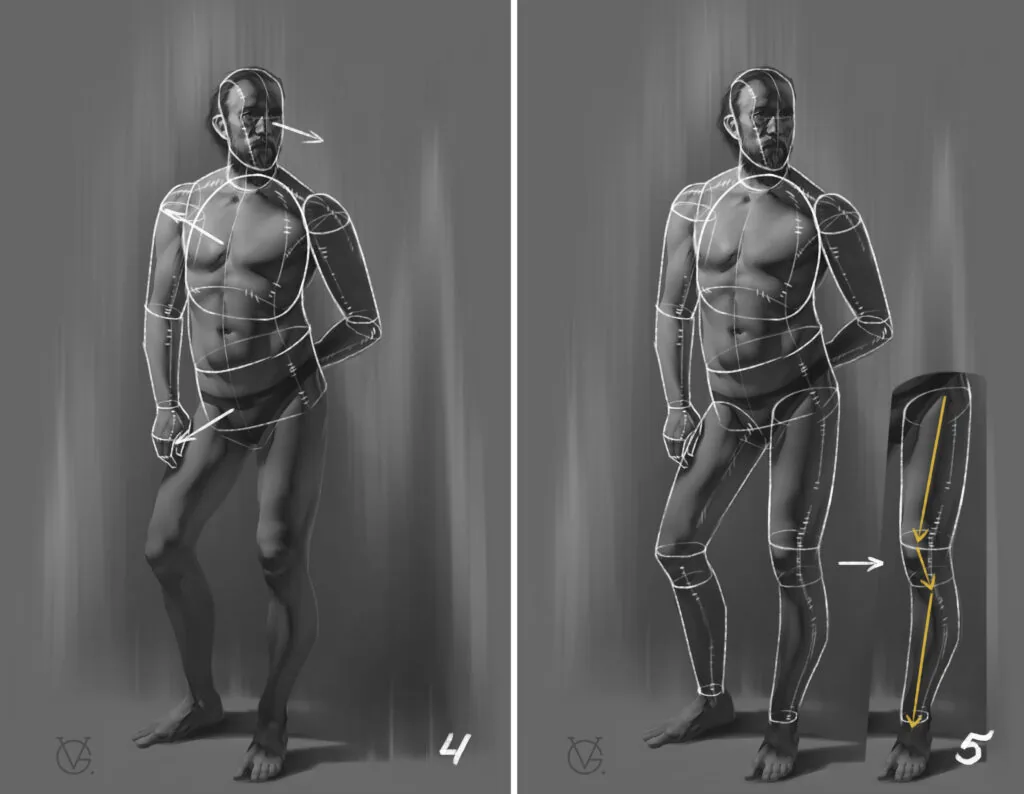
Step 4
Complete the left hand with a brush. The main thing is to mark the bends of the hand along the phalanges of the fingers with lines. Mark the neck as a cylinder, and put the head on it. The head resembles a bob, in which the cranial box is a sphere, and the end of the face on the chin has a rounded corner.
Also, mark the three-quarter turn along the face and temple with the edge — such a scheme resembles the head of a crash test dummy. Mark the axes on the face with light lines, put a semicircle of the ear. Thus, we show the direction of the head and see that the body and head look in different directions.
Step 5
The lower extremities are similar to the arms, divide them into three cylindrical sections. The cylinders of the thigh and shin are approximately equal: in the straightened state, they are rhymed in one direction, and the knee is tilted in the other direction.
Step 6
Imagine that the feet are like boots without the details of veins, bones, joints, and even better, imagine them in the form of flippers. Feet are inclined parallelepipeds that narrow towards the fingers. And the heels are rounded cubes attached to them.
Step 7
Add tone fill to all the found geometric volumes — such simplification reveals the main volumes of the figure, and the details do not interfere with perceiving the form цельно.
The human body: what is important to consider when drawing?
Related courses
All courses
from 3 900 ₽
-57%
Book illustration: The first page page
9 000 ₽3 900 ₽
Learn more

from 4 500 ₽
-55%
Character Concept: My First Hero
10 000 ₽4 500 ₽
Learn more

from 2 500 ₽
-50%
My first drawing
5 000 ₽2 500 ₽
Learn more
When drawing a person, there are several rules that will help you make a good drawing.
 Skeleton in dynamic movement, author: Eva Dmitrieva, course Drawing.
Figure of muscular structure, author: Azat Nurgaleev.
Skeleton in dynamic movement, author: Eva Dmitrieva, course Drawing.
Figure of muscular structure, author: Azat Nurgaleev.
 For example, a detailed analysis of the pelvis (author: Margarita Zaykina) or the belt of the lower extremities (author: Darya Sizova) allows a better understanding of the configuration of the selected forms. Graphic sheets were made in the Drawing course.
 If you remove the tonal and detailed drawing of the hands, arms, hair, and lower extremities, the girl's silhouette is still bright and spectacular. Author: Azat Nurgaleev.
 The lance копейщика from Evan Amudsen has an external silhouette that conveys the idea well, even when a gray fill is applied on top of the drawing.
 Step 2
We mark the center of the vertical axis — the figure's center will be at this point. We divide the upper and lower segments in half, marking them with light notches. The half of the lower segment is the knees, the half of the upper segment is the pectoral muscles.
All construction lines and sketch strokes are made very light. Draw them with the end of the lead — this way the imprint will be transparent, light, like haze.
Step 2
We mark the center of the vertical axis — the figure's center will be at this point. We divide the upper and lower segments in half, marking them with light notches. The half of the lower segment is the knees, the half of the upper segment is the pectoral muscles.
All construction lines and sketch strokes are made very light. Draw them with the end of the lead — this way the imprint will be transparent, light, like haze.
 Step 3
We mark the height of the head: in the contraposto position, the head fits 7.5 times into the height of a person. We compare the size of the head with the width of the pelvis — it will be right on the line of the center of the figure.
Step 4
We mark the placement of the feet with light lines. The main thing is that the heel of the supporting leg should be in the center of the vertical axis or touch it. If you move the foot too far, there will be a feeling of falling or a step in the figure that stands confidently in place. At the same stage, we mark the tilt of the pelvis, knees, and shoulders.
Step 3
We mark the height of the head: in the contraposto position, the head fits 7.5 times into the height of a person. We compare the size of the head with the width of the pelvis — it will be right on the line of the center of the figure.
Step 4
We mark the placement of the feet with light lines. The main thing is that the heel of the supporting leg should be in the center of the vertical axis or touch it. If you move the foot too far, there will be a feeling of falling or a step in the figure that stands confidently in place. At the same stage, we mark the tilt of the pelvis, knees, and shoulders.
 Step 5
We lay off two head sizes from the center of the figure down and we will get to the lower part of the knee. We mark the same distance from the heel base up — this is how we will find the height of the knee joint.
Since the right leg is not supporting and slightly bent, its knee will be lower than the left one. We tilt the found axes parallel to the tilt of the pelvis.
Step 6
We mark the volumes of the torso, chest, and head with simple light lines.
Step 7
On a new layer or on tracing paper, we mark the S-shaped curvature of the spine, the lines of the construction of the arms and legs. We mark the joint elements with circles, and the chest and cylindrical volume of the pelvis with an ellipse.
Step 5
We lay off two head sizes from the center of the figure down and we will get to the lower part of the knee. We mark the same distance from the heel base up — this is how we will find the height of the knee joint.
Since the right leg is not supporting and slightly bent, its knee will be lower than the left one. We tilt the found axes parallel to the tilt of the pelvis.
Step 6
We mark the volumes of the torso, chest, and head with simple light lines.
Step 7
On a new layer or on tracing paper, we mark the S-shaped curvature of the spine, the lines of the construction of the arms and legs. We mark the joint elements with circles, and the chest and cylindrical volume of the pelvis with an ellipse.
 Step 8
Let's move on to the torso. We clarify the shape of the chest and mark the volumes of the shoulders with arcs. We make sure that they are proportionally wide to the pelvis.
We mark the pectoral muscles and abdominal muscles, rhyming them with each other with curved strokes. At this stage, we begin to draw with the thin end of the pencil, less shading, because we need accurate, beautiful lines.
Step 9
We move on to the lower extremities. We divide the legs into three parts: thigh, knees, shin. We make sure that the knee joints are the same size and are on the same axes (we check with arcs).
We build ellipses into the upper part of the shin — they show the volume of the protruding muscles. We mark the fly in the groin area, and on the thigh — the turn line with four arcs according to the shape of the muscles. We make sure that the corners between these arcs are on the same axis.
Step 8
Let's move on to the torso. We clarify the shape of the chest and mark the volumes of the shoulders with arcs. We make sure that they are proportionally wide to the pelvis.
We mark the pectoral muscles and abdominal muscles, rhyming them with each other with curved strokes. At this stage, we begin to draw with the thin end of the pencil, less shading, because we need accurate, beautiful lines.
Step 9
We move on to the lower extremities. We divide the legs into three parts: thigh, knees, shin. We make sure that the knee joints are the same size and are on the same axes (we check with arcs).
We build ellipses into the upper part of the shin — they show the volume of the protruding muscles. We mark the fly in the groin area, and on the thigh — the turn line with four arcs according to the shape of the muscles. We make sure that the corners between these arcs are on the same axis.
 Step 10
We add the volume of the head, feet, and hands with simple geometry. On the hands, we mark the volume of the muscles of the shoulder joint and shoulder with rounded shapes.
Step 11
We draw the edges of the muscles with light turning strokes. We clarify the contour of the silhouette.
Step 10
We add the volume of the head, feet, and hands with simple geometry. On the hands, we mark the volume of the muscles of the shoulder joint and shoulder with rounded shapes.
Step 11
We draw the edges of the muscles with light turning strokes. We clarify the contour of the silhouette.
 Step 12
We wrap the pelvis of our hero with drapery. We add him portrait features, hairstyle, and beard.
We shade the legs, arm, and lower chest with arc-shaped strokes. We put strokes according to the shape of the section, we shade with the side of the pencil.
Step 13
We add contrasts along the boundaries of the light and shadow and falling shadows. We erase all the lines of additional construction, we put the final lines along the silhouettes of the muscles, folds, and joints.
Step 12
We wrap the pelvis of our hero with drapery. We add him portrait features, hairstyle, and beard.
We shade the legs, arm, and lower chest with arc-shaped strokes. We put strokes according to the shape of the section, we shade with the side of the pencil.
Step 13
We add contrasts along the boundaries of the light and shadow and falling shadows. We erase all the lines of additional construction, we put the final lines along the silhouettes of the muscles, folds, and joints.
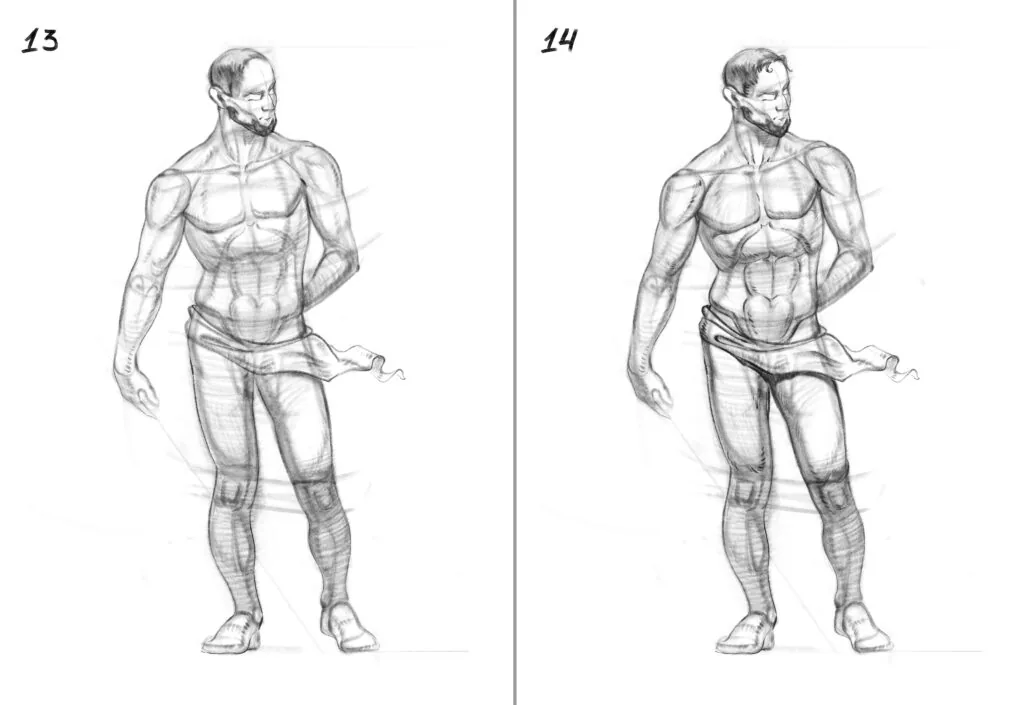 Step 14
We shade the background behind the figure with light strokes, darken the supporting leg, left arm, abdomen, and pelvis, right knee, as the figure is darker at the bottom. We put a spear in the hand to create an interesting image.
Voila! We have succeeded in drawing a male figure in full length.
Step 14
We shade the background behind the figure with light strokes, darken the supporting leg, left arm, abdomen, and pelvis, right knee, as the figure is darker at the bottom. We put a spear in the hand to create an interesting image.
Voila! We have succeeded in drawing a male figure in full length.
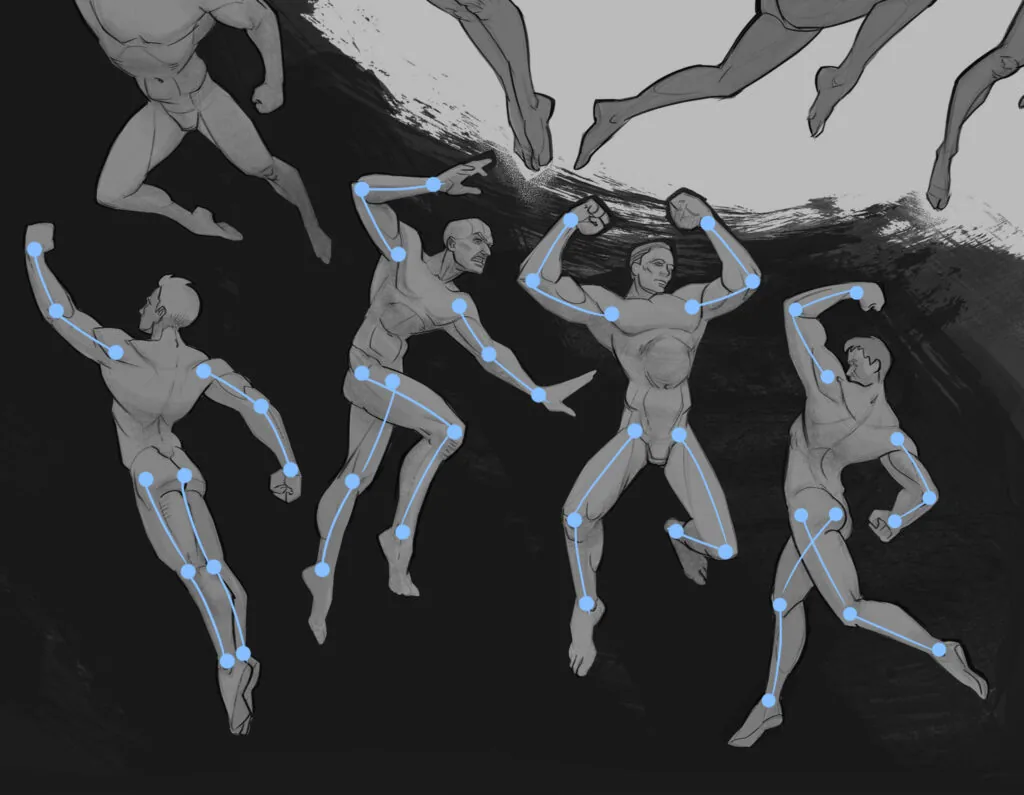 On the sketches of the student online course Figure in dynamics Kirill Plotnikov, male figures are depicted in very dynamic poses. Additional blue lines help to see the similarity.
When drawing, use similar axes for the limbs and torso. Drawing such simple linear structures helps to understand the movement of the figure and keep the symmetry.
Start drawing the figure with simple skeletal structures or with geometric shapes, do not draw muscles, complex changes in shape, and the like — in such a simplified sketch it is more effective to convey the movement and proportions of the figure.
On the sketches of the student online course Figure in dynamics Kirill Plotnikov, male figures are depicted in very dynamic poses. Additional blue lines help to see the similarity.
When drawing, use similar axes for the limbs and torso. Drawing such simple linear structures helps to understand the movement of the figure and keep the symmetry.
Start drawing the figure with simple skeletal structures or with geometric shapes, do not draw muscles, complex changes in shape, and the like — in such a simplified sketch it is more effective to convey the movement and proportions of the figure.
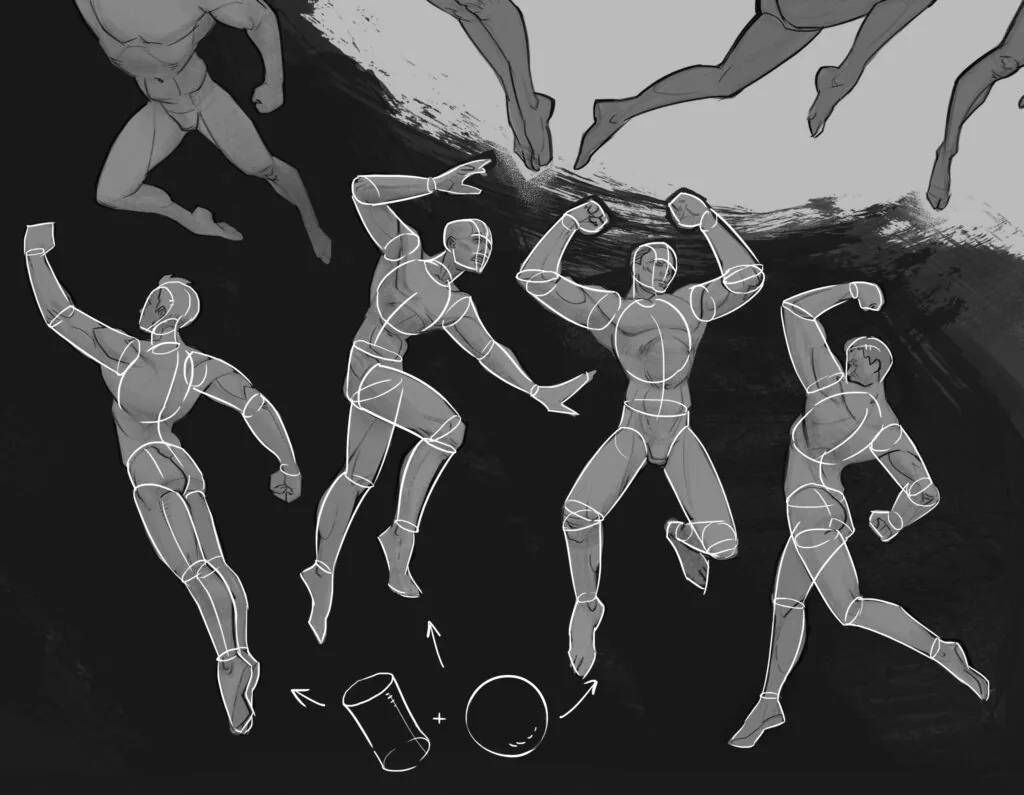 Let's imagine the body in the form of cylinders and spheres, like Ikea dolls. Author: Kirill Plotnikov, online course Figure in dynamics.
After this stage, clarify the lines of the figure's silhouette and details of the muscle mass on top. After practicing drawing from a geometric shape, it will be easier for you to draw a similar image without construction. But for this you need to practice.
Let's imagine the body in the form of cylinders and spheres, like Ikea dolls. Author: Kirill Plotnikov, online course Figure in dynamics.
After this stage, clarify the lines of the figure's silhouette and details of the muscle mass on top. After practicing drawing from a geometric shape, it will be easier for you to draw a similar image without construction. But for this you need to practice.
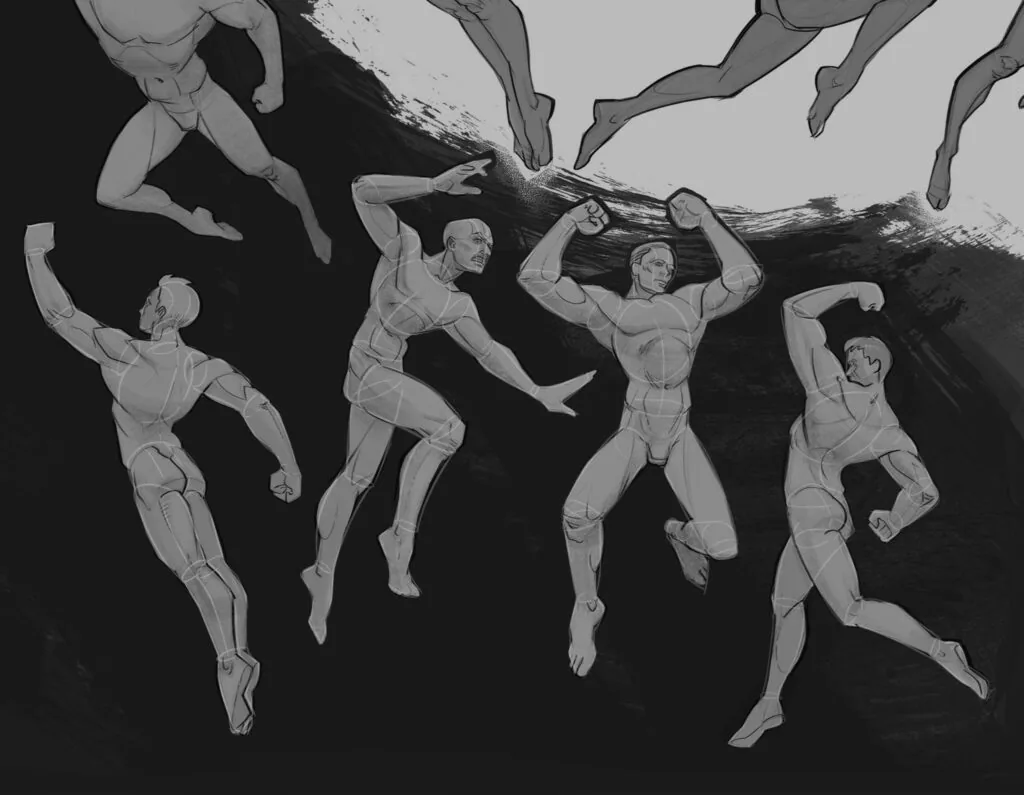 Author: Kirill Plotnikov, online course Figure in dynamics.
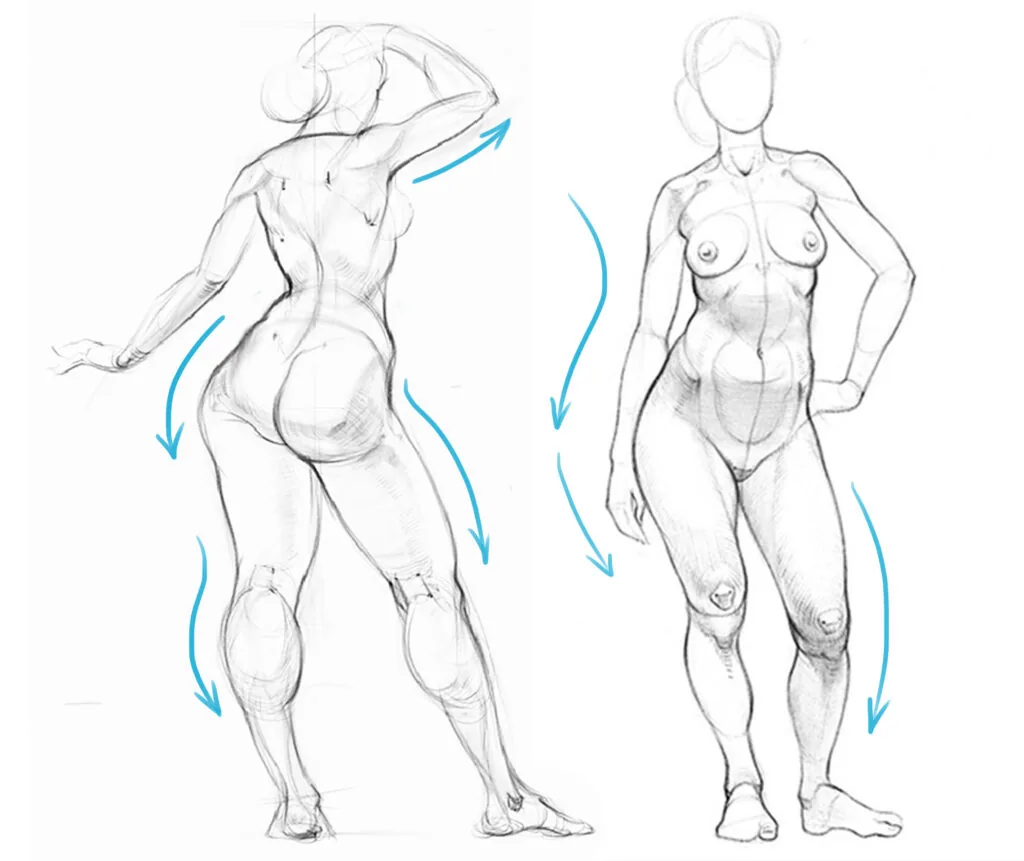
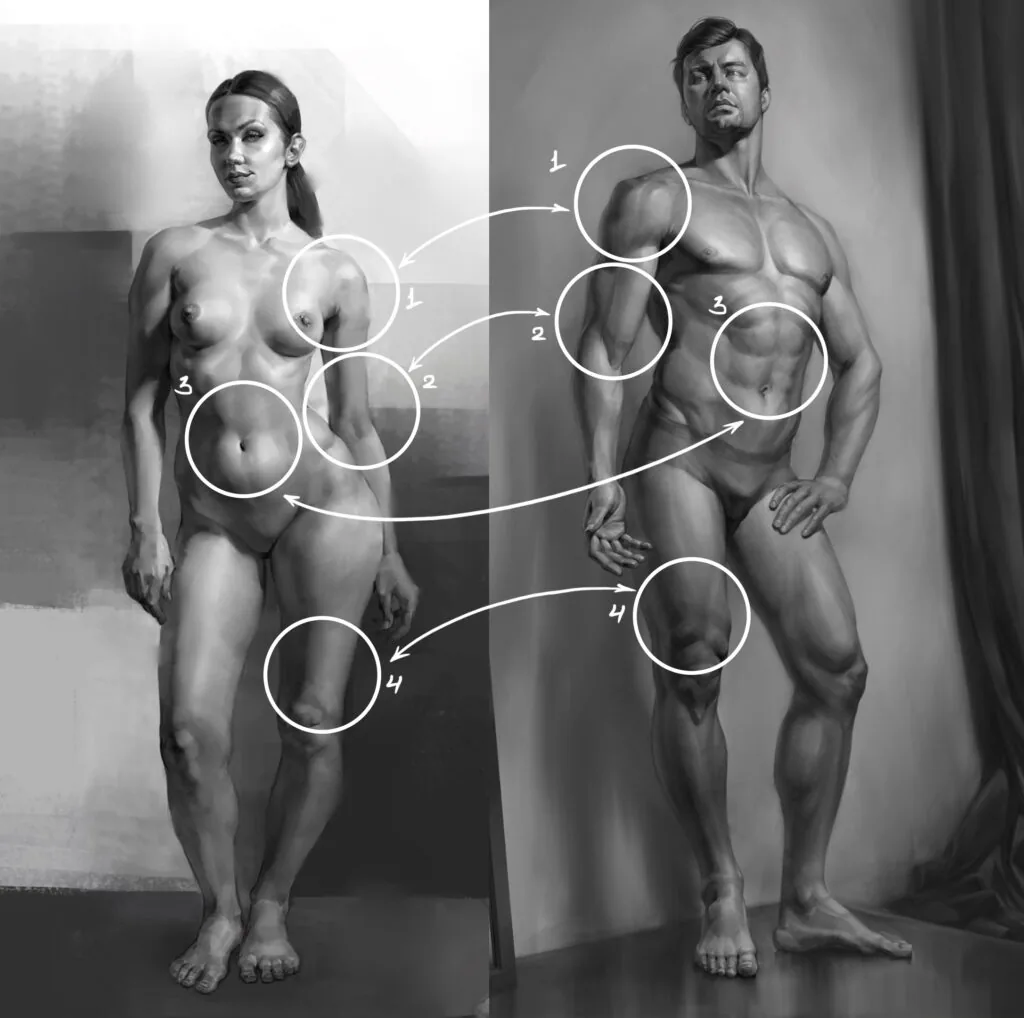
 Let's study the figures in detail by departments. Having marked the silhouette, the volume of the pelvis and the chest with a white line, we can find a pattern: the female silhouette is more graceful, a deeper waistline forms between the chest and the pelvis, and the body expands in the pelvic area. Thus, the female torso resembles a triangle with a base at the bottom.
The male figure has a more straight waist, and the silhouette widens at the top: from the pelvis to the shoulders. The male torso looks like an inverted triangle.
There is also a noticeable difference between the volume of the chest and the pelvis in women and men. Women have a visually larger pelvic area, while men, on the contrary, have a larger chest.
Let's study the figures in detail by departments. Having marked the silhouette, the volume of the pelvis and the chest with a white line, we can find a pattern: the female silhouette is more graceful, a deeper waistline forms between the chest and the pelvis, and the body expands in the pelvic area. Thus, the female torso resembles a triangle with a base at the bottom.
The male figure has a more straight waist, and the silhouette widens at the top: from the pelvis to the shoulders. The male torso looks like an inverted triangle.
There is also a noticeable difference between the volume of the chest and the pelvis in women and men. Women have a visually larger pelvic area, while men, on the contrary, have a larger chest.
 In the female figure, the width of the shoulders and the width of the hips — similar relationship. In the male figure, — the width of the shoulders is longer than the width of the pelvis. условно говоря, if we mark the shoulder joints and the trochanter (femoral joint) with dots, connect them with lines, then we will see two different figures in the models: a rectangle is formed in a woman, and a trapezoid is formed in a man.
 The lower extremities also differ: the female leg has a more curved silhouette, in the pelvic area the thigh has more mass. Gradually, the girth of the leg becomes thinner as it descends to the foot.
The male thigh does not have such a large rounded mass in the pelvic area, and, accordingly, it has a more stable difference in width in the hip, knee and ankle area. The width of the pelvis in women is greater than in men, so we can observe such different volume differences.
The lower extremities also differ: the female leg has a more curved silhouette, in the pelvic area the thigh has more mass. Gradually, the girth of the leg becomes thinner as it descends to the foot.
The male thigh does not have such a large rounded mass in the pelvic area, and, accordingly, it has a more stable difference in width in the hip, knee and ankle area. The width of the pelvis in women is greater than in men, so we can observe such different volume differences.
 Let's pay attention to the joints: the articular joints in the male figure are larger, more massive, they are pronounced and have more relief bone and muscle structures. The female body in these areas is more plastic, without sharp protrusions.
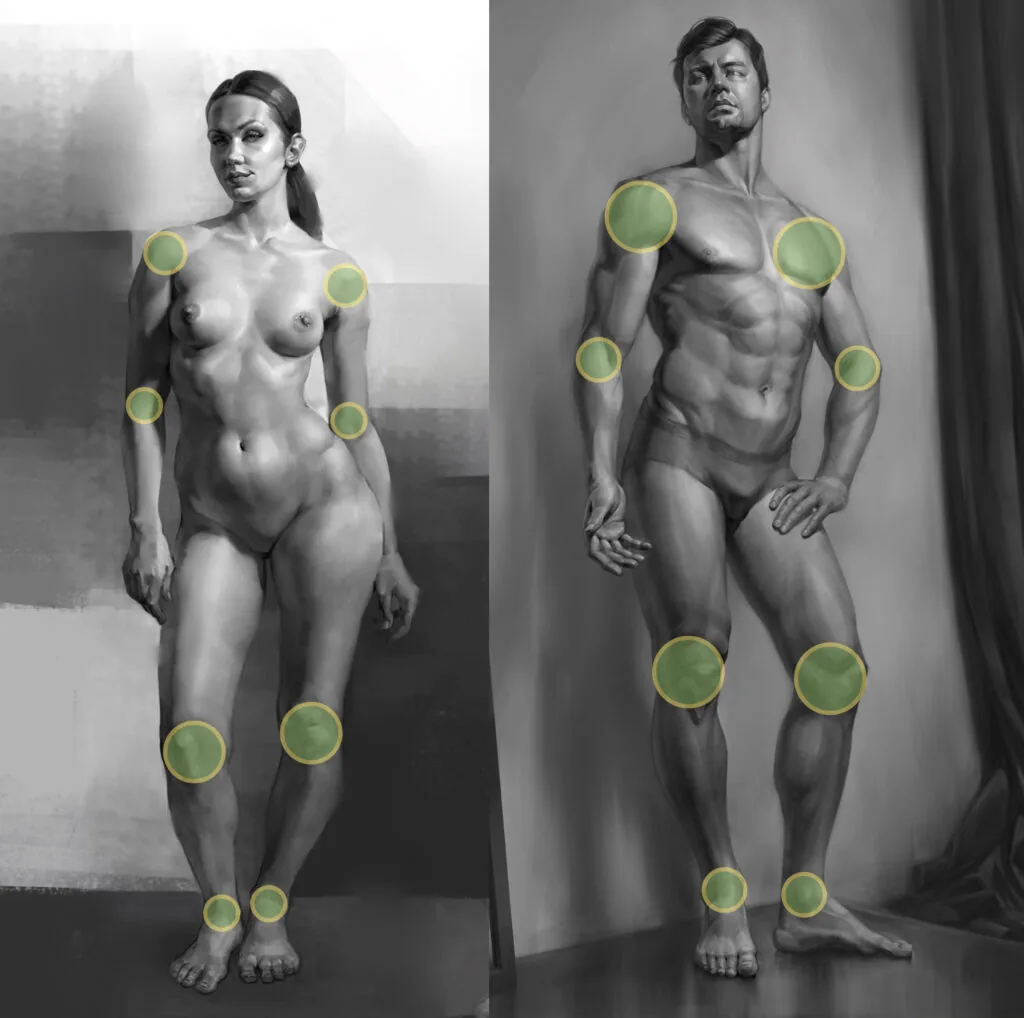 Relief and volume of the muscles are also different. In the male figure, the muscular structures are very textured and clearly visible. For example, pay attention to the clearly readable bundles of shoulder muscles (1), the active volume of the triceps and biceps (2), the relief cubes of the press (3), noticeable structures of the thigh muscles (4). The pectoral muscles in girls are hidden under the bust, while in men they are clearly visible.
Of course, a girl can have a рельефный muscle frame, and a man can have a full and soft appearance. But we are considering examples of figures on which the differences are clearly visible.
Relief and volume of the muscles are also different. In the male figure, the muscular structures are very textured and clearly visible. For example, pay attention to the clearly readable bundles of shoulder muscles (1), the active volume of the triceps and biceps (2), the relief cubes of the press (3), noticeable structures of the thigh muscles (4). The pectoral muscles in girls are hidden under the bust, while in men they are clearly visible.
Of course, a girl can have a рельефный muscle frame, and a man can have a full and soft appearance. But we are considering examples of figures on which the differences are clearly visible.
 But despite these differences, the basic rules of anatomy do not change — do not forget about this and do not violate the proportions. The main difference — in the silhouette and relief of the body contour. Imagine that you have two tangerines of the same size in front of you: one — with a smooth peel, the other — with pimples. The difference is only in the exterior, but not in the essence of the objects.
On the YouTube channel Skills Up School there are detailed free lessons on drawing the female and male figures front and back. It is very useful to study a person from all sides — you will understand the features of anatomy from different angles much better. Be sure to watch them:
But despite these differences, the basic rules of anatomy do not change — do not forget about this and do not violate the proportions. The main difference — in the silhouette and relief of the body contour. Imagine that you have two tangerines of the same size in front of you: one — with a smooth peel, the other — with pimples. The difference is only in the exterior, but not in the essence of the objects.
On the YouTube channel Skills Up School there are detailed free lessons on drawing the female and male figures front and back. It is very useful to study a person from all sides — you will understand the features of anatomy from different angles much better. Be sure to watch them:
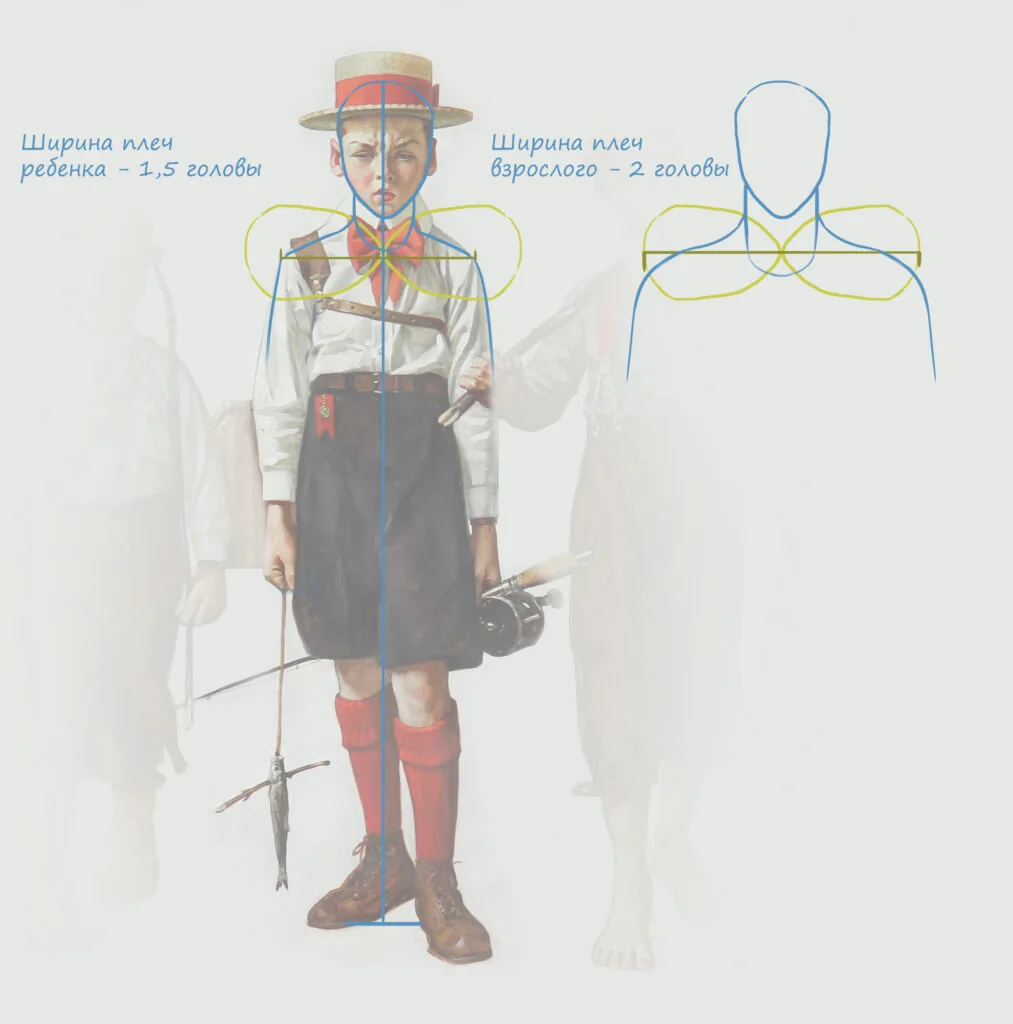
 Also in a child, the emphasis on the size of the head is clearly visible when comparing it with the shoulders. The width of an adult's shoulders in a frontal position is approximately equal to two head sizes, while in a child the shoulders take up about 1.5 head sizes.
 A child's figure is characterized by a slight puffiness or, conversely, frailty — it is concentrated in the torso, so as children grow, they become very slender, as their resource reserve goes into growth.
 Clothing can be divided into two types:
 Step 4
On top of the geometric shapes we draw clothes with folds according to the figure. We draw the folds with small strokes, checkmarks and loops. The bends of the clothes add irregularities to the relief on the silhouette of the figure.
Step 5
Erase the additional construction lines from the geometric shapes or turn off the layer with them.
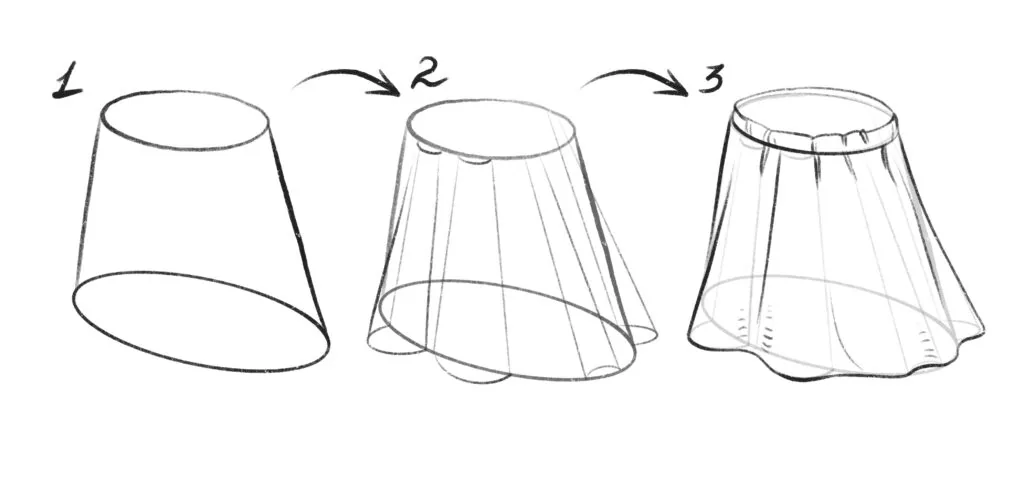
If you want to dress a figure in a dress, tunic or skirt, then the clothes will be more loose and less dependent on the contours of the body. The folds of the fabric in this case will look not like small creases, checkmarks or loops, but like vertical longitudinal cones or cylinders.
Let's draw a skirt. First, we draw a truncated cone with light strokes (1), then we designate the folds with cylinders (2). We erase the bright construction lines so that they become barely noticeable, and with smooth lines we designate the rounded folds (3). At the top in the belt area we add small strokes to get a «crumpled» fabric. With several rotary strokes we designate the volume of fabric turns.
Step 4
On top of the geometric shapes we draw clothes with folds according to the figure. We draw the folds with small strokes, checkmarks and loops. The bends of the clothes add irregularities to the relief on the silhouette of the figure.
Step 5
Erase the additional construction lines from the geometric shapes or turn off the layer with them.
If you want to dress a figure in a dress, tunic or skirt, then the clothes will be more loose and less dependent on the contours of the body. The folds of the fabric in this case will look not like small creases, checkmarks or loops, but like vertical longitudinal cones or cylinders.
Let's draw a skirt. First, we draw a truncated cone with light strokes (1), then we designate the folds with cylinders (2). We erase the bright construction lines so that they become barely noticeable, and with smooth lines we designate the rounded folds (3). At the top in the belt area we add small strokes to get a «crumpled» fabric. With several rotary strokes we designate the volume of fabric turns.
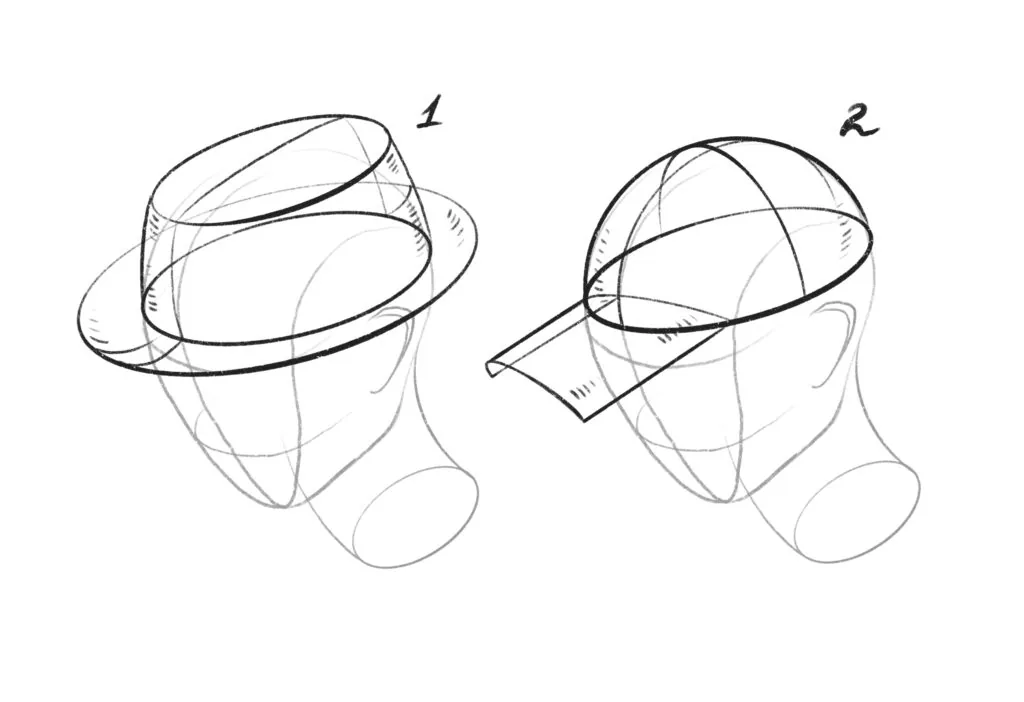
 Do not forget about such an important part of clothing as a headdress: hats, panamas, caps and hats are drawn according to the same principle as clothes. They repeat the shape of the head, so in the silhouette of the hat we will always see a cylinder (1), a sphere (2) or their combination.
 Step 6
Add tone to the pants and sweater. With the side of the pencil or a wider brush size of the stylus, we shade the volume of the arms, torso, legs. We create a shaded tone according to the shape of the geometric shapes that we designated earlier. We leave a small highlight at the edges of the figure — this is a reflex. We draw a line with a pencil according to the shape of the folds, thereby setting their volume.
Step 6
Add tone to the pants and sweater. With the side of the pencil or a wider brush size of the stylus, we shade the volume of the arms, torso, legs. We create a shaded tone according to the shape of the geometric shapes that we designated earlier. We leave a small highlight at the edges of the figure — this is a reflex. We draw a line with a pencil according to the shape of the folds, thereby setting their volume.
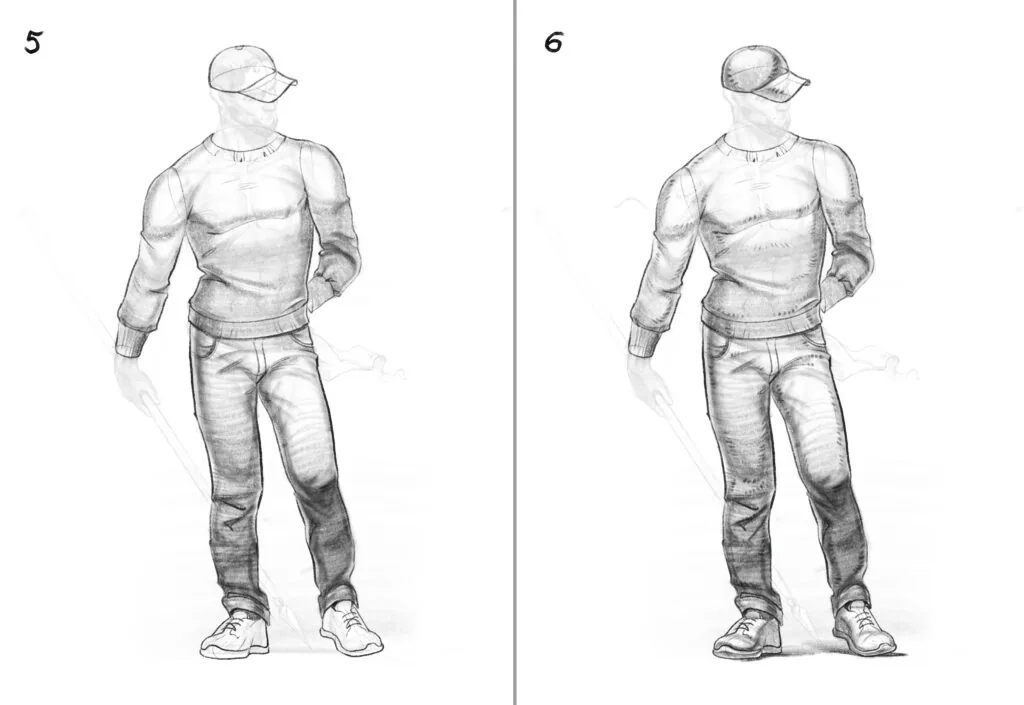 Step 7
Add tone to the cap and sneakers. We remember that clothes are a repetition of the body, which is based on geometry. Therefore, the shadows on the cap lie according to the shape of the half of the sphere, and on the shoes, like on parallelepipeds.
At this stage, we complete the drawing of the figure in clothes with light strokes indicating the turns of the folds. We combine three to five strokes into a line.
So, we managed to dress the figure.
Step 7
Add tone to the cap and sneakers. We remember that clothes are a repetition of the body, which is based on geometry. Therefore, the shadows on the cap lie according to the shape of the half of the sphere, and on the shoes, like on parallelepipeds.
At this stage, we complete the drawing of the figure in clothes with light strokes indicating the turns of the folds. We combine three to five strokes into a line.
So, we managed to dress the figure.
 If you choose a sketch, then it will be enough to designate the volume of clothes on the body with a line and dashes. Use hints, with just a couple of movements indicate the reliefs of the fabric. With light shadows or by increasing the thickness of the line, you can emphasize the folds on the clothes.
 On Matt Rhodes' sketches, the folds on the clothes are indicated with simple strokes and only in some places with dark fill.
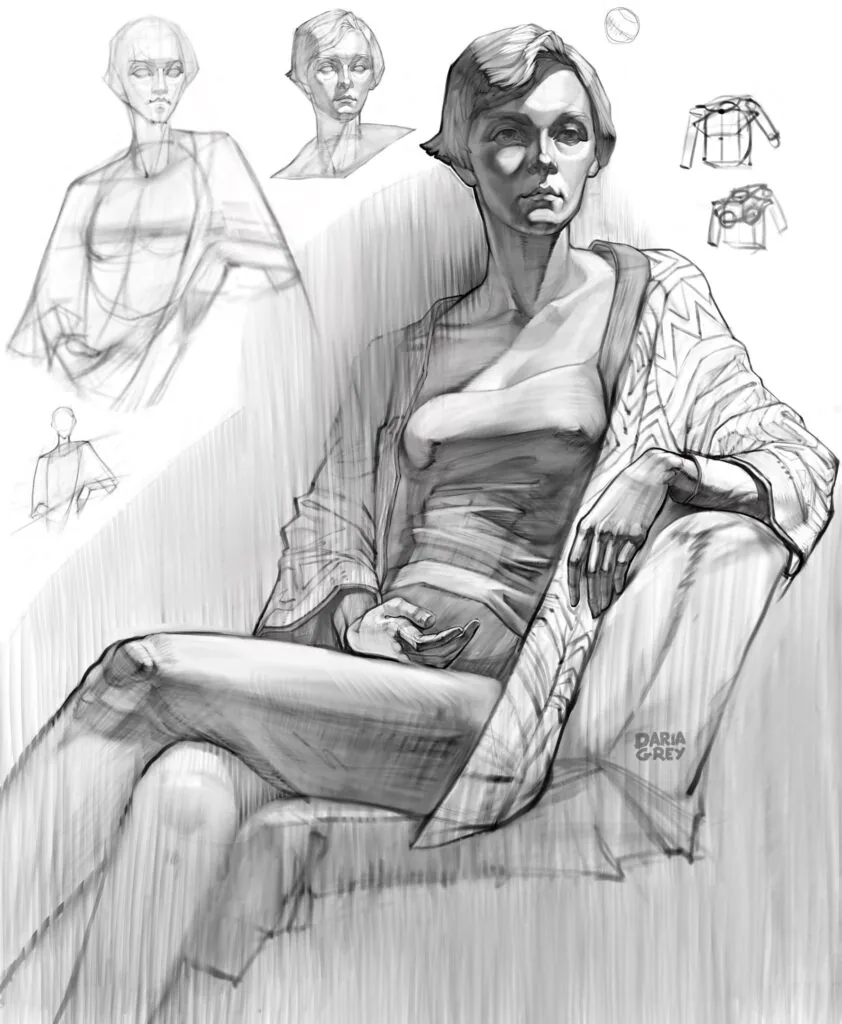
In a short drawing there is a little more time to explore the subtleties of the volumes of clothes. With the help of tone and hatching, we explore the differences in folds, do not forget that clothes — a doubler of the body, and it is necessary to show with tone analysis the volume of the body, and as a cherry on the cake — the folds of the clothes.
On Matt Rhodes' sketches, the folds on the clothes are indicated with simple strokes and only in some places with dark fill.
In a short drawing there is a little more time to explore the subtleties of the volumes of clothes. With the help of tone and hatching, we explore the differences in folds, do not forget that clothes — a doubler of the body, and it is necessary to show with tone analysis the volume of the body, and as a cherry on the cake — the folds of the clothes.
 There are many stylistic branches in the field of anime drawing. They differ in the characteristics of shaping, proximity to or distance from human anatomy, color palette, detail complexity, visual paraphernalia and effects. However, it is always easy to distinguish anime from Soviet animation or the classical school of drawing.
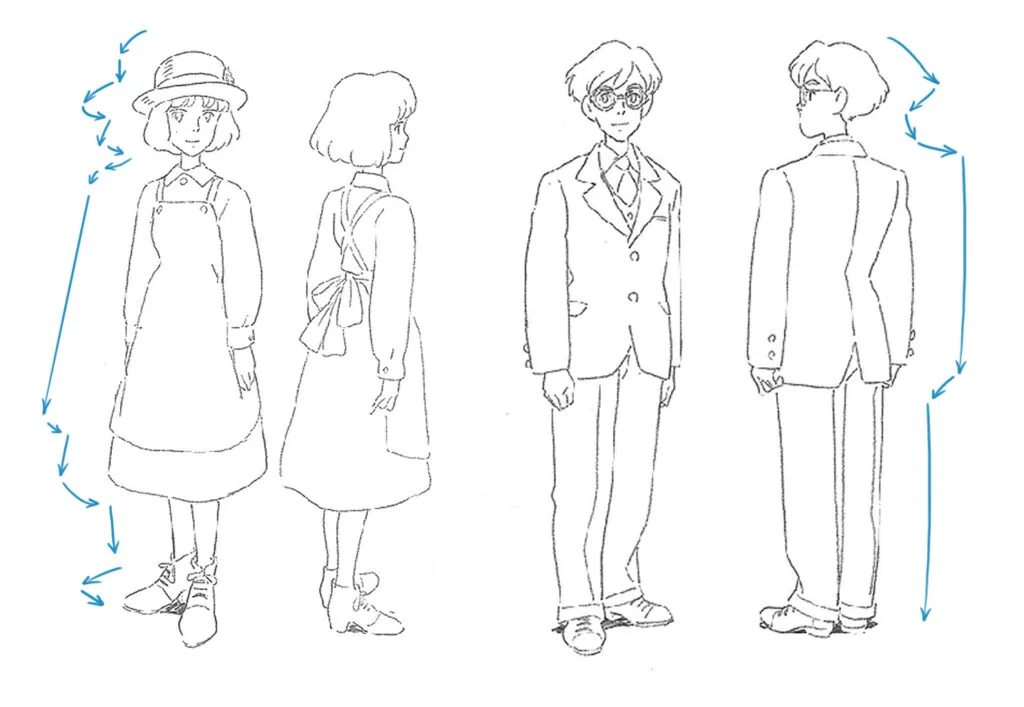
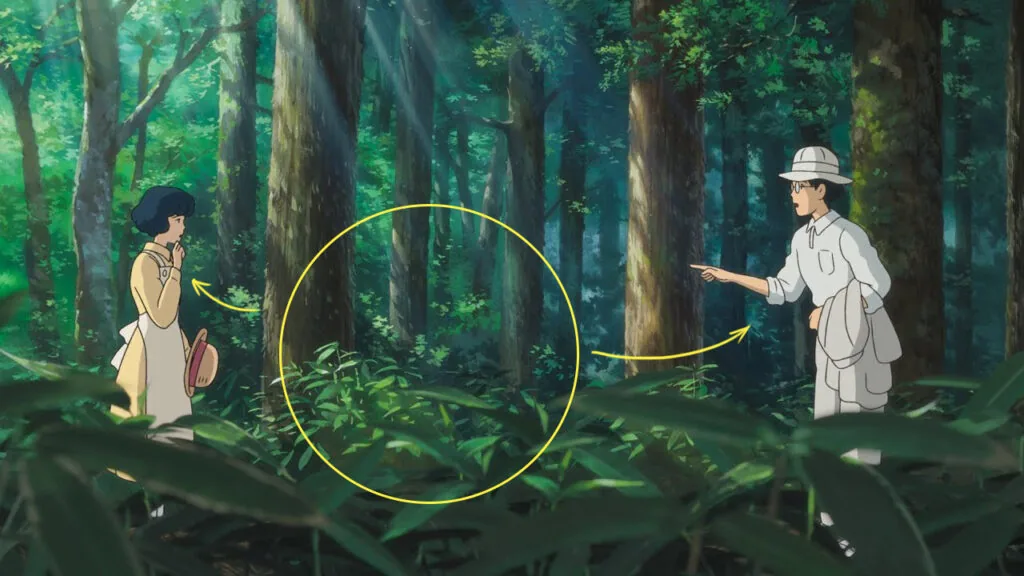
Let's analyze the basic rules for drawing a person in the style of anime using the example of characters from the cartoons of Studio Ghibli.
There are many stylistic branches in the field of anime drawing. They differ in the characteristics of shaping, proximity to or distance from human anatomy, color palette, detail complexity, visual paraphernalia and effects. However, it is always easy to distinguish anime from Soviet animation or the classical school of drawing.
Let's analyze the basic rules for drawing a person in the style of anime using the example of characters from the cartoons of Studio Ghibli.

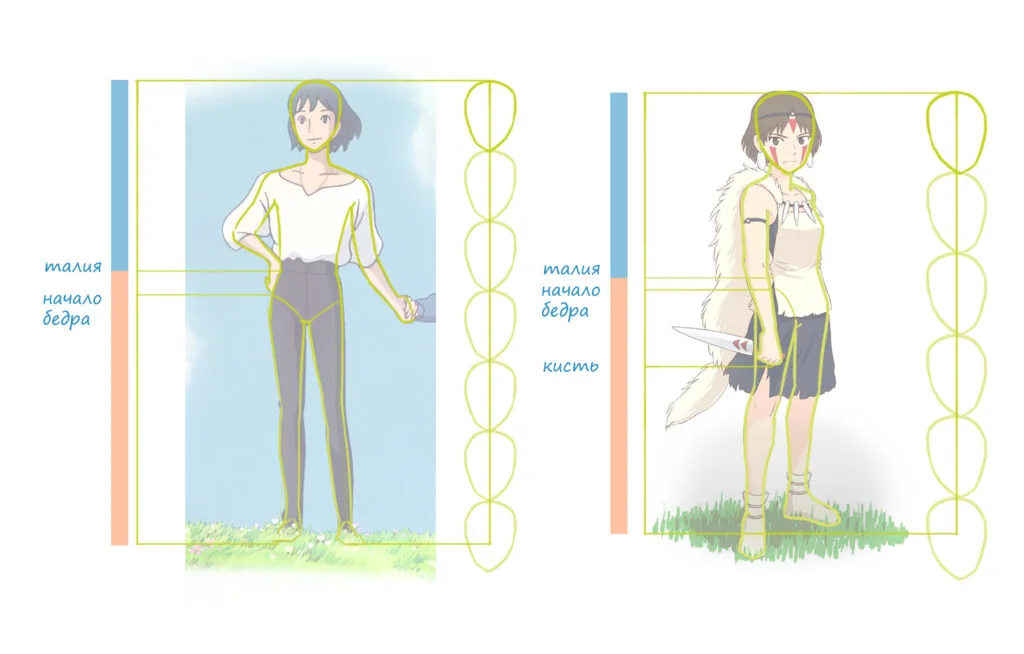
 Men have either equal shoulder girdle and pelvis, or wider shoulders. Howl from the cartoon "Howl's Moving Castle" has wide shoulders that are wider than the pelvis. His silhouette thins out towards the bottom of his legs. Thanks to the elongated legs, this effect is enhanced. The head fits 6.5 times, while for an ordinary person it is — eight times.
The silhouette of the girl San (the main character of "Princess Mononoke"), unlike Chihiro, expands in the hips and chest. Also, the size of the head fits an uncanonical number of times in the height of the body — 5.5.
Men have either equal shoulder girdle and pelvis, or wider shoulders. Howl from the cartoon "Howl's Moving Castle" has wide shoulders that are wider than the pelvis. His silhouette thins out towards the bottom of his legs. Thanks to the elongated legs, this effect is enhanced. The head fits 6.5 times, while for an ordinary person it is — eight times.
The silhouette of the girl San (the main character of "Princess Mononoke"), unlike Chihiro, expands in the hips and chest. Also, the size of the head fits an uncanonical number of times in the height of the body — 5.5.
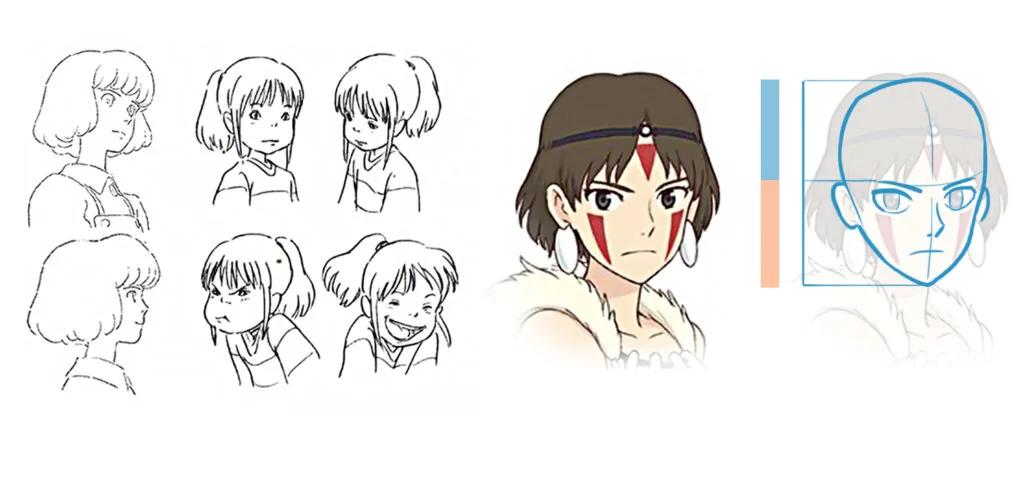 Even within the same studio, we see slight differences in the drawing and proportions of the width of the bodies, the ratio of the height of the figure to the height of the head, the style of drawing faces and limbs. But the basic techniques remain similar.
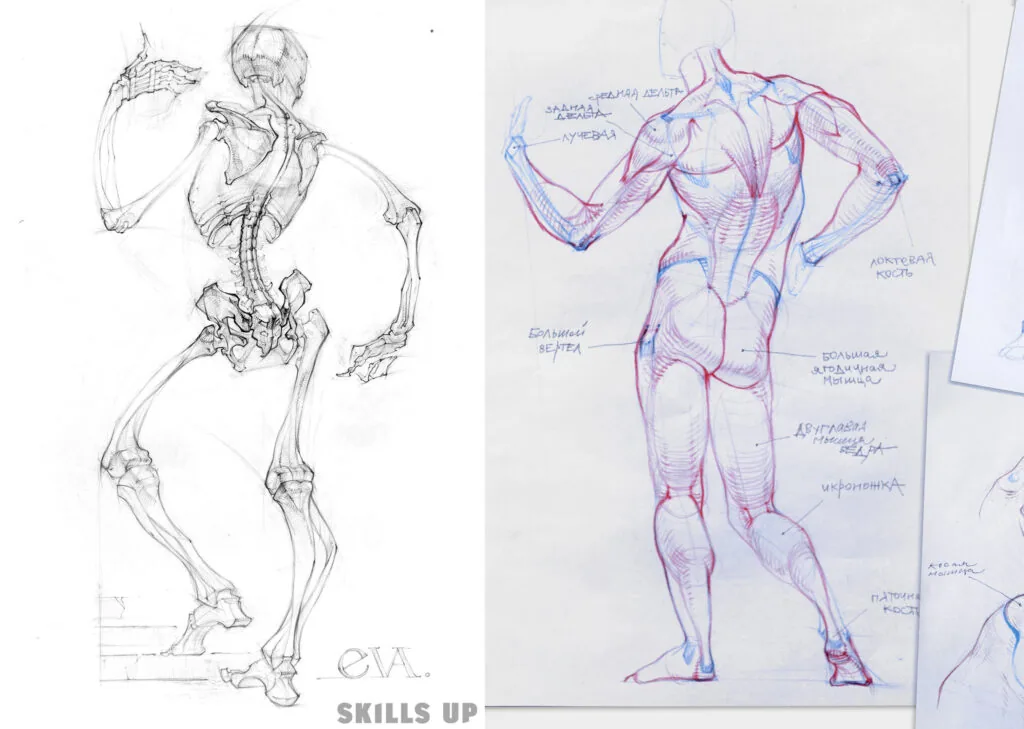
- Study anatomy, do not forget about proportions. It is advisable to study each part of the body and the muscle frame system in detail. It is useful to disassemble the structure of the skeleton and muscles to understand the relationship between the internal structure and the external one.
Skeleton in dynamic movement, author: Eva Dmitrieva, course Drawing.
Figure of muscular structure, author: Azat Nurgaleev.
- Study the hands, feet, head, and complex articular joints separately. Do not strive to draw a full-length person right away: even old masters created analytical sketches and etudes of a person in parts.
For example, a detailed analysis of the pelvis (author: Margarita Zaykina) or the belt of the lower extremities (author: Darya Sizova) allows a better understanding of the configuration of the selected forms. Graphic sheets were made in the Drawing course.
- Draw step by step. It is important when drawing a figure to study all parts of the body with the same force, do not leave any areas unfinished.
- The figure should be integral. Do not get carried away with one detail, for example, the face. Accents are added when the drawing is completed.
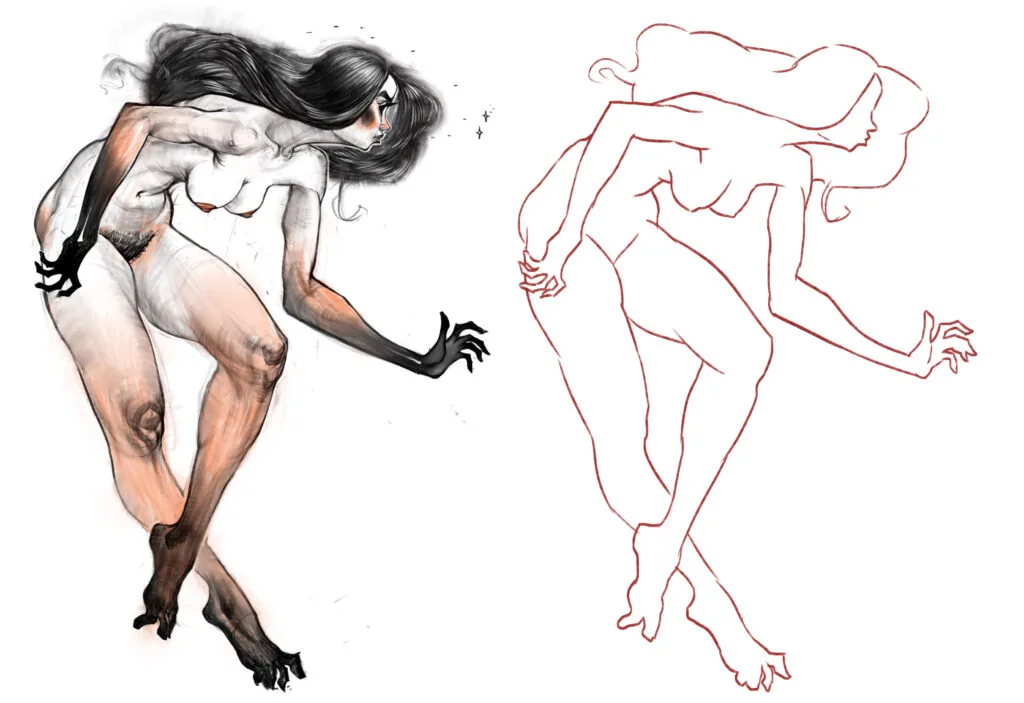
- Not only tone, stroke, or color elaboration is important. The outer contour should also be clear, attractive and create an expressive silhouette for the figure.
If you remove the tonal and detailed drawing of the hands, arms, hair, and lower extremities, the girl's silhouette is still bright and spectacular. Author: Azat Nurgaleev.
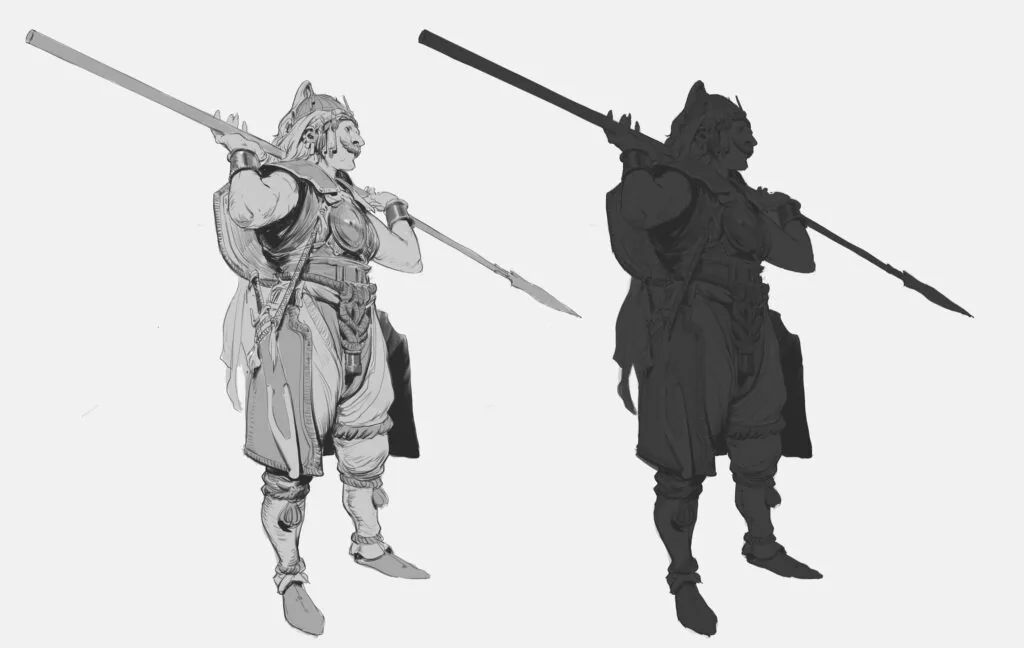
- Keep the idea: the pose and movement, clothing, and attributes should make it clear what kind of person we are dealing with, what gender, age, or, say, profession they have. Visually imagine your silhouette cut out of paper or place tracing paper on top of the drawing and trace the contour of the figure — this way it is easy to check the readability of the outer body line.
The lance копейщика from Evan Amudsen has an external silhouette that conveys the idea well, even when a gray fill is applied on top of the drawing.
Step-by-step drawing of a person standing
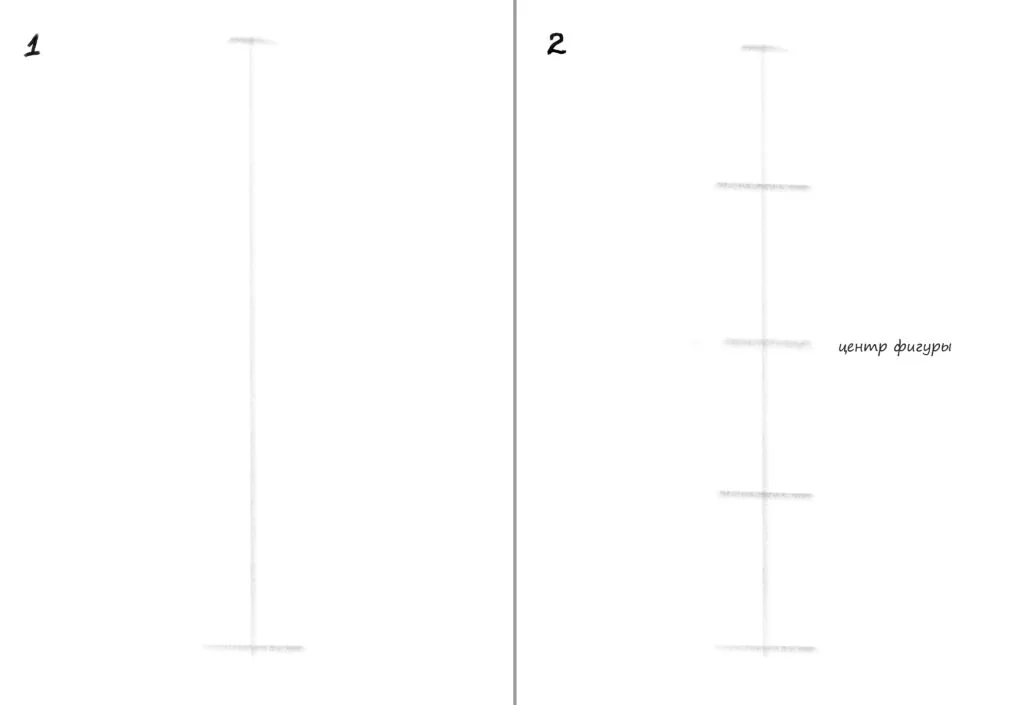
Let's choose a male figure in contraposto for step-by-step drawing — this is a position in which a person stands with the weight of the body transferred to one leg: the second leg is in a relaxed half-bent state. Thanks to this, the figure acquires hidden dynamics and a more plastic silhouette. To draw a figure, take a graphite pencil HB so as not to over-blacken the drawing, or use brushes that imitate a pencil. Step 1 We mark the center of the sheet with an axis — it will help to preserve the composition of the sheet and not to move too much to the left or right. We mark the boundaries on top and bottom in which the figure will exist. We leave a slightly larger indent at the bottom.
Step 2
We mark the center of the vertical axis — the figure's center will be at this point. We divide the upper and lower segments in half, marking them with light notches. The half of the lower segment is the knees, the half of the upper segment is the pectoral muscles.
All construction lines and sketch strokes are made very light. Draw them with the end of the lead — this way the imprint will be transparent, light, like haze.
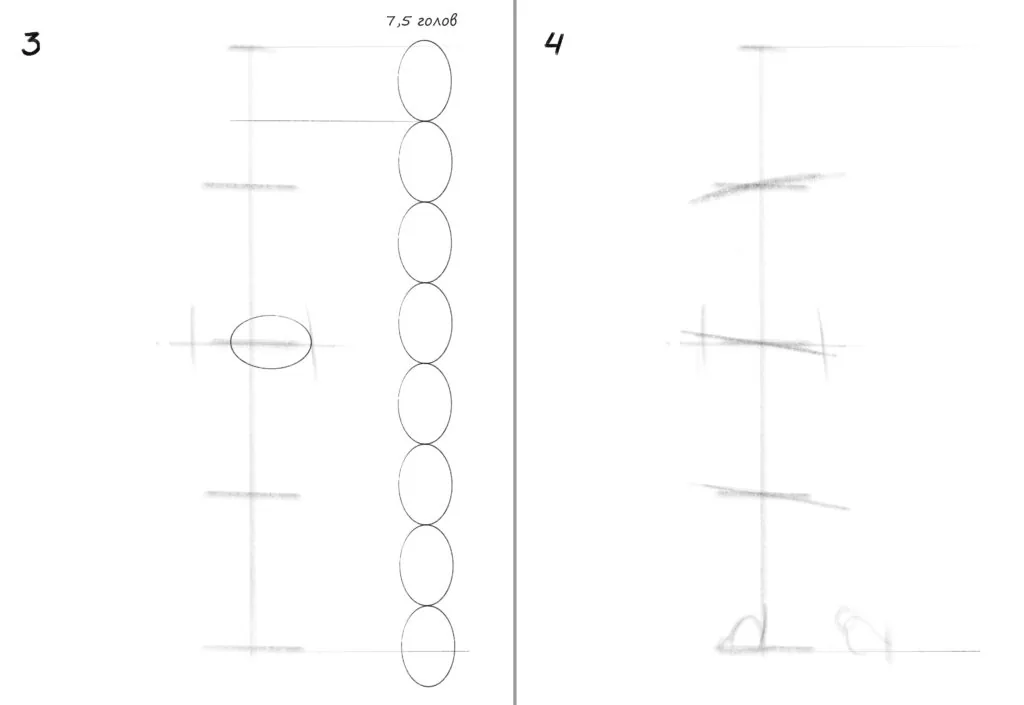
Step 3
We mark the height of the head: in the contraposto position, the head fits 7.5 times into the height of a person. We compare the size of the head with the width of the pelvis — it will be right on the line of the center of the figure.
Step 4
We mark the placement of the feet with light lines. The main thing is that the heel of the supporting leg should be in the center of the vertical axis or touch it. If you move the foot too far, there will be a feeling of falling or a step in the figure that stands confidently in place. At the same stage, we mark the tilt of the pelvis, knees, and shoulders.
Step 5
We lay off two head sizes from the center of the figure down and we will get to the lower part of the knee. We mark the same distance from the heel base up — this is how we will find the height of the knee joint.
Since the right leg is not supporting and slightly bent, its knee will be lower than the left one. We tilt the found axes parallel to the tilt of the pelvis.
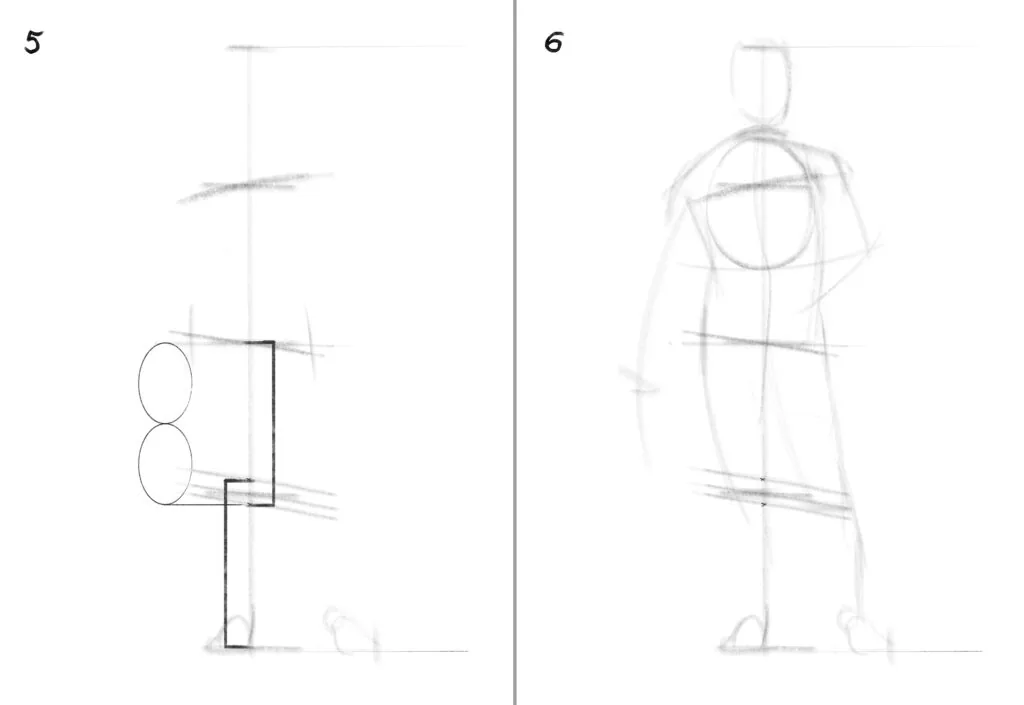
Step 6
We mark the volumes of the torso, chest, and head with simple light lines.
Step 7
On a new layer or on tracing paper, we mark the S-shaped curvature of the spine, the lines of the construction of the arms and legs. We mark the joint elements with circles, and the chest and cylindrical volume of the pelvis with an ellipse.
Step 8
Let's move on to the torso. We clarify the shape of the chest and mark the volumes of the shoulders with arcs. We make sure that they are proportionally wide to the pelvis.
We mark the pectoral muscles and abdominal muscles, rhyming them with each other with curved strokes. At this stage, we begin to draw with the thin end of the pencil, less shading, because we need accurate, beautiful lines.
Step 9
We move on to the lower extremities. We divide the legs into three parts: thigh, knees, shin. We make sure that the knee joints are the same size and are on the same axes (we check with arcs).
We build ellipses into the upper part of the shin — they show the volume of the protruding muscles. We mark the fly in the groin area, and on the thigh — the turn line with four arcs according to the shape of the muscles. We make sure that the corners between these arcs are on the same axis.
Step 10
We add the volume of the head, feet, and hands with simple geometry. On the hands, we mark the volume of the muscles of the shoulder joint and shoulder with rounded shapes.
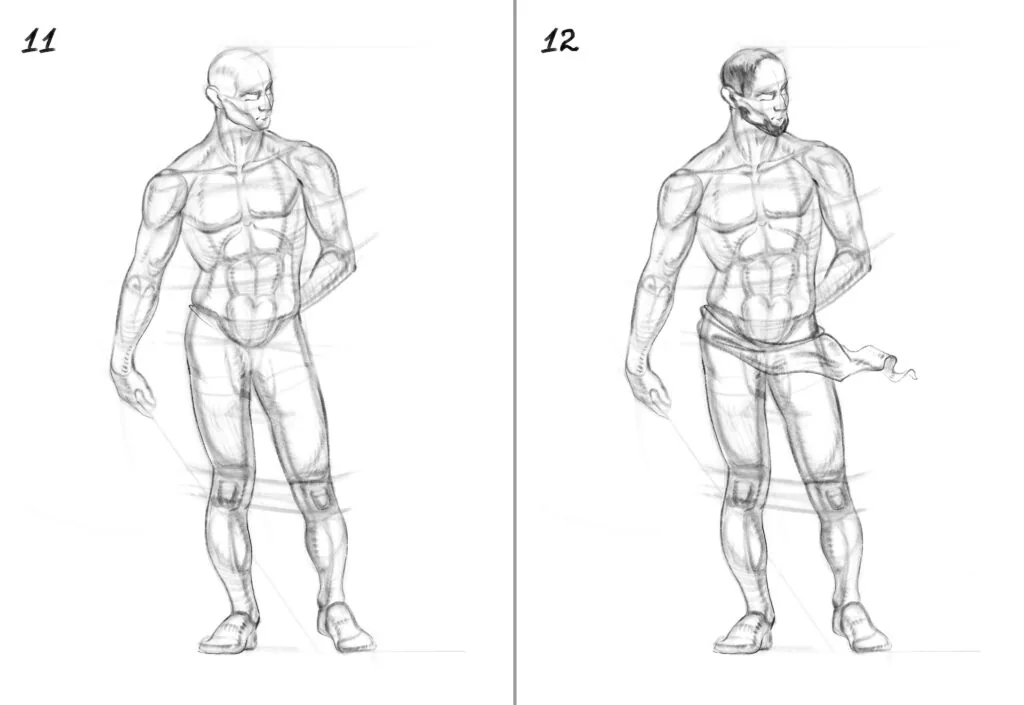
Step 11
We draw the edges of the muscles with light turning strokes. We clarify the contour of the silhouette.
Step 12
We wrap the pelvis of our hero with drapery. We add him portrait features, hairstyle, and beard.
We shade the legs, arm, and lower chest with arc-shaped strokes. We put strokes according to the shape of the section, we shade with the side of the pencil.
Step 13
We add contrasts along the boundaries of the light and shadow and falling shadows. We erase all the lines of additional construction, we put the final lines along the silhouettes of the muscles, folds, and joints.
Step 14
We shade the background behind the figure with light strokes, darken the supporting leg, left arm, abdomen, and pelvis, right knee, as the figure is darker at the bottom. We put a spear in the hand to create an interesting image.
Voila! We have succeeded in drawing a male figure in full length.
Look additionally at the video lesson on drawing a male figure from the back:
How to draw a person in motion
The human body in motion bends, stretches, limbs move in different directions, but the proportions remain unchanged. The internal structure of the skeleton is rigid and cannot suddenly become shorter or longer, so the proportions of the length of the legs to the torso, the size of the head to the height of the figure do not change. The human body is symmetrical: the left half is identical to the right. Keep an eye on the limbs being the same.
On the sketches of the student online course Figure in dynamics Kirill Plotnikov, male figures are depicted in very dynamic poses. Additional blue lines help to see the similarity.
When drawing, use similar axes for the limbs and torso. Drawing such simple linear structures helps to understand the movement of the figure and keep the symmetry.
Start drawing the figure with simple skeletal structures or with geometric shapes, do not draw muscles, complex changes in shape, and the like — in such a simplified sketch it is more effective to convey the movement and proportions of the figure.
Let's imagine the body in the form of cylinders and spheres, like Ikea dolls. Author: Kirill Plotnikov, online course Figure in dynamics.
After this stage, clarify the lines of the figure's silhouette and details of the muscle mass on top. After practicing drawing from a geometric shape, it will be easier for you to draw a similar image without construction. But for this you need to practice.
Author: Kirill Plotnikov, online course Figure in dynamics.
Differences between male and female figures
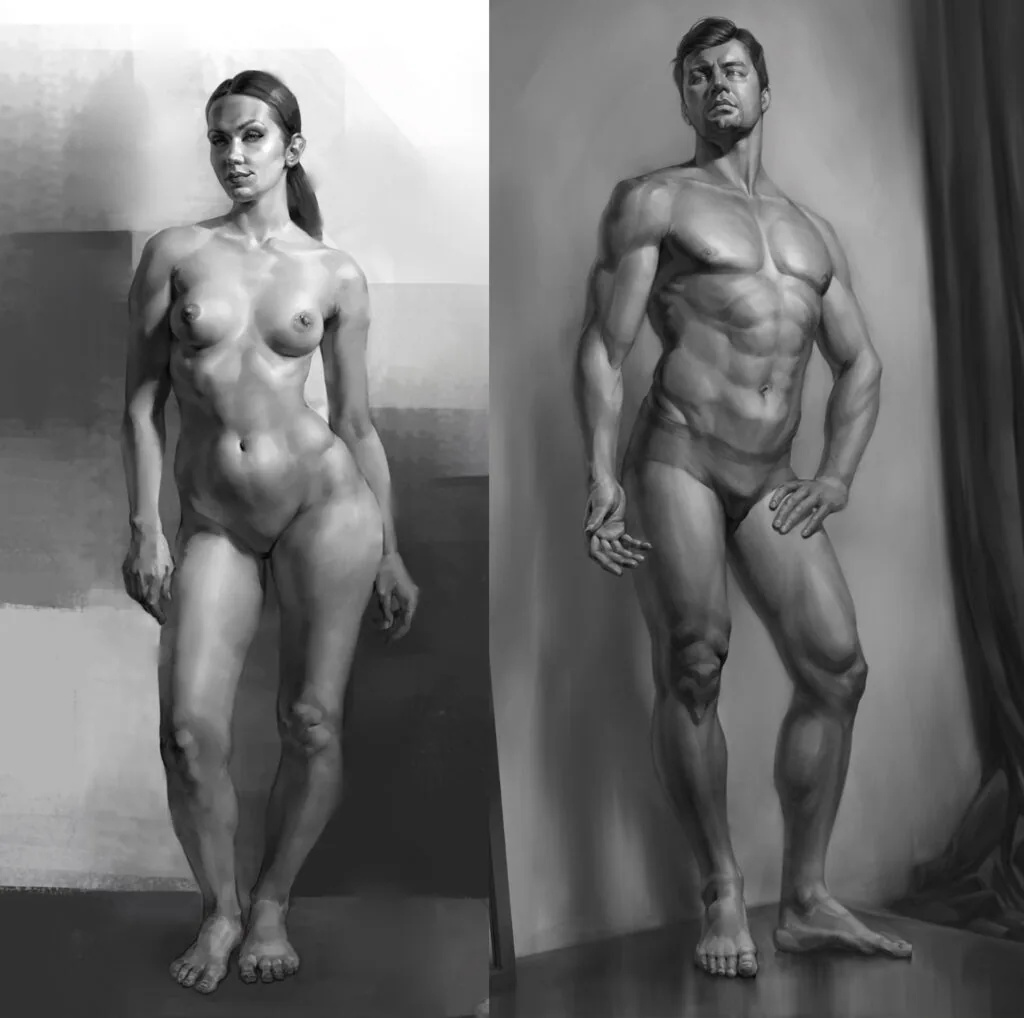
Men and women have different anatomical features, which are important to consider when drawing. Of course, there are girls with boyish proportions and boys with feminine features. Therefore, we take as a basis the classical proportions of the body typical for women and men. Let's consider the characteristic differences on the example of works from the Figure Pro course by Polina Shcherba and Marina Kalugina.
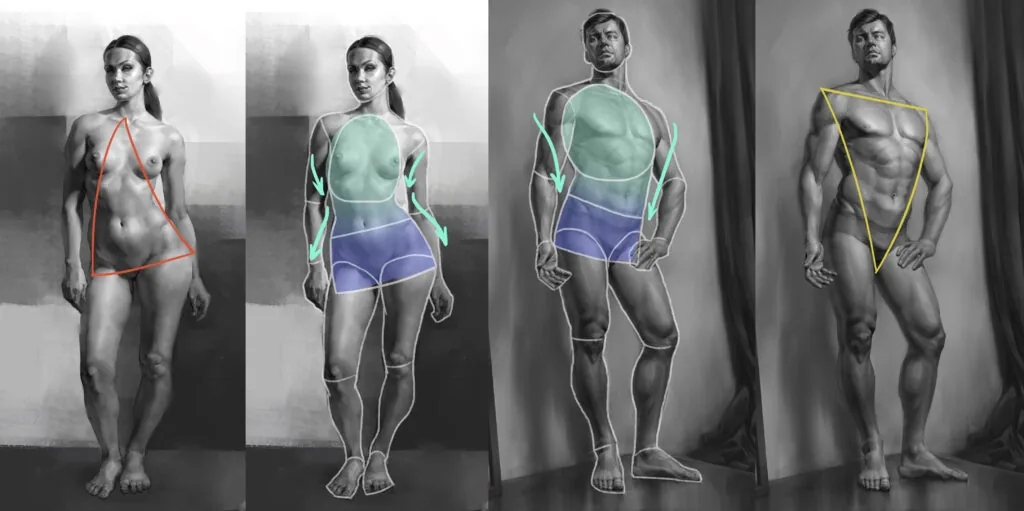
Let's study the figures in detail by departments. Having marked the silhouette, the volume of the pelvis and the chest with a white line, we can find a pattern: the female silhouette is more graceful, a deeper waistline forms between the chest and the pelvis, and the body expands in the pelvic area. Thus, the female torso resembles a triangle with a base at the bottom.
The male figure has a more straight waist, and the silhouette widens at the top: from the pelvis to the shoulders. The male torso looks like an inverted triangle.
There is also a noticeable difference between the volume of the chest and the pelvis in women and men. Women have a visually larger pelvic area, while men, on the contrary, have a larger chest.
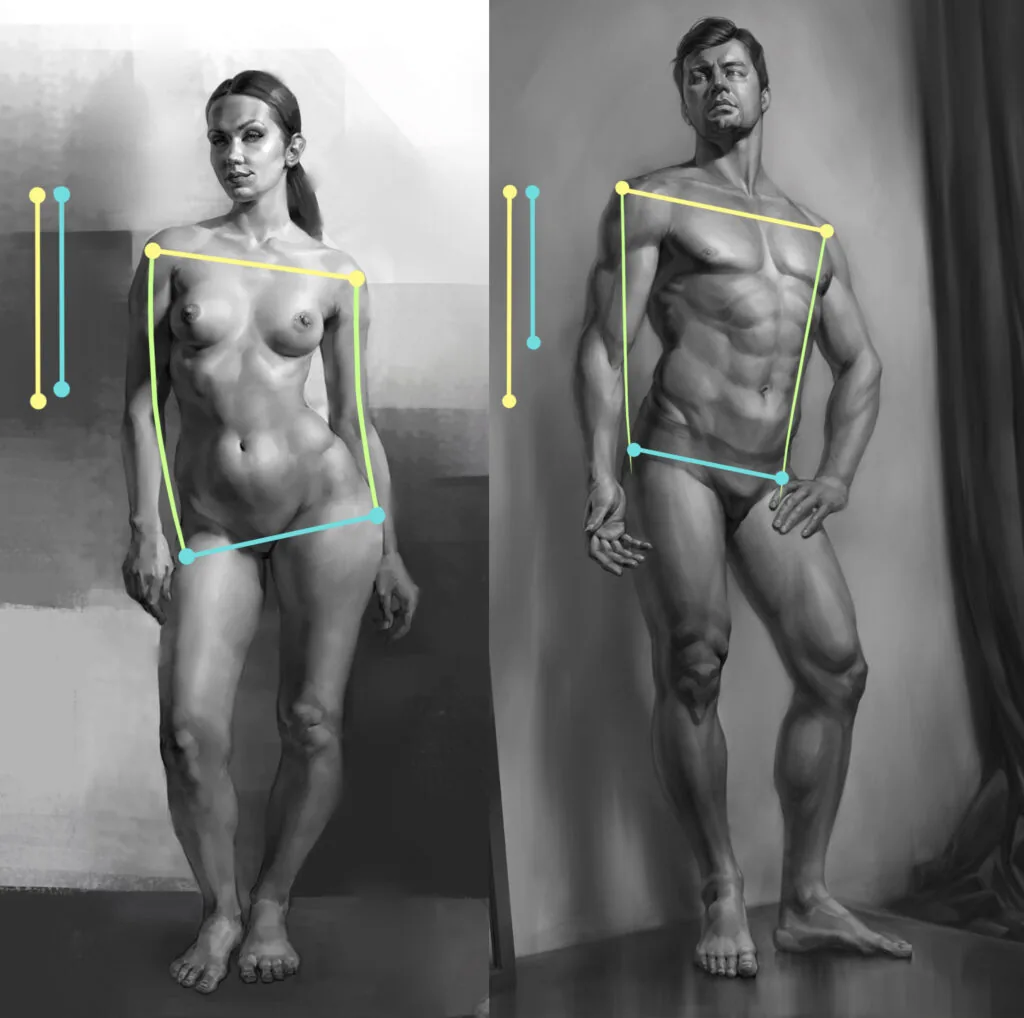
In the female figure, the width of the shoulders and the width of the hips — similar relationship. In the male figure, — the width of the shoulders is longer than the width of the pelvis. условно говоря, if we mark the shoulder joints and the trochanter (femoral joint) with dots, connect them with lines, then we will see two different figures in the models: a rectangle is formed in a woman, and a trapezoid is formed in a man.
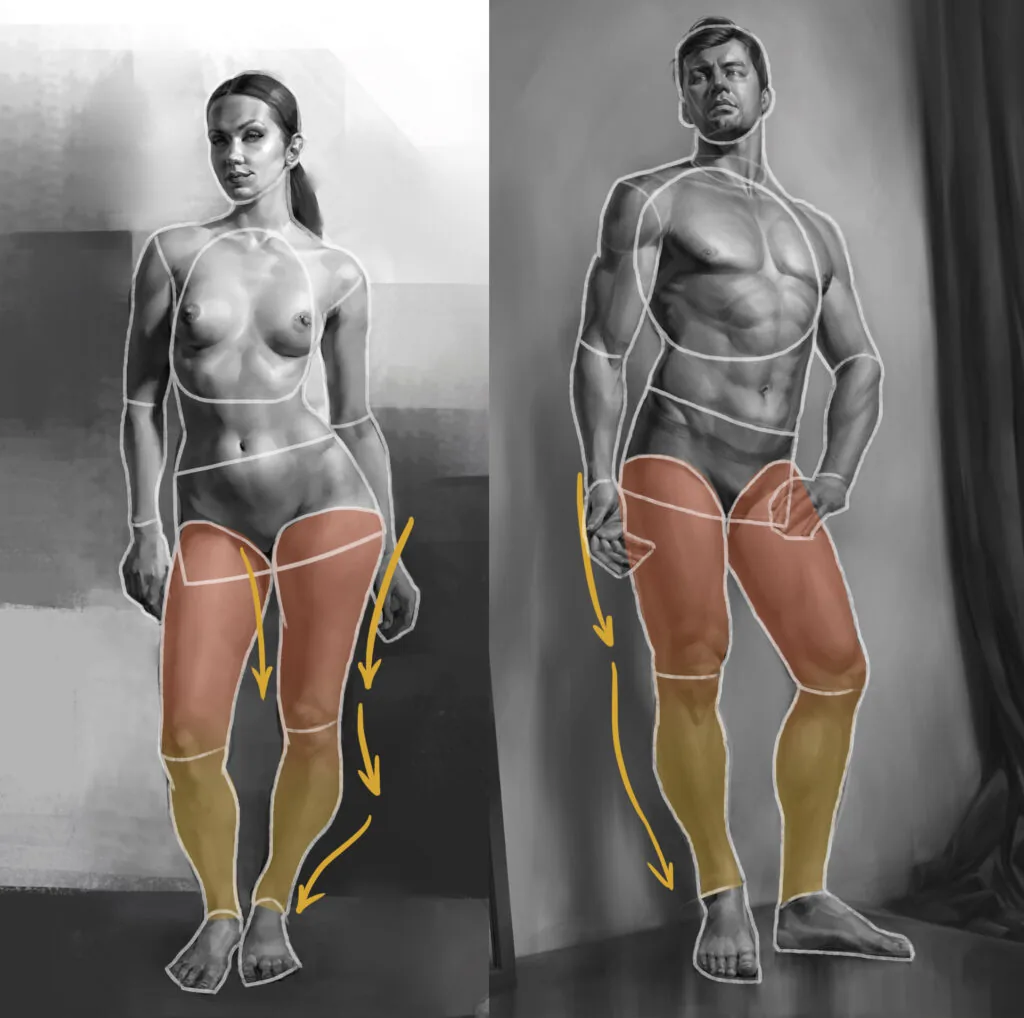
The lower extremities also differ: the female leg has a more curved silhouette, in the pelvic area the thigh has more mass. Gradually, the girth of the leg becomes thinner as it descends to the foot.
The male thigh does not have such a large rounded mass in the pelvic area, and, accordingly, it has a more stable difference in width in the hip, knee and ankle area. The width of the pelvis in women is greater than in men, so we can observe such different volume differences.
Let's pay attention to the joints: the articular joints in the male figure are larger, more massive, they are pronounced and have more relief bone and muscle structures. The female body in these areas is more plastic, without sharp protrusions.
Relief and volume of the muscles are also different. In the male figure, the muscular structures are very textured and clearly visible. For example, pay attention to the clearly readable bundles of shoulder muscles (1), the active volume of the triceps and biceps (2), the relief cubes of the press (3), noticeable structures of the thigh muscles (4). The pectoral muscles in girls are hidden under the bust, while in men they are clearly visible.
Of course, a girl can have a рельефный muscle frame, and a man can have a full and soft appearance. But we are considering examples of figures on which the differences are clearly visible.
But despite these differences, the basic rules of anatomy do not change — do not forget about this and do not violate the proportions. The main difference — in the silhouette and relief of the body contour. Imagine that you have two tangerines of the same size in front of you: one — with a smooth peel, the other — with pimples. The difference is only in the exterior, but not in the essence of the objects.
On the YouTube channel Skills Up School there are detailed free lessons on drawing the female and male figures front and back. It is very useful to study a person from all sides — you will understand the features of anatomy from different angles much better. Be sure to watch them:
Proportions of a child's figure
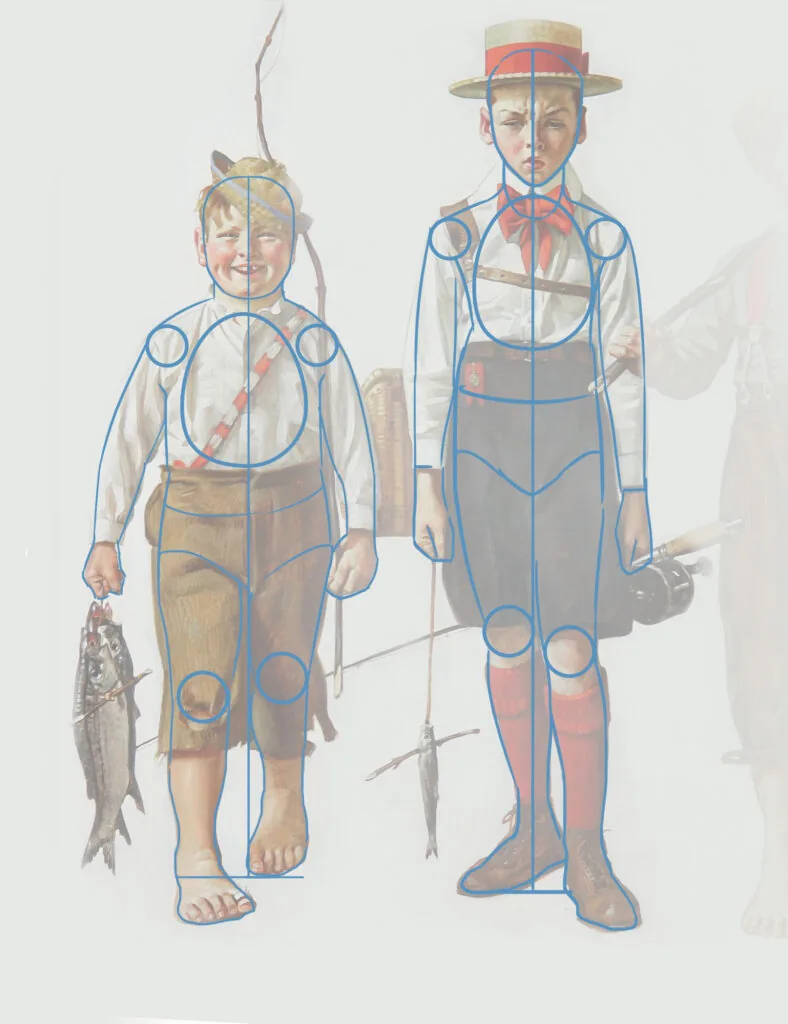
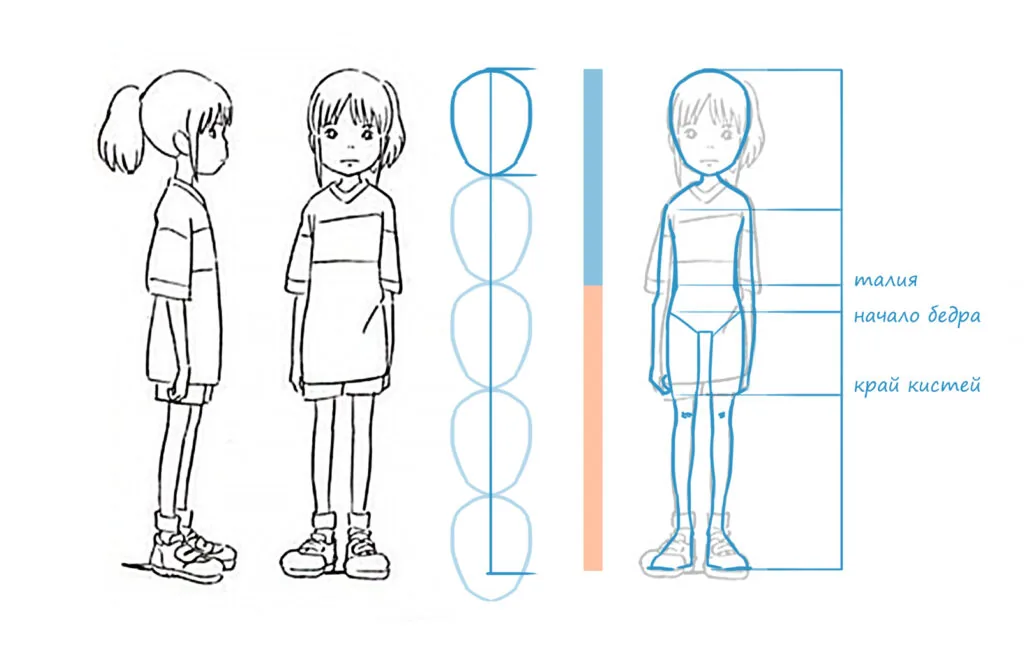
A child's figure differs from an adult's figure in some proportional ratios. Of course, there are no exact numerical proportions, since the human body is unique, but we can find some patterns. The most noticeable difference between an adult and a child — a large head in relation to the body. As you grow up, the body stretches, and the head gradually visually decreases. On the example of Norman Rockwell's boy's hands, we see that the head fits about six times the height of the body, by adulthood this ratio changes to eight times. The width of the shoulders and pelvis are close (green and purple stripes). As you grow up, boys' shoulders widen, and girls' pelvis becomes wider. The center of the body is shifted slightly upward. We see that the orange stripe, corresponding to the height of the lower limbs, is higher than the top of the body.
Also in a child, the emphasis on the size of the head is clearly visible when comparing it with the shoulders. The width of an adult's shoulders in a frontal position is approximately equal to two head sizes, while in a child the shoulders take up about 1.5 head sizes.
A child's figure is characterized by a slight puffiness or, conversely, frailty — it is concentrated in the torso, so as children grow, they become very slender, as their resource reserve goes into growth.
How to draw a person in clothes
Treat clothes as a wrapper: by the outlines of a packaged gift or a product in a wrapper, we can understand what is hidden inside. Therefore it is important to emphasize constructive features with clothes. Let's analyze the shapes of clothing elements: «body» of a sweater, T-shirt, jacket, etc. — a kind of cylinder, sleeves, legs — also cylinders. Hats — hemispheres, sometimes cylinders. Scarves — these are ribbons. Gloves or shoes — a combination of cylinders, hemispheres and cubes. Thus, any part of the wardrobe repeats the volumes of the body. Step 1 Let's try to dress our male figure. We will work with the previous figure drawing. Step 2 Put tracing paper or a new layer with a translucent light tone on top of the drawing to make the figure more transparent. First, wrap it in a shell of geometric shapes. Without folds, we denote the shapes of all clothing elements with lines.
Clothing can be divided into two types:
- tight-fitting, completely repeating the contours of the body
- loose, having its own shape, inside which the contour of the body appears
Step 4
On top of the geometric shapes we draw clothes with folds according to the figure. We draw the folds with small strokes, checkmarks and loops. The bends of the clothes add irregularities to the relief on the silhouette of the figure.
Step 5
Erase the additional construction lines from the geometric shapes or turn off the layer with them.
If you want to dress a figure in a dress, tunic or skirt, then the clothes will be more loose and less dependent on the contours of the body. The folds of the fabric in this case will look not like small creases, checkmarks or loops, but like vertical longitudinal cones or cylinders.
Let's draw a skirt. First, we draw a truncated cone with light strokes (1), then we designate the folds with cylinders (2). We erase the bright construction lines so that they become barely noticeable, and with smooth lines we designate the rounded folds (3). At the top in the belt area we add small strokes to get a «crumpled» fabric. With several rotary strokes we designate the volume of fabric turns.
Do not forget about such an important part of clothing as a headdress: hats, panamas, caps and hats are drawn according to the same principle as clothes. They repeat the shape of the head, so in the silhouette of the hat we will always see a cylinder (1), a sphere (2) or their combination.
Step 6
Add tone to the pants and sweater. With the side of the pencil or a wider brush size of the stylus, we shade the volume of the arms, torso, legs. We create a shaded tone according to the shape of the geometric shapes that we designated earlier. We leave a small highlight at the edges of the figure — this is a reflex. We draw a line with a pencil according to the shape of the folds, thereby setting their volume.
Step 7
Add tone to the cap and sneakers. We remember that clothes are a repetition of the body, which is based on geometry. Therefore, the shadows on the cap lie according to the shape of the half of the sphere, and on the shoes, like on parallelepipeds.
At this stage, we complete the drawing of the figure in clothes with light strokes indicating the turns of the folds. We combine three to five strokes into a line.
So, we managed to dress the figure.
A person in clothes: correct drawing
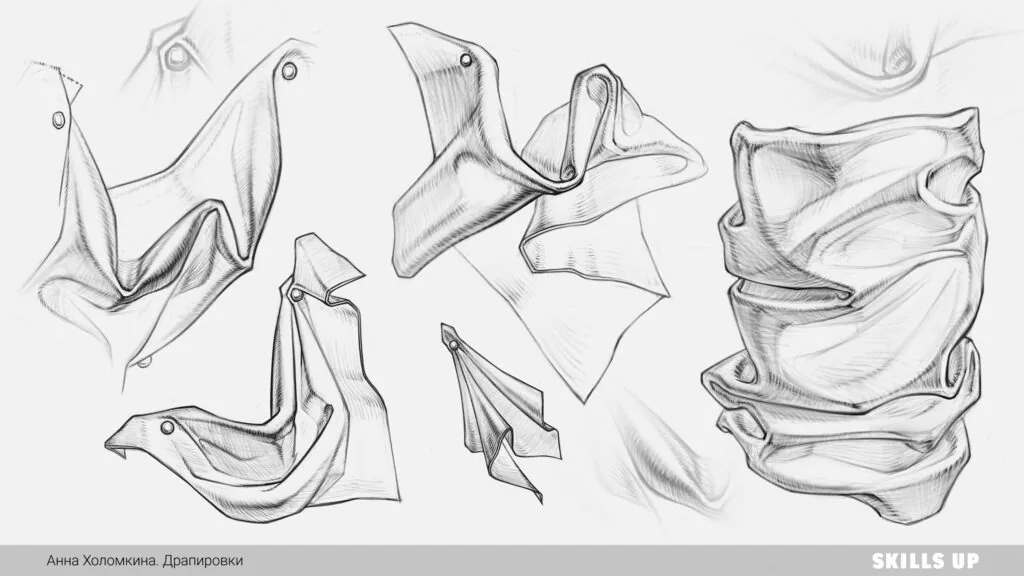
There are several ways to draw a figure in clothes: they depend on how long a work you are going to draw and what material you use. Before proceeding to drawing a person in clothes, it is useful to practice drawing draperies. Take a scarf or a scarf, try to create different shapes of folds and study their bends. Fold the fabric accordion-like, hang it with a V-shaped arc, collect cone-shaped folds, crumple and study the creases. Draw small areas like Anna Holomkina's analytical sketches, Figure High course.
If you choose a sketch, then it will be enough to designate the volume of clothes on the body with a line and dashes. Use hints, with just a couple of movements indicate the reliefs of the fabric. With light shadows or by increasing the thickness of the line, you can emphasize the folds on the clothes.
On Matt Rhodes' sketches, the folds on the clothes are indicated with simple strokes and only in some places with dark fill.
In a short drawing there is a little more time to explore the subtleties of the volumes of clothes. With the help of tone and hatching, we explore the differences in folds, do not forget that clothes — a doubler of the body, and it is necessary to show with tone analysis the volume of the body, and as a cherry on the cake — the folds of the clothes.
There are many stylistic branches in the field of anime drawing. They differ in the characteristics of shaping, proximity to or distance from human anatomy, color palette, detail complexity, visual paraphernalia and effects. However, it is always easy to distinguish anime from Soviet animation or the classical school of drawing.
Let's analyze the basic rules for drawing a person in the style of anime using the example of characters from the cartoons of Studio Ghibli.
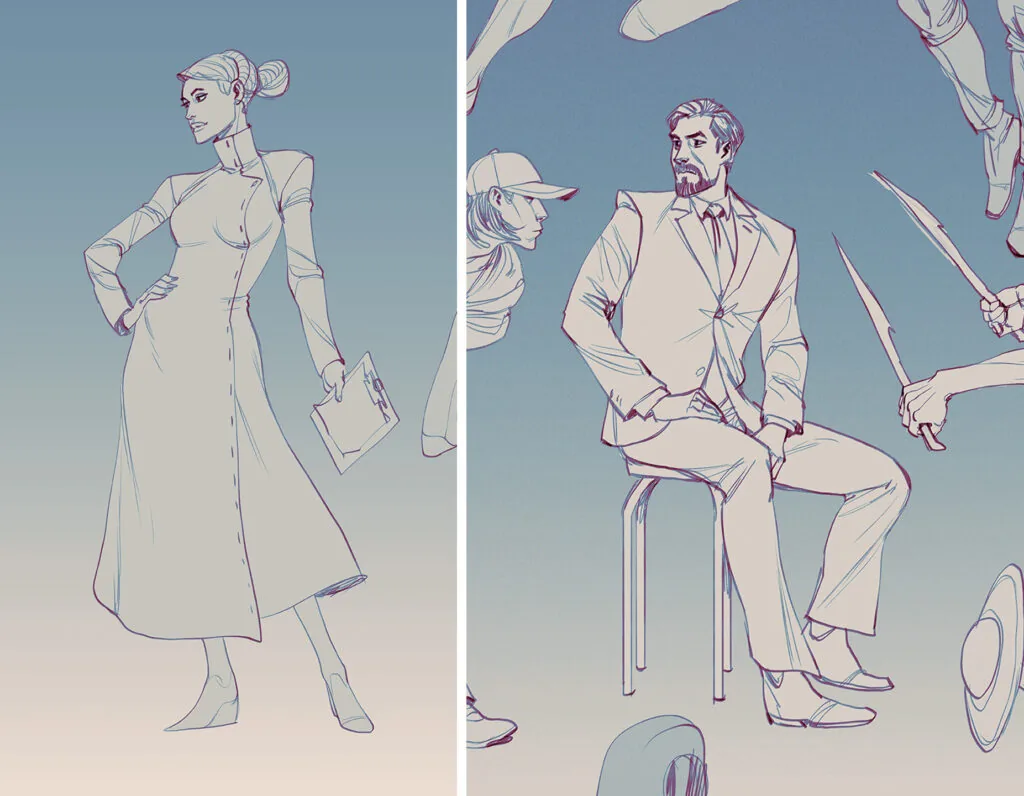
- The basis of the drawing is the line. The line — is the main tool that creates vivid images of people. It is incredibly dynamic, consists of sharp, sharp strokes and bent arcs. Even without the addition of shadows and color, the figures retain their integrity and recognizability.
- Simplicity is characteristic of anime. Static background landscapes can be extremely elaborated and drawn to the smallest highlights. But animating a highly detailed drawing is very difficult and costly, so characters, including people, are made very simply and cleanly. Artists "hit the nail on the head" to draw a beautiful hand, fold or face with a couple of strokes.
- Minimalism in volume. The rendering of the girl and the young man is very simple: there are no gradient stretches of halftones and shades, the figure clearly reads the shadow and light, the figures are filled with local color. Ambient occlusion, reflexes and penumbra are not used, there are no half-light fills in the light area of the skirt, apron, pants of the young man either.
- Deformation of body proportions
Men have either equal shoulder girdle and pelvis, or wider shoulders. Howl from the cartoon "Howl's Moving Castle" has wide shoulders that are wider than the pelvis. His silhouette thins out towards the bottom of his legs. Thanks to the elongated legs, this effect is enhanced. The head fits 6.5 times, while for an ordinary person it is — eight times.
The silhouette of the girl San (the main character of "Princess Mononoke"), unlike Chihiro, expands in the hips and chest. Also, the size of the head fits an uncanonical number of times in the height of the body — 5.5.
- Hyperbolization of emotions
Even within the same studio, we see slight differences in the drawing and proportions of the width of the bodies, the ratio of the height of the figure to the height of the head, the style of drawing faces and limbs. But the basic techniques remain similar.
Tips for novice artists: how to avoid mistakes
To summarize important points that we discussed earlier.- First of all, choose simple static poses to study the anatomy of the figure.
- Train on Greek and Roman sculptures, plaster casts of limbs. They are motionless, it will be comfortable for you to analyze them for a long time.
- Study the figure from all sides: go around it in a circle or turn the 3D model 180 degrees — so you will look at it in detail. Do not dwell only on one view.
- Try not to copy everything you see. First, apply the method of building a figure, then add details.
- Study the plastic anatomy of a person to convey the correct proportions of the human body.
- To more effectively advance in understanding and drawing the human body, study separately the hands, feet, head, joint elements, parts of the face.
- Simplify the shapes of the figure to simple geometry to more accurately convey the main volumes of the body.
- Practice the practice of sketches. Long-term drawing allows you to study in detail the nuances of the figure's structure, and the practice of quick sketching develops drawing speed, attentiveness and the ability to highlight the main thing in a short time.
- A beautiful and understandable contour line reveals the shapes of the human body. Do not blacken the drawing, use the silhouette line and halftones.
- Watch the setting of the feet. The figure should not fall or be in an unstable position.
- When drawing a figure in clothes, do not overdo it with the number of folds. Conciseness — it's attractiveness in the drawing.
Related materials

Tutorial
How to draw a human nose
August 15, 2024
Tutorial
How to draw a human head
September 18, 2023

Tutorial
How to learn to draw
April 24, 2024

Tutorial
How to learn to draw a person
January 18, 2024

Tutorial
How to learn to draw on a tablet. Tips and lessons for beginners
December 31, 2023

Article
How to draw armor
December 27, 2024

News
Создание 3D-модели нарисованного вручную человека с роботизированной рукой
March 2, 2026