TutorialUpdated: July 5, 2026
Pencil sketches for beginners
In short
Sketches are a very useful and fascinating activity. Let's figure out what makes it particularly attractive!
2D artist
Hello! My name is Elena Churkina, I am an artist and a course curator at Skills Up School. In this article, I will talk about how to draw sketches.
Why do you need a “mirrorless camera” or a camera on your phone with high-quality zoom, ultra-sensitive color reproduction and stabilization when you have a pencil and paper? How much can you draw using only lines! Both the sumac flower, and the portrait of a colorful watermelon seller, and a bun-Corgi in a helmet sitting on a moped with its owner.
Sketching is a very useful and exciting activity. Let's figure out what exactly makes it so attractive.
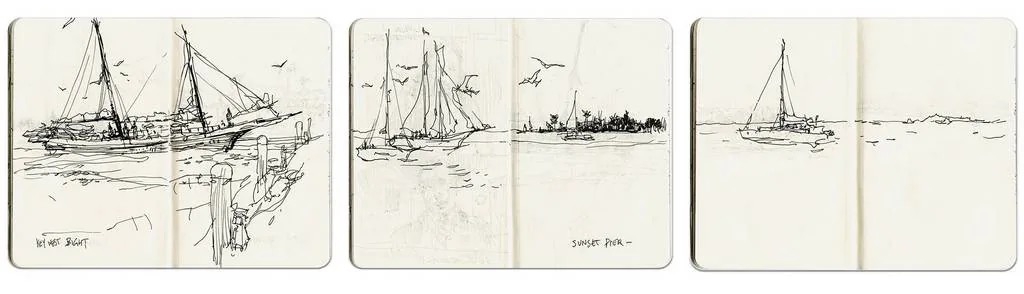 Mark Tarre Holmes' sketches are very simple and quick to make, yet they are not devoid of charm and clarity. Especially on the last spread, the speed of drawing is well read: a couple of lines — the yacht is ready, a couple more lines — and there is a horizon.
It is not for nothing that they say «Constancy is a sign of mastery», because regular training enhances the skill. At first, it will seem that the idea is useless, because it still turns out to be incomprehensible on paper. But this is only the beginning: just imagine what will happen later, when hundreds and thousands of hours of drawing, dozens of pencils worn down to the cores and rolls of paper will be left behind.
The third dogma of the draftsman — a weekly sketching schedule. More is much better than less!
Our brain and its ability to remember — a superpower, especially for an artist. It can be developed and enhanced: the more you look at references, sketches by modern and old masters, your colleagues, notice interesting details around, the easier and more effective the practice will be.
Try to evaluate the environment on the way to work or training and put virtual checkmarks on the objects that interest you. For example, what was special about the shape of the trees, how they combined with each other, what composition they formed together with the architectural environment, how the silhouette of the leaf affects the outline of the plant crown. Observation is your friend and ally.
This time we're taking on a more complex object — a kerosene lamp. When drawing household items, dishes, appliances, it's worth focusing on construction. We'll use this technique, but this time we'll draw on craft paper.
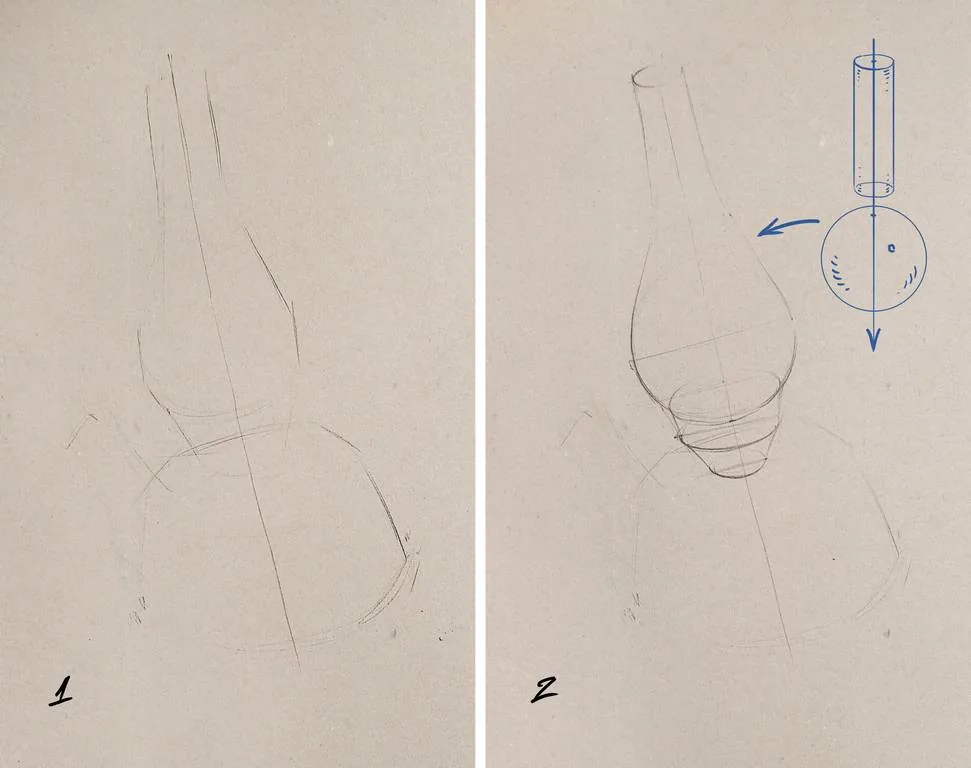
Step 1
We mark the general silhouette of the lamp with light lines. The main thing is to mark the glass head, the narrowing neck of the burner, and the wide body of the metal vessel. In this case, we put the axis line right away to check the symmetry relative to it.
Let's try a dynamic composition, tilt our lamp — this will give a diagonal and a sense of movement to a static object.
Step 2
At this stage, we draw the construction of the cylinder of the thin completion of the flask and the sphere of its body with light auxiliary lines. Immediately we draw the neck of the burner on which the glass is located.
Mark Tarre Holmes' sketches are very simple and quick to make, yet they are not devoid of charm and clarity. Especially on the last spread, the speed of drawing is well read: a couple of lines — the yacht is ready, a couple more lines — and there is a horizon.
It is not for nothing that they say «Constancy is a sign of mastery», because regular training enhances the skill. At first, it will seem that the idea is useless, because it still turns out to be incomprehensible on paper. But this is only the beginning: just imagine what will happen later, when hundreds and thousands of hours of drawing, dozens of pencils worn down to the cores and rolls of paper will be left behind.
The third dogma of the draftsman — a weekly sketching schedule. More is much better than less!
Our brain and its ability to remember — a superpower, especially for an artist. It can be developed and enhanced: the more you look at references, sketches by modern and old masters, your colleagues, notice interesting details around, the easier and more effective the practice will be.
Try to evaluate the environment on the way to work or training and put virtual checkmarks on the objects that interest you. For example, what was special about the shape of the trees, how they combined with each other, what composition they formed together with the architectural environment, how the silhouette of the leaf affects the outline of the plant crown. Observation is your friend and ally.
This time we're taking on a more complex object — a kerosene lamp. When drawing household items, dishes, appliances, it's worth focusing on construction. We'll use this technique, but this time we'll draw on craft paper.
Step 1
We mark the general silhouette of the lamp with light lines. The main thing is to mark the glass head, the narrowing neck of the burner, and the wide body of the metal vessel. In this case, we put the axis line right away to check the symmetry relative to it.
Let's try a dynamic composition, tilt our lamp — this will give a diagonal and a sense of movement to a static object.
Step 2
At this stage, we draw the construction of the cylinder of the thin completion of the flask and the sphere of its body with light auxiliary lines. Immediately we draw the neck of the burner on which the glass is located.
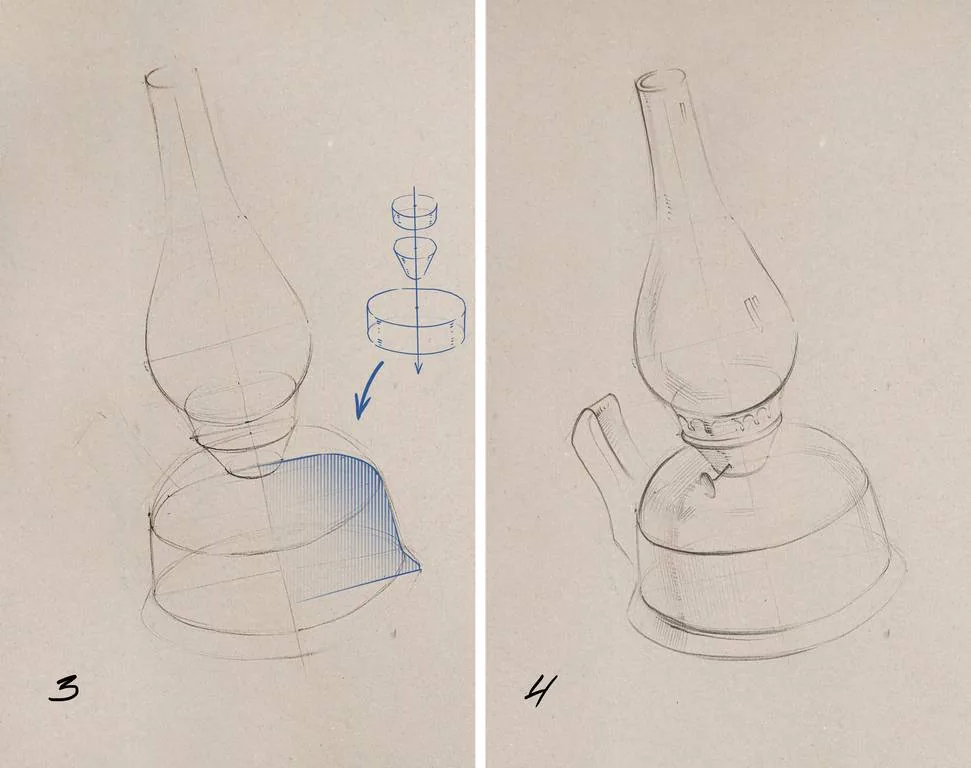
 Step 3
We perform all the same manipulations, but with the kerosene vessel. It consists of a cylinder with rounded shoulders — the blue section with hatching clearly demonstrates this. Do not forget that the neck and body sit on the same axis, all our cylinders should be one above the other and not scatter to the sides.
Step 4
We finish the construction stage, move on to tone and add a few details. We outline the highlights on the glass with rectangular polygons, as if the reflection of the squares of the window. We designate the areas of shadow with homogeneous long strokes, and short small strokes — turns of the shape. Add a handle: closer to the body, dissolve it in the light tone of the sheet — this way we create the effect of depth. Draw a small pattern on the burner and the fire regulator.
Step 3
We perform all the same manipulations, but with the kerosene vessel. It consists of a cylinder with rounded shoulders — the blue section with hatching clearly demonstrates this. Do not forget that the neck and body sit on the same axis, all our cylinders should be one above the other and not scatter to the sides.
Step 4
We finish the construction stage, move on to tone and add a few details. We outline the highlights on the glass with rectangular polygons, as if the reflection of the squares of the window. We designate the areas of shadow with homogeneous long strokes, and short small strokes — turns of the shape. Add a handle: closer to the body, dissolve it in the light tone of the sheet — this way we create the effect of depth. Draw a small pattern on the burner and the fire regulator.
 Step 5
We have five minutes left, and we can смело заняться небольшой детализацией. We will enhance the contrast of the lines in the foreground, add scuffs and cracks on the lamp, add a light. We create it with strokes: closer to the fire, press the strokes closer to each other, and further away — dissipate them.
We draw the glow effect: add lines that tend to the fire. Remember the rhythm: combine a sequence of long, medium, and short lines. Since the lamp shines in all directions, like a ball, we draw a couple of arcs around to enhance this feeling. This is how we complete our sketch.
Step 5
We have five minutes left, and we can смело заняться небольшой детализацией. We will enhance the contrast of the lines in the foreground, add scuffs and cracks on the lamp, add a light. We create it with strokes: closer to the fire, press the strokes closer to each other, and further away — dissipate them.
We draw the glow effect: add lines that tend to the fire. Remember the rhythm: combine a sequence of long, medium, and short lines. Since the lamp shines in all directions, like a ball, we draw a couple of arcs around to enhance this feeling. This is how we complete our sketch.

 Step 3
We pick up the chest and belly of the dog with a line. You're kind of assembling a sandwich: you've drawn a line on top, complete the silhouette with lines on the bottom. These lines are two slices of bread holding the filling (almost a hot dog!). We continue to collect the sketch in a similar way.
Step 4
We add the muzzle with lines, mark the nose and eye on it, and also show the drooping tongue and one fang.
Step 3
We pick up the chest and belly of the dog with a line. You're kind of assembling a sandwich: you've drawn a line on top, complete the silhouette with lines on the bottom. These lines are two slices of bread holding the filling (almost a hot dog!). We continue to collect the sketch in a similar way.
Step 4
We add the muzzle with lines, mark the nose and eye on it, and also show the drooping tongue and one fang.
 Step 5
We add details opposite the head — paws and tail. On the bends of the joints and the tail, the fur is more fluffy, so we use not a single continuous line, but a broken one. We break the silhouette with small strokes and show the dog's disheveled coat.
Step 6
We will complete the sketch with a light hint of volume. We darken the nose, mark with a line the own and falling shadows on the chest, paws, and tail. We fill the marked areas of shadows with a homogeneous vertical hatching. The main thing is to maintain the lightness of the sketch and not to over-blacken, otherwise it will turn out heavy.
We put the dog on the ground with a shadow, and with a couple of strokes we designate the blades of grass. The trick is done: the dog has materialized on a white sheet! And you can use a similar technique to draw other animals.
Step 5
We add details opposite the head — paws and tail. On the bends of the joints and the tail, the fur is more fluffy, so we use not a single continuous line, but a broken one. We break the silhouette with small strokes and show the dog's disheveled coat.
Step 6
We will complete the sketch with a light hint of volume. We darken the nose, mark with a line the own and falling shadows on the chest, paws, and tail. We fill the marked areas of shadows with a homogeneous vertical hatching. The main thing is to maintain the lightness of the sketch and not to over-blacken, otherwise it will turn out heavy.
We put the dog on the ground with a shadow, and with a couple of strokes we designate the blades of grass. The trick is done: the dog has materialized on a white sheet! And you can use a similar technique to draw other animals.
 Step 3
It is important to analyze the turns of the body parts at this stage so that the final line of the sketch reliably conveys information about the figure of the girl. Therefore, we have marked their directions with arrows to make it easier for you to see.
Step 4
It is important to check the location of the joints relative to each other. If symmetrical joints are рифмованы on the same axis, then the figure will have the same length of limbs, and this is very important.
Step 3
It is important to analyze the turns of the body parts at this stage so that the final line of the sketch reliably conveys information about the figure of the girl. Therefore, we have marked their directions with arrows to make it easier for you to see.
Step 4
It is important to check the location of the joints relative to each other. If symmetrical joints are рифмованы on the same axis, then the figure will have the same length of limbs, and this is very important.
 Step 5
Now we can start drawing the final contour. We start with the pelvis: with a bold fat line we draw the silhouettes of the pelvis, hips, and abdomen. Immediately we put details: navel, pelvic protrusion to the left of it, folds.
Step 6
We go up higher and draw the shoulders, chest, neck. We designate the edge of the chest, collarbones, armpit folds with light strokes — all that will be inside the outer line of the figure.
Step 5
Now we can start drawing the final contour. We start with the pelvis: with a bold fat line we draw the silhouettes of the pelvis, hips, and abdomen. Immediately we put details: navel, pelvic protrusion to the left of it, folds.
Step 6
We go up higher and draw the shoulders, chest, neck. We designate the edge of the chest, collarbones, armpit folds with light strokes — all that will be inside the outer line of the figure.
 Step 7
We go even higher and schematically show the outline of the face, a semicircle of the ear. Eyes, nose, and mouth are simple dashes, there is no time for detailed images. We also diversify the silhouette of the hairstyle — we show the rhythm of the voids between the curls of hair from below.
Step 8
After the head, we go down and draw the final lines of the shins, feet. We designate the knee joints with strokes — hints. We mark the ankles with curls, and on the feet we show the big toe separately from the others — this way we will add elegance and transform the galoshe-like silhouette into a readable sign of the foot.
Step 7
We go even higher and schematically show the outline of the face, a semicircle of the ear. Eyes, nose, and mouth are simple dashes, there is no time for detailed images. We also diversify the silhouette of the hairstyle — we show the rhythm of the voids between the curls of hair from below.
Step 8
After the head, we go down and draw the final lines of the shins, feet. We designate the knee joints with strokes — hints. We mark the ankles with curls, and on the feet we show the big toe separately from the others — this way we will add elegance and transform the galoshe-like silhouette into a readable sign of the foot.
 Step 9
We complete our silhouette with the drawing of the gesture of the hands. The main thing is to use only 2-3 lines to draw the brushes, as if you are making a simple logo, without going into details much.
The hand sign should look like real hands. We put a butterfly on the left wrist, so that the girl's gaze is обращен not to empty space, but to a specific character of the scene.
Step 10
We erase the construction lines and give a little elegant stylization to our miss in the last minutes of the timer. We fill the hair area with a thin hatching, imitating the flow of curls. We put a shadow on the neck to highlight the face, a shadow on the buttocks, left armpit, and along the left edge of the pelvis and leg. After that, we complete the sketch of the girl.
Step 9
We complete our silhouette with the drawing of the gesture of the hands. The main thing is to use only 2-3 lines to draw the brushes, as if you are making a simple logo, without going into details much.
The hand sign should look like real hands. We put a butterfly on the left wrist, so that the girl's gaze is обращен not to empty space, but to a specific character of the scene.
Step 10
We erase the construction lines and give a little elegant stylization to our miss in the last minutes of the timer. We fill the hair area with a thin hatching, imitating the flow of curls. We put a shadow on the neck to highlight the face, a shadow on the buttocks, left armpit, and along the left edge of the pelvis and leg. After that, we complete the sketch of the girl.
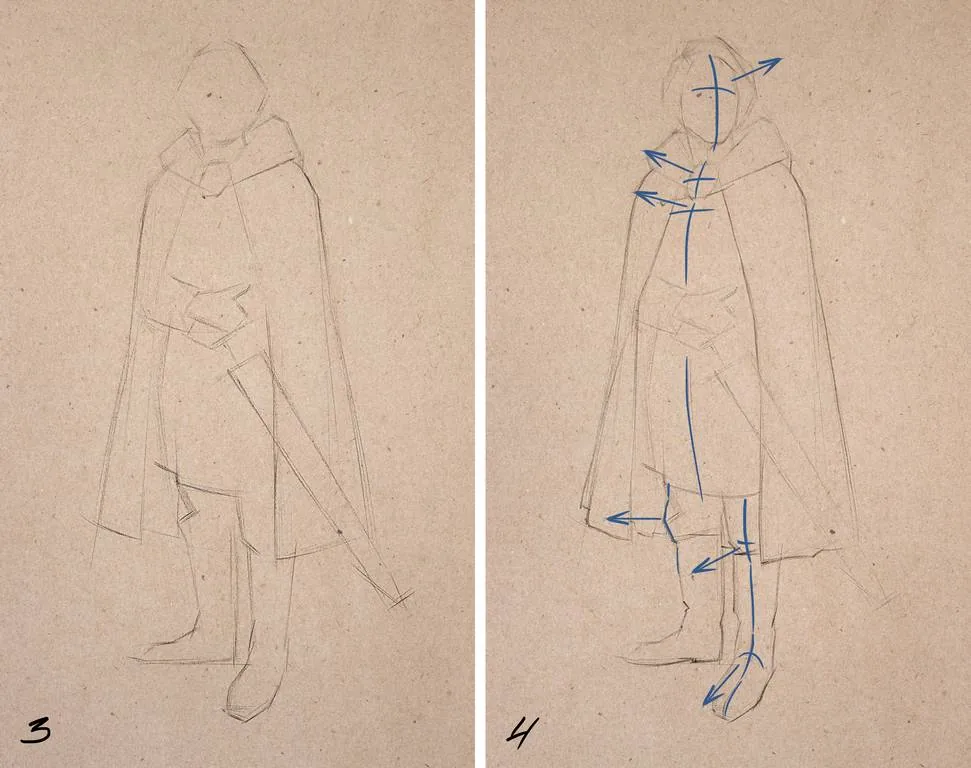
 Step 3
We boldly mark all the listed elements with strokes, put symbols of brushes, clasps in the form of simple geometric primitives.
Step 4
It is important to understand the turns of the parts of the body, and axes will help us with this. They show the direction of the volumes and the correct arrangement of them in space with each other. The warrior's head looks to the right, and the chest — in the opposite direction, the left leg is turned to us sideways, and the right one — looks at us.
Step 3
We boldly mark all the listed elements with strokes, put symbols of brushes, clasps in the form of simple geometric primitives.
Step 4
It is important to understand the turns of the parts of the body, and axes will help us with this. They show the direction of the volumes and the correct arrangement of them in space with each other. The warrior's head looks to the right, and the chest — in the opposite direction, the left leg is turned to us sideways, and the right one — looks at us.
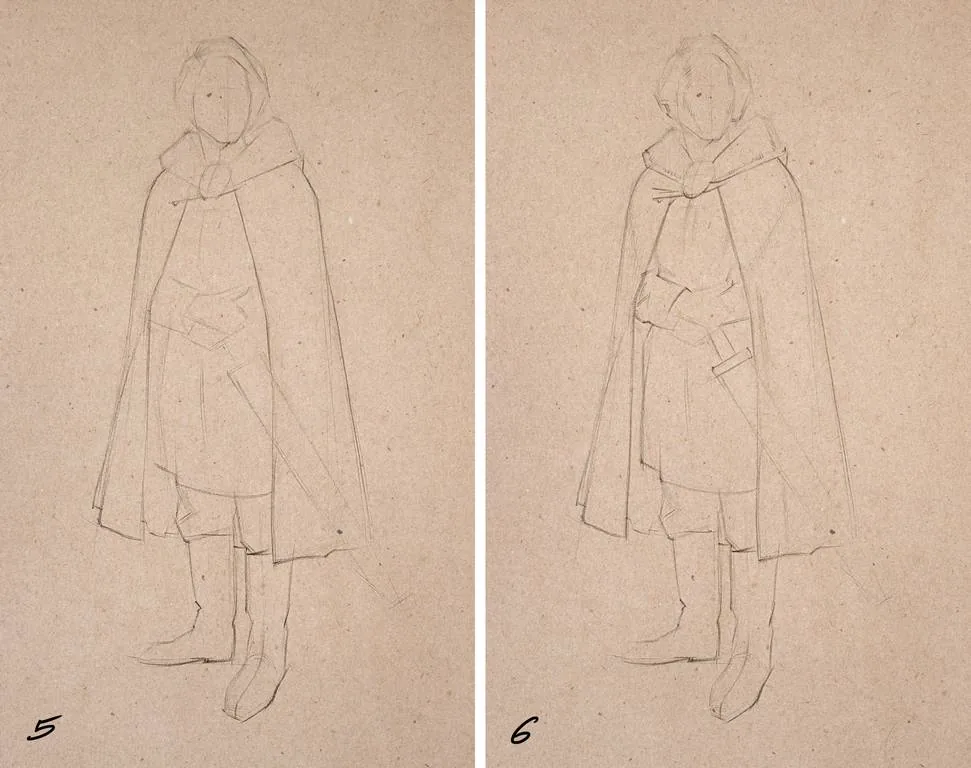
 Step 5
We mark our axes with light lines and begin to gradually work out the details of the folds, mark the facial mask and the volume of hair, the volume of the collar, show the edge of the boots and pants with a line.
Step 6
After the main volumes and a small amount of details are drawn, you can move on to detailing. We mark three-quarter turns of the face, a little more curls, folds on the clothes.
Step 5
We mark our axes with light lines and begin to gradually work out the details of the folds, mark the facial mask and the volume of hair, the volume of the collar, show the edge of the boots and pants with a line.
Step 6
After the main volumes and a small amount of details are drawn, you can move on to detailing. We mark three-quarter turns of the face, a little more curls, folds on the clothes.
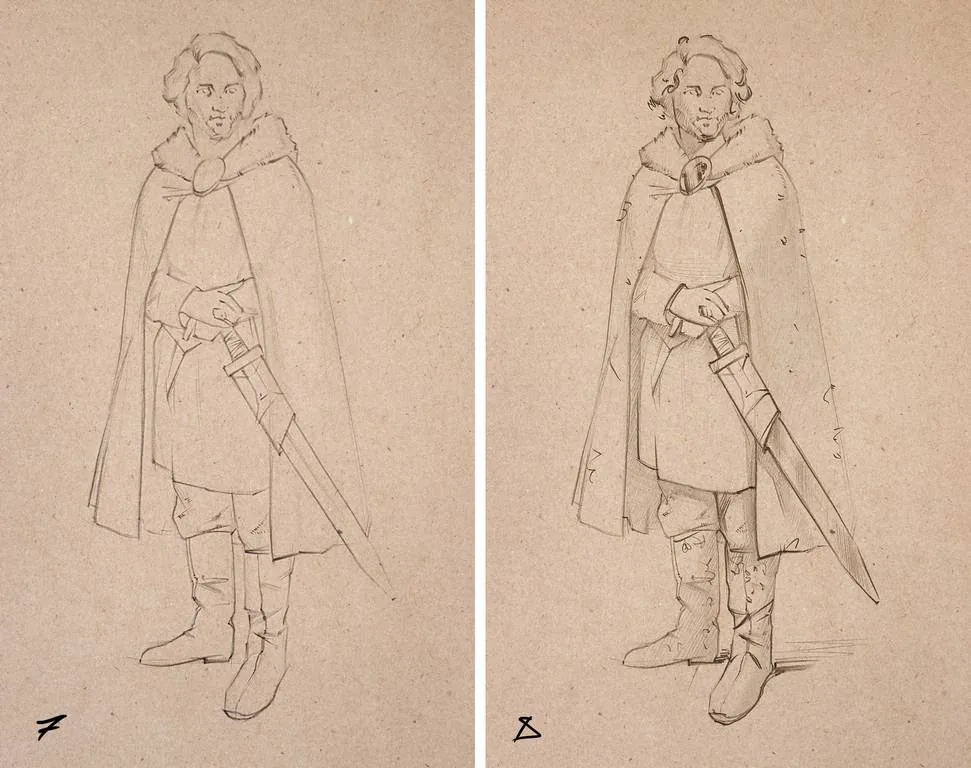
 Step 7
It's time for contrasting and more noticeable lines. They mark accents and model the edge of the contours. The silhouette should not be monotonous: the line either interrupts, then appears again, then turns into strokes.
Step 9
We add a little tone with a thin hatching. We mark falling shadows, place dark spots on metal details: clasp, ring, and sword. Small swift strokes and curls will add flair and freshness to the sketch — this is the effect we use to complete the sketch of the warrior.
Step 7
It's time for contrasting and more noticeable lines. They mark accents and model the edge of the contours. The silhouette should not be monotonous: the line either interrupts, then appears again, then turns into strokes.
Step 9
We add a little tone with a thin hatching. We mark falling shadows, place dark spots on metal details: clasp, ring, and sword. Small swift strokes and curls will add flair and freshness to the sketch — this is the effect we use to complete the sketch of the warrior.
How to learn to draw sketches
I have collected for you five tips that will be useful to both beginners and continuing artists. For some, this list will be a discovery, while others will smile with kind nostalgia, remembering their first studies from the era of school or university. When meeting something new, we often experience embarrassment and uncertainty. And when you have to draw in a crowded place (on public transport, in a cafe or museum), you need to grow a dense protective scale and not pay attention to what is happening around. You should be interested only in the dialogue of the pencil and paper, not passers-by and what is happening around — this is a very important point that often interferes with beginners and discourages the desire to draw. Therefore, the first and most important thing you need to remember — concentration on the process, everything else is secondary and unimportant. Sketches involve quick drawing within a limited time. If you draw a house or fruits on a plate, then time does not interfere with you so much. But if it's a flock of geese in the village, which is about to run away to its pen, then you should hurry up, of course. So try to practice with different timing. To begin with, choose a longer segment of time — 40 minutes, then shorter — 30, 15, 10 and 5. The faster you start making sketches, without drawing with a pencil in the same place many times, without copying everything you see, the better you will be able to depict objects. And moving objects and changes in the environment will cease to be a problem for you. Therefore, the second important advice — draw quickly, do not linger on the nuances.
Mark Tarre Holmes' sketches are very simple and quick to make, yet they are not devoid of charm and clarity. Especially on the last spread, the speed of drawing is well read: a couple of lines — the yacht is ready, a couple more lines — and there is a horizon.
It is not for nothing that they say «Constancy is a sign of mastery», because regular training enhances the skill. At first, it will seem that the idea is useless, because it still turns out to be incomprehensible on paper. But this is only the beginning: just imagine what will happen later, when hundreds and thousands of hours of drawing, dozens of pencils worn down to the cores and rolls of paper will be left behind.
The third dogma of the draftsman — a weekly sketching schedule. More is much better than less!
Our brain and its ability to remember — a superpower, especially for an artist. It can be developed and enhanced: the more you look at references, sketches by modern and old masters, your colleagues, notice interesting details around, the easier and more effective the practice will be.
Try to evaluate the environment on the way to work or training and put virtual checkmarks on the objects that interest you. For example, what was special about the shape of the trees, how they combined with each other, what composition they formed together with the architectural environment, how the silhouette of the leaf affects the outline of the plant crown. Observation is your friend and ally.
This time we're taking on a more complex object — a kerosene lamp. When drawing household items, dishes, appliances, it's worth focusing on construction. We'll use this technique, but this time we'll draw on craft paper.
Step 1
We mark the general silhouette of the lamp with light lines. The main thing is to mark the glass head, the narrowing neck of the burner, and the wide body of the metal vessel. In this case, we put the axis line right away to check the symmetry relative to it.
Let's try a dynamic composition, tilt our lamp — this will give a diagonal and a sense of movement to a static object.
Step 2
At this stage, we draw the construction of the cylinder of the thin completion of the flask and the sphere of its body with light auxiliary lines. Immediately we draw the neck of the burner on which the glass is located.
Step 3
We perform all the same manipulations, but with the kerosene vessel. It consists of a cylinder with rounded shoulders — the blue section with hatching clearly demonstrates this. Do not forget that the neck and body sit on the same axis, all our cylinders should be one above the other and not scatter to the sides.
Step 4
We finish the construction stage, move on to tone and add a few details. We outline the highlights on the glass with rectangular polygons, as if the reflection of the squares of the window. We designate the areas of shadow with homogeneous long strokes, and short small strokes — turns of the shape. Add a handle: closer to the body, dissolve it in the light tone of the sheet — this way we create the effect of depth. Draw a small pattern on the burner and the fire regulator.
Step 5
We have five minutes left, and we can смело заняться небольшой детализацией. We will enhance the contrast of the lines in the foreground, add scuffs and cracks on the lamp, add a light. We create it with strokes: closer to the fire, press the strokes closer to each other, and further away — dissipate them.
We draw the glow effect: add lines that tend to the fire. Remember the rhythm: combine a sequence of long, medium, and short lines. Since the lamp shines in all directions, like a ball, we draw a couple of arcs around to enhance this feeling. This is how we complete our sketch.
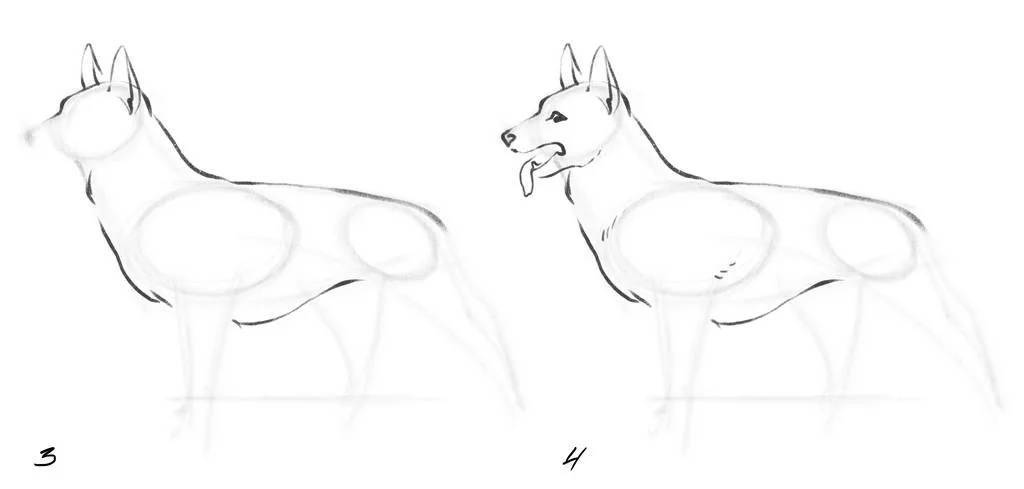
How to draw a sketch of an animal
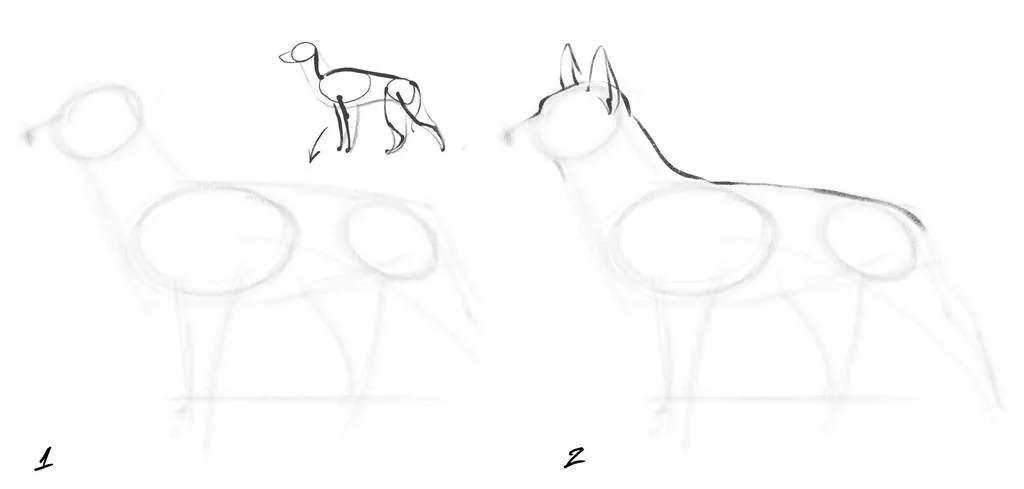
Let's try to draw a four-legged companion of a person — a dog. Watching pets is an interesting task, and they are the most convenient models, as they accompany us always and everywhere. Step 1 We mark three important parts for us with translucent ellipsoids: the head, chest, and pelvis — this way you can change their position and put the animal in different poses. We designate the connection of these parts with thin lines. The limbs do not have much mass, so we designate them simply with lines. Step 2 On top of the resulting ghostly outline, we begin to draw the final silhouette with lines. Boldly increase the pressure of the pencil or stylus. We draw a line from the head with ears to the tail.
Step 3
We pick up the chest and belly of the dog with a line. You're kind of assembling a sandwich: you've drawn a line on top, complete the silhouette with lines on the bottom. These lines are two slices of bread holding the filling (almost a hot dog!). We continue to collect the sketch in a similar way.
Step 4
We add the muzzle with lines, mark the nose and eye on it, and also show the drooping tongue and one fang.
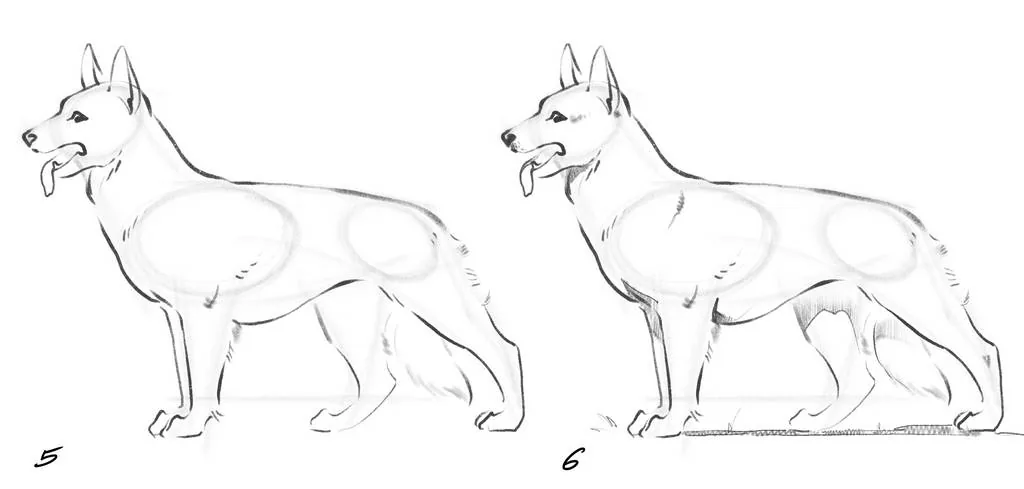
Step 5
We add details opposite the head — paws and tail. On the bends of the joints and the tail, the fur is more fluffy, so we use not a single continuous line, but a broken one. We break the silhouette with small strokes and show the dog's disheveled coat.
Step 6
We will complete the sketch with a light hint of volume. We darken the nose, mark with a line the own and falling shadows on the chest, paws, and tail. We fill the marked areas of shadows with a homogeneous vertical hatching. The main thing is to maintain the lightness of the sketch and not to over-blacken, otherwise it will turn out heavy.
We put the dog on the ground with a shadow, and with a couple of strokes we designate the blades of grass. The trick is done: the dog has materialized on a white sheet! And you can use a similar technique to draw other animals.
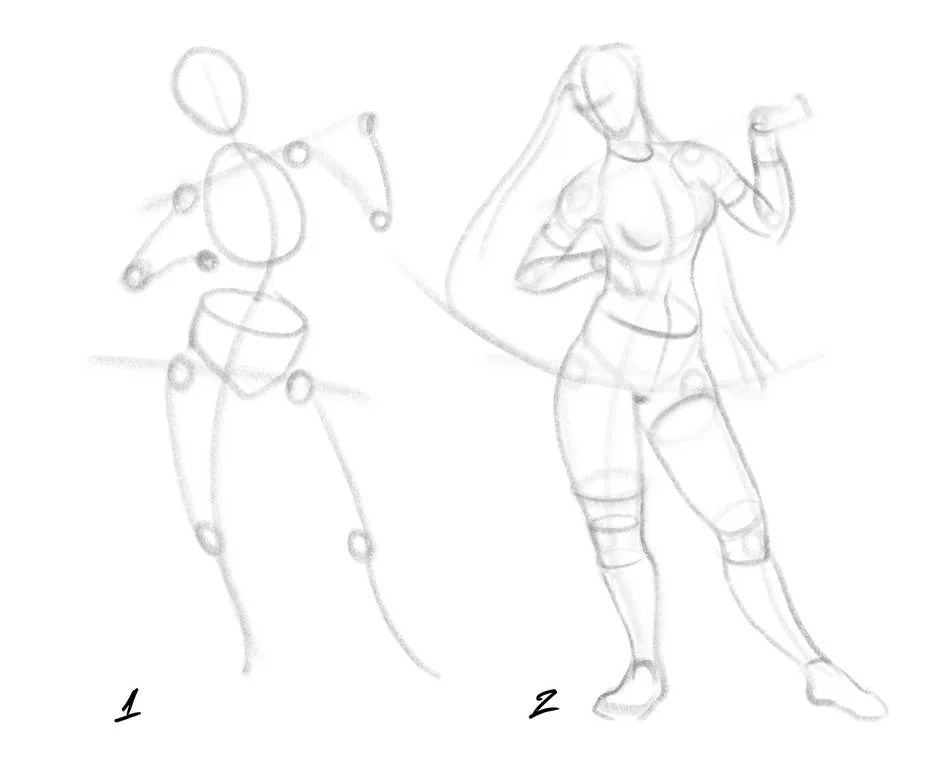
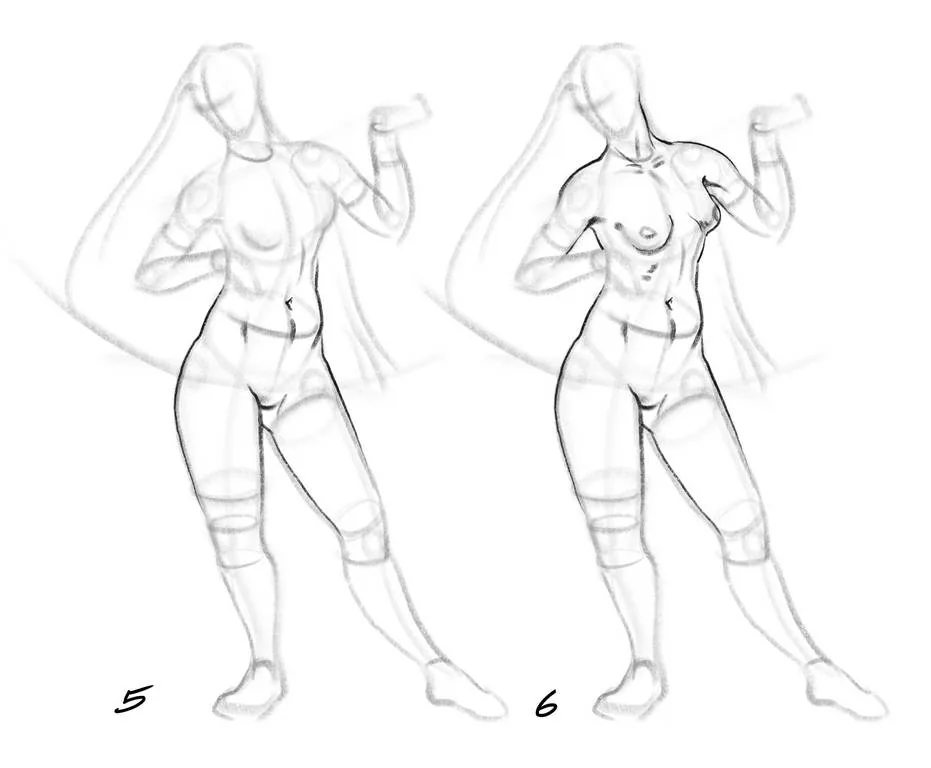
How to make sketches of a naked figure
Drawing a human figure starts with the same principle as drawing animals in the previous fragment — we use a scheme with body parts, around which we draw the silhouette of the girl. Our miss will be in a position of slight movement. Step 1 We mark the head, chest, and pelvis in the form of a cylinder with ovals. We show the location of all the joints of the limbs with small circles-hinges. We connect the joints with lines — these are our future arms and legs. We do the same with the head, chest, and pelvis — we mark them with a line of the spine. We mark the tilt of the pelvis and the tilt of the shoulders so as not to forget their location in space relative to each other. Step 2 We build up the mass of the body and limbs around our scheme of cylinders and spheres. Very simple and schematic, we leave the most beautiful things for last.
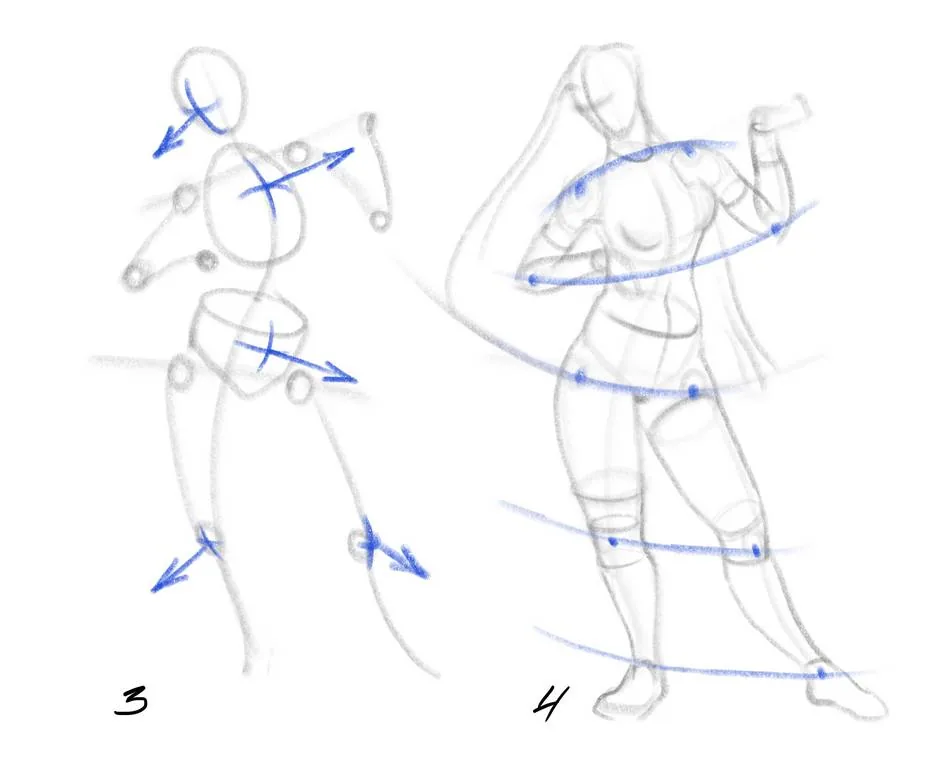
Step 3
It is important to analyze the turns of the body parts at this stage so that the final line of the sketch reliably conveys information about the figure of the girl. Therefore, we have marked their directions with arrows to make it easier for you to see.
Step 4
It is important to check the location of the joints relative to each other. If symmetrical joints are рифмованы on the same axis, then the figure will have the same length of limbs, and this is very important.
Step 5
Now we can start drawing the final contour. We start with the pelvis: with a bold fat line we draw the silhouettes of the pelvis, hips, and abdomen. Immediately we put details: navel, pelvic protrusion to the left of it, folds.
Step 6
We go up higher and draw the shoulders, chest, neck. We designate the edge of the chest, collarbones, armpit folds with light strokes — all that will be inside the outer line of the figure.
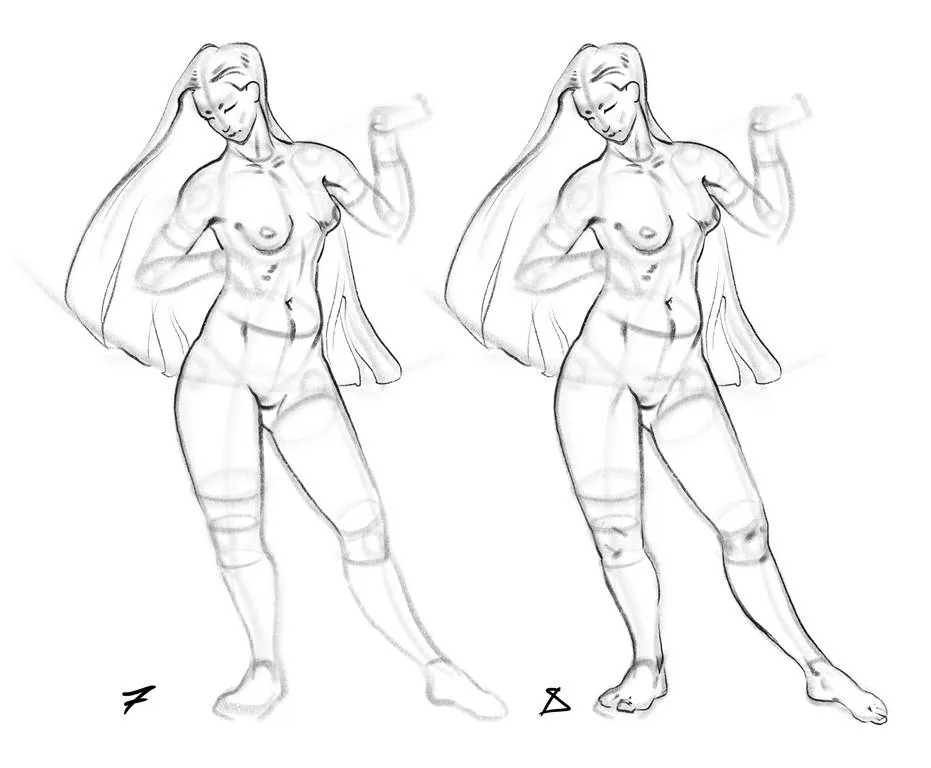
Step 7
We go even higher and schematically show the outline of the face, a semicircle of the ear. Eyes, nose, and mouth are simple dashes, there is no time for detailed images. We also diversify the silhouette of the hairstyle — we show the rhythm of the voids between the curls of hair from below.
Step 8
After the head, we go down and draw the final lines of the shins, feet. We designate the knee joints with strokes — hints. We mark the ankles with curls, and on the feet we show the big toe separately from the others — this way we will add elegance and transform the galoshe-like silhouette into a readable sign of the foot.
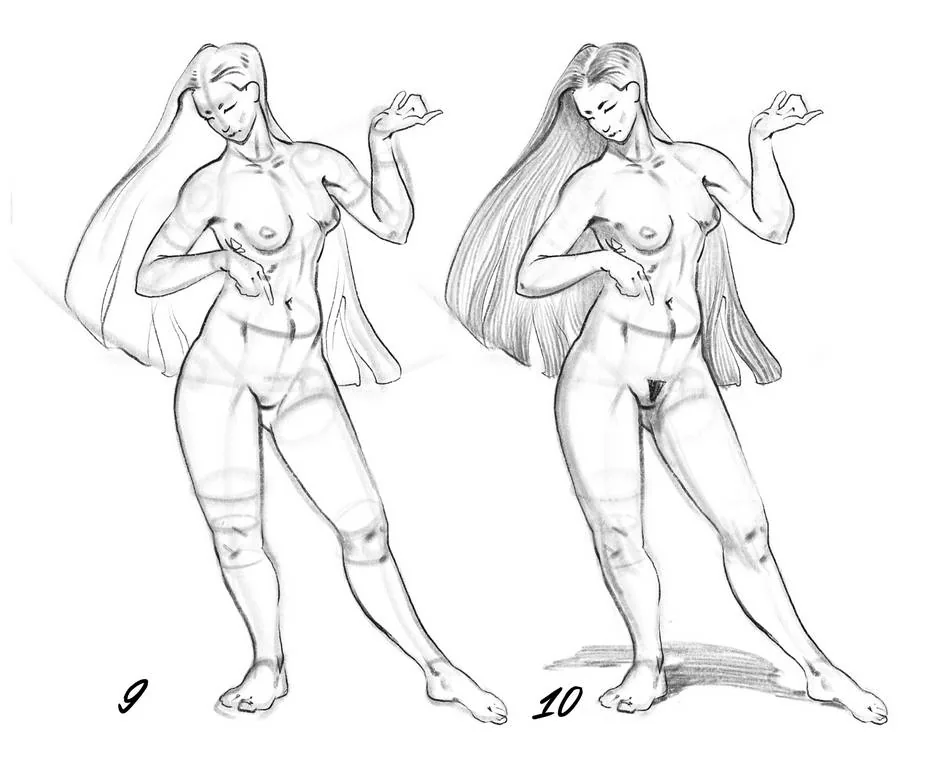
Step 9
We complete our silhouette with the drawing of the gesture of the hands. The main thing is to use only 2-3 lines to draw the brushes, as if you are making a simple logo, without going into details much.
The hand sign should look like real hands. We put a butterfly on the left wrist, so that the girl's gaze is обращен not to empty space, but to a specific character of the scene.
Step 10
We erase the construction lines and give a little elegant stylization to our miss in the last minutes of the timer. We fill the hair area with a thin hatching, imitating the flow of curls. We put a shadow on the neck to highlight the face, a shadow on the buttocks, left armpit, and along the left edge of the pelvis and leg. After that, we complete the sketch of the girl.
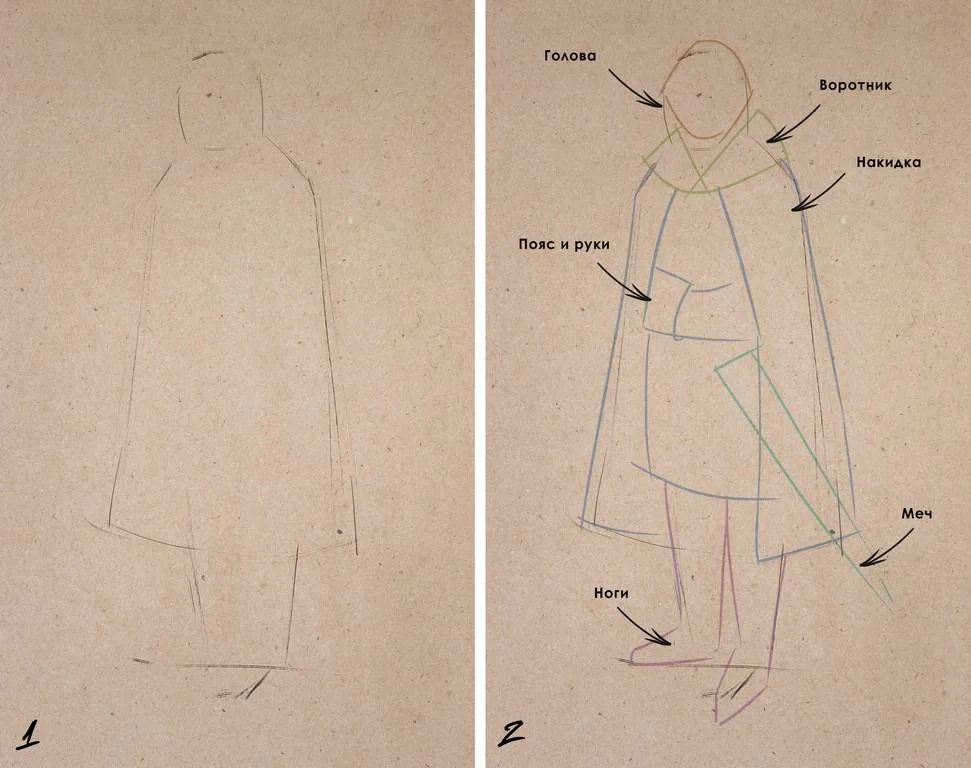
How to make sketches of a person in clothes
In this exercise, we have a different task — it is important to draw a proportional person and convey the image of a warrior. Let's try not to build the body through, as we did with the naked girl this time. We pay more attention to the harmonious combination of body and clothes. Since we are limited by time, drawing a lot of details and complex tonal analysis is not our main goal. Again we take a graphite pencil and draw on craft paper. Changing paper gives a new vision of the sketch, which is very useful. Step 1 A person in clothes is full of many small details, and you should not rush to draw them right away. Imagine that he is like a pepper or a lamp, consisting of large departments. It is important to remember the internal structure and integrity of the image. We mark the outer contour of the figure with light strokes. We monitor the proportions of the parts of the body that are well read in the silhouette — head, cloak, and legs. Step 2 We divide our silhouette with light barely noticeable strokes into key details of the image: we mark the head, collar, and cape, the area of the belt and hands, sword, legs.
Step 3
We boldly mark all the listed elements with strokes, put symbols of brushes, clasps in the form of simple geometric primitives.
Step 4
It is important to understand the turns of the parts of the body, and axes will help us with this. They show the direction of the volumes and the correct arrangement of them in space with each other. The warrior's head looks to the right, and the chest — in the opposite direction, the left leg is turned to us sideways, and the right one — looks at us.
Step 5
We mark our axes with light lines and begin to gradually work out the details of the folds, mark the facial mask and the volume of hair, the volume of the collar, show the edge of the boots and pants with a line.
Step 6
After the main volumes and a small amount of details are drawn, you can move on to detailing. We mark three-quarter turns of the face, a little more curls, folds on the clothes.
Step 7
It's time for contrasting and more noticeable lines. They mark accents and model the edge of the contours. The silhouette should not be monotonous: the line either interrupts, then appears again, then turns into strokes.
Step 9
We add a little tone with a thin hatching. We mark falling shadows, place dark spots on metal details: clasp, ring, and sword. Small swift strokes and curls will add flair and freshness to the sketch — this is the effect we use to complete the sketch of the warrior.
Useful video on sketching a figure for beginners
How to draw sketches of plants
The essence of the subject for drawing, be it an animal, tableware or a person, lies in its structure. The artist's understanding of this structure comes first, and beautiful decor and graphic techniques come second. Let's analyze the process of drawing a willow branch. In the same way, you can zoom in and draw a whole tree, or, conversely, take a lily branch. Did you know that willow was considered a plant of the solar Yarilo in ancient times? After such news, it's the perfect time to draw a willow on a nice autumn day! **Step 1** With light lines, we mark the main movements of the branch. It is important to catch the movement itself. **Step 2** The willow branch is like the Volga delta: the powerful flow of the trunk breaks up into smaller currents of thin branches, and then they scatter into capillary streams. Imagine a scheme of blue arrows on top of our branch — having felt this splitting of a large volume into small ones, draw the contours of the branch and its branches with bold thick lines. We will also show the expansion of the broken-off twig on the branch. **Step 3** When the main movement is drawn, we add smaller twigs and прутики with quick and simple strokes. A slight share of inaccuracy of the lines is acceptable and suits the mood of our willow. We show the place of the broken-off twig with an arc-shaped dash. **Step 4** Now we can move on to decorating the branch and giving it identity with the willow. We draw a light line to mark the boundary of light and shadow, and depict the irregularities of the bark with rounded small drops. **Step 5** We add the crown, and complicate the task by вписывая our branch into a rectangle, as if it is limited by the page of the sketchbook. The crown of the willow resembles a cluster of balls, but we limit it on the right by the corner, so we don't draw them. From the side of the branches, the crown has semicircular niches into which the stems are embedded. We draw the crown line with arcs, into which loops and triangles — leaves — are embedded. **Step 6** We close the line of the frame on the left at the top with a corner with leaves, and cut off the bottom right corner to the tune of the crown. We fill the area of the marked shadow with a homogeneous vertical hatching, put dark strokes of dense hatching on the trunk and add a little shadow on the foliage. We put the cherry on the cake — we add one branch on the left as a contrast to the movement of all the other branches. This will add grace to our sketch. We complete the drawing and remember that the sketch is a lightning-fast thought, quickly placed on paper. You can't work on it for a long time! **How to make an architectural sketch** For the sketch, let's take the perspective of a Romanian street with Vlad Dracula's house. If you want to take a walk on a virtual map and look at this wonderful place from different sides, you will find it at Casa Vlad Dracul, Piața Cetății 8, Sighișoara 545400. In this task, we will need not only a graphite pencil, but also a blue one. Let's try to play with space and add color. **Step 1** First, we denote the location of the houses with cubic outlines and the perspective of the street receding from us with light lines. It runs into a tower with a spire, which faces the viewer frontally with a facade without perspective distortions. We do not draw small details, only the largest generalized forms. **Step 2** With light strokes, we mark the divisions of the wall: the location of windows, бойниц, выступы and niches. We observe the proportions of these ratios. For clarity, the breakdown of the walls into elements is demonstrated in red, green and blue. **Step 3** At this stage, you can see what the breakdown of the walls, made with a pencil, should look like. Use very light translucent lines — they are auxiliary and should be invisible in the future. **Step 4** We start with the farthest «characters» of our scene — the tower and the house. With a sharply sharpened pencil, we draw the outer contour of the building, immediately noting the details of the wall decor. We do these manipulations with the thinnest lines with a very weak pressure. Everything that is drawn with thin lines is far, and with thicker lines — close. We will adhere to this strategy. **Step 5** We begin to «approach» the viewer and add new buildings. We increase the pressure and draw the next house with a thicker line. We note only the most key details: the outer silhouette, the roof, windows, doors, protruding beams under the windows. **Step 6** In the same way, we draw an element of the house closest to us. We do not add a lot of small details that we noted on the distant tower, since the front buildings need to be whole, contrasting in the number of details with the background. **Step 7** We draw the houses on the left in the foreground. We preserve the integrity, thickness of the line and pressure. Details will appear in the next stages. **Step 8** Now we can boldly throw a scattering of architectural elements and textures to the foreground (signs, paving stones, hatch, frames). In the corners of the doorways, in the windows, we can show corners of shadows with solid fills — this technique will further distance the front houses from the background. **Step 9** We add stuffage and clouds. Stuffage is a crowd of people in the background. We place four people with a gradual removal from us. Do not try to clearly outline all the figures, a light hint and dashes-tables and chairs between them are enough to create the feeling of the presence of people on the street. If you draw people in detail, you will distract attention from the main idea of our sketch — architecture. **Step 10** To finally complete our sketch and focus on the houses, we add the background. Take a blue pencil and fill the sky with a wide hatching. You can fill it completely, or you can leave the strokes visible — this will make the sketch more lively. With this sudden color technique, we complete our sketch of the street. **How to draw a variety of sketches** Sometimes, when you have gained experience and have already drawn a whole stack of sketches as high as Mount Everest, a feeling of sameness and boredom comes. To avoid self-citation and dullness, variety, the uniqueness of each new series is necessary. How to bring it into your sketches: * Change the material. Try to replace the usual graphite pencil with sanguine or charcoal, or with an alternative tool with a different character of the imprint — liner. This move will allow you to enrich your graphics. If before the pencil line was continuous and integral, like the horizon of the Kalmyk steppe, then with the use of charcoal pencil it will acquire a porous texture and heterogeneity. * Add color. If you feel that you have sat down for black and white images, dilute the color of the sketches. Color can be added partially, to some details, say, to the girl's hair and skirt, or to the main «character» of the still life — lemon. Be careful, a wide palette of colors can spoil the sketch and make a rainbow jelly mess. * Explore new things. Periodically challenge yourself with new tasks: change the theme of sketches and place. To get out of your comfort zone, you first need to get into it, but we don't have time for that (of course, it's a joke!). Try to go to the very thick of people or climb a mountain. New feelings, new environment, new challenges and events will refresh your perception and bring their own pluses, which smoothly flow through the pencil onto paper. * Change the scale and angle. It is always worth changing the point of view and looking at the composition from a new angle. Try not to draw a person or an object in the same poses, and the landscape — in the same viewing points. Look at the perspective of the street from a bird's eye view or go down to the level of a dog with a cat. Try to draw a person not the main accent of the sheet, but a secondary character, small and unnoticed. Change the points of focus and accents. * Vary the style. You probably have a selection of favorite artists — look at their techniques and cross them with your own approach. To begin with, it will be useful to make a couple of copies — this way you will go through the path of the artist, and your hand will get used to the peculiarities of the author's drawing. We offer three authors from different eras: Karl Kopinsky, Lee. K and Ilya Repin. Try to identify from one to three stylistic techniques in portraits and apply them in your sketches. A samurai has no goal, only a path. And an artist has both. Moreover, having the skill of drawing sketches, you become the strongest shogun with a pencil instead of a katana. In the field of sketches, there are always new paths of growth and new materials unknown to sketching. Draw more sketches, look for unusual approaches for yourself and don't be afraid, and if suddenly your dream is to learn how to make cool sketches of people in a team of creative followers, then on our course Sketching you will find a teacher, a team and knowledge. And you can also come to our live sketching evenings at Skills Up. Follow the events and activities of our school in the telegram channel. Author: Elena ChurkinaReady for serious form? Work through how to draw a plaster head step by step, from composition to tone.
Related materials

Tutorial
Drawing with a pencil for beginners: Step by step to mastery
January 3, 2024
Tutorial
Sketching for beginners
January 30, 2024

Tutorial
Blender 3D lessons for beginners
December 27, 2024

Tutorial
Zbrush lesson for beginners
December 23, 2024

Tutorial
Digital painting for beginners
July 3, 2024

Article
5 tips for a budding environmental artist
September 18, 2023

News
Создание реалистичного бинокля для начинающих с помощью ZBrush и Substance 3D
August 18, 2025