TutorialUpdated: July 2, 2026
Drawing with a pencil for beginners: Step by step to mastery
In short
Drawing with pencil for beginners: step by step, master lines, hatching, chiaroscuro and proportions. Practical tips will help to develop drawing skills.
2D artist (illustrator)
Drawing with a pencil is a wonderful way to express your creative nature and develop your skills in art. Even if you have no experience in drawing, this tutorial will help you start your creative journey and master the basics of pencil drawing techniques. We will look at how to learn to draw, the basic principles of technique, step-by-step instructions for creating drawings with a pencil, and also present several lessons to make it easier for you to understand the process.
How to learn to draw
Let's look at the key aspects of drawing that form the foundation for creating high-quality works:Line
A line is a basic element in a drawing that helps the artist determine silhouettes, outline contours, make constructive structures, and emphasize the shape of objects to make the drawing voluminous and realistic. Practice creating straight and curved lines, drawing lines from point to point to better control them. The pressure on the line is also important to make the line varied, contrasting, and interesting. To do this, you need to practice the degree of pressure on the pencil, which also needs to be trained in exercises to master it. Clear contours and lines will add expressiveness to your drawings.
Hatching
Hatching in a drawing plays an important role as it helps to give volume and texture to the image. It helps to create depth and perspective by adding details and shades. Hatching also allows you to convey various textures, such as fabric, metal, wood, and other materials. It can be used to create contrast and enhance chiaroscuro effects, giving the drawing a realistic look. In addition, hatching can be used to convey mood and emotion, making the image more expressive. Thus, hatching plays a key role in creating an artistic drawing, making it more interesting and attractive to the viewer.
Shadows and light
Understanding chiaroscuro will help you create realistic and voluminous images on paper. Study how light falls on objects and how it affects their shape. To draw volume, we need to practice creating gradients. This can be done using a pencil stroke.
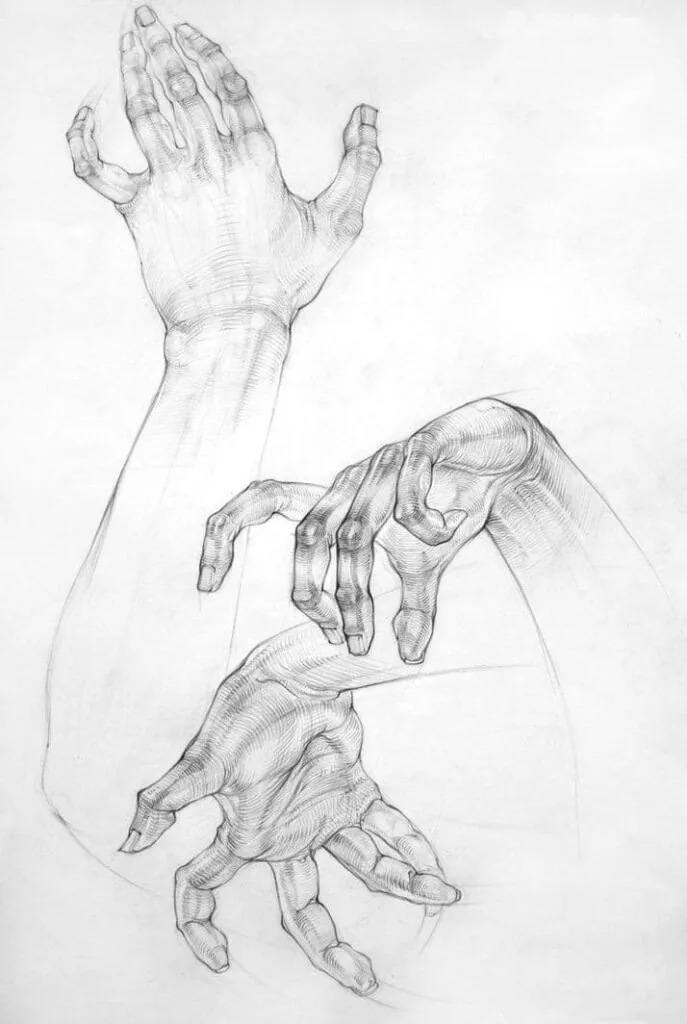
Proportions
Observing proportions is important for the authenticity of the drawing. The ability to determine proportions and visually correlate one part of an object with another is a very important skill for an artist, which helps to avoid distortions and achieve maximum similarity to nature. Recommendation: study the cool article by our curators «Proportions in drawing».
Composition
Composition is the placement of objects in a drawing in such a way that the image looks harmonious and balanced. You will have to study the basic rules of composition to create expressive and interesting compositions. Recommendation: study the cool article by our curators «Composition in drawing».
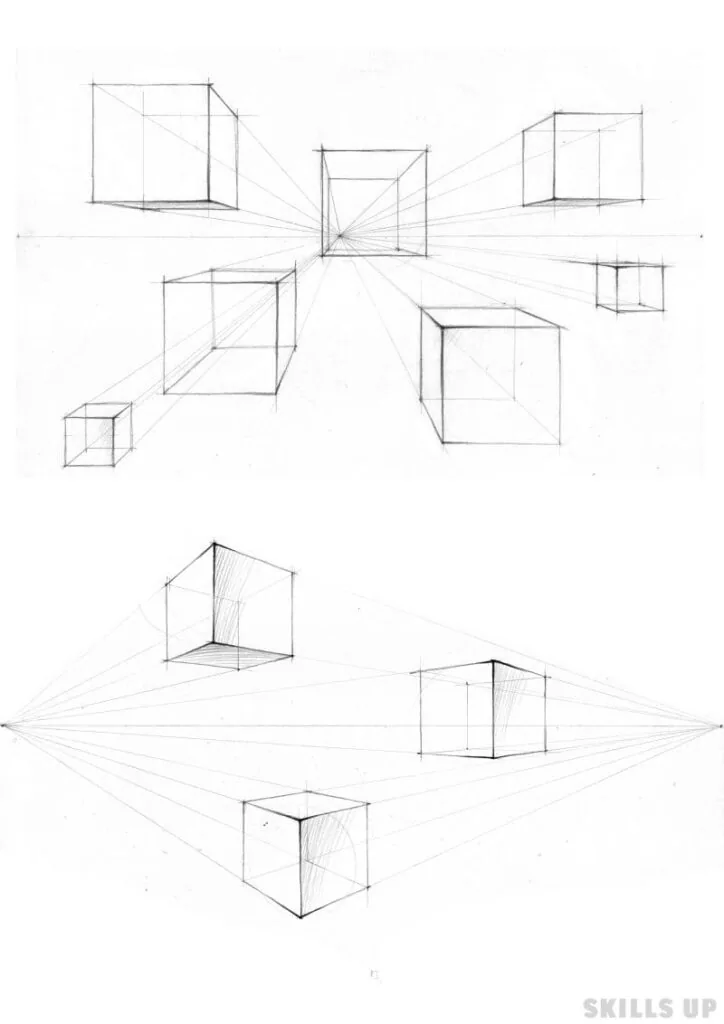
Perspective
Understanding perspective will help you depict objects in three-dimensional space. Study perspective with one, two, and three vanishing points. Recommendation: study the cool article by our curators «Perspective in drawing».
Materials
Related courses
All courses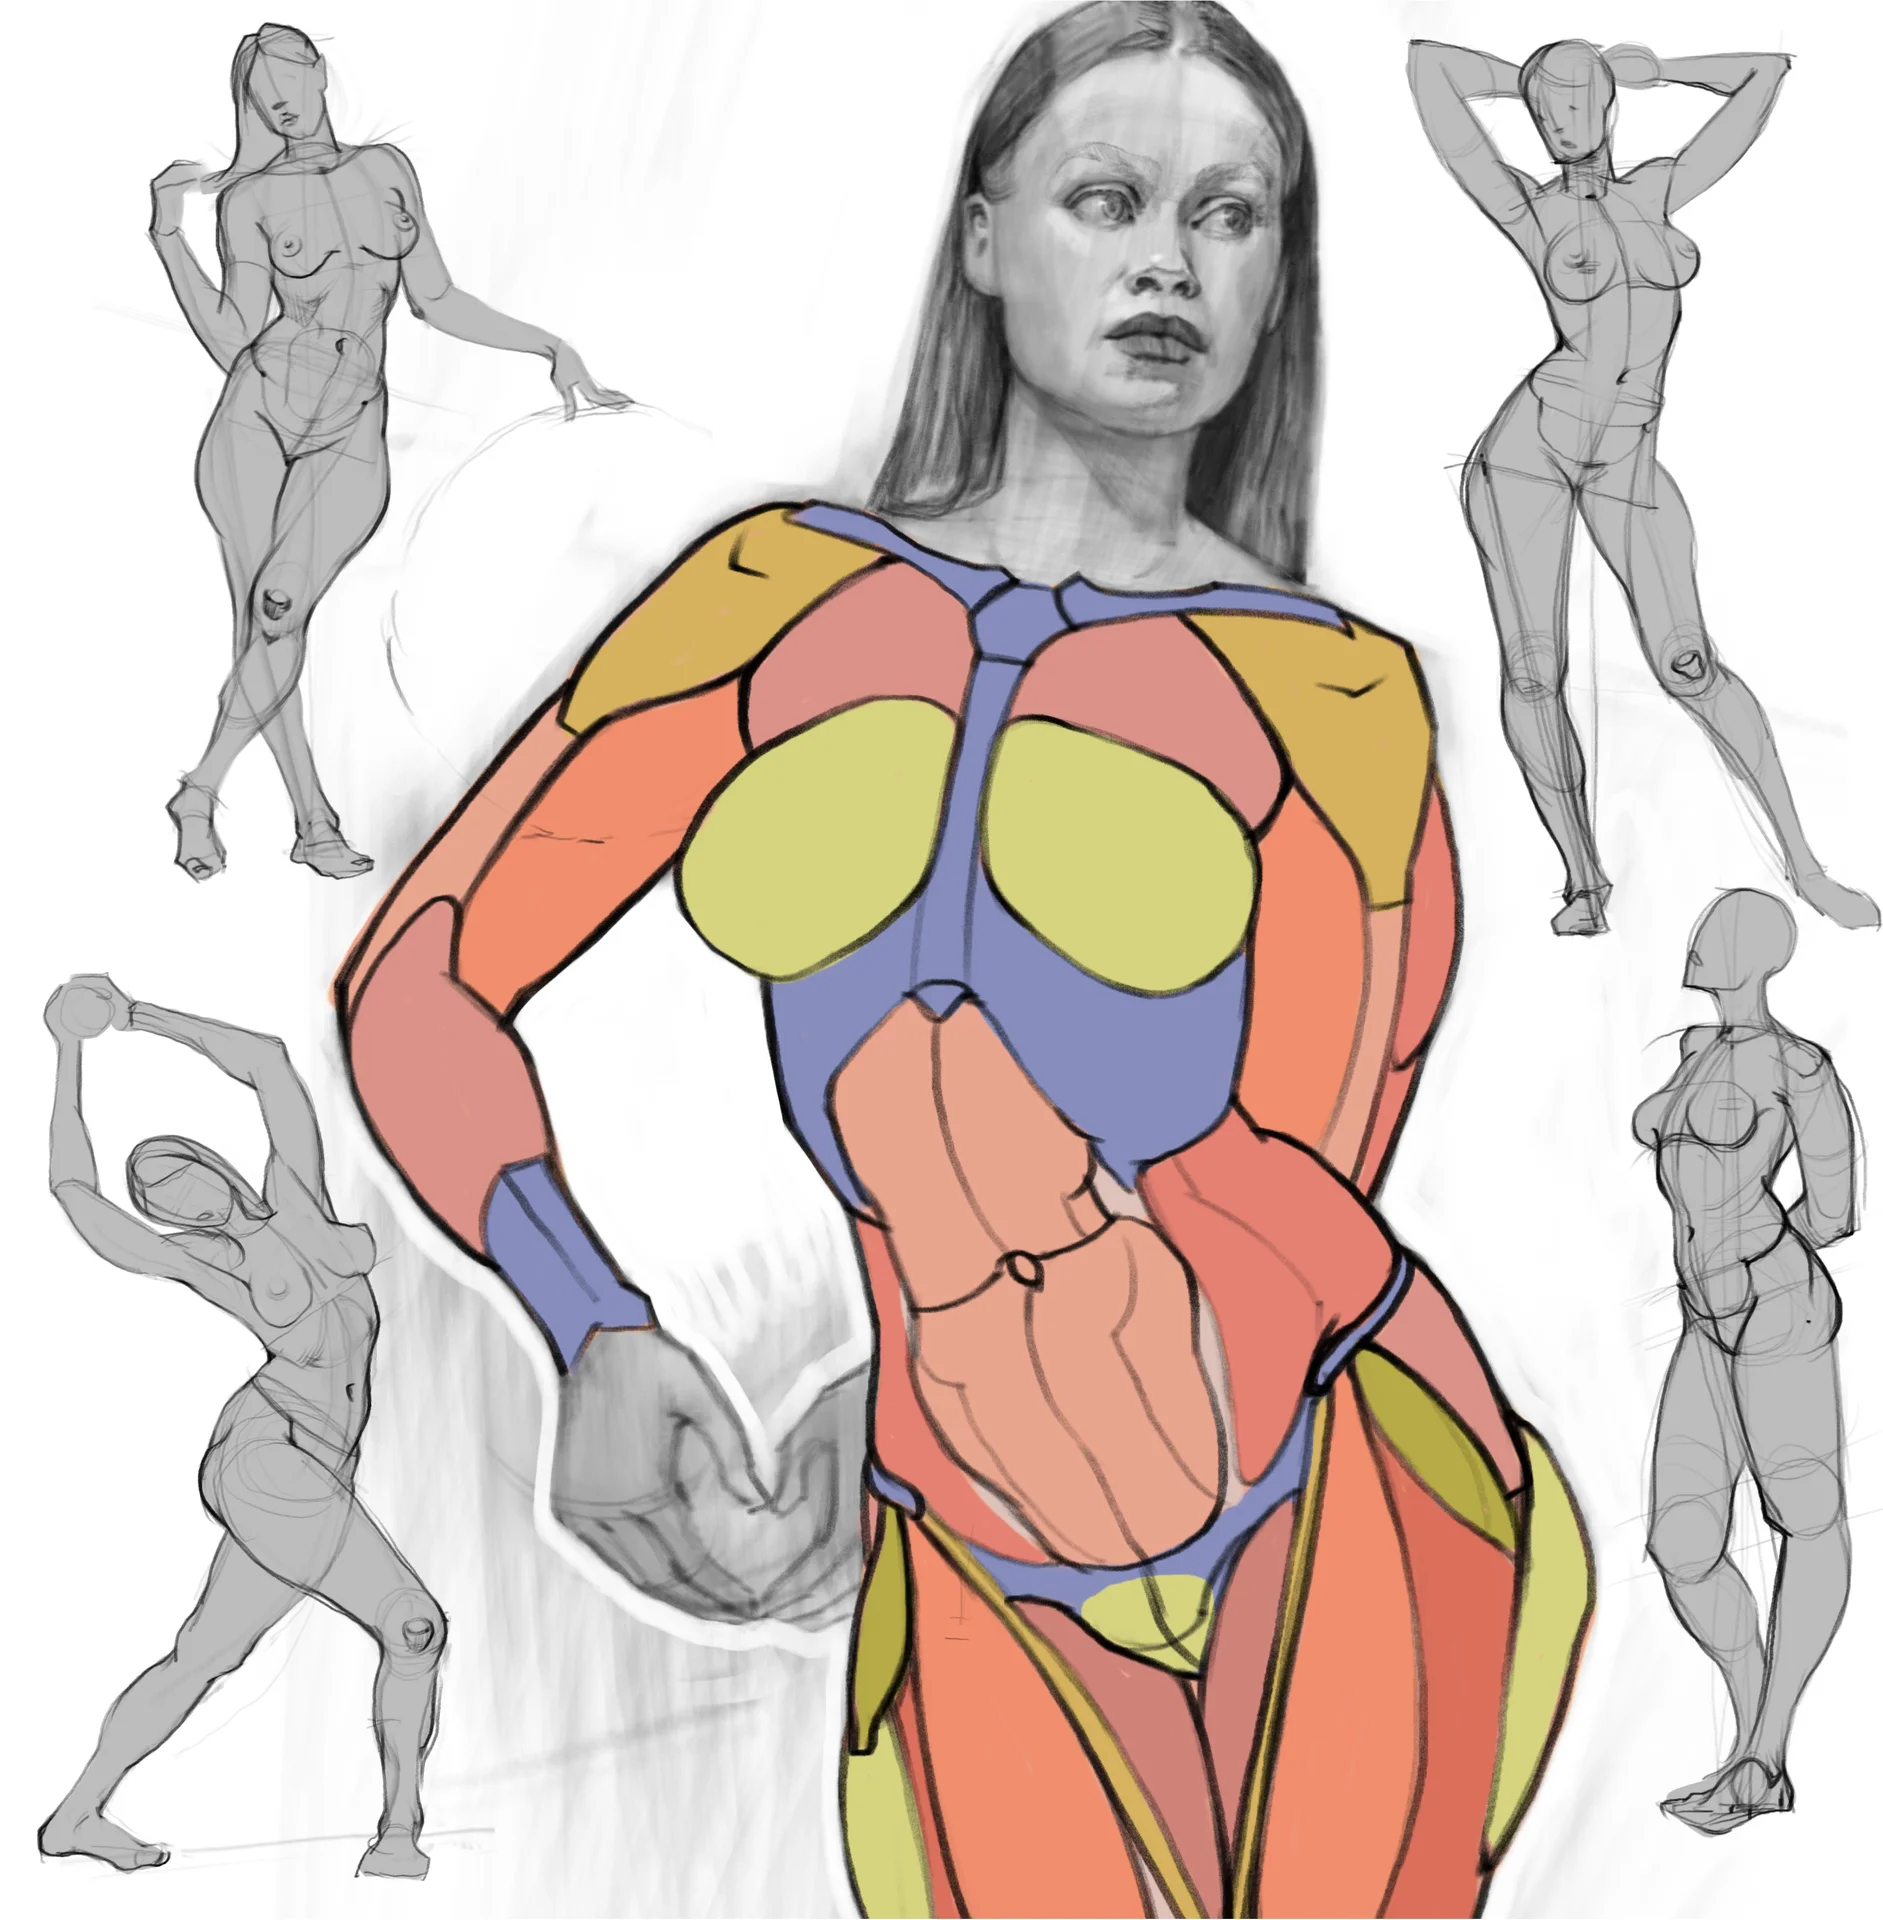
from 2 500 ₽
-50%
Моя первая фигура
5 000 ₽2 500 ₽
Learn more

from 3 900 ₽
-57%
Prop concept: render and atmosphere
9 000 ₽3 900 ₽
Learn more

from 3 900 ₽
-57%
Book illustration: The first page page
9 000 ₽3 900 ₽
Learn more
We will need paper, you can take simple office A4 format. Textured paper, such as watercolor paper, will not be suitable for us. A tablet on which we will place the paper. A sharpened pencil, the softness of which is needed 2b and more. Sharpen the pencil with a knife, not an eraser, so that the length of the exposed part of the lead is greater. We will also need an eraser to erase lines and formoplast to slightly soften the tone of the drawing.
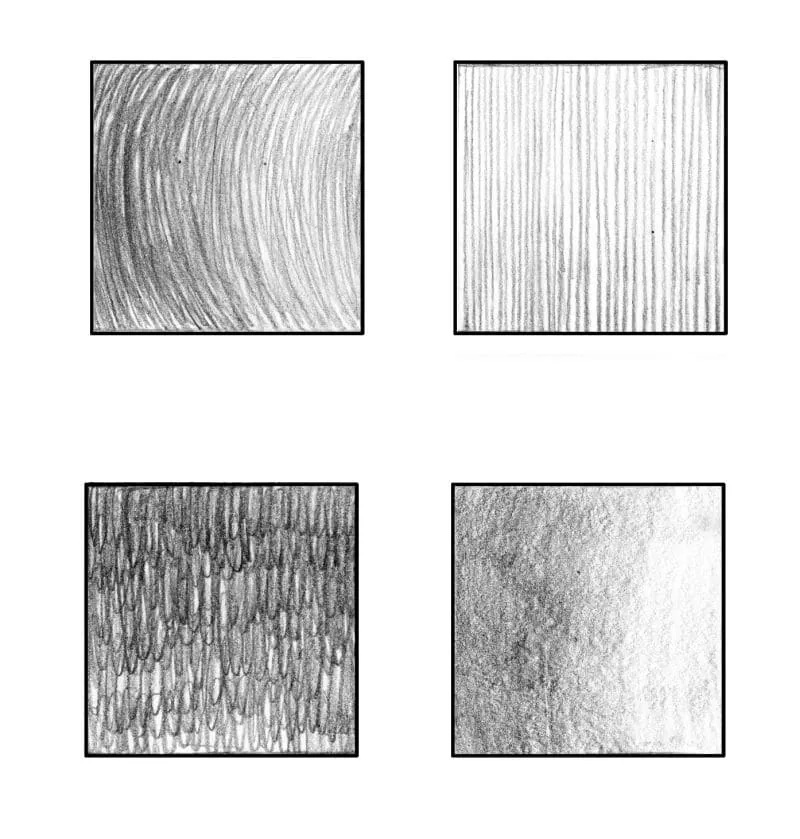
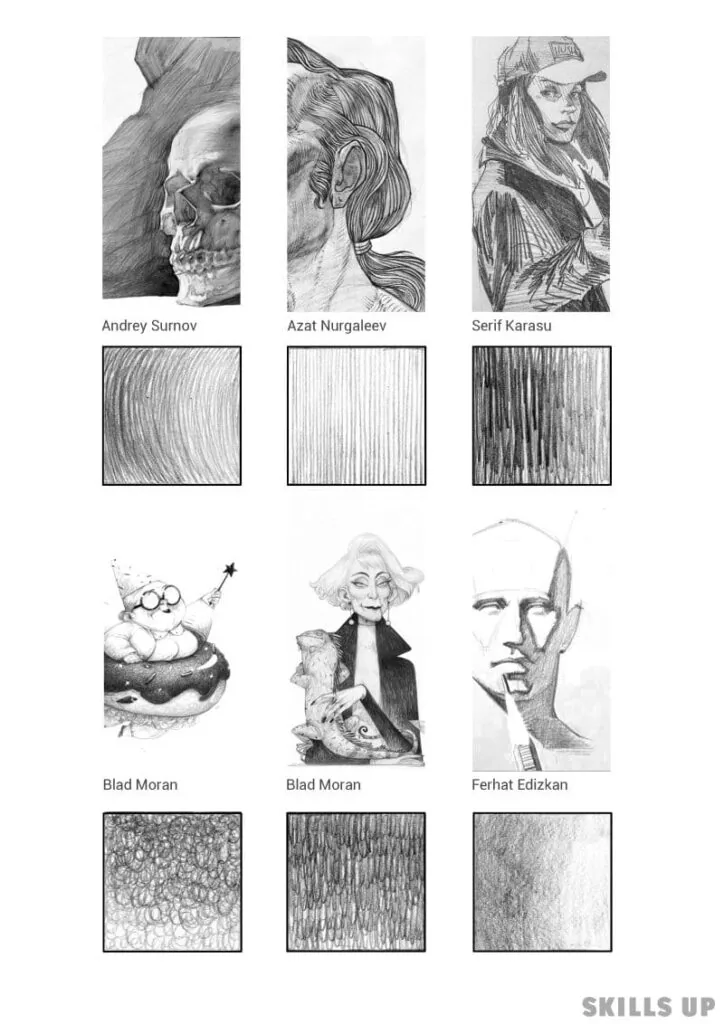
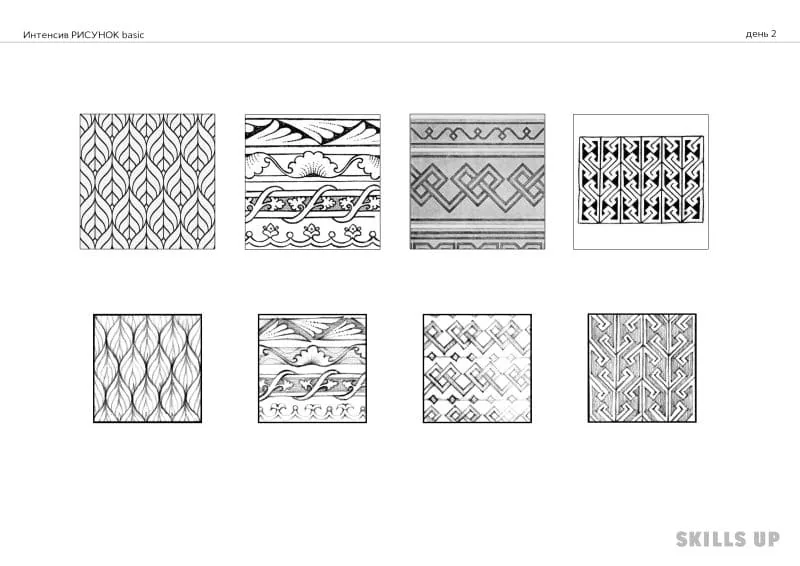
 Now let's start drawing various textures. First, make several figures drawn with lines through points, as we have already done with you before. Now start filling the figures with textures.
Fill the first figure with rows of repeating loops. Try to fill the entire area of the figure, and make the texture uniform.
Fill the second figure with rows of vertical short segments. If your hand gets tired, allow yourself short breaks.
Fill the next figure with rows of zigzag lines. The texture is already more complicated. Do it carefully and accurately. Such a texture can show a kind of scaly nature of an object or, for example, the roof of a house.
Try to make the next texture from longer segments, with a fan-shaped distribution of strokes in rows that fill our figure.
Now let's fill the figure with vertical strokes so that we get a gradient from dark to light. To do this, first fill the figure evenly with strokes. Then start shading with the second layer to about the middle of the figure. After that, make another layer of shading in the lower part of the figure, not to the middle, but only a quarter. A smooth gradient should be obtained, the upper part of which is lighter than the lower one. If necessary, add a stroke in those areas where it is not enough for a uniform gradient.
Now let's draw a texture of small bubbles. Fill the figure with circles of different sizes adjacent to each other. Make sure that the sizes of the bubbles are different and a sense of randomness is created. Try to create a gradient effect by making the bubbles smaller and farther apart in the upper part, and the distance between them increases the higher up. You can also use pressure on the pencil - in the lower part of the drawing make it more contrasting, and the upper part of the texture lighter. To enhance the contrast, you can re-draw some of the texture elements in some places.
Next, we will make a texture of bundles of strokes. Fill the figure with such groups of strokes, and try to achieve a gradient texture effect so that the top is lighter compared to the bottom.
And draw another texture with similar loops that we did in the very first texture, but now add a gradient effect by layering rows of loops on top of each other so that the bottom of the texture becomes darker than the top.
Now let's start drawing various textures. First, make several figures drawn with lines through points, as we have already done with you before. Now start filling the figures with textures.
Fill the first figure with rows of repeating loops. Try to fill the entire area of the figure, and make the texture uniform.
Fill the second figure with rows of vertical short segments. If your hand gets tired, allow yourself short breaks.
Fill the next figure with rows of zigzag lines. The texture is already more complicated. Do it carefully and accurately. Such a texture can show a kind of scaly nature of an object or, for example, the roof of a house.
Try to make the next texture from longer segments, with a fan-shaped distribution of strokes in rows that fill our figure.
Now let's fill the figure with vertical strokes so that we get a gradient from dark to light. To do this, first fill the figure evenly with strokes. Then start shading with the second layer to about the middle of the figure. After that, make another layer of shading in the lower part of the figure, not to the middle, but only a quarter. A smooth gradient should be obtained, the upper part of which is lighter than the lower one. If necessary, add a stroke in those areas where it is not enough for a uniform gradient.
Now let's draw a texture of small bubbles. Fill the figure with circles of different sizes adjacent to each other. Make sure that the sizes of the bubbles are different and a sense of randomness is created. Try to create a gradient effect by making the bubbles smaller and farther apart in the upper part, and the distance between them increases the higher up. You can also use pressure on the pencil - in the lower part of the drawing make it more contrasting, and the upper part of the texture lighter. To enhance the contrast, you can re-draw some of the texture elements in some places.
Next, we will make a texture of bundles of strokes. Fill the figure with such groups of strokes, and try to achieve a gradient texture effect so that the top is lighter compared to the bottom.
And draw another texture with similar loops that we did in the very first texture, but now add a gradient effect by layering rows of loops on top of each other so that the bottom of the texture becomes darker than the top.
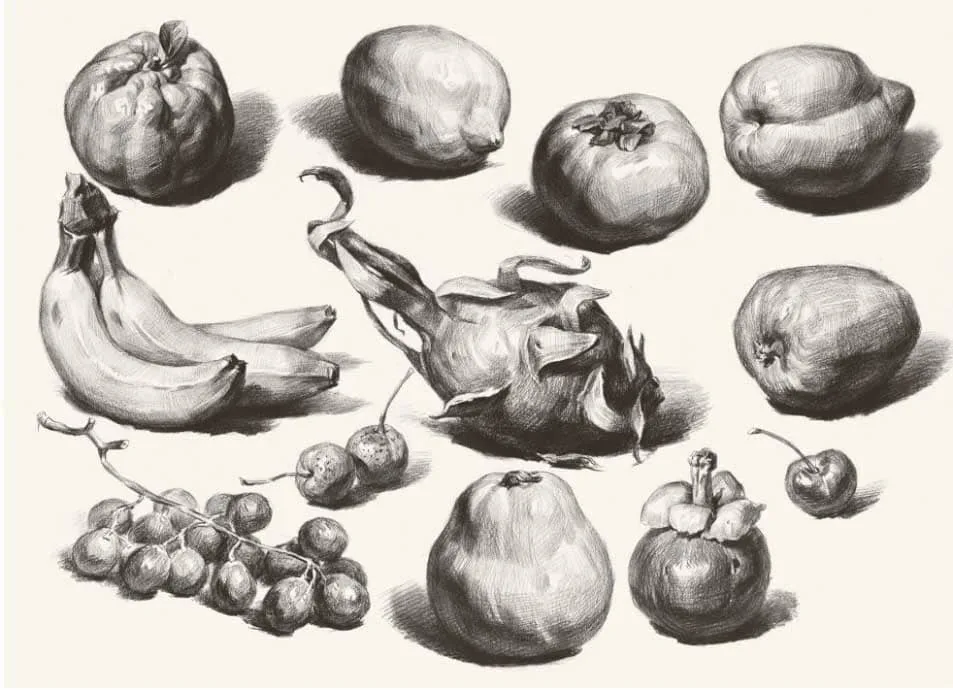
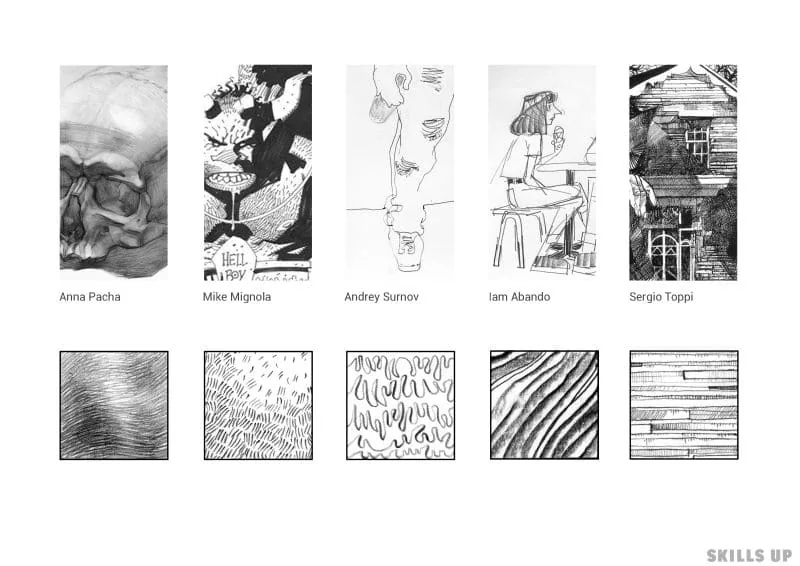
 Now you know how to create various textures with a pencil. Try to draw several textures on your own, as shown in the examples. You can also look for drawings by other artists, analyze their work, and make several sketches of the textures they use, this will greatly diversify and enrich your graphic technique and visual library.
Recommendation: study the cool article by our curators «Texture and texture in drawing».
Now you know how to create various textures with a pencil. Try to draw several textures on your own, as shown in the examples. You can also look for drawings by other artists, analyze their work, and make several sketches of the textures they use, this will greatly diversify and enrich your graphic technique and visual library.
Recommendation: study the cool article by our curators «Texture and texture in drawing».
 Make several more sketches of ornaments on your own to consolidate the result. You can practice on the ornaments located below.
Drawing elements
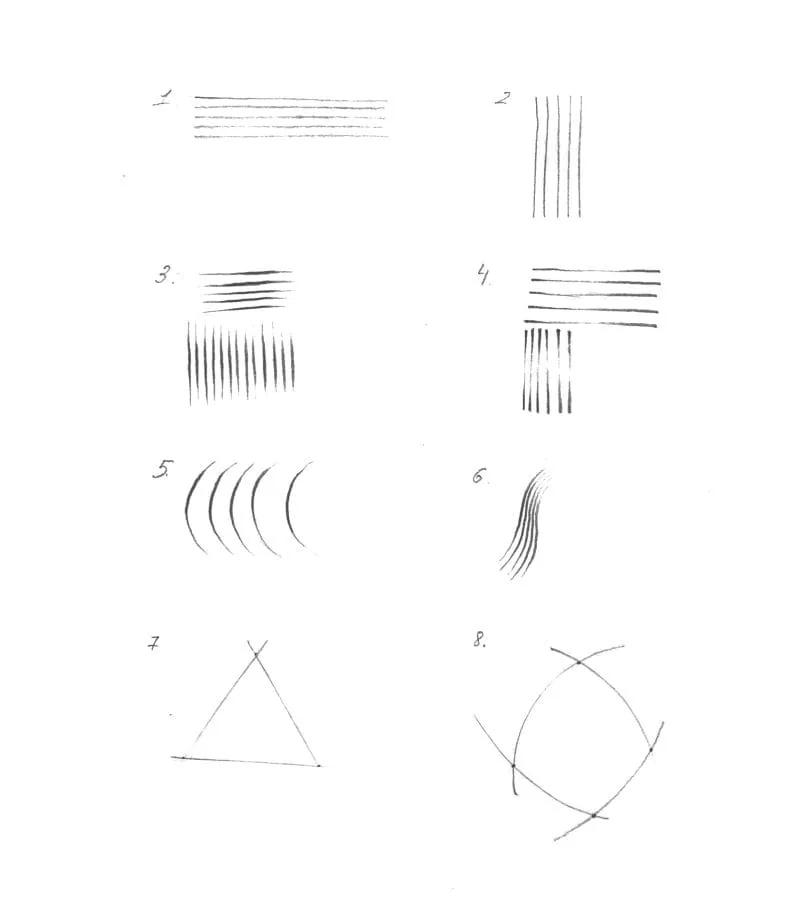
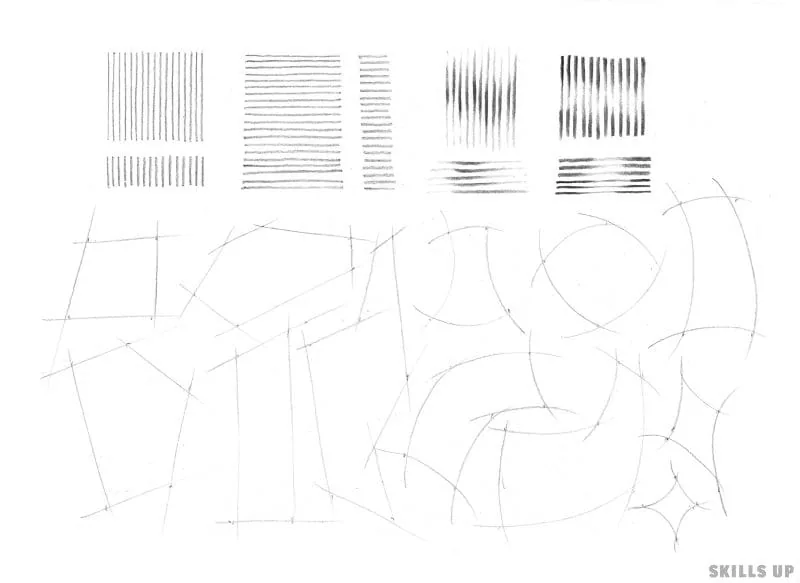
Let's start with a simple exercise: draw straight lines. It is important to feel the pencil when you lead it across the paper and to learn to control the pressure on it. Draw a block in which the lines will be drawn vertically from top to bottom 3-5 cm. The pressure should now be uniform and the lines the same throughout their length. Below, make a row of short lines, also vertical. This is an isolated exercise, the hand can get tired, so take short breaks if necessary. Next, make a block of horizontal lines and draw some shorter lines next to it. Now we need to practice making lines with pressure. To do this, start by drawing a line above the sheet of paper and smoothly lower the pencil, drawing a line first light without strong pressure, and then increasing the pressure to a contrast in the middle, after which smoothly raise the pencil, reducing the pressure so that the line becomes light and non-contrast again. Make a block of vertical and horizontal lines in this way. Practice more if it didn't work out right away, because a lot of practice is needed for a good result. Now, if everything worked out, make an inverted pressure. First, drawing a line with pressure, and in the middle, reduce the pressure, and at the end, strengthen the pressure on the pencil again. Thus, the line in the middle will be light, and the edges will be contrasting with clear ends. Practice drawing such lines more often so that you gain confidence and easily control the pressure. Using this method, the line in your drawings will look more spectacular and picturesque. Now let's practice drawing long lines. Put points at different distances from each other and connect these points with straight lines. It is not necessary to end the movement at the point, draw the line "through". In this exercise, we learn to create long segments so that the hand has a feeling of lightness and there is no stiffness of movements. Hand movements should be from the elbow, not with the hand, and do not try to hit the points very accurately, since in this exercise we need to learn to create confident straight lines. Try to make shapes similar to various fragments. And next, draw several more shapes from lines through points, but now try to make the lines curved and concave, alternating them at your discretion.
Now let's start drawing various textures. First, make several figures drawn with lines through points, as we have already done with you before. Now start filling the figures with textures.
Fill the first figure with rows of repeating loops. Try to fill the entire area of the figure, and make the texture uniform.
Fill the second figure with rows of vertical short segments. If your hand gets tired, allow yourself short breaks.
Fill the next figure with rows of zigzag lines. The texture is already more complicated. Do it carefully and accurately. Such a texture can show a kind of scaly nature of an object or, for example, the roof of a house.
Try to make the next texture from longer segments, with a fan-shaped distribution of strokes in rows that fill our figure.
Now let's fill the figure with vertical strokes so that we get a gradient from dark to light. To do this, first fill the figure evenly with strokes. Then start shading with the second layer to about the middle of the figure. After that, make another layer of shading in the lower part of the figure, not to the middle, but only a quarter. A smooth gradient should be obtained, the upper part of which is lighter than the lower one. If necessary, add a stroke in those areas where it is not enough for a uniform gradient.
Now let's draw a texture of small bubbles. Fill the figure with circles of different sizes adjacent to each other. Make sure that the sizes of the bubbles are different and a sense of randomness is created. Try to create a gradient effect by making the bubbles smaller and farther apart in the upper part, and the distance between them increases the higher up. You can also use pressure on the pencil - in the lower part of the drawing make it more contrasting, and the upper part of the texture lighter. To enhance the contrast, you can re-draw some of the texture elements in some places.
Next, we will make a texture of bundles of strokes. Fill the figure with such groups of strokes, and try to achieve a gradient texture effect so that the top is lighter compared to the bottom.
And draw another texture with similar loops that we did in the very first texture, but now add a gradient effect by layering rows of loops on top of each other so that the bottom of the texture becomes darker than the top.
Now you know how to create various textures with a pencil. Try to draw several textures on your own, as shown in the examples. You can also look for drawings by other artists, analyze their work, and make several sketches of the textures they use, this will greatly diversify and enrich your graphic technique and visual library.
Recommendation: study the cool article by our curators «Texture and texture in drawing».
Exercise Greek ornament
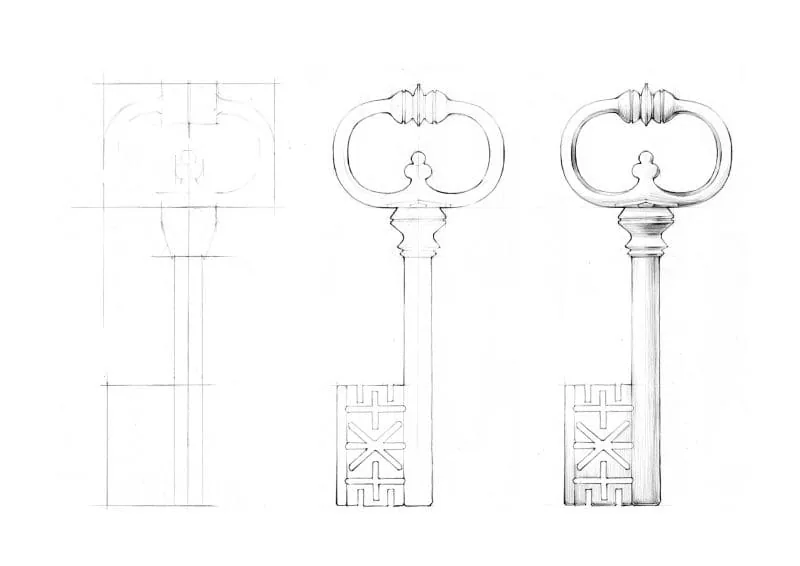
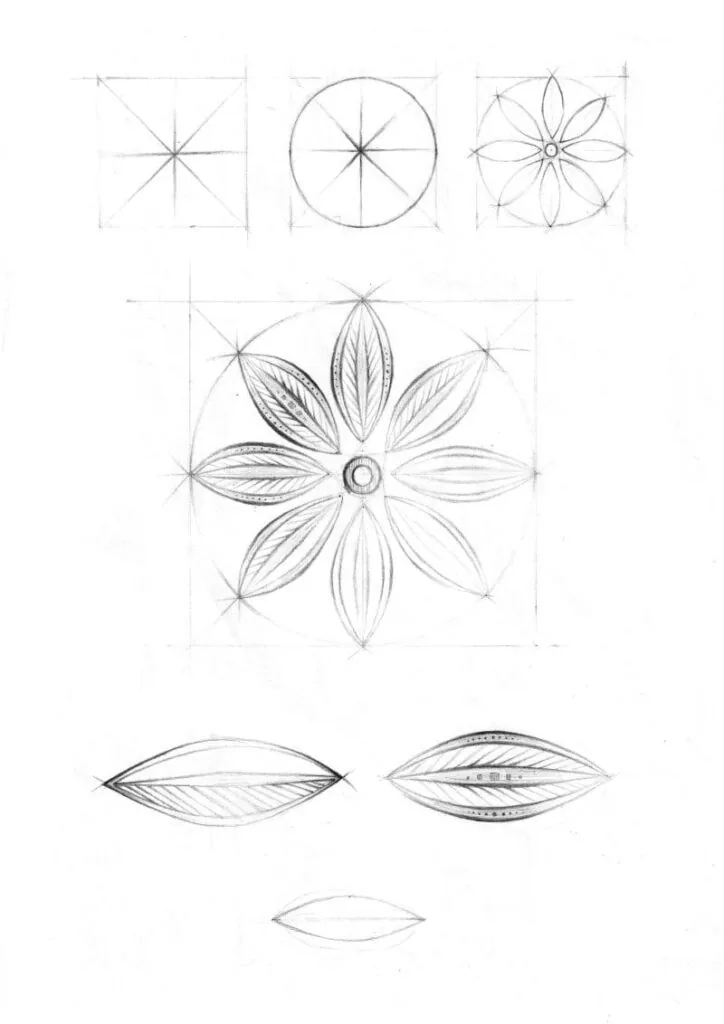
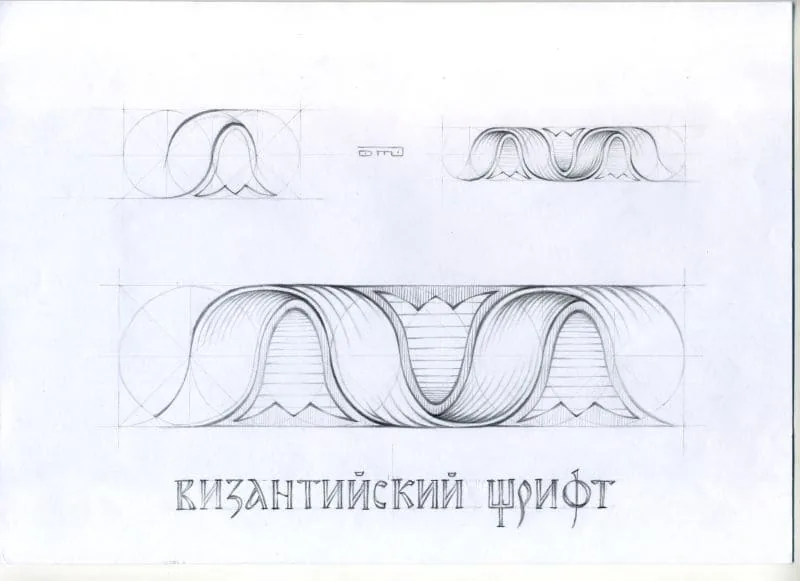
Let's do another exercise in which you can draw a Greek ornament. To make the ornament, you need to make a preliminary layout-scheme of a small size. Let's take a clean sheet of A4 format, and draw a small square (4*4 cm) on the side. Divide it in half with a vertical and horizontal line, also draw the diagonals of the square. And then inscribe a circle so that it touches this square on four sides. Now we can mark the elements of the ornament. Let's start with a small circle in the center, and having retreated a couple of millimeters from it, outline eight elements in the form of leaves, arranging them along the vertical, horizontal, and diagonal lines that we marked before. Now we have a scheme according to which we can draw an ornament of a larger size. Do the same actions in the same order by drawing this ornament 10*10 cm in the center of your sheet of paper. Make your drawing without pressing too hard on the pencil so that you have the opportunity to correct the drawing and then erase the construction lines. When all the elements are drawn, you can add a drawing to the leaves based on the image of the original ornament depicted in the reference. The side and central lines of the leaves can be made thicker, and the pressure can be increased at the beginning and end on the corners, thereby increasing the contrast and making the image more lively and vibrant. The inner space of the leaf can be filled with lighter strokes imitating a real leaf of the plant. We managed to draw a simple but expressive sketch of an ornament with a pencil, on which we were able to practice drawing straight and curved lines, measure equal distances, and apply the effect of pressure on the pencil. Exercises like these are very good for developing your eye and honing your graphic technique.
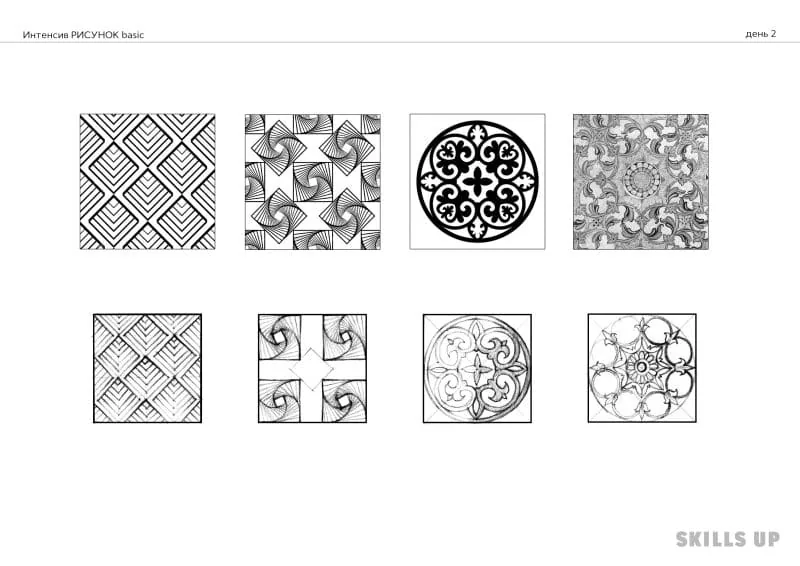
Make several more sketches of ornaments on your own to consolidate the result. You can practice on the ornaments located below.
Conclusion
Drawing with a pencil is a process that requires practice, patience, and dedication. Following this tutorial, you can develop your skills and express your creativity on paper. Do not be afraid to experiment, learn from mistakes, and enjoy the process. Drawing with a pencil is an amazing way to express yourself and discover new facets of your creative potential. If you want to gain more knowledge and learn the basic skills of drawing with a pencil - confidently master the line, use the stroke to model the shape, understand the principles of chiaroscuro, understand perspective and composition, then be sure to sign up for our basic drawing course.Useful video from our school «drawing for beginners or how to start your way as an artist?»
Related materials

Tutorial
Pencil sketches for beginners
October 2, 2024
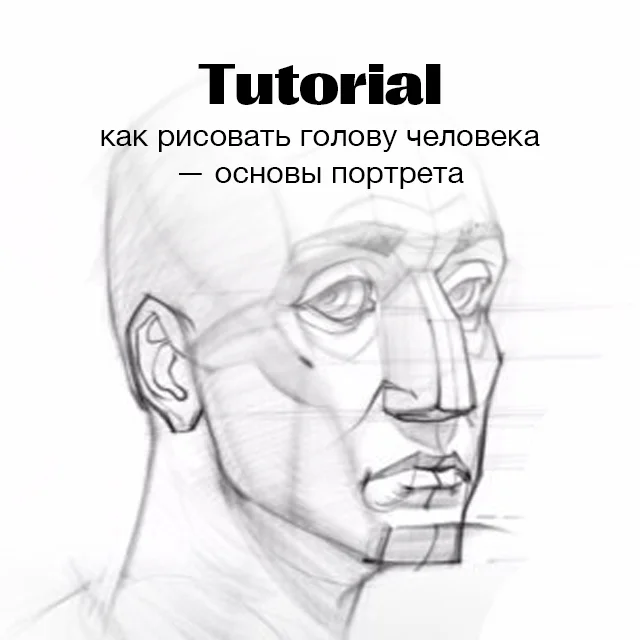
Tutorial
How to draw a human head
September 18, 2023

Tutorial
How to learn to draw on a tablet. Tips and lessons for beginners
December 31, 2023

Tutorial
How to draw a crystal. Step-by-step guide for artists
March 24, 2025

Tutorial
Learning to draw glow
March 21, 2025

Article
3 tips for a beginner character artist. How to draw emotions
September 18, 2023

News
Эта уютная игра-рисовалка позволяет исследовать созданные вами пейзажи
May 22, 2026