ArticleUpdated: July 15, 2026
How to draw hands correctly
In short
Drawing hands is one of the most difficult parts of the body to depict due to their complex anatomy and mobility.
2D artist (illustrator)
Hello! My name is Anton Korostov, I am an artist and a curator of drawing courses at Skills Up School.
The hand is built on bones, just like the whole figure. See the overall structure of the body in the master class How to draw a human skeleton.
Hands are one of the most difficult parts of the body to depict due to their complex anatomy and mobility. This makes them an interesting challenge for artists seeking to improve their skills.
We use our hands not only for practical purposes, holding a mug, typing text and performing other everyday actions, but also for expressively conveying our words, reacting to emotions. Hands are a multifunctional part of the body: a person can perform complex and precise movements with the help of a hand, engaging in physical labor, or use fine motor skills to perform ultra-precise manipulations in space.
In order for everything to work synchronously, there are a lot of nerves and receptors concentrated on the fingers, which are responsible for movements. Hands help us feel objects with touches, determine their size and texture.
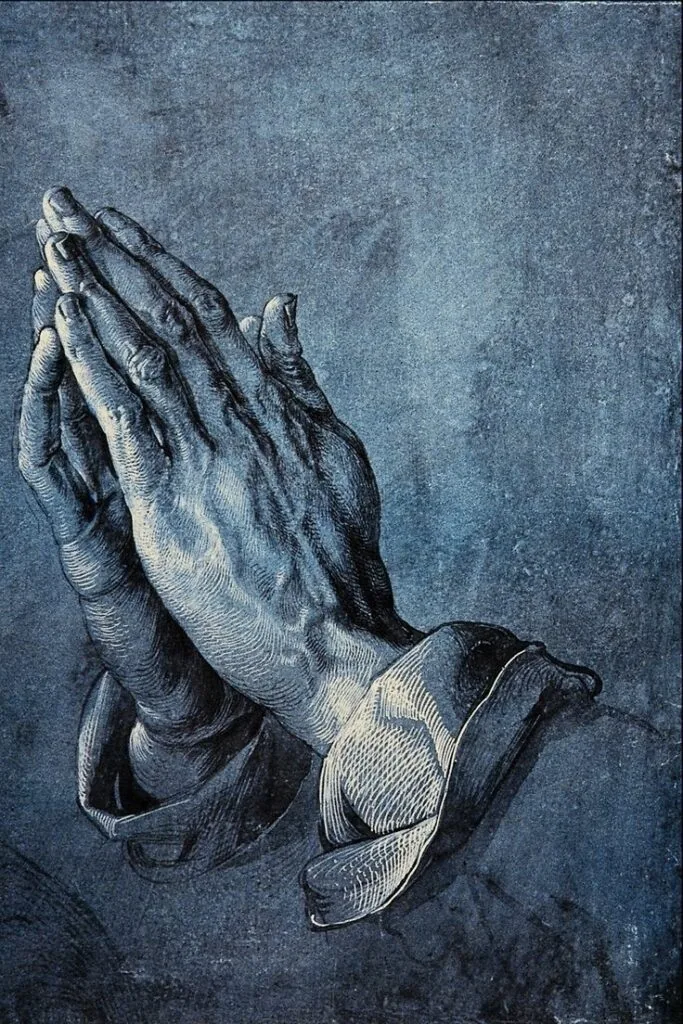
Great masters of the past, Leonardo da Vinci, Michelangelo, Albrecht Dürer and Sandro Botticelli were well aware of the importance of accurate depiction of anatomy and hand gestures in their works. The famous drawing of the hands of a praying Dürer is considered one of the first detailed anatomical studies in history. It shows the artist's deep understanding of the structure of bones, muscles and tendons.
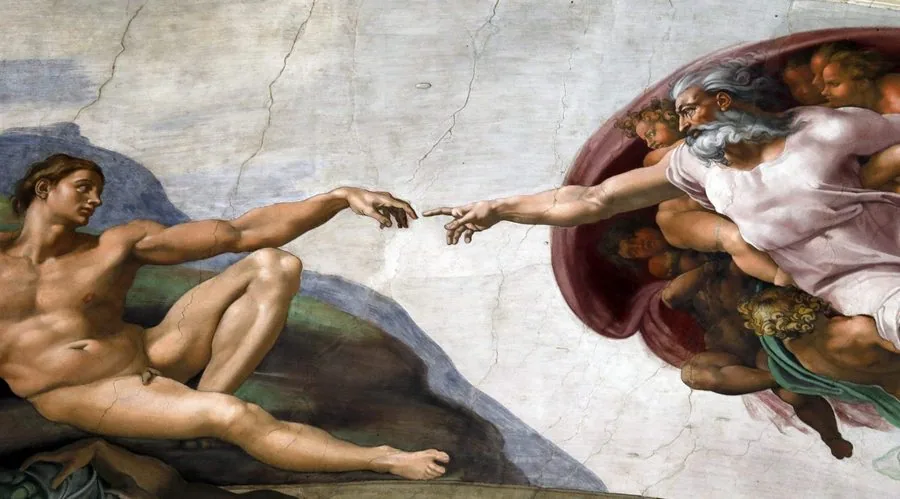
 In the painting of the Sistine Chapel, Michelangelo masterfully uses hand gestures to convey emotions and interactions of characters. For example, in the scene «The Creation of Adam» the almost touching hands of God and Adam symbolize the moment of transmission of life. The image of the hands of Adam and God becomes key in the artist's work, it demonstrates the connection between God and his creation.
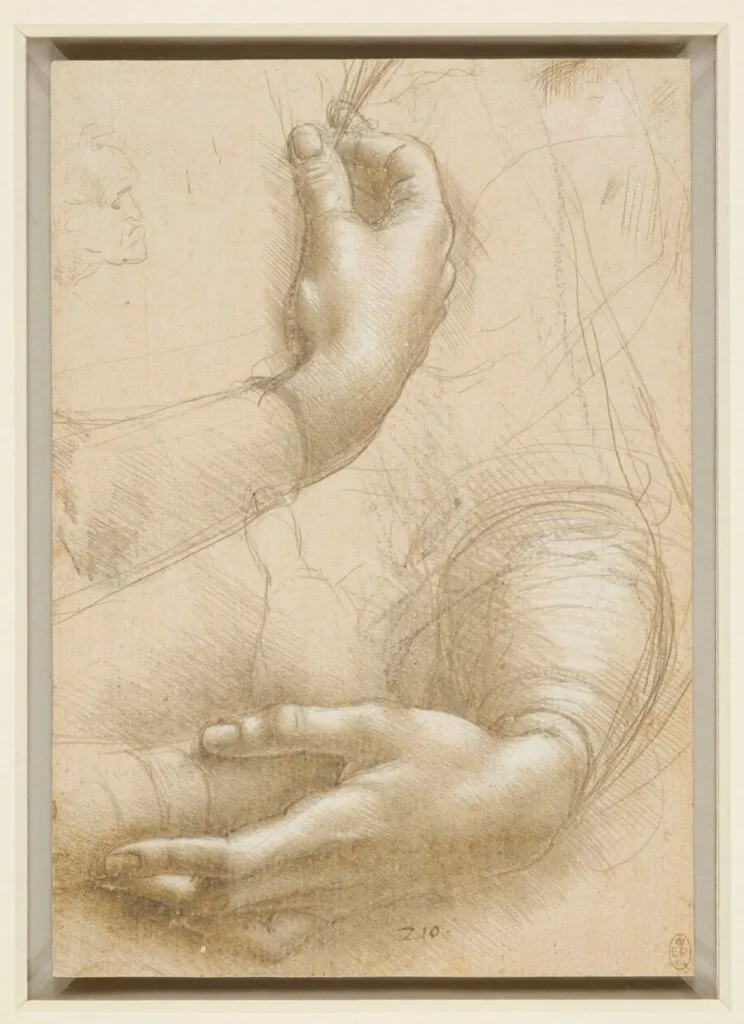
 Leonardo da Vinci is known for his numerous anatomical sketches, including detailed studies of hands. His works combine scientific accuracy with artistic expressiveness.
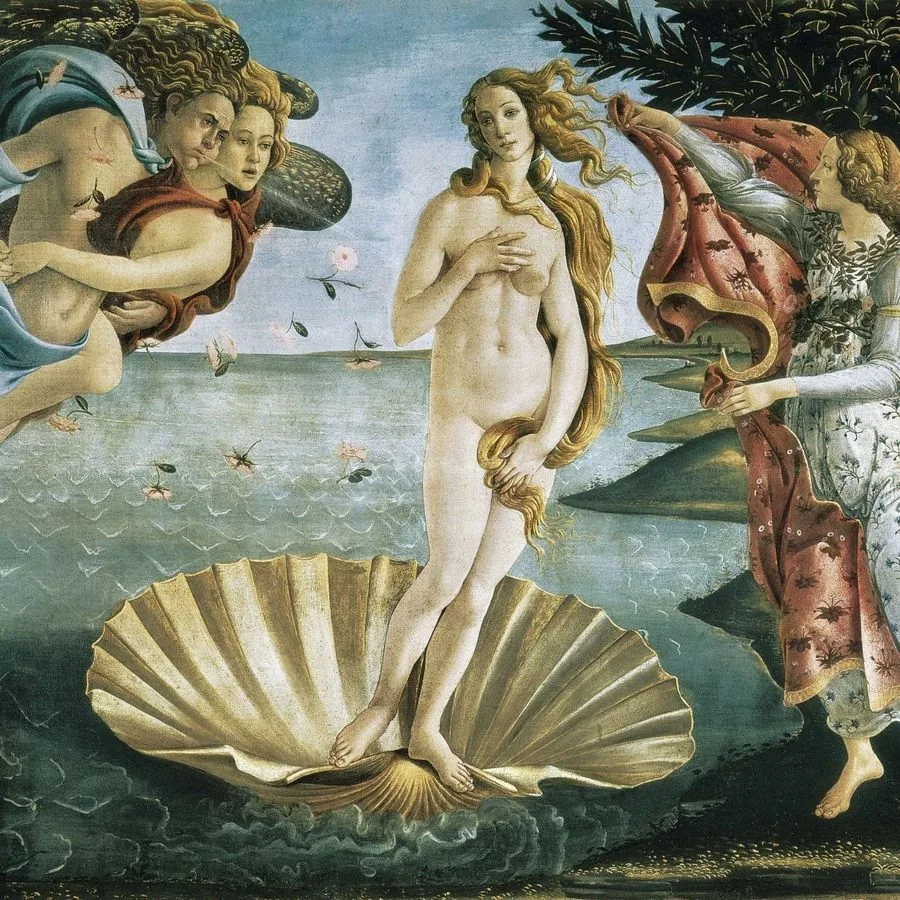
 Botticelli in his works «The Birth of Venus» or «The Spring» gracefully depicts hands, emphasizing the grace and sophistication of the characters.
 These and many other examples show how important it is for an artist to develop the skill of depicting hands. Understanding the anatomy of the structure of bones, muscles, tendons allows us to convey the subtle nuances of movements and gestures, to fill paintings with life and emotions.
In the article, we will analyze in detail the anatomy of the hand, learn to depict it from different angles, in various positions and gestures. Mastering this skill will help you take your artistic skill to a new level.
These and many other examples show how important it is for an artist to develop the skill of depicting hands. Understanding the anatomy of the structure of bones, muscles, tendons allows us to convey the subtle nuances of movements and gestures, to fill paintings with life and emotions.
In the article, we will analyze in detail the anatomy of the hand, learn to depict it from different angles, in various positions and gestures. Mastering this skill will help you take your artistic skill to a new level.
 There are also eight small carpal bones, which are immobile in themselves, but are of great importance when considered as a whole element. They serve to connect the palm with the forearm, and also allow the hand to move and bend in several positions.
It is also worth analyzing the joints of the fingers. Where the phalanges connect to each other, the fingers can bend strictly in one direction. The joint system resembles a coil at the end of one phalanx and a matching shape at the beginning of the next phalanx. To put it simply, the joint can be imagined as a cylinder, along the surface of which the phalanx moves up and down.
There are also eight small carpal bones, which are immobile in themselves, but are of great importance when considered as a whole element. They serve to connect the palm with the forearm, and also allow the hand to move and bend in several positions.
It is also worth analyzing the joints of the fingers. Where the phalanges connect to each other, the fingers can bend strictly in one direction. The joint system resembles a coil at the end of one phalanx and a matching shape at the beginning of the next phalanx. To put it simply, the joint can be imagined as a cylinder, along the surface of which the phalanx moves up and down.
 The principle of the joint at the attachment of the finger, that is, the first phalanx to the palm, is slightly different: here the metacarpal bone at the end has a spherical protrusion to which the phalanx adjoins. Thus, the finger can move both up and down, and sideways.
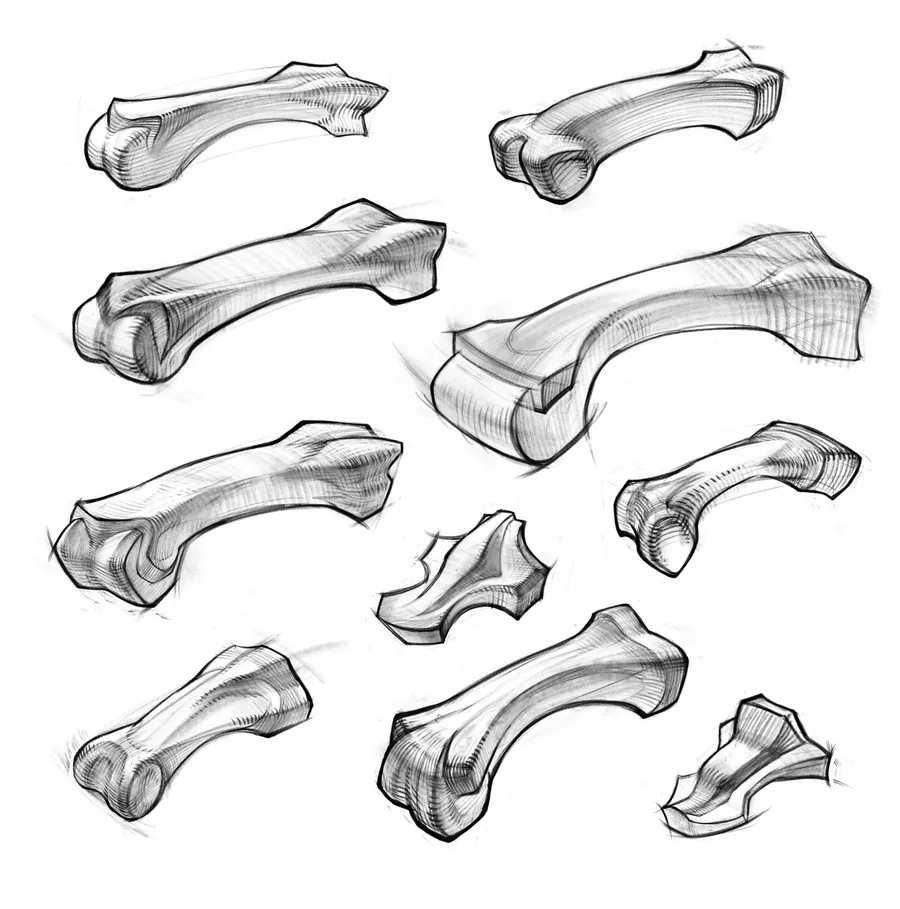
Let's look at the given diagrams and determine some properties of the bones of the hand, proportions and their position relative to each other.
The principle of the joint at the attachment of the finger, that is, the first phalanx to the palm, is slightly different: here the metacarpal bone at the end has a spherical protrusion to which the phalanx adjoins. Thus, the finger can move both up and down, and sideways.
Let's look at the given diagrams and determine some properties of the bones of the hand, proportions and their position relative to each other.
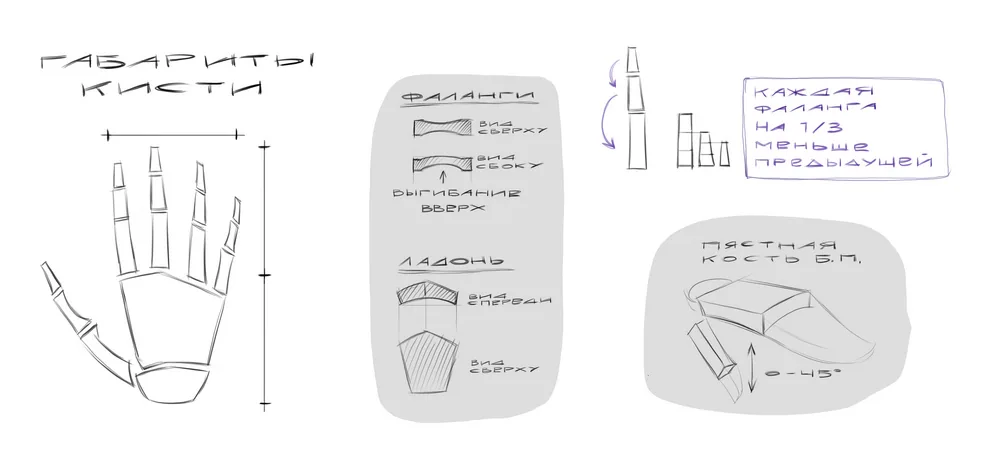 The palm consists of four metacarpal bones and forms the basis of the hand — in the diagram you can see that it is an elongated pentagonal figure. If you look from the end, we will see that the palm has an upward bend in the form of an arc.
Four fingers are directed forward from the palm: index, middle, ring and little finger. Each finger has three phalanges, decreasing by one third in relation to each other. The phalanx that is attached to the metacarpal bone — the longest, and the last (nail) phalanx — the shortest. It is quite important to note the silhouette and bend of the phalangeal bones — you can look at the diagram.
Separately, it is worth mentioning the thumb, since its position is different from the others. It is attached to the side of the palm. Its metacarpal bone is also attached to the group of carpal bones, but it is развернута at 90 degrees so that the thumb appears to be tilted to the side relative to the palm.
The thumb has greater mobility: it can deviate from the palm by 90 degrees to the side and go inwards, touching the base of the little finger. If you look at the palm from the side, so that the nail of the thumb looks at us, the thumb can deviate down by about 45 degrees.
The palm consists of four metacarpal bones and forms the basis of the hand — in the diagram you can see that it is an elongated pentagonal figure. If you look from the end, we will see that the palm has an upward bend in the form of an arc.
Four fingers are directed forward from the palm: index, middle, ring and little finger. Each finger has three phalanges, decreasing by one third in relation to each other. The phalanx that is attached to the metacarpal bone — the longest, and the last (nail) phalanx — the shortest. It is quite important to note the silhouette and bend of the phalangeal bones — you can look at the diagram.
Separately, it is worth mentioning the thumb, since its position is different from the others. It is attached to the side of the palm. Its metacarpal bone is also attached to the group of carpal bones, but it is развернута at 90 degrees so that the thumb appears to be tilted to the side relative to the palm.
The thumb has greater mobility: it can deviate from the palm by 90 degrees to the side and go inwards, touching the base of the little finger. If you look at the palm from the side, so that the nail of the thumb looks at us, the thumb can deviate down by about 45 degrees.
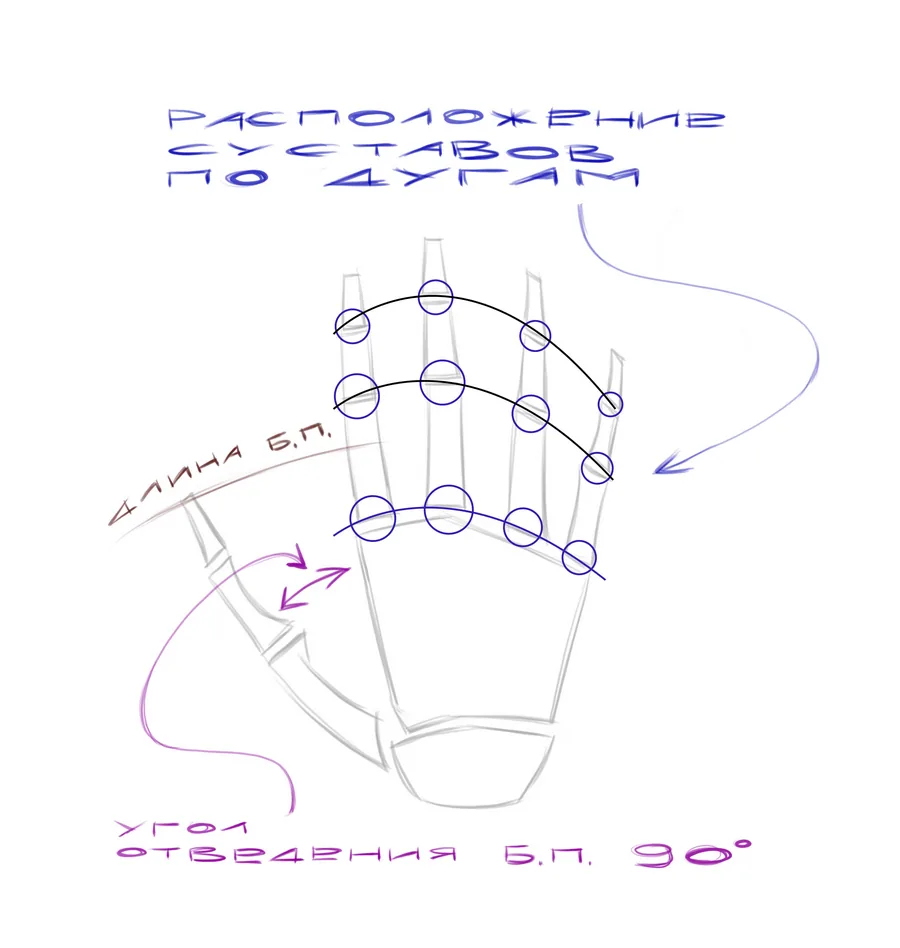 The overall proportions of the palm can be defined as two combined squares. In the first square, the block of carpal bones and the base of the palm from the metacarpal bones fit, in the second square the fingers of the hand fit.
Not all fingers have the same length: the longest finger — middle, slightly shorter — index and ring, and the shortest — little finger. The joints between the phalanges of the fingers are located in such a way that we can draw imaginary arcs through them, curved forward. The length of the thumb can be determined by focusing on the index finger. The tip of the thumb reaches the middle of the first phalanx of the index finger.
The overall proportions of the palm can be defined as two combined squares. In the first square, the block of carpal bones and the base of the palm from the metacarpal bones fit, in the second square the fingers of the hand fit.
Not all fingers have the same length: the longest finger — middle, slightly shorter — index and ring, and the shortest — little finger. The joints between the phalanges of the fingers are located in such a way that we can draw imaginary arcs through them, curved forward. The length of the thumb can be determined by focusing on the index finger. The tip of the thumb reaches the middle of the first phalanx of the index finger.
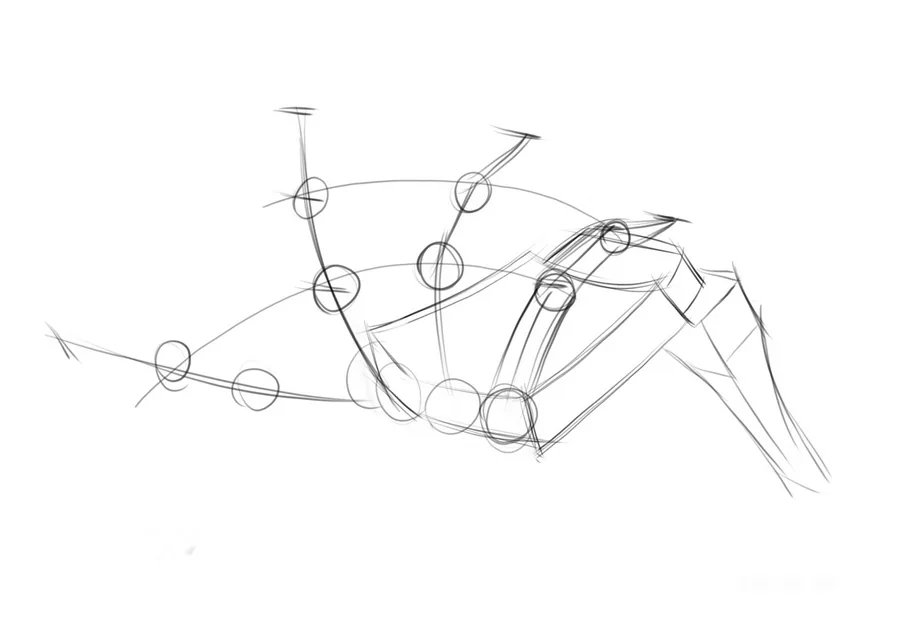
 Check that the proportions of the length of the fingers and the shape of the palm correspond to what we learned above from the text and continue the drawing.
Now you can simplifiedly outline the joints with balls, having заранее marked the arcs on which these balls are located. Once again, check that the phalanges decrease in length of the finger by a third in the direction from the metacarpal block of the palm. Make sure that the joints, respectively, also decrease in volume.
Check that the proportions of the length of the fingers and the shape of the palm correspond to what we learned above from the text and continue the drawing.
Now you can simplifiedly outline the joints with balls, having заранее marked the arcs on which these balls are located. Once again, check that the phalanges decrease in length of the finger by a third in the direction from the metacarpal block of the palm. Make sure that the joints, respectively, also decrease in volume.
 Next, we form the mass of the phalanges and build their structure. For now, try to draw the phalanges simplifiedly, without going into details and detailed drawing. And remember that the phalanges bend only in one direction, so keep track of the position of the joint in space and do not tilt it, otherwise the fingers will begin to turn out, and the drawing will become unconvincing.
At this stage, you can complicate the basis of the palm, outlining the metacarpal bones, and also outline the thumb in the background.
Next, we form the mass of the phalanges and build their structure. For now, try to draw the phalanges simplifiedly, without going into details and detailed drawing. And remember that the phalanges bend only in one direction, so keep track of the position of the joint in space and do not tilt it, otherwise the fingers will begin to turn out, and the drawing will become unconvincing.
At this stage, you can complicate the basis of the palm, outlining the metacarpal bones, and also outline the thumb in the background.
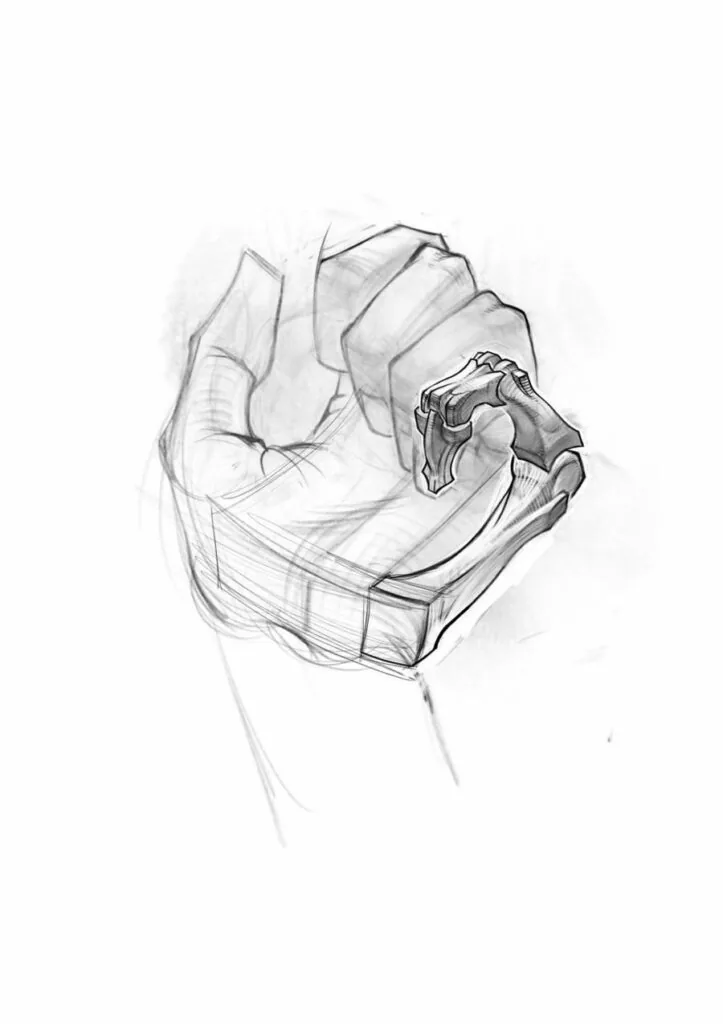
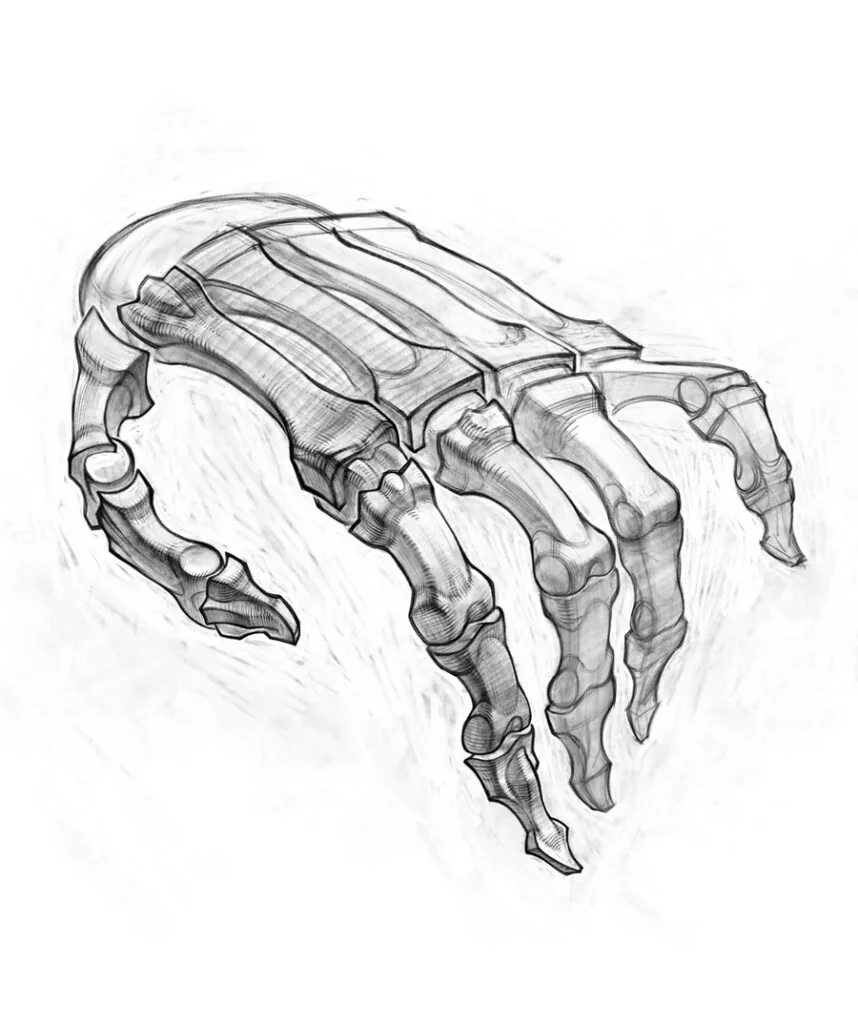
 If everything is in order with the location of the joints, and it was possible to mark the phalanges and their concave silhouette from the inside, then you can proceed to a more detailed drawing. Pay the most attention to the joints — they can be made more complex in shape.
Do not forget about the principle of connecting the phalanges to each other and to the metacarpal bones. Make the contours of the nearest fingers a little more contrasting. The carpal block of bones and the thumb are in the background, so they do not need to be drawn in detail.
If everything is in order with the location of the joints, and it was possible to mark the phalanges and their concave silhouette from the inside, then you can proceed to a more detailed drawing. Pay the most attention to the joints — they can be made more complex in shape.
Do not forget about the principle of connecting the phalanges to each other and to the metacarpal bones. Make the contours of the nearest fingers a little more contrasting. The carpal block of bones and the thumb are in the background, so they do not need to be drawn in detail.
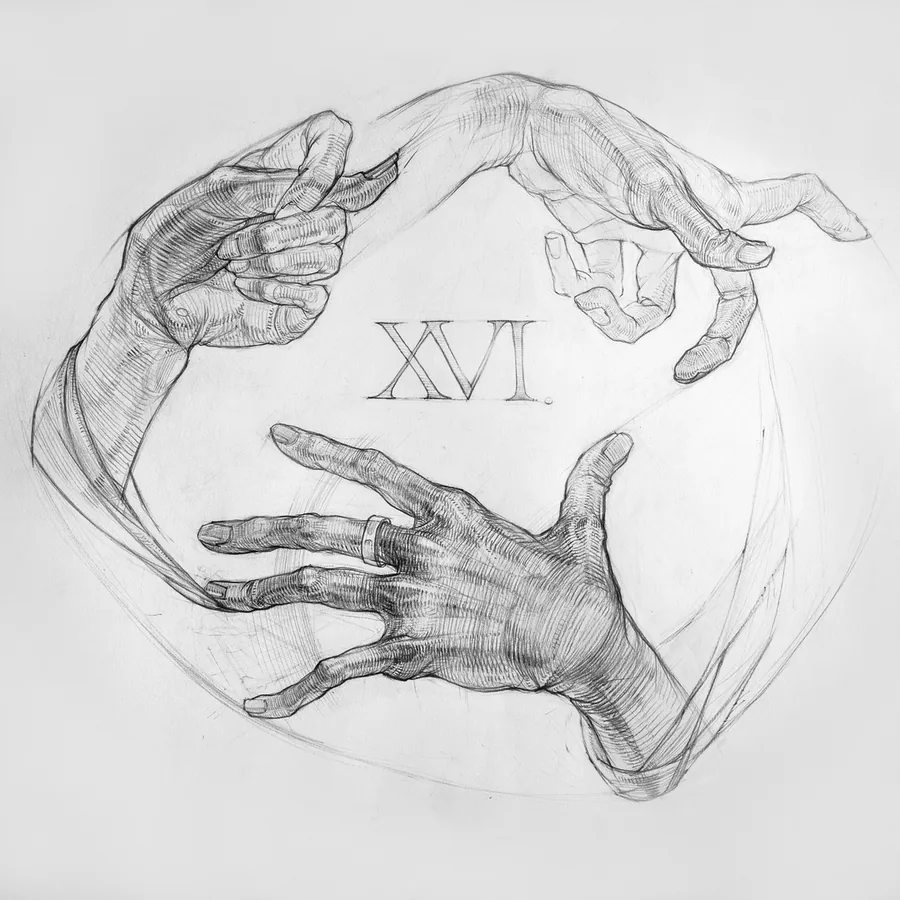
 You can make a few more such sketches, to better study and remember the process of drawing a bony hand of a person. And we recommend that you look at examples of drawings of hands by other artists: since the interpretation of human anatomy forms by artists is always different, it is useful to analyze the drawings of different authors.
In the painting of the Sistine Chapel, Michelangelo masterfully uses hand gestures to convey emotions and interactions of characters. For example, in the scene «The Creation of Adam» the almost touching hands of God and Adam symbolize the moment of transmission of life. The image of the hands of Adam and God becomes key in the artist's work, it demonstrates the connection between God and his creation.
Leonardo da Vinci is known for his numerous anatomical sketches, including detailed studies of hands. His works combine scientific accuracy with artistic expressiveness.
Botticelli in his works «The Birth of Venus» or «The Spring» gracefully depicts hands, emphasizing the grace and sophistication of the characters.
These and many other examples show how important it is for an artist to develop the skill of depicting hands. Understanding the anatomy of the structure of bones, muscles, tendons allows us to convey the subtle nuances of movements and gestures, to fill paintings with life and emotions.
In the article, we will analyze in detail the anatomy of the hand, learn to depict it from different angles, in various positions and gestures. Mastering this skill will help you take your artistic skill to a new level.
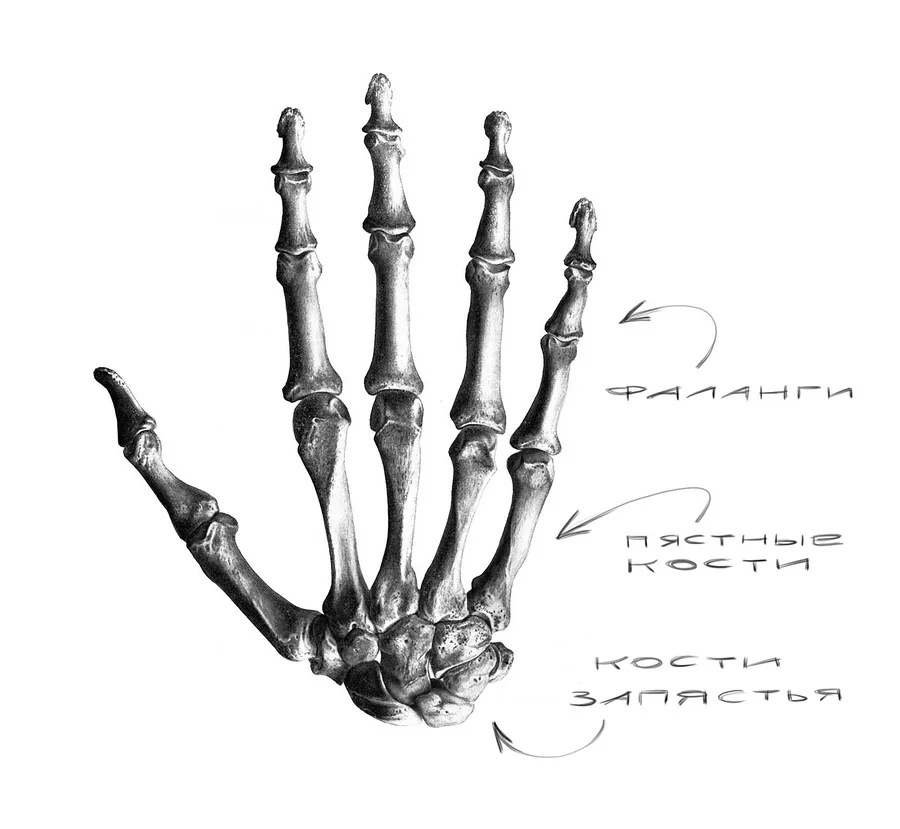
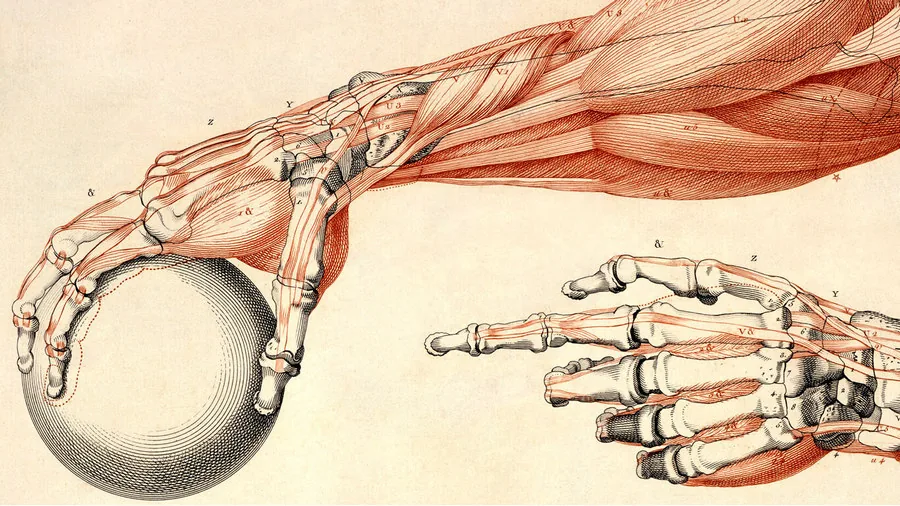
Bones
Let's start by studying the components of the hand and looking at the structure of the arm skeleton. The hand consists of five metacarpal bones, which form the basis of the palm and the base for the fingers. These bones are connected to each other by muscles and transverse ligaments, so they are less mobile in relation to each other. The bones of the fingers — called phalanges — are attached to the ends of the metacarpal bones. The thumb has two phalanges, and all other fingers have three, so one hand has 14 phalanges.
There are also eight small carpal bones, which are immobile in themselves, but are of great importance when considered as a whole element. They serve to connect the palm with the forearm, and also allow the hand to move and bend in several positions.
It is also worth analyzing the joints of the fingers. Where the phalanges connect to each other, the fingers can bend strictly in one direction. The joint system resembles a coil at the end of one phalanx and a matching shape at the beginning of the next phalanx. To put it simply, the joint can be imagined as a cylinder, along the surface of which the phalanx moves up and down.
The principle of the joint at the attachment of the finger, that is, the first phalanx to the palm, is slightly different: here the metacarpal bone at the end has a spherical protrusion to which the phalanx adjoins. Thus, the finger can move both up and down, and sideways.
Let's look at the given diagrams and determine some properties of the bones of the hand, proportions and their position relative to each other.
The palm consists of four metacarpal bones and forms the basis of the hand — in the diagram you can see that it is an elongated pentagonal figure. If you look from the end, we will see that the palm has an upward bend in the form of an arc.
Four fingers are directed forward from the palm: index, middle, ring and little finger. Each finger has three phalanges, decreasing by one third in relation to each other. The phalanx that is attached to the metacarpal bone — the longest, and the last (nail) phalanx — the shortest. It is quite important to note the silhouette and bend of the phalangeal bones — you can look at the diagram.
Separately, it is worth mentioning the thumb, since its position is different from the others. It is attached to the side of the palm. Its metacarpal bone is also attached to the group of carpal bones, but it is развернута at 90 degrees so that the thumb appears to be tilted to the side relative to the palm.
The thumb has greater mobility: it can deviate from the palm by 90 degrees to the side and go inwards, touching the base of the little finger. If you look at the palm from the side, so that the nail of the thumb looks at us, the thumb can deviate down by about 45 degrees.
The overall proportions of the palm can be defined as two combined squares. In the first square, the block of carpal bones and the base of the palm from the metacarpal bones fit, in the second square the fingers of the hand fit.
Not all fingers have the same length: the longest finger — middle, slightly shorter — index and ring, and the shortest — little finger. The joints between the phalanges of the fingers are located in such a way that we can draw imaginary arcs through them, curved forward. The length of the thumb can be determined by focusing on the index finger. The tip of the thumb reaches the middle of the first phalanx of the index finger.
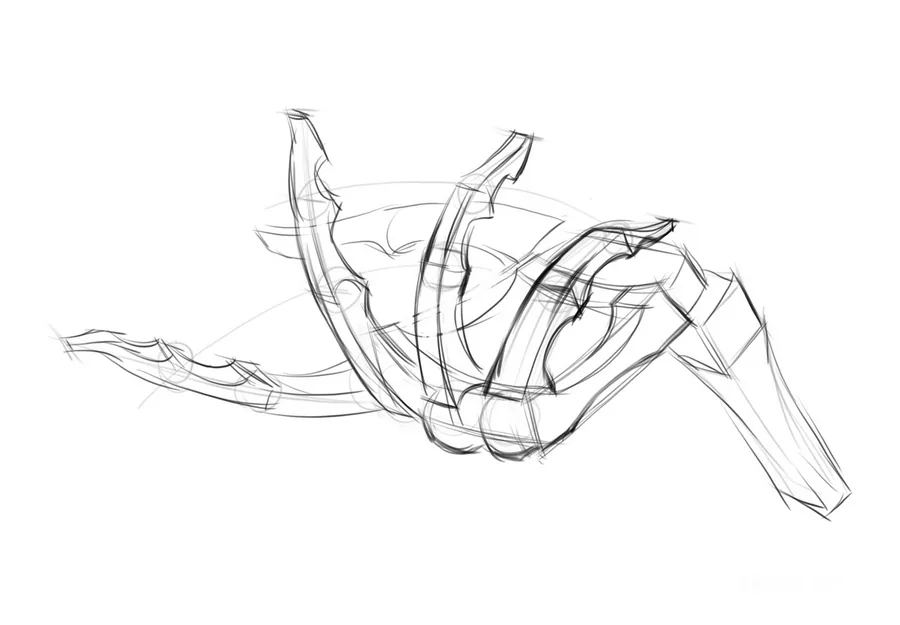
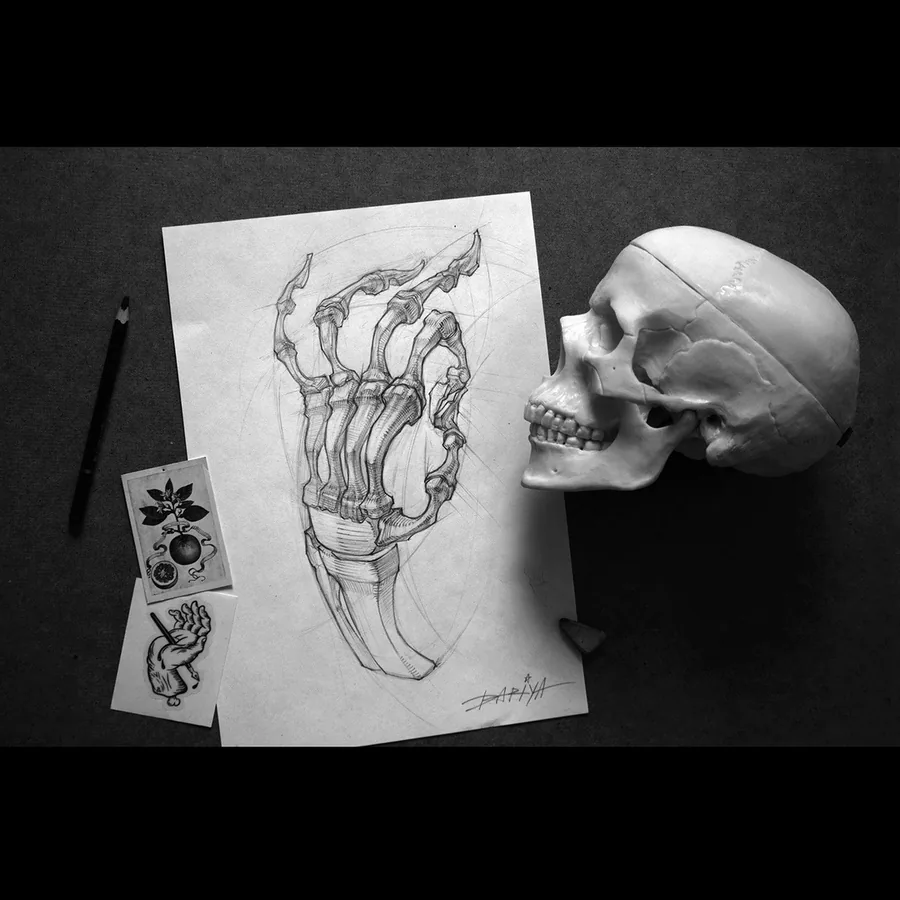
Step-by-step drawing of the human bony hand
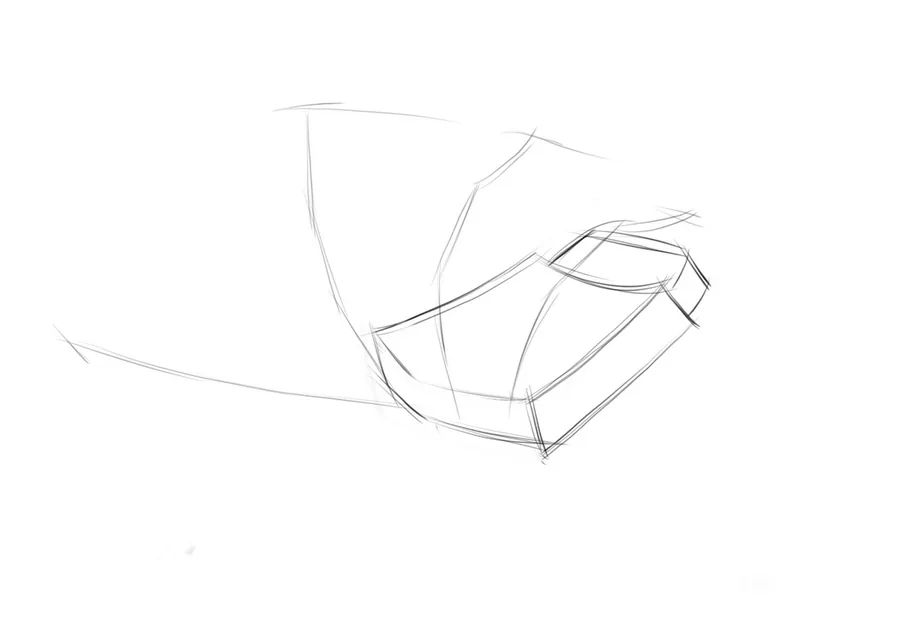
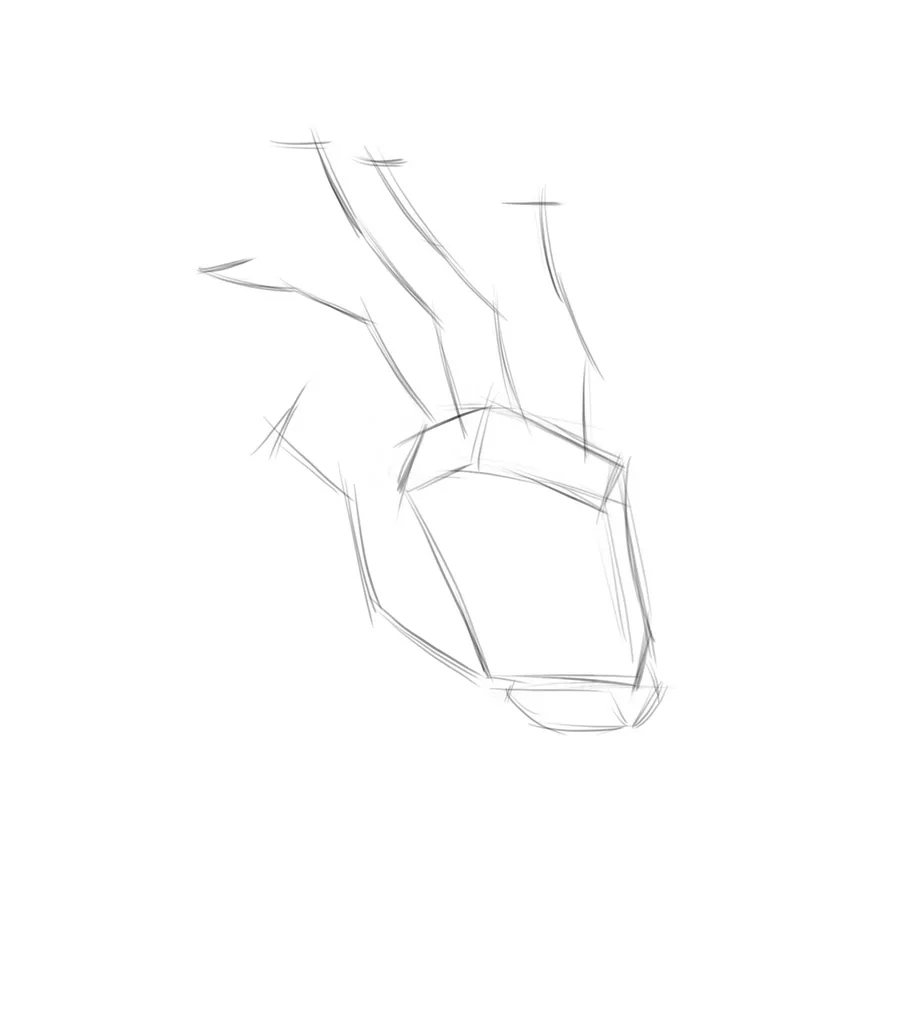
Let's try to draw several versions of bony hands to consolidate the theory learned in practice. First we will outline the basis of the palm in the form of a rectangular figure — this is a group of future metacarpal bones. Behind the basis of the palm we will place the block of carpal bones in the form of a smaller rectangular figure. Now with straight lines we will outline the phalanges of the fingers, which bend in the joints and create an interesting gesture, partially overlapping the base of the palm. We will bend the index finger on our drawing only slightly, we will bend the little finger as much as possible, and the middle and ring fingers will have intermediate values of bending in the joints. The thumb is вытянут and slightly retracted to the side, interrupted by the middle and index fingers. Remember that its two phalanges and metacarpal bones are tilted in a different way relative to the other bones of the palm. Thus, we immediately set an interesting rhythmic composition of the fingers and show the effect of depth inside our drawing of the human hand.
Check that the proportions of the length of the fingers and the shape of the palm correspond to what we learned above from the text and continue the drawing.
Now you can simplifiedly outline the joints with balls, having заранее marked the arcs on which these balls are located. Once again, check that the phalanges decrease in length of the finger by a third in the direction from the metacarpal block of the palm. Make sure that the joints, respectively, also decrease in volume.
Next, we form the mass of the phalanges and build their structure. For now, try to draw the phalanges simplifiedly, without going into details and detailed drawing. And remember that the phalanges bend only in one direction, so keep track of the position of the joint in space and do not tilt it, otherwise the fingers will begin to turn out, and the drawing will become unconvincing.
At this stage, you can complicate the basis of the palm, outlining the metacarpal bones, and also outline the thumb in the background.
If everything is in order with the location of the joints, and it was possible to mark the phalanges and their concave silhouette from the inside, then you can proceed to a more detailed drawing. Pay the most attention to the joints — they can be made more complex in shape.
Do not forget about the principle of connecting the phalanges to each other and to the metacarpal bones. Make the contours of the nearest fingers a little more contrasting. The carpal block of bones and the thumb are in the background, so they do not need to be drawn in detail.
You can make a few more such sketches, to better study and remember the process of drawing a bony hand of a person. And we recommend that you look at examples of drawings of hands by other artists: since the interpretation of human anatomy forms by artists is always different, it is useful to analyze the drawings of different authors.
Muscles and soft parts of the hands
Related courses
All courses
from 3 900 ₽
-57%
Book illustration: The first page page
9 000 ₽3 900 ₽
Learn more

from 12 000 ₽
-20%
Векторная иллюстрация для начинающих
15 000 ₽12 000 ₽
Learn more

from 4 500 ₽
-55%
Character Concept: My First Hero
10 000 ₽4 500 ₽
Learn more
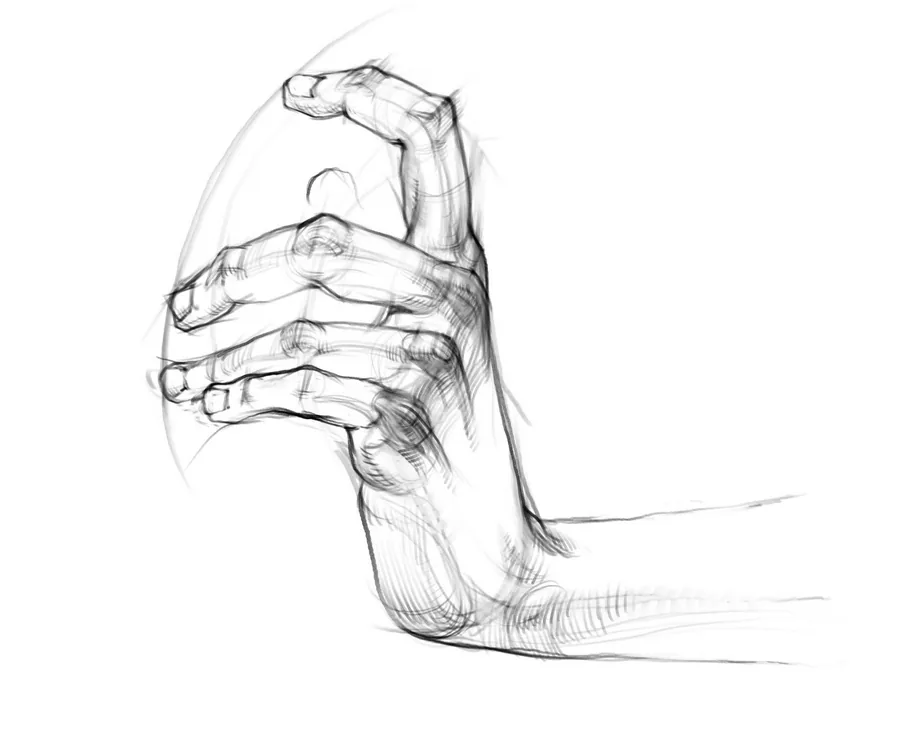
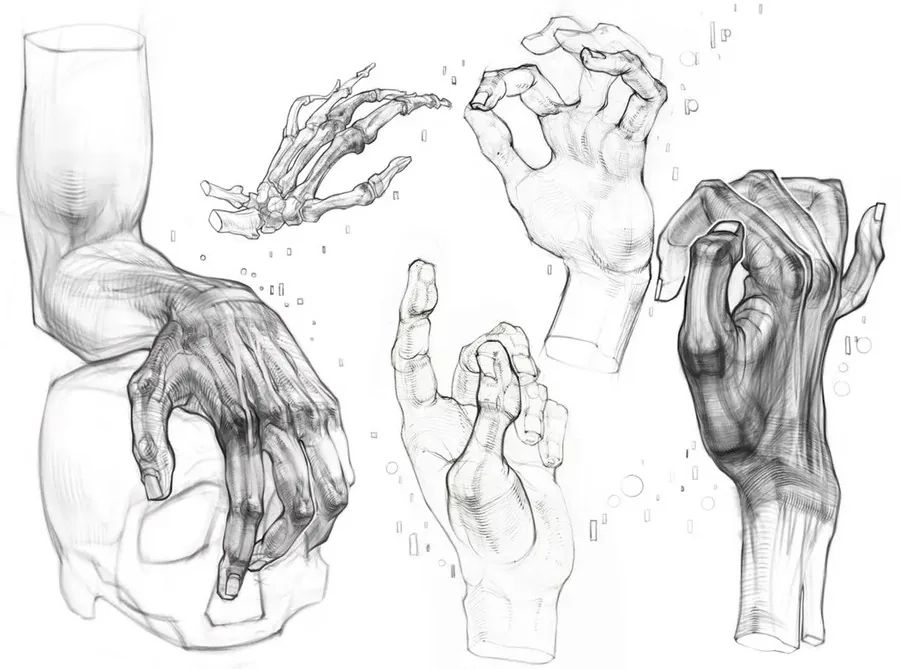
Soft tissues of the hands — skin, muscles, tendons and fatty deposits — play a key role in shaping their appearance and functionality. These components are built up on a bone base, distributed unevenly: in some areas their concentration is higher, in others — lower. This uneven distribution determines the characteristic contour of the hand.
For example, the inner side of the palm and the pads of the fingers contain more fatty tissue, which gives them roundness and volume. At the same time, the back of the hand has a less pronounced layer of soft tissues, which allows us to better see the structure of the bones and tendons.
Thus, it is the interaction of the bone base and soft tissues that forms an individual silhouette and plastic of the hand, which must be taken into account when depicting them.
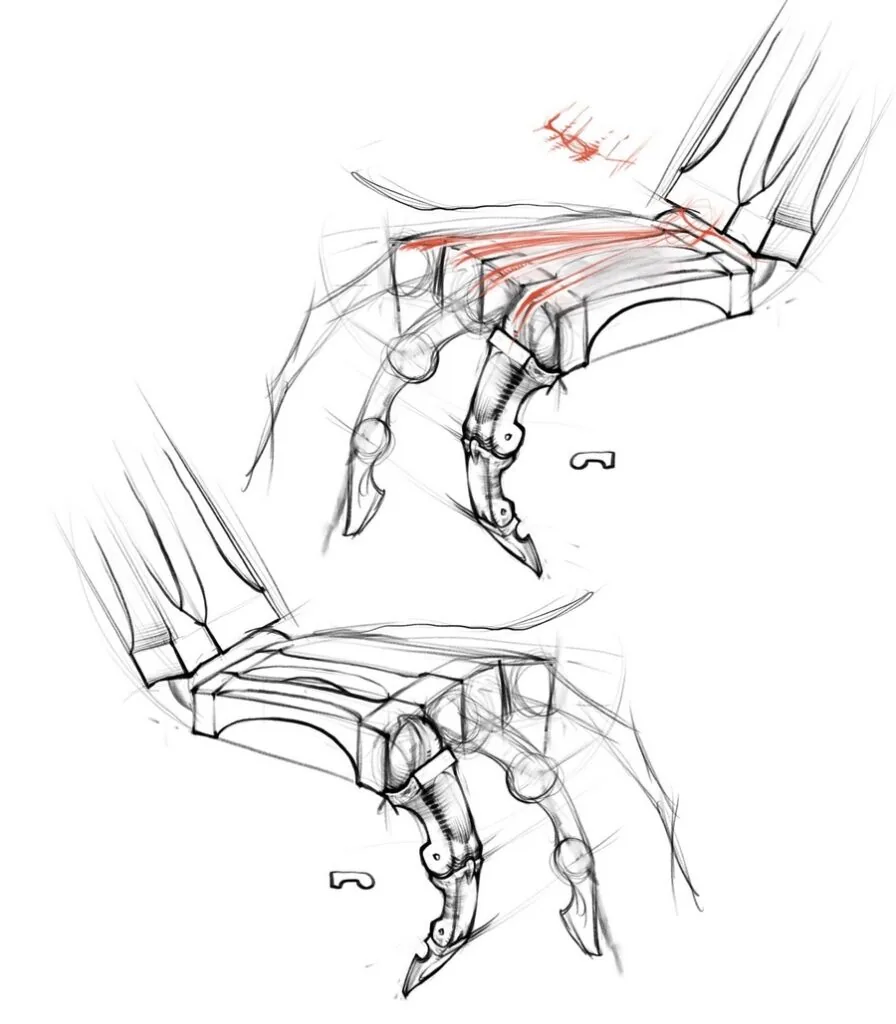 The tendons of the brush go from the muscles of the forearm and have the functions of flexing and extending the fingers. There are about 20 of these tendons.
The tendons that flex the fingers are located on the inner side of the palm, and they are practically not noticeable due to the presence of soft elements filling this part of the palm — they begin to appear on the wrist part when the hand is tense. Look at your hand when it is tense, and you will see the tendons going from the palm towards the elbow joint.
The extensors are located on the outer side of the palm, and they are already more noticeable. In the area of the wrist bones block, the tendons are gathered together and fixed by transverse ligaments and then fan out to each finger.
When drawing, you can highlight these tendons on the back of the hand, especially to focus on the joint, on top of which the tendon passes. Take a closer look at the diagram to understand what it is about. Then the tendons bifurcate and pass along the sides of the phalanx joints, but in these places they are already difficult to notice.
The tendons of the brush go from the muscles of the forearm and have the functions of flexing and extending the fingers. There are about 20 of these tendons.
The tendons that flex the fingers are located on the inner side of the palm, and they are practically not noticeable due to the presence of soft elements filling this part of the palm — they begin to appear on the wrist part when the hand is tense. Look at your hand when it is tense, and you will see the tendons going from the palm towards the elbow joint.
The extensors are located on the outer side of the palm, and they are already more noticeable. In the area of the wrist bones block, the tendons are gathered together and fixed by transverse ligaments and then fan out to each finger.
When drawing, you can highlight these tendons on the back of the hand, especially to focus on the joint, on top of which the tendon passes. Take a closer look at the diagram to understand what it is about. Then the tendons bifurcate and pass along the sides of the phalanx joints, but in these places they are already difficult to notice.
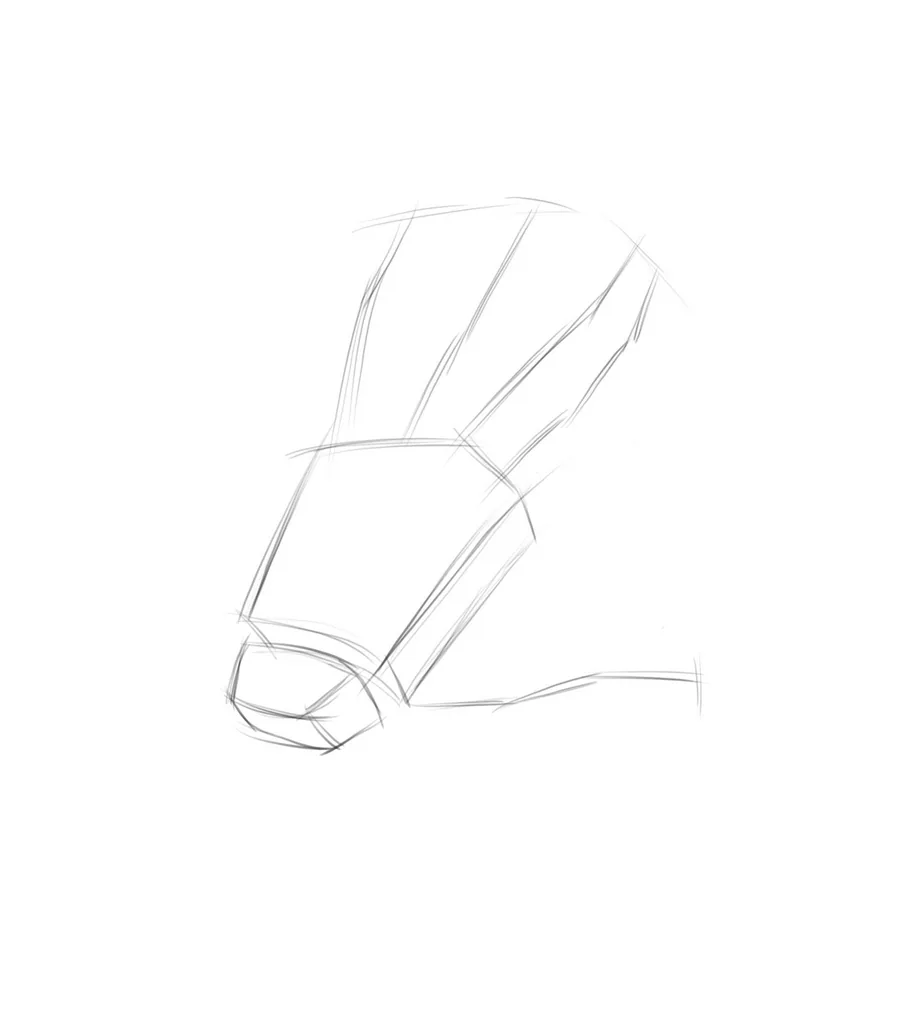 We will draw a hand in which the fingers are straightened to better understand how to draw it from the back. The drawing begins exactly the same as the drawing of the bone brush – we outline the palmar block to set the main volume, and the approximate location of the fingers going forward from the palm.
Separately we outline the components of the thumb from the side of the palm. Immediately set the rhythm in the arrangement of the fingers and combine the index and middle finger together. In the wrist area, we can simplify the outline of the block of wrist bones.
We will draw a hand in which the fingers are straightened to better understand how to draw it from the back. The drawing begins exactly the same as the drawing of the bone brush – we outline the palmar block to set the main volume, and the approximate location of the fingers going forward from the palm.
Separately we outline the components of the thumb from the side of the palm. Immediately set the rhythm in the arrangement of the fingers and combine the index and middle finger together. In the wrist area, we can simplify the outline of the block of wrist bones.
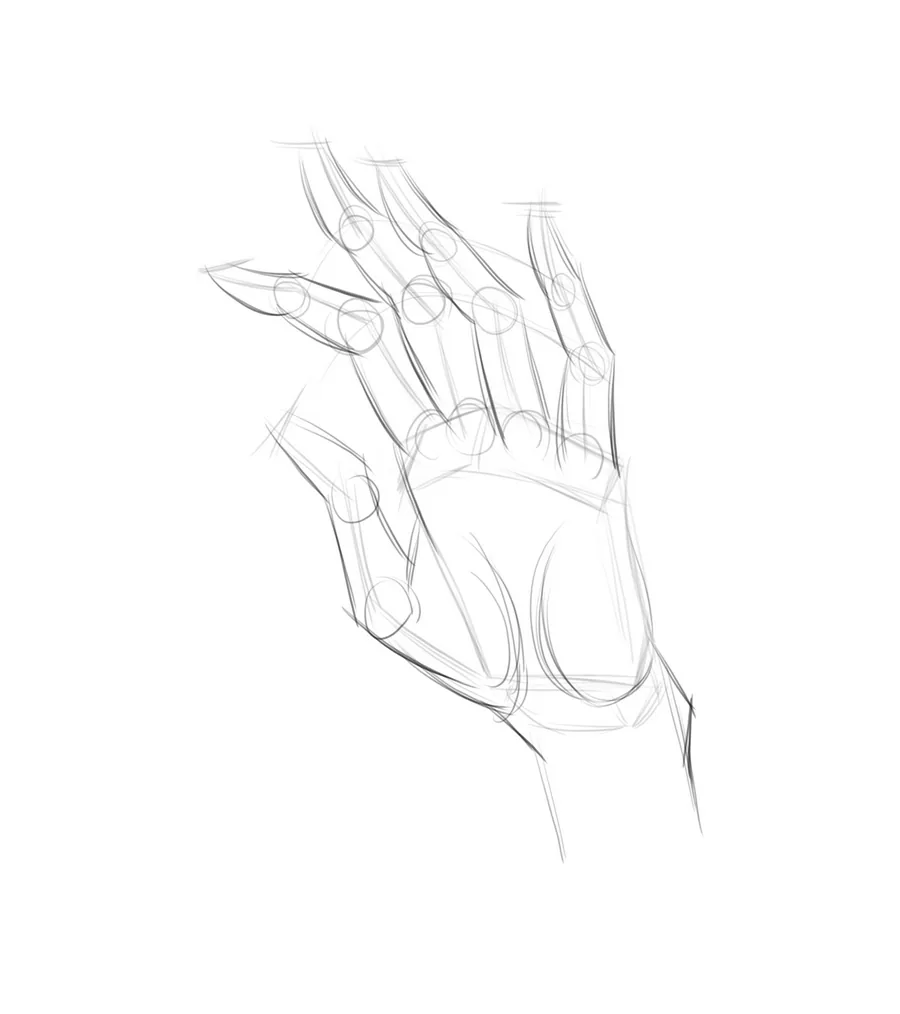
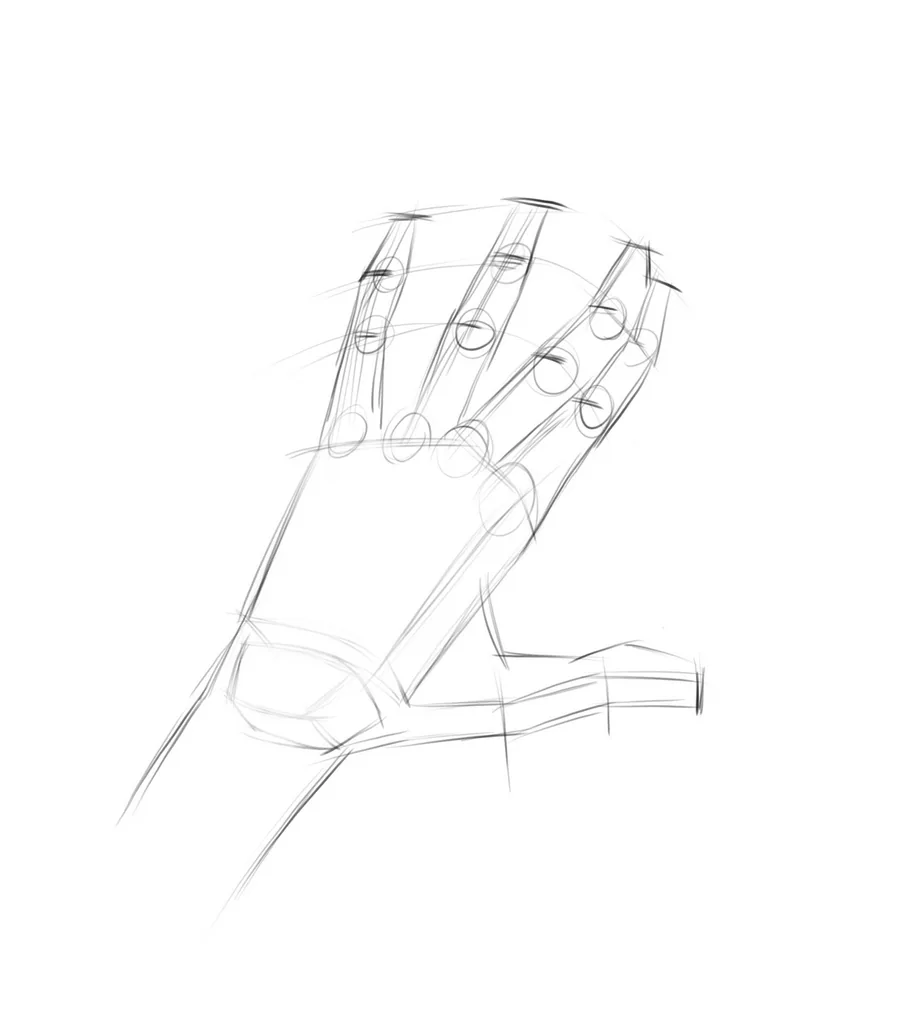 Next, we will outline the masses of the fingers and the location of the joints, remembering that the joints are located on imaginary arcs. We need to outline the joints and the silhouette of the fingers barely noticeable, so that the lines remain light. If the drawing and lines are already over-darkened, then before the next stage you can lighten them by going over with an eraser.
It is important at this stage to double-check the proportions before continuing the drawing. If something is wrong, then do not be afraid to make changes to the drawing and even redraw separate parts of the drawing.
Next, we will outline the masses of the fingers and the location of the joints, remembering that the joints are located on imaginary arcs. We need to outline the joints and the silhouette of the fingers barely noticeable, so that the lines remain light. If the drawing and lines are already over-darkened, then before the next stage you can lighten them by going over with an eraser.
It is important at this stage to double-check the proportions before continuing the drawing. If something is wrong, then do not be afraid to make changes to the drawing and even redraw separate parts of the drawing.
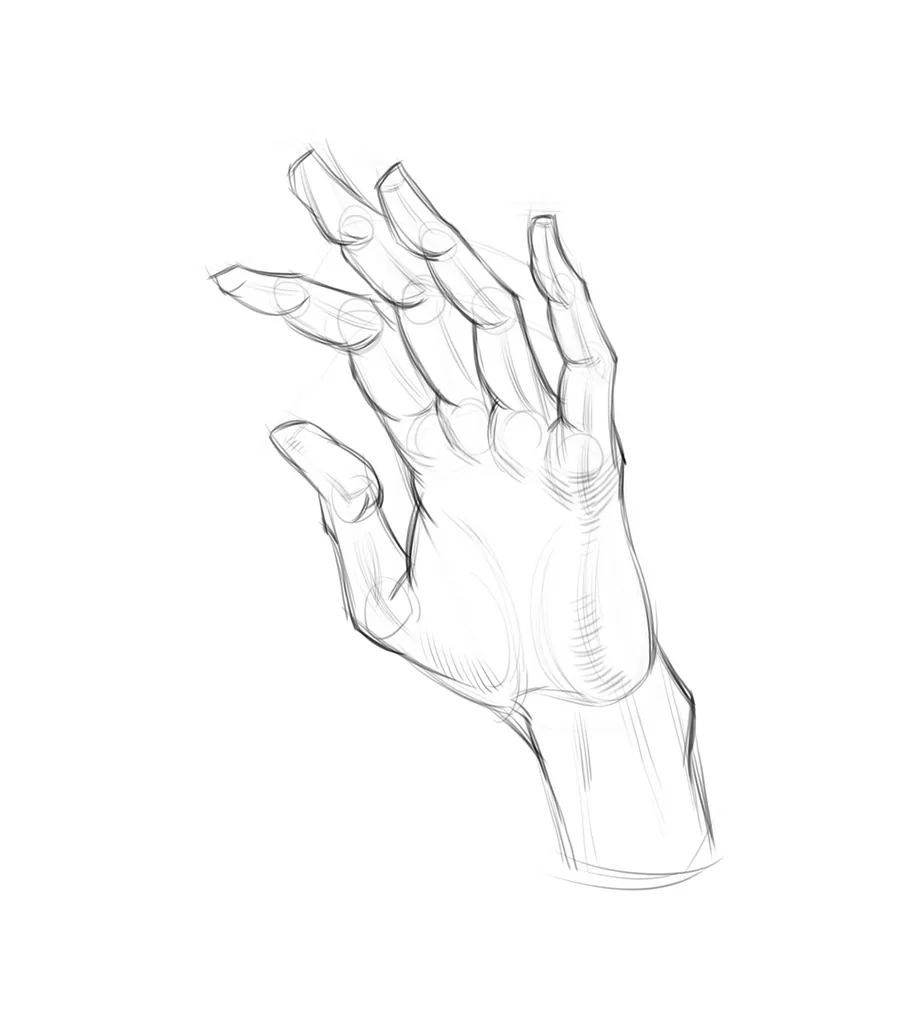
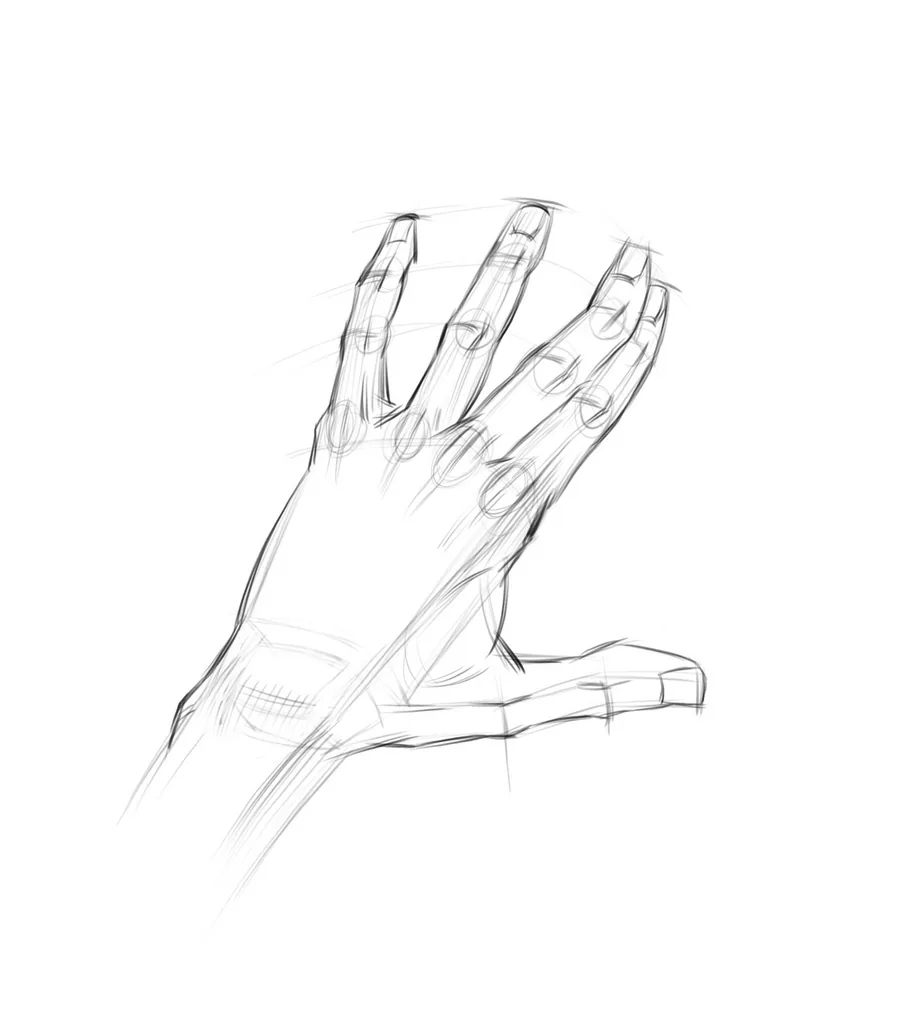 Now we can draw the silhouette of the fingers and palm even more precisely. Since we are drawing the palm from the back side, we see how the joints appear in the silhouette of the fingers at the junction of the phalanges – here we need to show the silhouette more angular. But we also see the soft masses of the fingers that are on the inner side of the palm, so we show soft volumes on the fingers there.
Thus, sharp and smoothed outlines of the silhouette alternate in the drawing, which adds liveliness to our drawing.
Now we can draw the silhouette of the fingers and palm even more precisely. Since we are drawing the palm from the back side, we see how the joints appear in the silhouette of the fingers at the junction of the phalanges – here we need to show the silhouette more angular. But we also see the soft masses of the fingers that are on the inner side of the palm, so we show soft volumes on the fingers there.
Thus, sharp and smoothed outlines of the silhouette alternate in the drawing, which adds liveliness to our drawing.
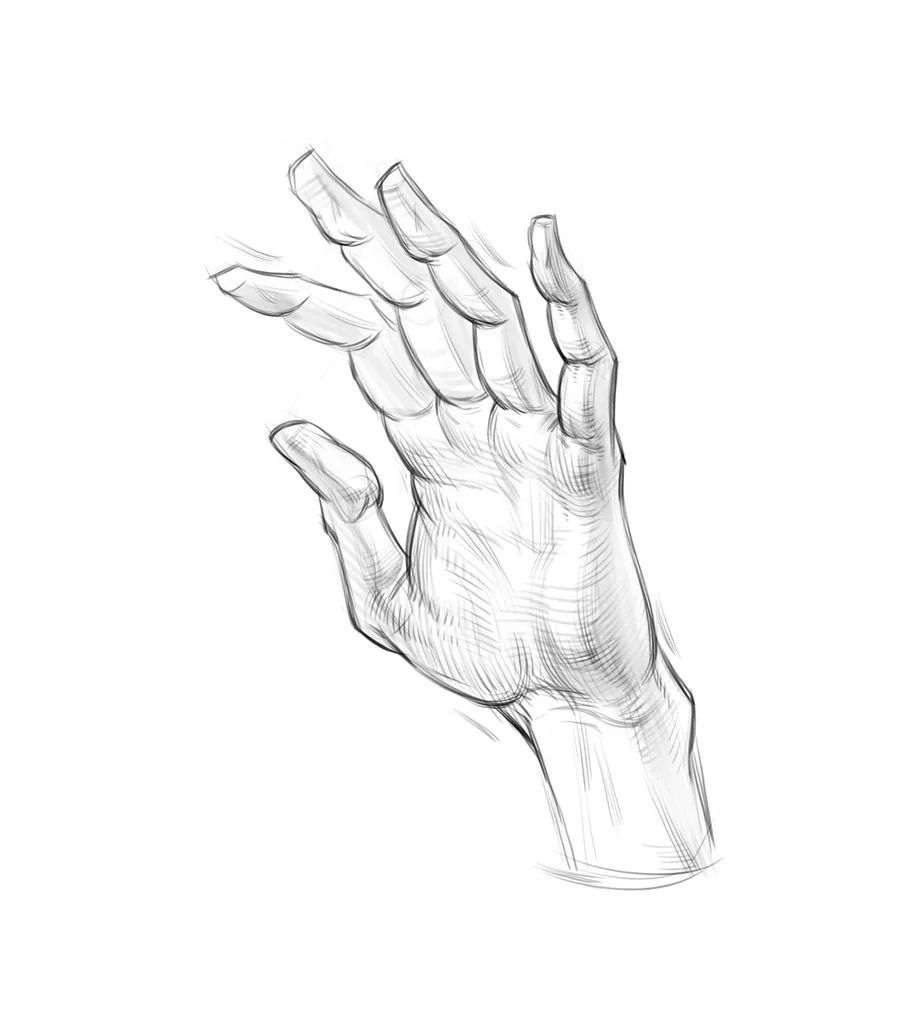
 The main work has been done, and now we can do a more detailed drawing of some areas of the brush, clarify the contours where they were too условными, and add tone in the shadows. The main focal point will be the joints connecting the base of the palm and the fingers.
The joint of the index finger is located closest to us, so we will make it more active and, as we move away, we will reduce the degree of study. Remember that the joint in this place looks like a spherical volume, and a tendon of the finger runs right on top of it along the center.
Try not to smooth out the shape in these places too much: after all, this is the place where the hard bones protrude the most. And, conversely, try to leave more smoothed areas between the joints: especially softened we need to draw the soft volume of the muscle mass near the metacarpal bone of the thumb.
On the areas where the phalanges of the fingers join each other, we can depict small folds and wrinkles. At this stage, take details from nature, for example, by analyzing your own hand.
The main work has been done, and now we can do a more detailed drawing of some areas of the brush, clarify the contours where they were too условными, and add tone in the shadows. The main focal point will be the joints connecting the base of the palm and the fingers.
The joint of the index finger is located closest to us, so we will make it more active and, as we move away, we will reduce the degree of study. Remember that the joint in this place looks like a spherical volume, and a tendon of the finger runs right on top of it along the center.
Try not to smooth out the shape in these places too much: after all, this is the place where the hard bones protrude the most. And, conversely, try to leave more smoothed areas between the joints: especially softened we need to draw the soft volume of the muscle mass near the metacarpal bone of the thumb.
On the areas where the phalanges of the fingers join each other, we can depict small folds and wrinkles. At this stage, take details from nature, for example, by analyzing your own hand.
 Let's draw the inner side of the palm. As usual, we start with a pentagonal base of the palm and outline the fingers. We monitor the proportions of the phalanges in relation to each other and the fingers in relation to the palm.
 We mark the joints and silhouettes of the fingers to give them mass. We outline the muscle mass near the thumb and little finger with general outlines.
 If everything is marked correctly and you are sure of the proportions, continue the drawing. We clarify the silhouette of the fingers and palm. Just as in the previous drawing, the fingers in the silhouette on the one hand have a more angular contour, on the other – a softer one. The contours of the palm are rounded and folds appear in some places.
 The final stage remains, but by this time major changes in the drawing should not be made. We can add tone to enhance the volume, and at the place of shape bends to emphasize the accents with a stroke. You can look at the references or your own palm and analyze the configuration of the folds.
The main thing is not to get carried away too much: our task is to create the effect of volume in the brush and only slightly show the texture of the skin.
The final stage remains, but by this time major changes in the drawing should not be made. We can add tone to enhance the volume, and at the place of shape bends to emphasize the accents with a stroke. You can look at the references or your own palm and analyze the configuration of the folds.
The main thing is not to get carried away too much: our task is to create the effect of volume in the brush and only slightly show the texture of the skin.
 Let's summarize. We made sure that the image of hands is an integral part of artistic skill, we know how great masters of the past used images of hands to reveal the depth of the image and enhance the emotional impact of the painting.
Understanding anatomy, the ability to accurately depict the structure of bones, muscles and tendons of the brush allows an artist to create realistic, lively images. Gestures and hand positions can tell the viewer about mood, feelings and even the social status of the person portrayed.
For an artist striving to improve his skills, studying the anatomy of hands is mandatory. This knowledge will allow you to create more expressive psychologically filled portraits and compositions in which every detail, including the hands, will work to reveal the idea of the work.
We hope that our article helped you better understand the structure of the brush, master the principles of its depiction and inspired you to further improve your skills. Remember that the path to mastery requires constant practice and observation, but the result is worth the effort.
Do you want to learn how to draw anatomically correct brushes in different perspectives and poses? Then be sure to sign up for our cool course Human hands. We promise: after the course you will gently fall in love with drawing hands and will never call this topic complicated or boring!
Let's summarize. We made sure that the image of hands is an integral part of artistic skill, we know how great masters of the past used images of hands to reveal the depth of the image and enhance the emotional impact of the painting.
Understanding anatomy, the ability to accurately depict the structure of bones, muscles and tendons of the brush allows an artist to create realistic, lively images. Gestures and hand positions can tell the viewer about mood, feelings and even the social status of the person portrayed.
For an artist striving to improve his skills, studying the anatomy of hands is mandatory. This knowledge will allow you to create more expressive psychologically filled portraits and compositions in which every detail, including the hands, will work to reveal the idea of the work.
We hope that our article helped you better understand the structure of the brush, master the principles of its depiction and inspired you to further improve your skills. Remember that the path to mastery requires constant practice and observation, but the result is worth the effort.
Do you want to learn how to draw anatomically correct brushes in different perspectives and poses? Then be sure to sign up for our cool course Human hands. We promise: after the course you will gently fall in love with drawing hands and will never call this topic complicated or boring!
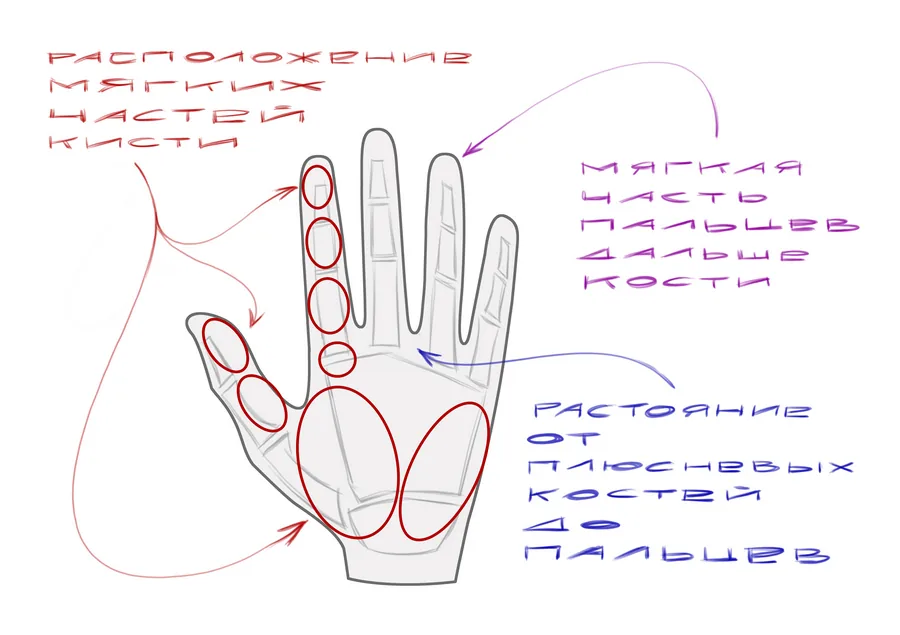
The inner side of the palm
Let's start with the largest volumes — they are located on the inner side of the palm: one — on the side of the little finger, the other — near the thumb. These muscle volumes form a rounded silhouette of the palm. The fingers of the hands do not have muscles, but there are noticeable fatty volumes on each phalanx on the inside of the palm. Because of them, the silhouette of the fingers consists as if of several barrels placed on top of each other. Sometimes in a person these volumes are not so large, and the joints in the silhouette become more noticeable than the pads of the phalanges. There are also pads in the area of the joints of the fingers between the first phalanx and the metacarpal bone. Note that the soft structure of the hand will retreat at a distance from the bones, for example, this is noticeable at the fingertips: the bone of the nail phalanx ends earlier than the soft part of the finger. The visible base of the fingers, where they connect to the base of the palm, is also located at a distance from the real connection of the bones of the palm with the bones of the finger.
The outer side of the palm
On the outer side of the hand we see a noticeable protrusion of bones in the joints. The metacarpal bones can be slightly noticeable, but they do not need to be highlighted much, since the space between them is filled with muscles, ligaments and tendons. The main emphasis in the development of drawings of the hand can be placed on the joints. On the back of the hand, moreUser: The joints in the process of drawing the brush can be outlined as small spheres, but in the process of detailing they are drawn in more detail, putting emphasis in the composition of the drawing. The joints are especially clearly visible when the fingers of the brush are in a bent state. When bending the fingers, the skin on the joints is stretched and shows the characteristic relief of the bones — this is especially noticeable on the back of the hand: the joint becomes angular and consists of two tubercles, and a small groove appears on the joint. The joint of the phalanx of the finger and the metacarpal bone can be depicted more rounded, since the principle of connection here is slightly different. In addition, at this place, a tendon of the finger flexor runs along the top of the joint.
The tendons of the brush go from the muscles of the forearm and have the functions of flexing and extending the fingers. There are about 20 of these tendons.
The tendons that flex the fingers are located on the inner side of the palm, and they are practically not noticeable due to the presence of soft elements filling this part of the palm — they begin to appear on the wrist part when the hand is tense. Look at your hand when it is tense, and you will see the tendons going from the palm towards the elbow joint.
The extensors are located on the outer side of the palm, and they are already more noticeable. In the area of the wrist bones block, the tendons are gathered together and fixed by transverse ligaments and then fan out to each finger.
When drawing, you can highlight these tendons on the back of the hand, especially to focus on the joint, on top of which the tendon passes. Take a closer look at the diagram to understand what it is about. Then the tendons bifurcate and pass along the sides of the phalanx joints, but in these places they are already difficult to notice.
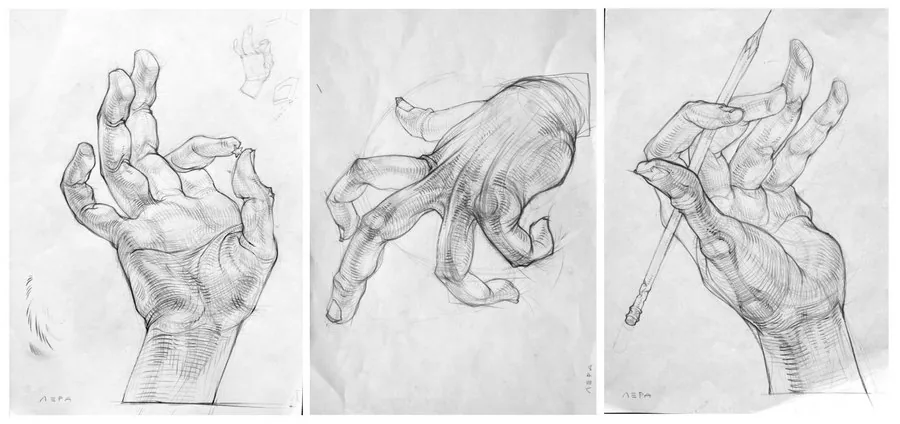
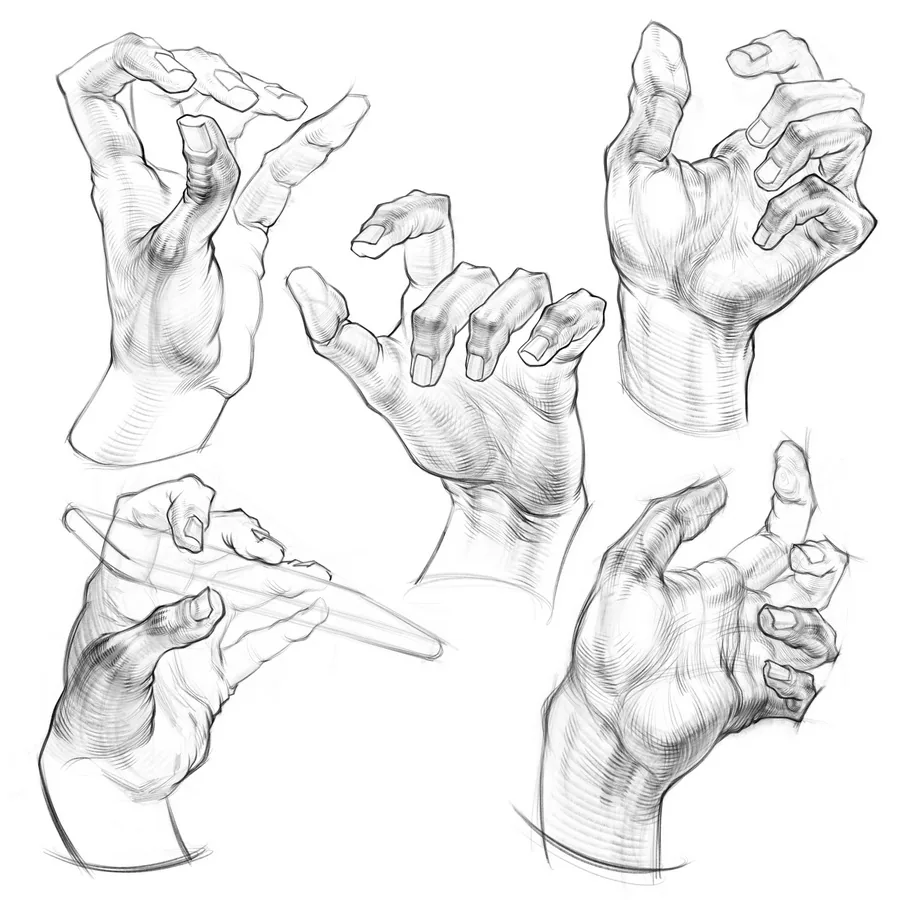
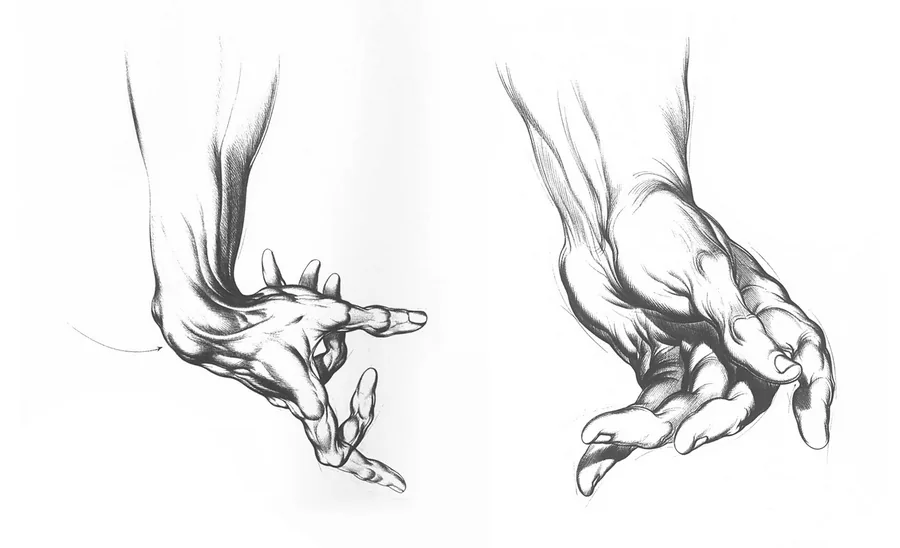
Folds and gestures
Since the hand has many movable elements, a large number of folds can form on its surface. Basically, the folds are located on the inner part of the palm and are formed when the hand performs any action. With our hand we can hold something, push, pull, squeeze, make various gestures. In these situations, the skin, muscles and fatty elements in some places are compressed, in others — they are stretched. Trace on the example of your hands how the folds behave, change the gestures of the brush and analyze the volumes that you see. In the drawing, the folds are very interesting to complement the composition, make it more dynamic and lively, and also help to show space and depth. We must remember the basic rules of composition, for example, how much the angle of view affects the image, so try to sketch complex gestures formed by the hand.Let's start practicing and draw the human hand with muscles and skin
Back of the hand. Step-by-step drawing
We will draw a hand in which the fingers are straightened to better understand how to draw it from the back. The drawing begins exactly the same as the drawing of the bone brush – we outline the palmar block to set the main volume, and the approximate location of the fingers going forward from the palm.
Separately we outline the components of the thumb from the side of the palm. Immediately set the rhythm in the arrangement of the fingers and combine the index and middle finger together. In the wrist area, we can simplify the outline of the block of wrist bones.
Next, we will outline the masses of the fingers and the location of the joints, remembering that the joints are located on imaginary arcs. We need to outline the joints and the silhouette of the fingers barely noticeable, so that the lines remain light. If the drawing and lines are already over-darkened, then before the next stage you can lighten them by going over with an eraser.
It is important at this stage to double-check the proportions before continuing the drawing. If something is wrong, then do not be afraid to make changes to the drawing and even redraw separate parts of the drawing.
Now we can draw the silhouette of the fingers and palm even more precisely. Since we are drawing the palm from the back side, we see how the joints appear in the silhouette of the fingers at the junction of the phalanges – here we need to show the silhouette more angular. But we also see the soft masses of the fingers that are on the inner side of the palm, so we show soft volumes on the fingers there.
Thus, sharp and smoothed outlines of the silhouette alternate in the drawing, which adds liveliness to our drawing.
The main work has been done, and now we can do a more detailed drawing of some areas of the brush, clarify the contours where they were too условными, and add tone in the shadows. The main focal point will be the joints connecting the base of the palm and the fingers.
The joint of the index finger is located closest to us, so we will make it more active and, as we move away, we will reduce the degree of study. Remember that the joint in this place looks like a spherical volume, and a tendon of the finger runs right on top of it along the center.
Try not to smooth out the shape in these places too much: after all, this is the place where the hard bones protrude the most. And, conversely, try to leave more smoothed areas between the joints: especially softened we need to draw the soft volume of the muscle mass near the metacarpal bone of the thumb.
On the areas where the phalanges of the fingers join each other, we can depict small folds and wrinkles. At this stage, take details from nature, for example, by analyzing your own hand.
Step-by-step drawing of the inner side of the palm
Let's draw the inner side of the palm. As usual, we start with a pentagonal base of the palm and outline the fingers. We monitor the proportions of the phalanges in relation to each other and the fingers in relation to the palm.
We mark the joints and silhouettes of the fingers to give them mass. We outline the muscle mass near the thumb and little finger with general outlines.
If everything is marked correctly and you are sure of the proportions, continue the drawing. We clarify the silhouette of the fingers and palm. Just as in the previous drawing, the fingers in the silhouette on the one hand have a more angular contour, on the other – a softer one. The contours of the palm are rounded and folds appear in some places.
The final stage remains, but by this time major changes in the drawing should not be made. We can add tone to enhance the volume, and at the place of shape bends to emphasize the accents with a stroke. You can look at the references or your own palm and analyze the configuration of the folds.
The main thing is not to get carried away too much: our task is to create the effect of volume in the brush and only slightly show the texture of the skin.
Let's summarize. We made sure that the image of hands is an integral part of artistic skill, we know how great masters of the past used images of hands to reveal the depth of the image and enhance the emotional impact of the painting.
Understanding anatomy, the ability to accurately depict the structure of bones, muscles and tendons of the brush allows an artist to create realistic, lively images. Gestures and hand positions can tell the viewer about mood, feelings and even the social status of the person portrayed.
For an artist striving to improve his skills, studying the anatomy of hands is mandatory. This knowledge will allow you to create more expressive psychologically filled portraits and compositions in which every detail, including the hands, will work to reveal the idea of the work.
We hope that our article helped you better understand the structure of the brush, master the principles of its depiction and inspired you to further improve your skills. Remember that the path to mastery requires constant practice and observation, but the result is worth the effort.
Do you want to learn how to draw anatomically correct brushes in different perspectives and poses? Then be sure to sign up for our cool course Human hands. We promise: after the course you will gently fall in love with drawing hands and will never call this topic complicated or boring!
Video teaser of the course "Human hands"
Related materials

Article
How to draw armor
December 27, 2024
Tutorial
How to draw a nut
September 18, 2023

Article
What to start drawing with?
December 20, 2024

Article
Linear perspective: what it is and why it is needed
March 14, 2024

Article
Drawing faces of people of different ages
December 26, 2023

Tutorial
How to draw a crystal. Step-by-step guide for artists
March 24, 2025

News
Вы неправильно ведёте разговор о совместной разработке арта окружения
June 11, 2026