ArticleUpdated: July 2, 2026
What to start drawing with?
In short
What should a beginner artist start with when drawing? Find out how to choose a direction, materials and master basic skills to develop creativity!
2D artist
```

 Motivation is "a strange thing, it seems to be there, but it also seems not to be." In fact, it can and should be managed. But only with gentle and careful methods, without self-harm, otherwise the magic won't happen, everything should be done out of love. We have collected for you a list of good thoughts that will help with motivation, ignite creative passion in you, and give you the strength of self-confidence:

Where to start learning to draw for a beginner
Many paths in drawing are open to you, and which one to choose depends on your goals and preferences. Drawing is like a pastry shop where you want to try everything: croissants, cakes, meringues, caramel, and wash it all down with either cappuccino, cocoa with marshmallows, or even jasmine tea. At the beginning of the journey, it's worth deciding what you want: will it be painting, graphics, or digital illustration. Each direction has its own characteristics in the use of materials, technical techniques, drawing principles, and implementation. If you clearly imagine the area that interests you, feel free to go for it. You can go to a university in this field, you can go to courses in private studios and schools, any choice will be good and right. The main thing is to listen to your heart and take into account the availability of free time. Sometimes it's easier to get additional education through courses rather than spending many years achieving your goal. Well, if you don't understand what and how to draw, it's worth just trying different materials, taking trial lessons to understand if working with paints is close to you, or maybe you still prefer working with digital brushes. So the first task for a beginner to draw is to decide on the direction. And then it's always worth starting with the basics — studying the fundamentals of the specifics of the drawing field that you like. In addition to practice, it is necessary to study the theory: the laws of coloristics, the laws of composition, the principles of perspective, the features of tone and lighting, the basics of concepting, the laws of anatomy, the principles of stylization, the laws of design, to follow trends, and most importantly — to develop your skills! You will tell us that you have already read something similar, you need specifics. That's right, it will come! And we are gently and smoothly leading you to it and will further talk about the pitfalls and necessary knowledge.How to motivate yourself?
Motivation is "a strange thing, it seems to be there, but it also seems not to be." In fact, it can and should be managed. But only with gentle and careful methods, without self-harm, otherwise the magic won't happen, everything should be done out of love. We have collected for you a list of good thoughts that will help with motivation, ignite creative passion in you, and give you the strength of self-confidence:
- Starting something new is always scary and difficult
- Drawing is not stressful
- Try to imagine drawing as a hobby
- Look for inspiration
- Make a schedule for drawing evenings
- Look for company
- Start with the simple
- Experiment
- Imagine the learning process as a game
- Praise and reward yourself
Related courses
All courses
from 3 900 ₽
-57%
Book illustration: The first page page
9 000 ₽3 900 ₽
Learn more

from 12 000 ₽
-20%
Векторная иллюстрация для начинающих
15 000 ₽12 000 ₽
Learn more

from 4 500 ₽
-55%
Character Concept: My First Hero
10 000 ₽4 500 ₽
Learn more
```
It's important to praise yourself in a healthy way for your achievements, but of course, you shouldn't go to extremes and become like Narcissus from the ancient Greek myth. As Garfield the cat said: "Feed me, love me, and never give up on me!" You're already on the path to your goal and constantly learning new techniques, absorbing new information. Got the hang of perspective construction — treat yourself to some chocolate. Painted a whole still life — take yourself to a concert. Drew a portrait — treat yourself to a whole cake! Don't forget that you're always doing great!

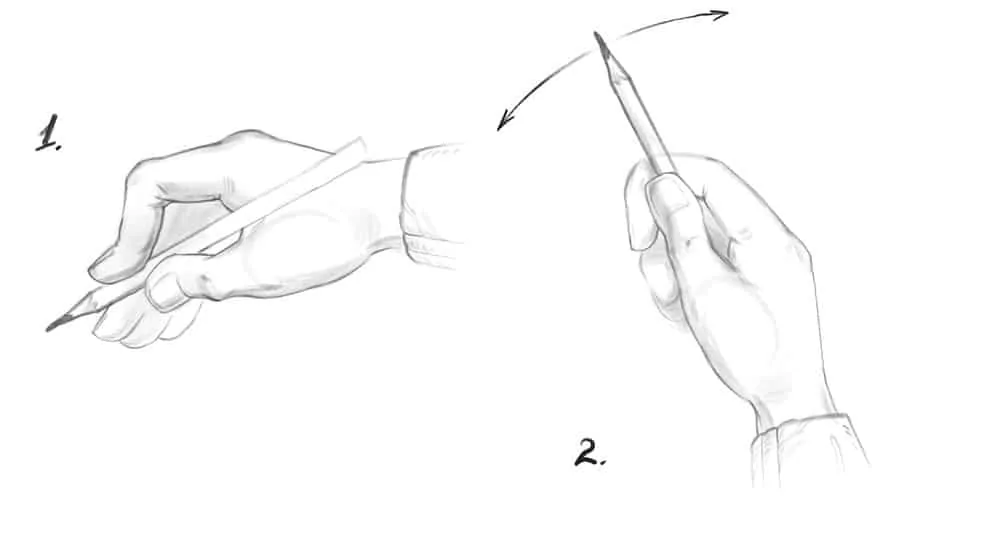 To draw contours, construct, and do fine shading, use position 1. Hold the tool with three fingers (index, thumb, and middle). All other variations will give unnatural movements for the brush, which can even lead to wrist injury.
And for more sweeping, ink shading, it's convenient to change the grip of your fingers. Try holding the tool with two fingers, as in position 2. Now, moving your wrist in an arc, you'll be able to leave strokes of greater length and radius, they'll be wider because the lead will lie on the sheet sideways.
To draw contours, construct, and do fine shading, use position 1. Hold the tool with three fingers (index, thumb, and middle). All other variations will give unnatural movements for the brush, which can even lead to wrist injury.
And for more sweeping, ink shading, it's convenient to change the grip of your fingers. Try holding the tool with two fingers, as in position 2. Now, moving your wrist in an arc, you'll be able to leave strokes of greater length and radius, they'll be wider because the lead will lie on the sheet sideways.
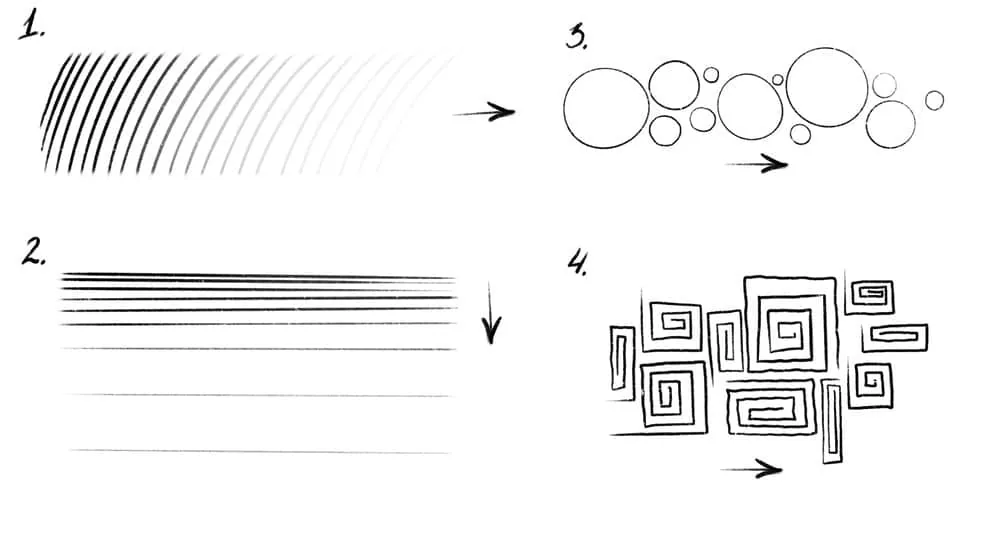 We start with the simple things — getting used to the position of the hand and drawing lines of different characters. It may seem that the exercises are boring, but try to perform them accurately and neatly. Trust us, these exercises are perfect for a beginner to get used to the new position. First, make a series of inclined strokes with equal distances between them — 1. Then try drawing longer horizontal strokes with increasing space between them — 2. How about filling an area with circles of different diameters? And not just circles, but neat, even ones, without tails and gaps — 3. Let's change tactics and give the hand a new challenge: fill the area of the sheet with Greek meander scrolls — 4.
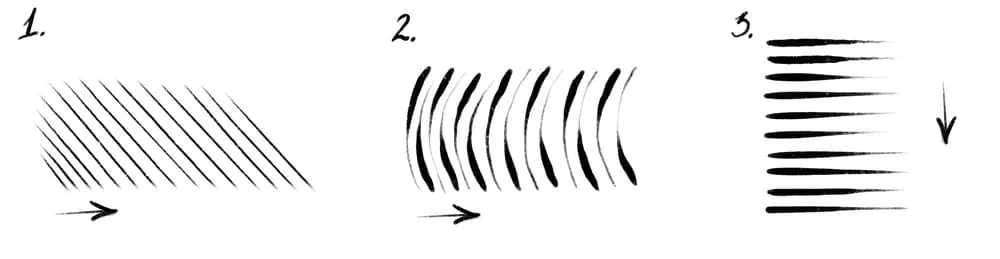 Don't forget about the pressure on the tool. There are liners, markers, pens that do not change the width of the imprint with pressure. But generally brushes, pencils, crayons, and styluses have this ability. Try changing the angle of the line at the beginning and fill the area with uniform strokes — 1. We're changing tactics again. At first, press hard on the tool, causing it to flatten and leave a wide mark. And by the end of the arc, ease up on the pressure. We get curved droplets — 2. Let's try the same technique on horizontal strokes — 3.
You won't believe it, but we have a whole talmud with exercises and step-by-step tutorials for beginning artists! Thanks to them, you'll be able to get your hand in shape and start drawing more complex things than lines and simple geometry.
We highly recommend reading the article “How to Learn to Draw” on our school's website.
Don't forget about the pressure on the tool. There are liners, markers, pens that do not change the width of the imprint with pressure. But generally brushes, pencils, crayons, and styluses have this ability. Try changing the angle of the line at the beginning and fill the area with uniform strokes — 1. We're changing tactics again. At first, press hard on the tool, causing it to flatten and leave a wide mark. And by the end of the arc, ease up on the pressure. We get curved droplets — 2. Let's try the same technique on horizontal strokes — 3.
You won't believe it, but we have a whole talmud with exercises and step-by-step tutorials for beginning artists! Thanks to them, you'll be able to get your hand in shape and start drawing more complex things than lines and simple geometry.
We highly recommend reading the article “How to Learn to Draw” on our school's website.

 We have a fun analogy with games on this issue: imagine that you are developing your character and deciding whether they will be just an archer or a multi-warrior who wields magic, a one-handed sword, and archery skills.
 See how our students grow! They go from simple cubes and balls to complex geometry and bionic plasticity. And you can do the same, either on your own or with us in a cozy and positive atmosphere of like-minded people in the Drawing Basic course. We'll leave you the link in case you get interested and grab your pencils and run with us to draw!
Always remember, you have already taken the first and most difficult step towards your goal — you started thinking and making the first moves in drawing! So, the rest will definitely work out.
The army of artists must grow to fill this world with beautiful arts and drawings. We at Skills Up School believe that none other than us (artists) will save this world with beauty and make it better. Join us and let's grow and draw together!
See how our students grow! They go from simple cubes and balls to complex geometry and bionic plasticity. And you can do the same, either on your own or with us in a cozy and positive atmosphere of like-minded people in the Drawing Basic course. We'll leave you the link in case you get interested and grab your pencils and run with us to draw!
Always remember, you have already taken the first and most difficult step towards your goal — you started thinking and making the first moves in drawing! So, the rest will definitely work out.
The army of artists must grow to fill this world with beautiful arts and drawings. We at Skills Up School believe that none other than us (artists) will save this world with beauty and make it better. Join us and let's grow and draw together!
- Give yourself some rest
Setting hand movement
There's an opinion that the brain doesn't care which method you use for learning: practical or theoretical. It learns and develops the skill one way or another. Oh, how easy it would be then: watch a video, flip through a book, listen to a lecture, and voila, you're Botticelli! Be prepared for a slow but interesting process of teaching your hands the motor skills you need. You have to learn to hold brushes, pencils, and styluses. The style and quality of the stroke or line depend on the movement of the brush or hand, the angle of the tool, or its rotation. At first, your hand will tremble, make sudden movements, and round turns awkwardly. And the line will come out прерывистой, trembling, with poorly controlled pressure. Everything is fine with you, it's not that your hand is crooked or the pencils are bad. It's just that the line trembles because it's scared by the understanding of its creator's power (just kidding). We've written some tips that will help you set your hand and make its movements confident and well-controlled.- How to hold the tool
To draw contours, construct, and do fine shading, use position 1. Hold the tool with three fingers (index, thumb, and middle). All other variations will give unnatural movements for the brush, which can even lead to wrist injury.
And for more sweeping, ink shading, it's convenient to change the grip of your fingers. Try holding the tool with two fingers, as in position 2. Now, moving your wrist in an arc, you'll be able to leave strokes of greater length and radius, they'll be wider because the lead will lie on the sheet sideways.
- Hand position on the table/in the air
- Exercises
We start with the simple things — getting used to the position of the hand and drawing lines of different characters. It may seem that the exercises are boring, but try to perform them accurately and neatly. Trust us, these exercises are perfect for a beginner to get used to the new position. First, make a series of inclined strokes with equal distances between them — 1. Then try drawing longer horizontal strokes with increasing space between them — 2. How about filling an area with circles of different diameters? And not just circles, but neat, even ones, without tails and gaps — 3. Let's change tactics and give the hand a new challenge: fill the area of the sheet with Greek meander scrolls — 4.
- Pressure
Don't forget about the pressure on the tool. There are liners, markers, pens that do not change the width of the imprint with pressure. But generally brushes, pencils, crayons, and styluses have this ability. Try changing the angle of the line at the beginning and fill the area with uniform strokes — 1. We're changing tactics again. At first, press hard on the tool, causing it to flatten and leave a wide mark. And by the end of the arc, ease up on the pressure. We get curved droplets — 2. Let's try the same technique on horizontal strokes — 3.
You won't believe it, but we have a whole talmud with exercises and step-by-step tutorials for beginning artists! Thanks to them, you'll be able to get your hand in shape and start drawing more complex things than lines and simple geometry.
We highly recommend reading the article “How to Learn to Draw” on our school's website.
Learning the basics: simple shapes, perspective, constructing volumes, and shading
Why learn the basics when you can move straight to your ultimate goal? It's because they give you a solid foundation and confidence in drawing. They help you develop the mindset of a creator and the vision of an artist. If you disrupt the sequence of learning the basics, it will be much harder to learn. Each brick of knowledge fills in the gaps of ignorance consistently. Would it be possible to build a tall tower if there were gaps and uneven masonry in the wall?- Simple shapes are straight, curved lines, and all sorts of other variations. Flat geometric shapes or frivolous silhouettes also belong to them. Practicing on simple shapes teaches you to control the tool, get your hand in shape, and understand the basics of the laws of composition, dynamic shape, and static shape. It's as if you're learning to walk in the drawing world. Imagine that you're studying the features of chess pieces and their capabilities. Leave the cunning forks and gambits for later.
- Perspective. We live in a rather promising world, objects separate and approach, enlarge and narrow. An artist needs to know about the types of perspective reductions and their laws. Otherwise, how will you draw locations with architecture?
- Constructing volumes happens precisely by using the laws of perspective in practice. Every ball, every cube, every cone, and every complex shape composed of their combination is subject to perspective reduction. Away with unpromising objects! Also, at this level, practicing drawing cutaways helps a lot. That is, combining shapes with each other. These are no longer single cubes, but a whole art object. ```
- Chiaroscuro is the creation of the illusion of volume of drawn objects. It's important to understand what it consists of and how to combine all its elements. If shadows became light and light became shadow, it's scary to imagine a world where everything is upside down. By the way, we've written an article about highlights and light, and even made simple tutorials on how to draw them.
How to make a plan and stick to it?
You've already taken the first step — you've decided on the direction. Let's take the next one: determine your level. If you're a complete beginner in this field, then let's start with the basics. And if you have some drawing experience, then identify your weaknesses: perhaps it's constructive drawing and proportion analysis, perhaps a lack of knowledge in the field of color theory, or maybe you don't know how to draw people. Of course, then we set a goal to learn a certain technique and skill in the chosen direction and make a schedule for the week. In it, you can and should take breaks, short vacations. It's not worth putting off classes for a long time, as the skill will grow slowly. Choose 2-3 days a week when you will devote your free time to drawing. Once a week will be too little, and more days can be tiring. Well, in order not to retreat and not give in to procrastination and sadness by a single step, we want to advise you some actions:- Imagine your final goal. When you achieve it, you'll feel good about fulfilling your dream and overcoming difficulties, you'll feel the satisfaction of an achiever. During the learning process, you'll also experience positive emotions, but they'll be tempered by огорчения from periodic failures. Don't forget about the happy ending.
- Don't forget to enjoy the process. If you wait too long for the same ending, the brightness of the sensations will disappear, as will the value of drawing. Master Oogway from Kung Fu Panda said: "The past is forgotten, the future is closed, the present is given. That's why it's called the present!"
- Don't accumulate difficult drawing tasks into one big lump. Otherwise, it can turn into a wall that you won't go beyond. Make a mix: first, something pleasant and interesting for you, then something difficult and challenging, and then again something pleasant. Imagine a cake that suddenly has some unloved pieces of nuts. However, they are so distributed throughout it, hidden behind the cream and the delicious fruit filling, behind the softest layers of dough, that they no longer stop you from eating this miracle of light. And the cake didn't get worse, and perhaps you even came to like the nuts after such a combination!
- Find like-minded people with whom you will draw or a company in which you can discuss issues of interest to you about drawing. Support and involvement from others is a very good motivation not to deviate from your plan. For example, our Skills Up Club has just such a company увлеченная drawing and sculpting, you can always come for advice or support, and also draw together on diverse streams. (It seems that we advised you something similar about motivation, but in this case, this approach is also very effective!)
- Think of the drawing process not as a duty, but as an opportunity. With each mastered stage, more and more new doors open to you in this field.
We will outline your study of the basics step by step
For beginners in drawing, painting, or digital graphics, it's important to learn the general basics. And only then move on to the specifics of each direction. And we will help you with that. It's easy to get confused in new information, as if in a swamp. So don't despair and move forward together! It's much easier to start with a pencil and monochromatic colors.- Master the line.
- Constructive drawing of simple volumetric geometry
- Proportions
- Laws of perspective
- Laws of light and shadow
- Rendering or hatching
- Complex geometry
- Anatomy
How to grow further?
We have a fun analogy with games on this issue: imagine that you are developing your character and deciding whether they will be just an archer or a multi-warrior who wields magic, a one-handed sword, and archery skills.
- You can go by leaps and bounds, developing abilities in parallel in several areas, sometimes changing direction. For example, first you learned the basics of drawing techniques and the laws of perspective on simple geometry, and then you went on to apply what you learned in still life painting and working with color. It's as if you were a navigator exploring scattered islands in the sea.
- You can gradually expand your knowledge in one area. This way, you will follow a more consistent path, and each new topic for you will flow smoothly from the previous one. Let's say you started studying the same drawing with simple geometry and perspective, then delved into the more complex topic of bionic plasticity and complex geometry, and then moved on to the stage of drawing the basics of human anatomy with a pencil, and then to drawing a portrait. In this case, you are like an explorer who gradually increases the range of their radial journeys into unexplored lands. Isn't that romantic and exciting!
See how our students grow! They go from simple cubes and balls to complex geometry and bionic plasticity. And you can do the same, either on your own or with us in a cozy and positive atmosphere of like-minded people in the Drawing Basic course. We'll leave you the link in case you get interested and grab your pencils and run with us to draw!
Always remember, you have already taken the first and most difficult step towards your goal — you started thinking and making the first moves in drawing! So, the rest will definitely work out.
The army of artists must grow to fill this world with beautiful arts and drawings. We at Skills Up School believe that none other than us (artists) will save this world with beauty and make it better. Join us and let's grow and draw together!Related materials

Article
What to start learning 3D modeling with
January 30, 2025
Tutorial
How to draw a palm tree
September 18, 2023

Article
How to draw armor
December 27, 2024

Article
How to draw hands correctly
October 14, 2024

Article
Drawing faces of people of different ages
December 26, 2023

Tutorial
How to draw a crystal. Step-by-step guide for artists
March 24, 2025
News
Старший специалист по освещению ILM о вызовах в визуальных эффектах, создании освещения для голограмм в фильме «Трансформеры: Один» и начале карьеры в индустрии
June 23, 2026