TutorialUpdated: July 2, 2026
How to draw a house
In short
Before we start drawing our beautiful house, we will need to figure out how to draw simple shapes.
2D artist
To draw a house with a pencil or using a graphics tablet, you need to know several things to make the drawing convincing, as well as to express your замысел and idea. Let's list some of them.
The most important topic in depicting architecture should be perspective. It is important to be able to build objects with an understanding of the laws of perspective. The laws of composition are also important to make an expressive drawing of a house. The composition can also include the angle of view of the object. The angle of view is a very important aspect because it greatly influences how the viewer will perceive the image and which elements will catch the eye at first glance.
If you are going to come up with a house design or create concept art of an architectural object, you need to have knowledge of design and understand the basics of the functions of architectural elements of buildings. Even if you only need to come up with the image of a cozy country house or a fatalistic skyscraper, understanding the structure of architectural objects will help you make more convincing and impressive drawings of houses.
Shading as part of an important component of the drawing can add volume and depth to the space and help to identify the main thing in the drawing by accentuating the focal points. And the ability to draw textures can perfectly decorate the drawing and give a special atmosphere to the image.
We will look at the most important points in this article to help us draw a beautiful house that we will come up with together. Let's start with simple geometric shapes and the theory of perspective construction of objects. And then we will put them together, think over the silhouette and angle of view, and draw the architectural elements of the house, decorating the drawing with details and textures.
So, let's start exploring the techniques that will help us draw a beautiful house with a pencil. By the way, if you are drawing on a graphics tablet, all the actions will be the same, so let's go!
The basis for the house will be simple figures, so first we will master how to draw a cube. This figure and its modifications—parallelepipeds—are great for the initial sketch of a house to determine the dimensions and then refine the drawing. You can use other figures, such as pyramids, cones, cylinders, etc., the main thing is that they are very simple. This way, you can quickly get a preliminary visual scheme of the house.
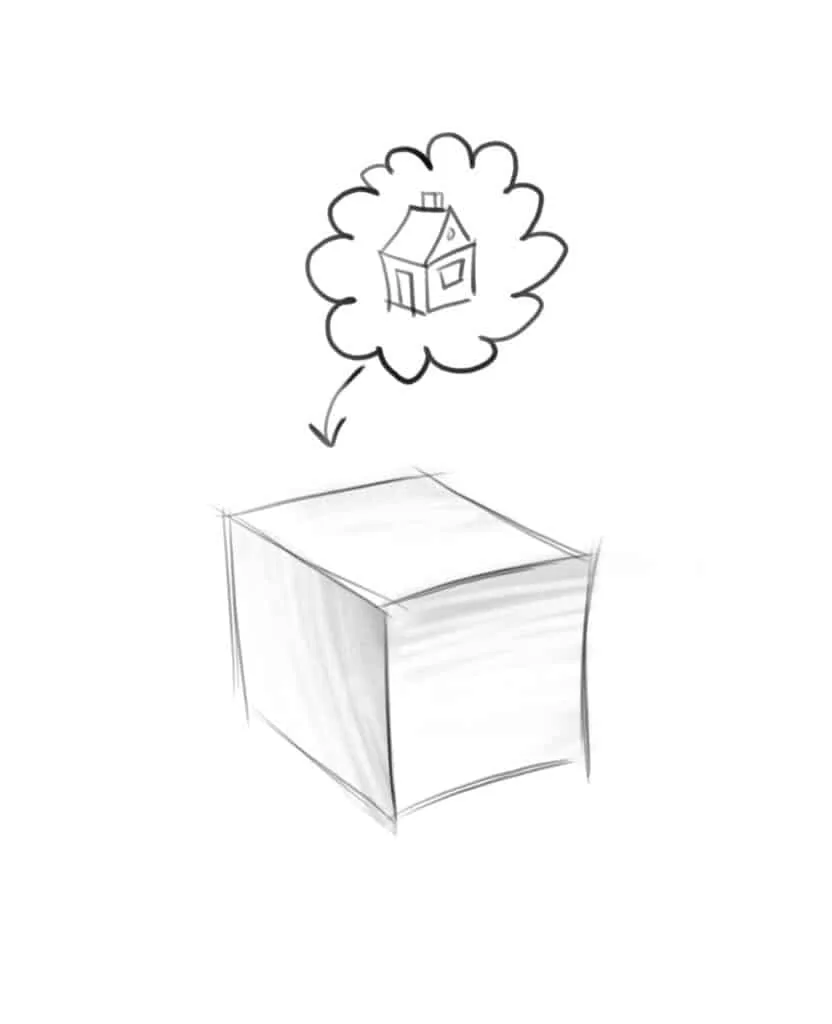 Before we start drawing our beautiful house, we need to figure out how to draw simple figures. Let's start with a very simple figure that will be our first house, and it will help us deal with the study of perspective.
 Draw a horizon line and put a point in the middle of it. This is our first vanishing point, a very important point in the topic of perspective. Now draw a small square so that the point is in its center. We have drawn the front wall of our future cube.
 Next, draw lines from each vertex of the square to the vanishing point, as shown in the diagram. Now we need to step back a little into the square and draw a smaller square, which is shown in green on the diagram. This way we got a cube, the walls of which we see through. We can say that we have drawn a room without a front wall and can observe the back and side walls, as well as the floor and ceiling. Let's weaken those construction lines that we no longer need and draw the rest.
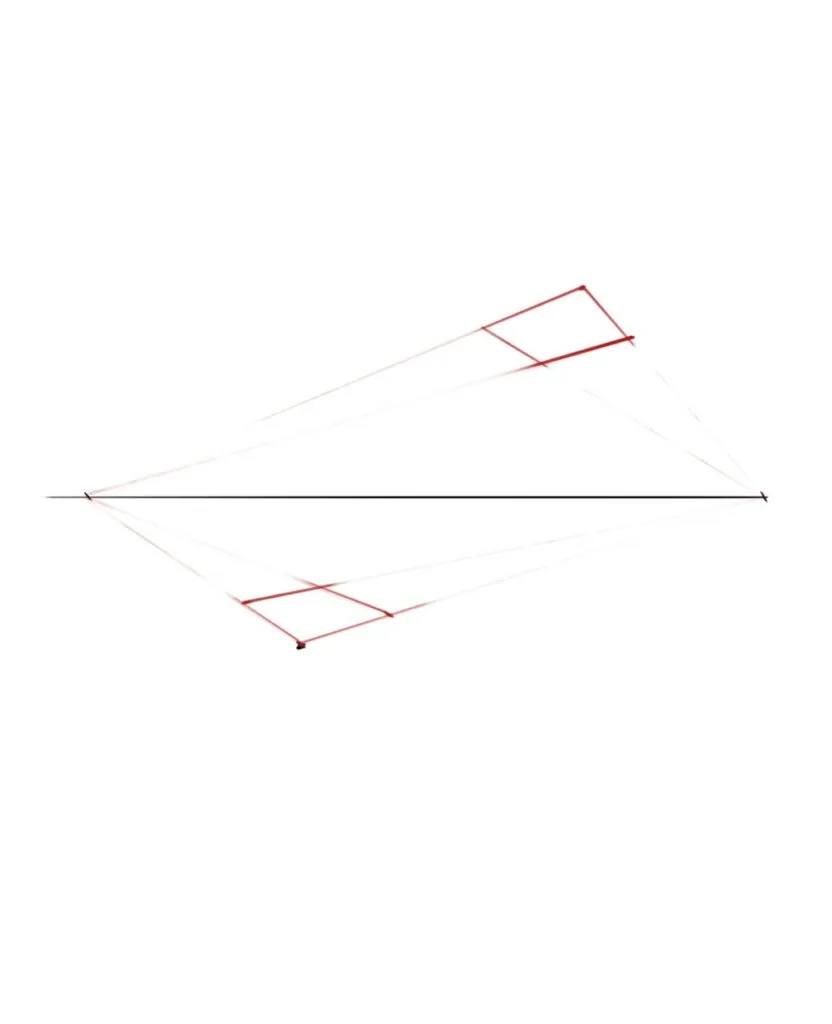
 Let's continue the topic of frontal perspective and see what the cubes will look like if they are placed below or above the horizon line. Outline 4 squares on top and bottom closer to the edge of the canvas and draw lines from each vertex of the squares to the vanishing point.
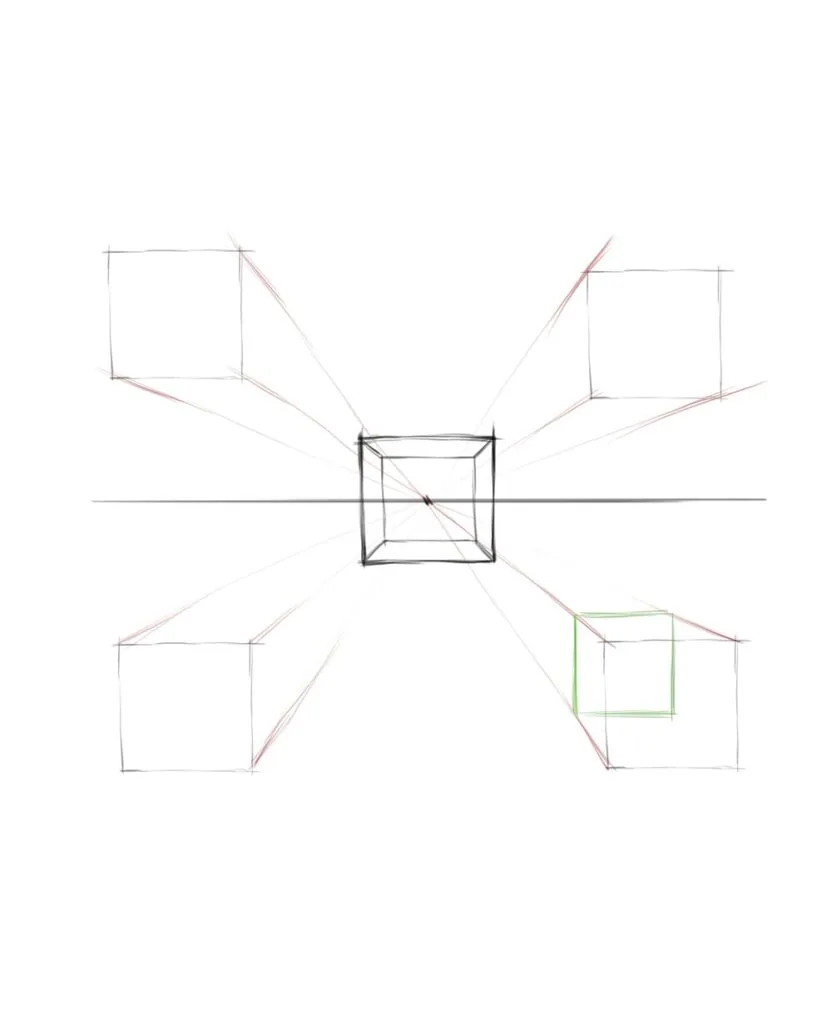 After that, measure a slight shift into the depth in the directions that the lines going to the vanishing point gave us. Look at how it is done in the diagram—the back wall in the form of a green square has moved a short distance into the depth. Do this with each object and clean up the drawing so that the construction lines become weaker.
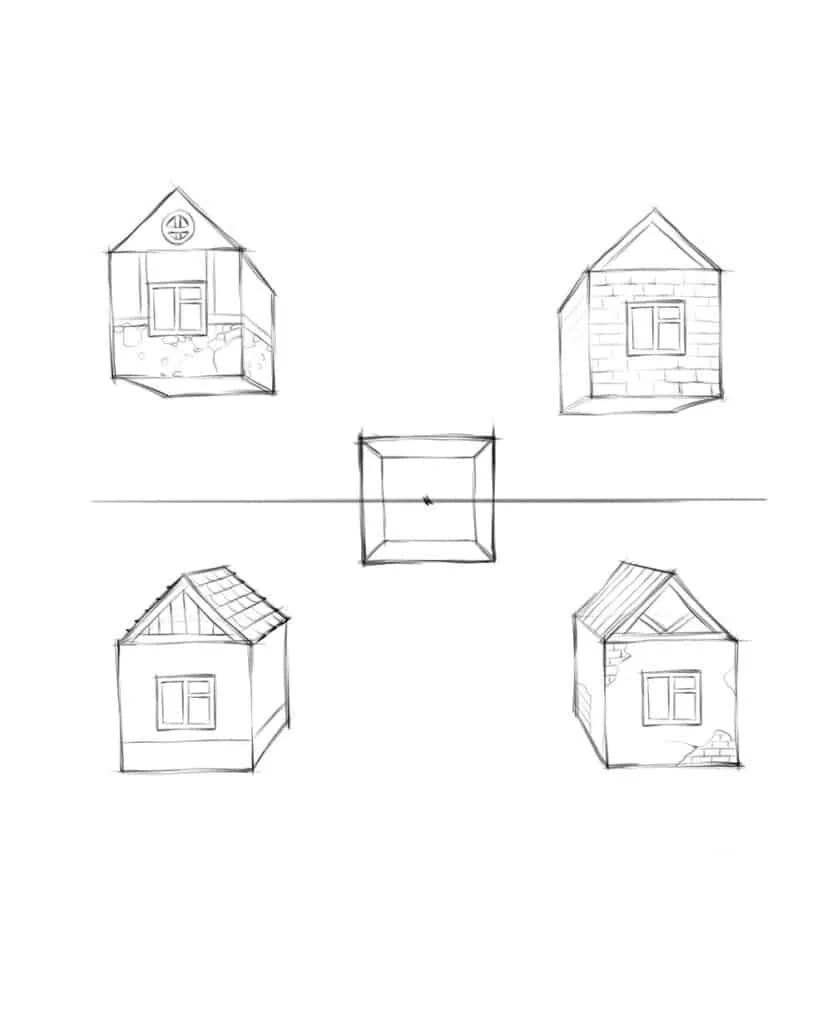
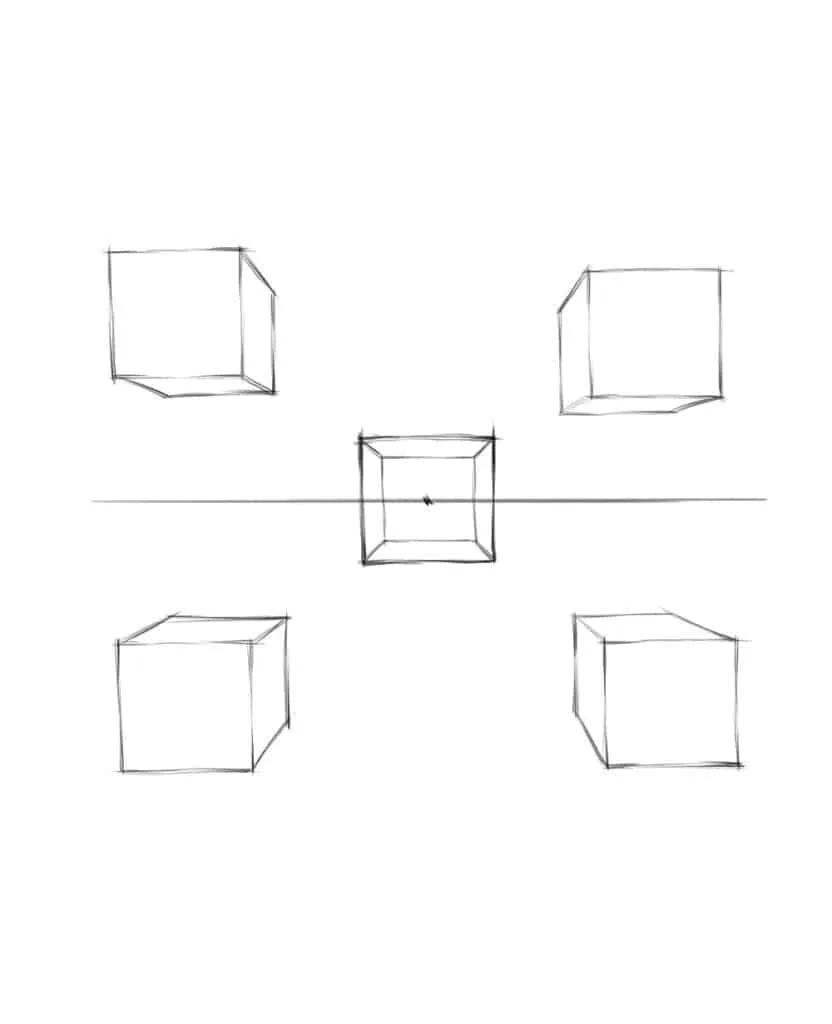 Let's draw the roofs of our figures to get 4 houses with gable roofs. To do this, we need to draw triangles on top of each cube. Draw them up against the squares that we had a few steps ago when we just outlined the front walls of the cubes.
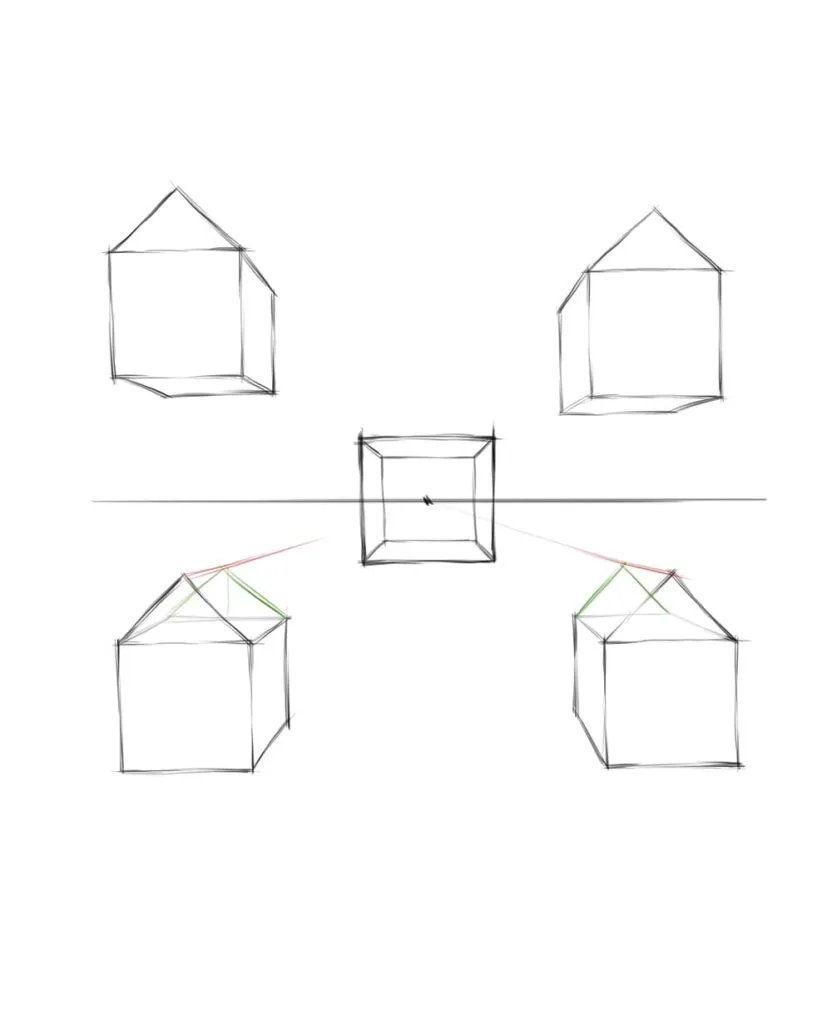 Since the upper cubes in such a perspective, which does not allow you to see the roof from above, then we will not draw anything there. And for the lower cubes, you need to complete the roof. Draw a line from the top of the triangle to the vanishing point, and on the back wall draw a smaller triangle so that its vertex touches the ridge line—this is the upper edge of the roof.
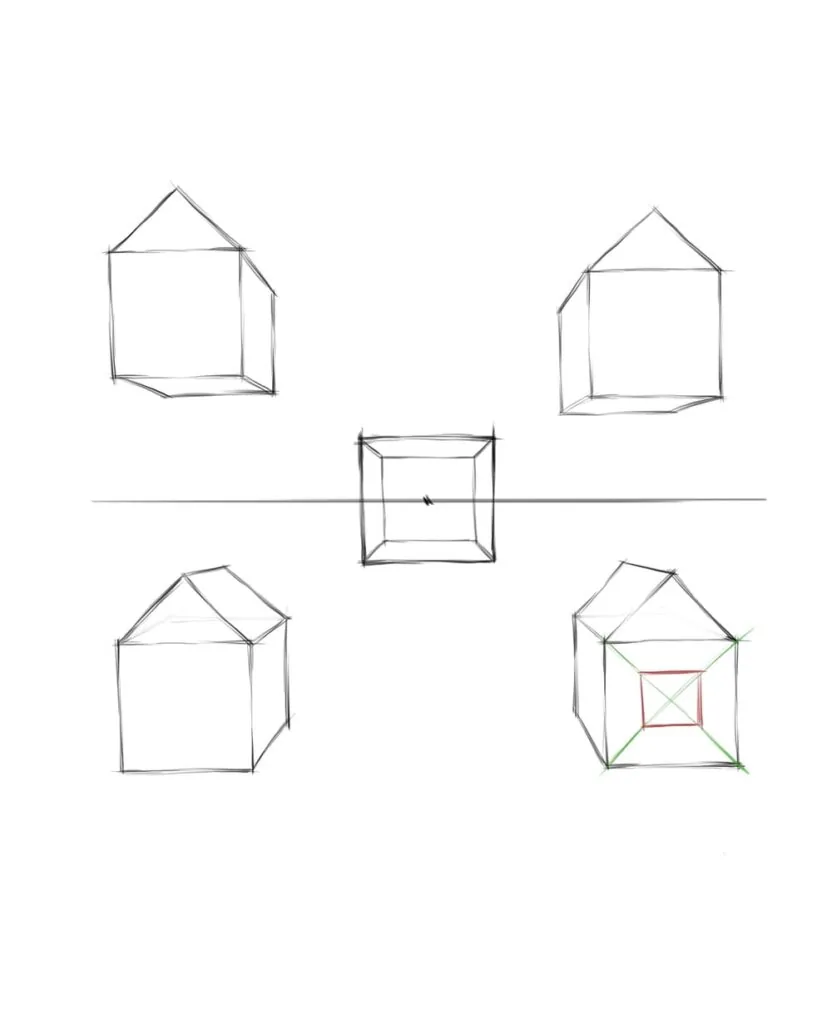 Now you have learned how to build objects in frontal perspective and as a result you have drawn 4 simple houses. Let's practice drawing windows on them, and at the same time we will master a useful method with which you can find the middle of any figure. Draw diagonal lines from the 4 vertices on the front wall of the house. The center of this square is at the intersection of the diagonals, and now we will draw a window in the center of the house.
 If you wish, you can decorate the houses with textures and practice drawing architectural elements, but the main topic now is perspective, so let's move on to the next method.
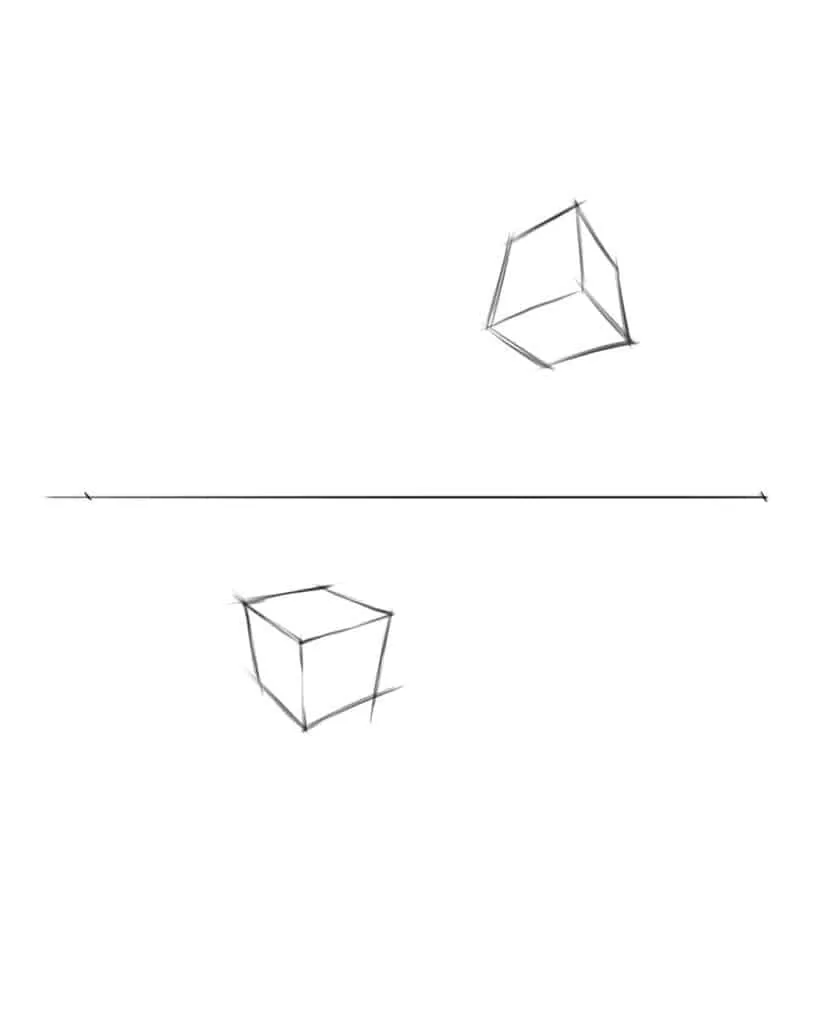
 For the next method, we will need two vanishing points. Draw a horizon line and mark 2 vanishing points on it closer to the edges of your sheet of paper or digital canvas. In the center of the horizon line, draw a small vertical segment.
 Draw lines from the top and bottom vertices of the segment to the vanishing points. These are the first planes of the cube, imagine that they are moving very far away and decreasing so much that they themselves turn into points in the distance. We need to limit the length of the planes, for this draw vertical lines as shown in the diagram in green.
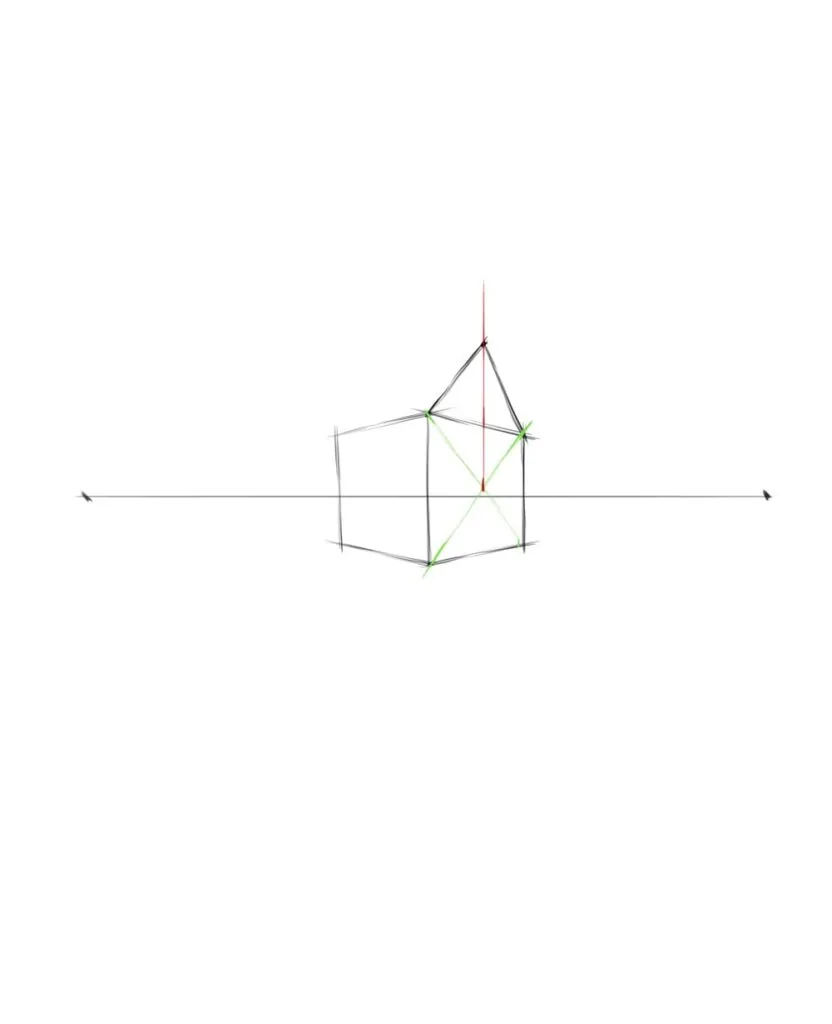 Next, let's draw the roof for our cube, for this draw diagonals on the right wall and find the center. Raise a construction line from the center on which the top of the triangle will be. Draw a triangle and extend the roof into the depth to the back wall of our cubic house.
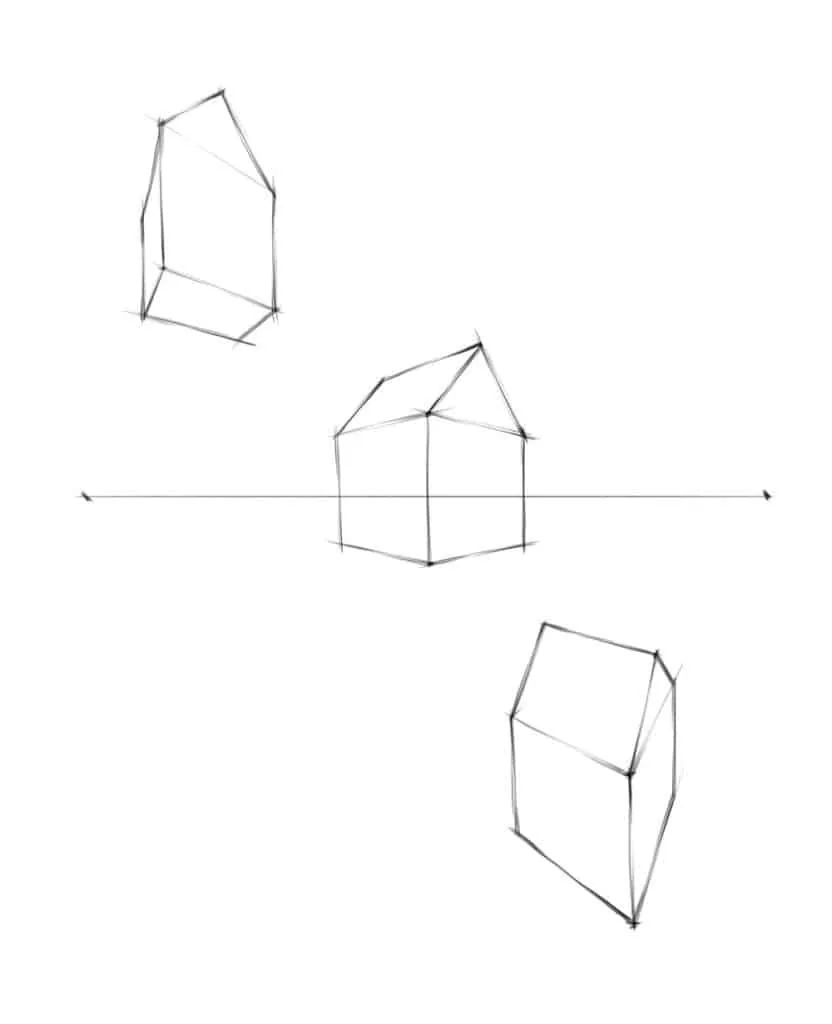
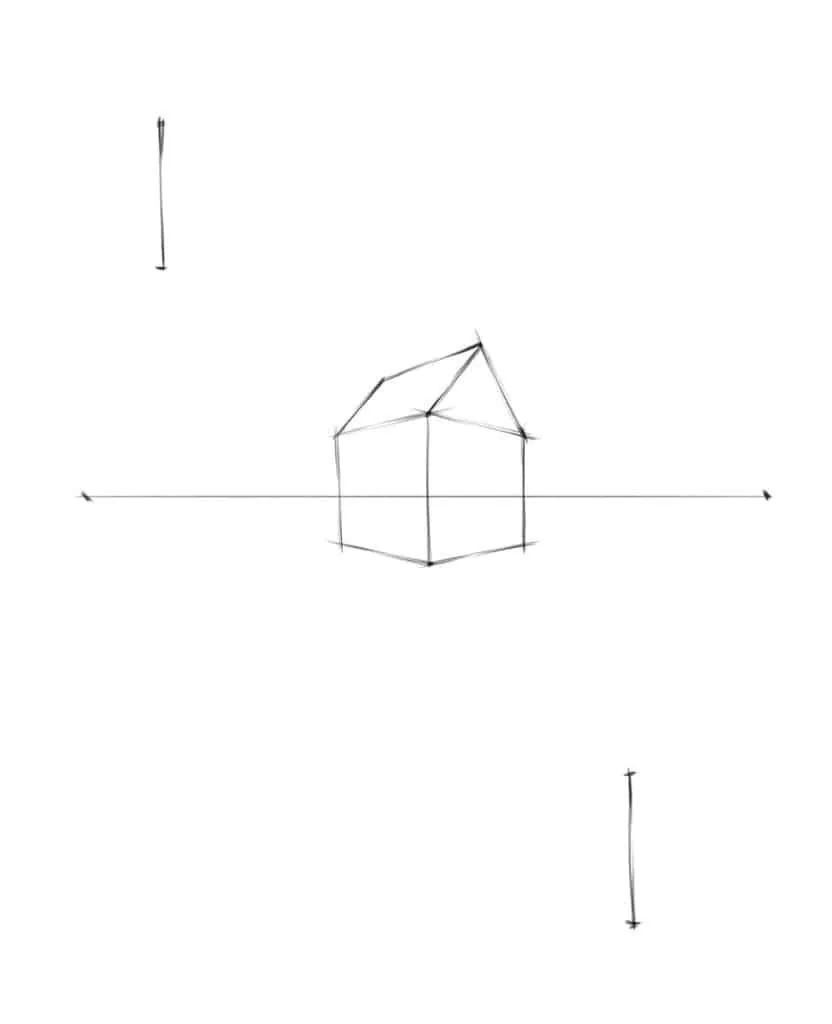 After you have drawn the first house, let's draw 2 more to consolidate this construction method. Outline two segments that will be the front corners of the houses. Now we will choose areas closer to the vanishing points and draw one house from below and the other from above. Further actions are repeated according to the example described above.
 It's time to draw conclusions and compare the two methods of perspective construction. The frontal angle should be chosen if you want to depict the front wall of the house, and all the others are not so important to you. Or if you want to depict a group of separate houses to show the depth of space. Perspective with two vanishing points is attractive because we depict the house in a more dynamic angle. This type of perspective is more often used to depict houses.
 We will need a horizon line, two vanishing points and to start we will build two planes, one above and the other below the horizon line.
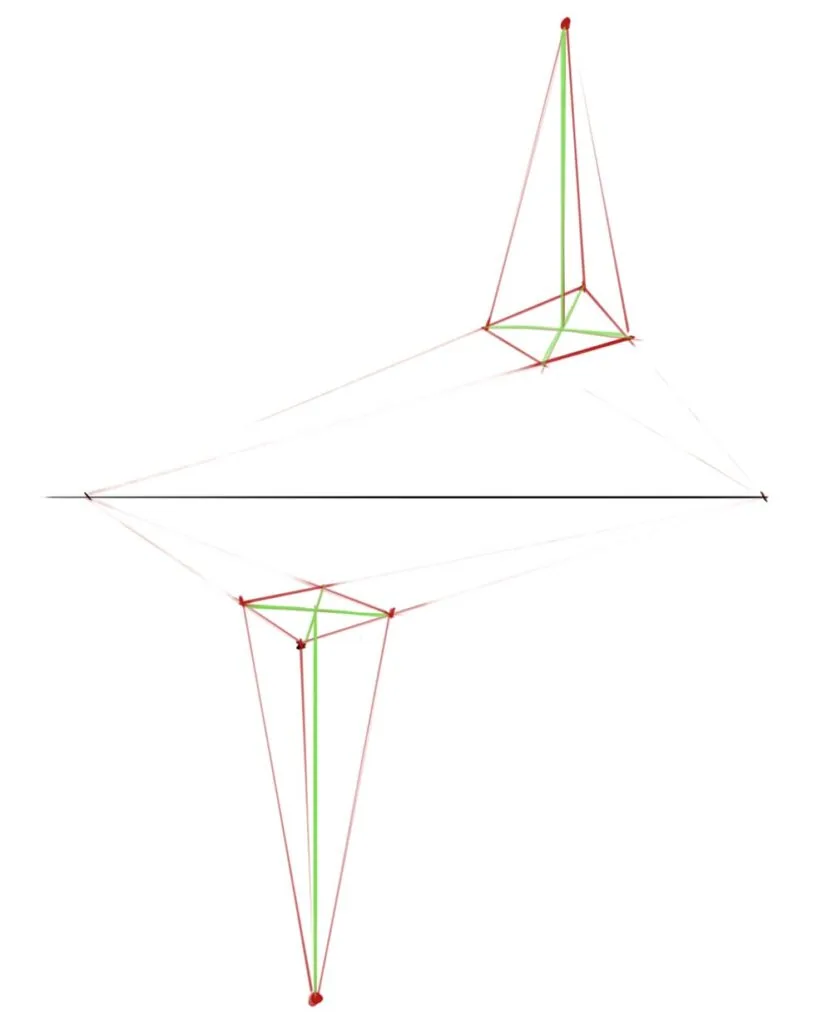 Having found the center of the plane, we extend the segments under and above the planes vertically. Almost at the very edge of the sheet, put a point at the end of the segment—this is the third vanishing point for each object.
 Draw lines to the 3rd point from the vertices of our planes. Then you need to limit the length of the planes, and you will get cubes that you can turn into houses.
So, we have become acquainted with the most frequently used types of perspectives, and we advise you to practice drawing simple figures using the knowledge you have acquired, but now without visible vanishing points on a sheet of paper, but imagining them beyond the edges of the sheet. Try to combine simple figures with each other, you can subtract one figure from another. Experiment with sizes, angles and composition.
This stage may seem difficult to you, especially if you are a beginner artist, but it is very important and it's okay if you make a lot of mistakes. The main thing in this matter is practice, and the result will make itself felt in the near future. And if you still want to study the construction methods described here in more detail, then join our groups, in which you will be able to learn how to draw not only houses, but also a lot of other things in a short time. Experienced teachers will help you, with whom you will succeed! (link to courses)
Draw lines to the 3rd point from the vertices of our planes. Then you need to limit the length of the planes, and you will get cubes that you can turn into houses.
So, we have become acquainted with the most frequently used types of perspectives, and we advise you to practice drawing simple figures using the knowledge you have acquired, but now without visible vanishing points on a sheet of paper, but imagining them beyond the edges of the sheet. Try to combine simple figures with each other, you can subtract one figure from another. Experiment with sizes, angles and composition.
This stage may seem difficult to you, especially if you are a beginner artist, but it is very important and it's okay if you make a lot of mistakes. The main thing in this matter is practice, and the result will make itself felt in the near future. And if you still want to study the construction methods described here in more detail, then join our groups, in which you will be able to learn how to draw not only houses, but also a lot of other things in a short time. Experienced teachers will help you, with whom you will succeed! (link to courses)
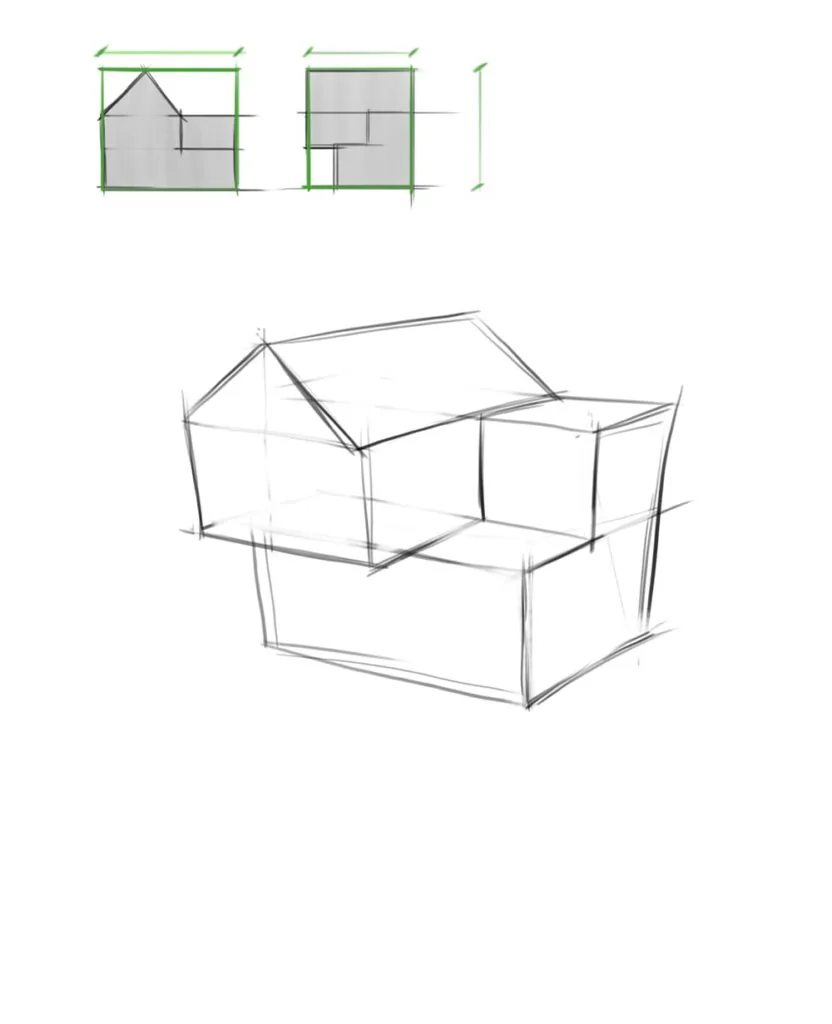
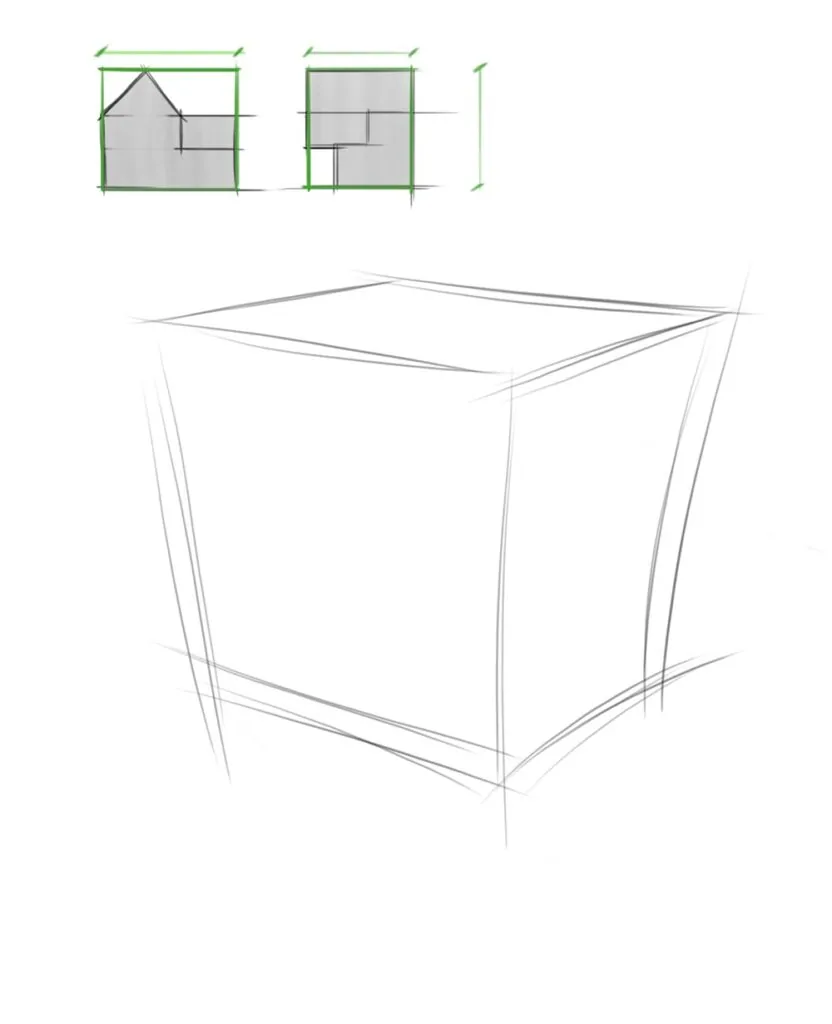 To fit into the format and get the proportions right, we need to determine the dimensions of our projections. Look at the example on the diagram above to see how to do this. Now that we know the proportions of the dimensions, we should outline the drawing of a parallelepiped.
 Next, we need to clarify the shape, but without specifics. You can estimate the shape of the house as one tall parallelepiped and another smaller one. Focus on the projections of the house from the front and side.
 Next, we need to clarify the volumes by subtracting pieces of the shape from the mass that was obtained before. Now we can designate a gable roof, and try not to go too far beyond the dimensions that have already been determined. This method will allow us to more accurately control the proportions of the house and not find out at the last stages that we have drawn something completely different from what we planned.
So, at this stage, we need to double-check the proportions of our drawings and the correctness of the perspective reduction, and finally it's time to work magic and turn our geometric object into a real house. You can follow our drawing, or you can come up with your own design, in any case, let's continue.
Next, we need to clarify the volumes by subtracting pieces of the shape from the mass that was obtained before. Now we can designate a gable roof, and try not to go too far beyond the dimensions that have already been determined. This method will allow us to more accurately control the proportions of the house and not find out at the last stages that we have drawn something completely different from what we planned.
So, at this stage, we need to double-check the proportions of our drawings and the correctness of the perspective reduction, and finally it's time to work magic and turn our geometric object into a real house. You can follow our drawing, or you can come up with your own design, in any case, let's continue.
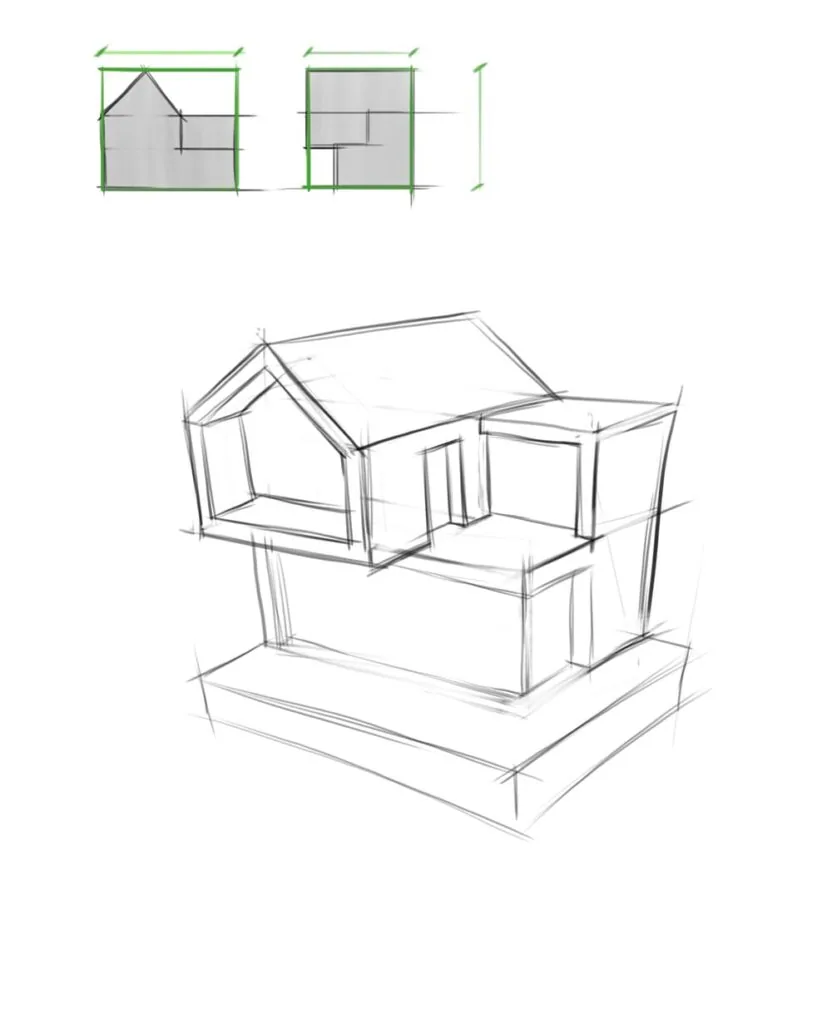 Now we will clarify the architectural elements of the house, but the shape should not change much. The lower floor will have panoramic windows, so we will make a recess from the front part and a little from the side of the house. The upper floor consists of a module with a gable roof, and part of the floor has a horizontal one. We make recesses in one and the other module for windows and a door as it will correspond to the idea of our design.
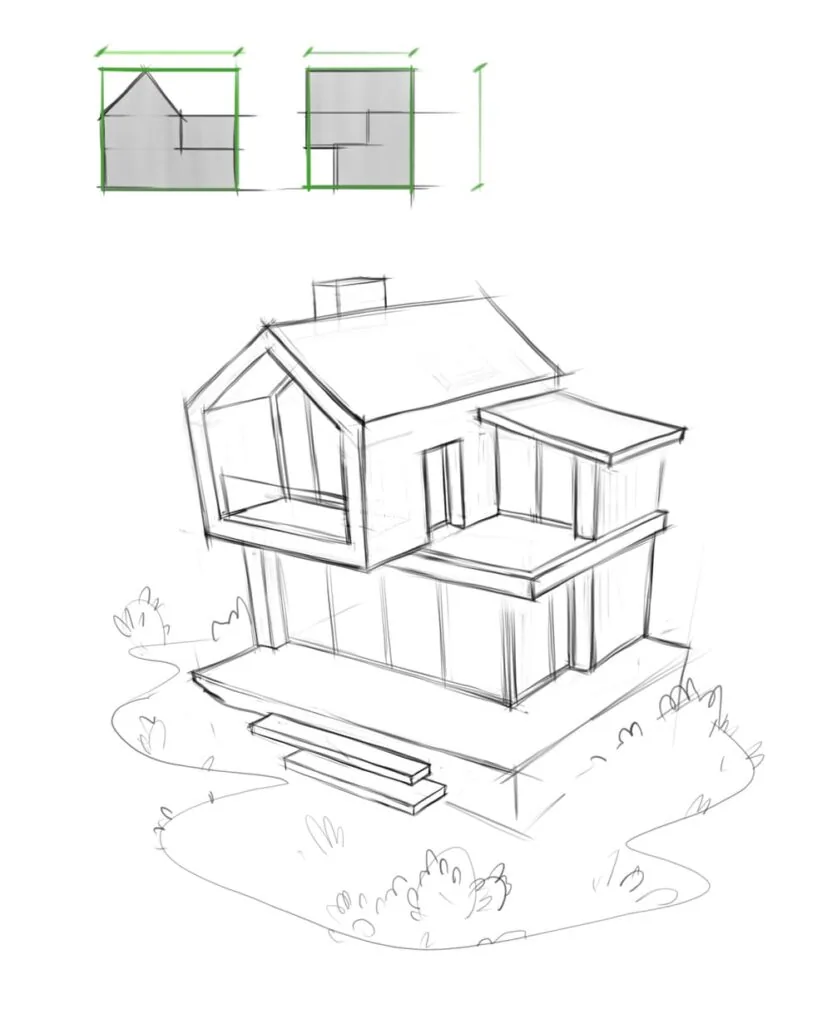 Next, more exterior elements are added to our drawing. Now we can draw frames with window joints. To make our house more cozy, we will draw a small terrace and some bushes around it.
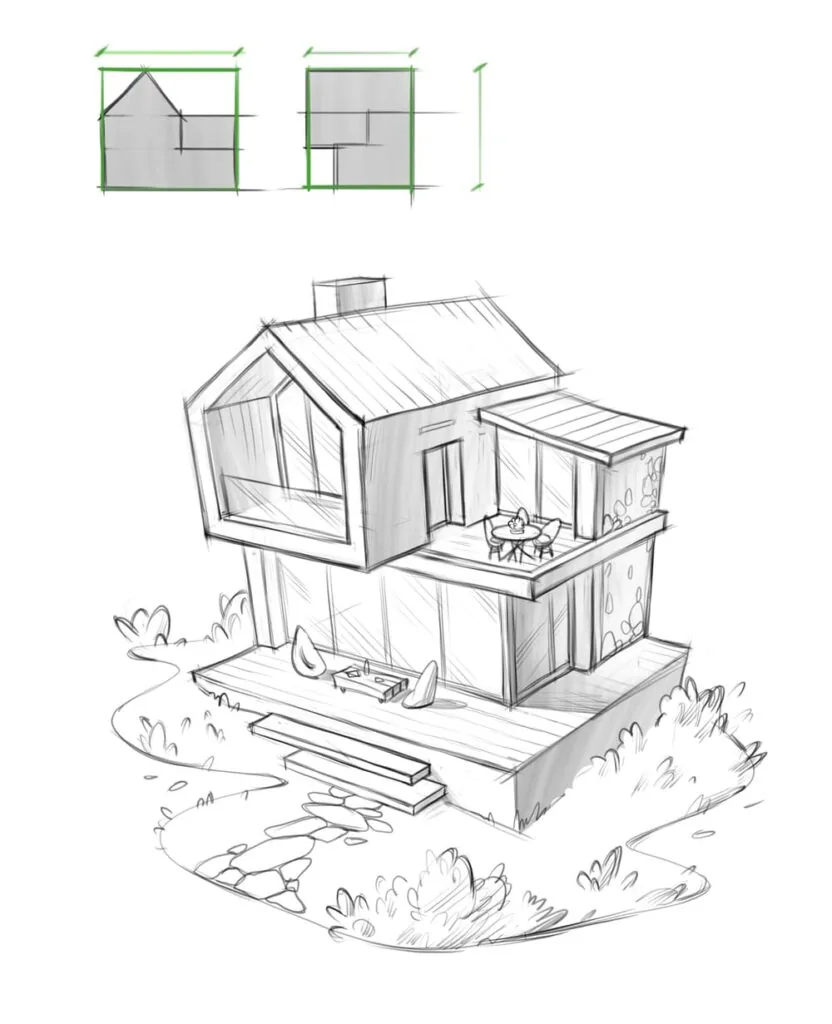 Finally, we have reached the final stage. Now it's time to add the entourage to our architectural work by placing objects in the drawing that will create the presence of a person in this space. We will draw a table and bean bags on the terrace, and on the second floor a dining table with chairs. We need to draw objects very conditionally, since the scale does not allow us to draw them too подробно. You can also add textures to the materials of the house. The floor is laid with a terrace board, so we will draw longitudinal lines throughout the terrace on the first floor and the floor on the second floor. The texture of the glass is very easy to show with an inclined hatch, imitating the glare. Part of the walls can be decorated with decorative stone. You can also lay a path of stones in front of the house. To enhance the volume of our drawing of the house, we can draw shadows, but do not try to darken the shadow areas too much otherwise the drawing may become fractional. With textures, too, do not get carried away too much, just slightly suggest what material the elements of the house are made of.
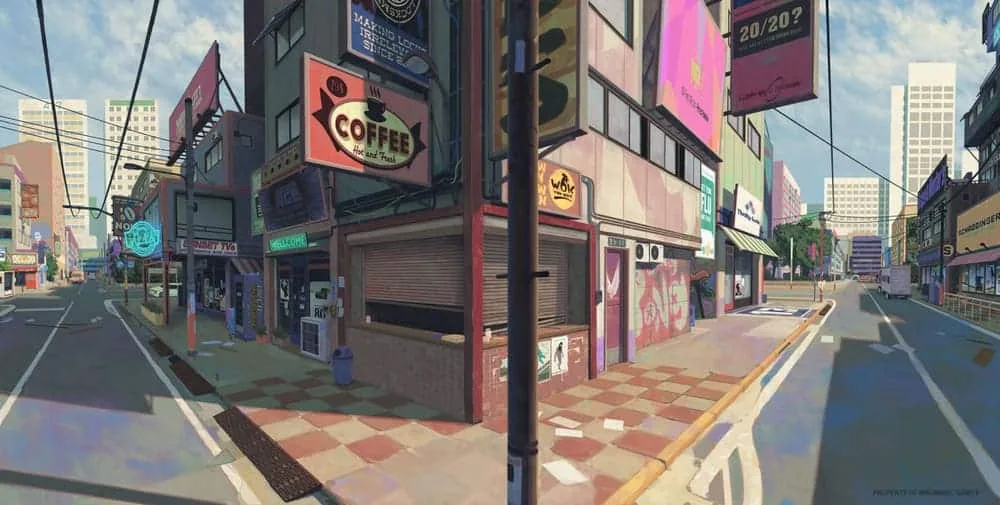
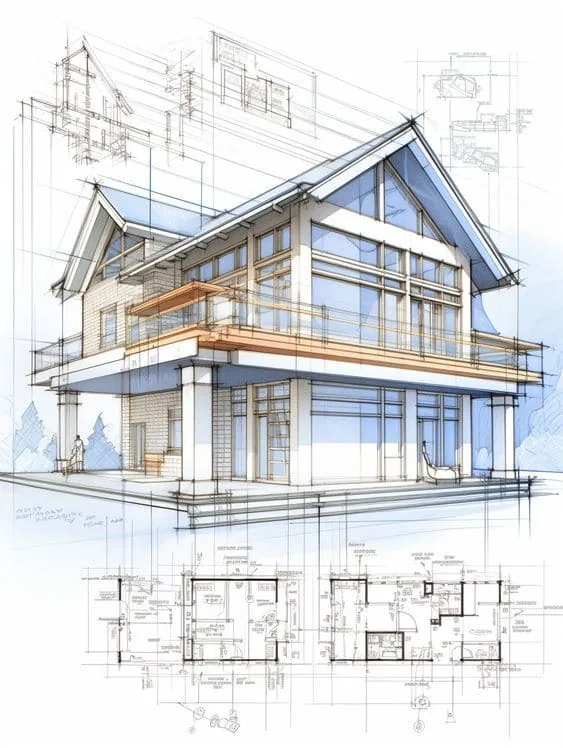
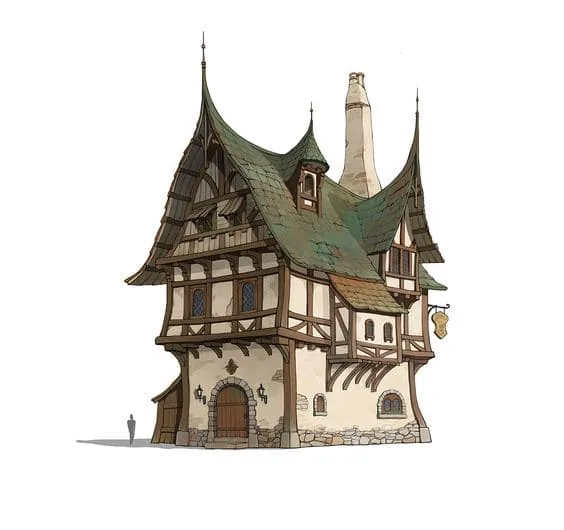
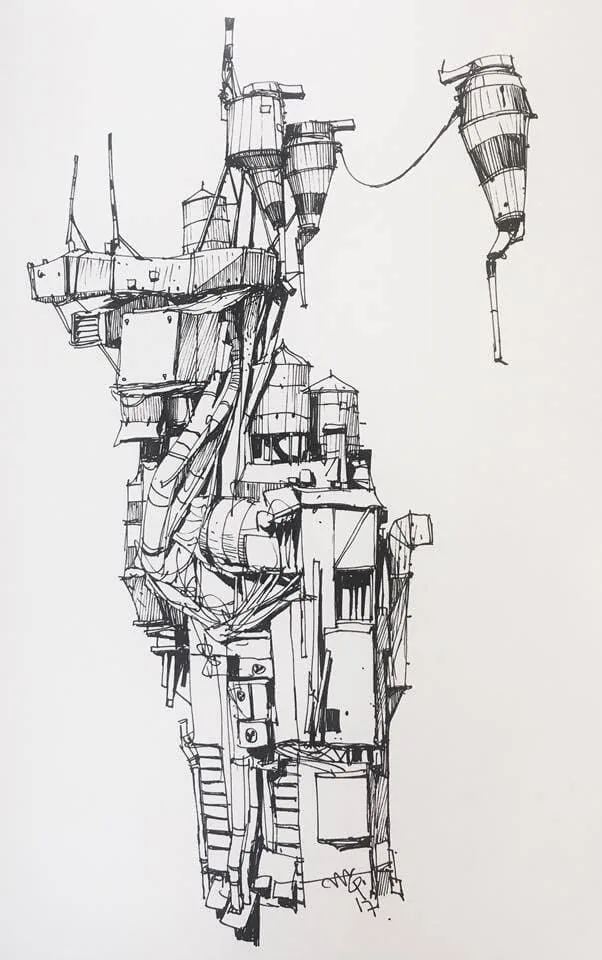
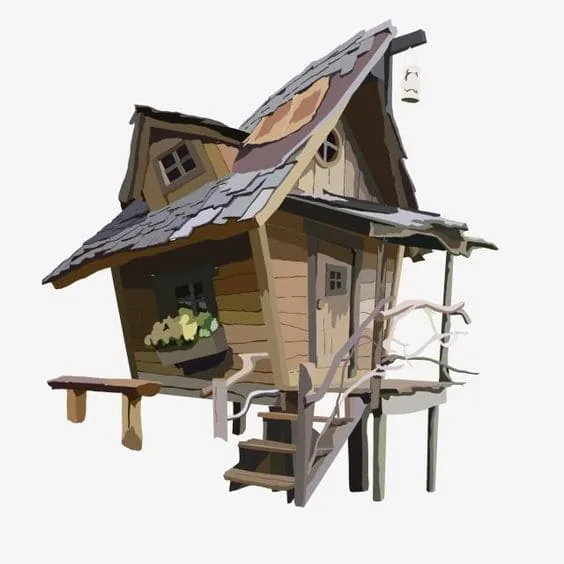
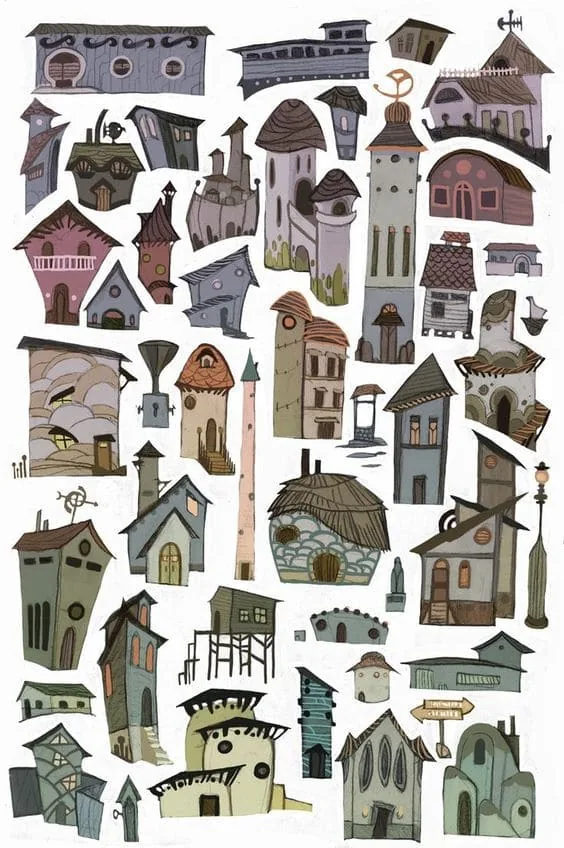
Congratulations, you have learned how to draw a house! You have done a great job by studying several types of perspective. You can enjoy the results and do not worry if something did not work out the first time. And to enrich your visual library, you can often look at how other artists draw. We have chosen several examples of drawings by artists working in different styles.
Finally, we have reached the final stage. Now it's time to add the entourage to our architectural work by placing objects in the drawing that will create the presence of a person in this space. We will draw a table and bean bags on the terrace, and on the second floor a dining table with chairs. We need to draw objects very conditionally, since the scale does not allow us to draw them too подробно. You can also add textures to the materials of the house. The floor is laid with a terrace board, so we will draw longitudinal lines throughout the terrace on the first floor and the floor on the second floor. The texture of the glass is very easy to show with an inclined hatch, imitating the glare. Part of the walls can be decorated with decorative stone. You can also lay a path of stones in front of the house. To enhance the volume of our drawing of the house, we can draw shadows, but do not try to darken the shadow areas too much otherwise the drawing may become fractional. With textures, too, do not get carried away too much, just slightly suggest what material the elements of the house are made of.
Congratulations, you have learned how to draw a house! You have done a great job by studying several types of perspective. You can enjoy the results and do not worry if something did not work out the first time. And to enrich your visual library, you can often look at how other artists draw. We have chosen several examples of drawings by artists working in different styles.
 Continue to draw, experiment with different techniques and perspectives, and soon you will notice how your work is getting better and better. Remember, the main thing is to enjoy the process and believe in yourself. You will definitely succeed!
Do you want to learn how to draw correctly? Then be sure to sign up for our cool Free courses We promise: after the courses, you will gently fall in love with drawing and will never call this topic difficult or boring!
Continue to draw, experiment with different techniques and perspectives, and soon you will notice how your work is getting better and better. Remember, the main thing is to enjoy the process and believe in yourself. You will definitely succeed!
Do you want to learn how to draw correctly? Then be sure to sign up for our cool Free courses We promise: after the courses, you will gently fall in love with drawing and will never call this topic difficult or boring!
Before we start drawing our beautiful house, we need to figure out how to draw simple figures. Let's start with a very simple figure that will be our first house, and it will help us deal with the study of perspective.
Frontal perspective
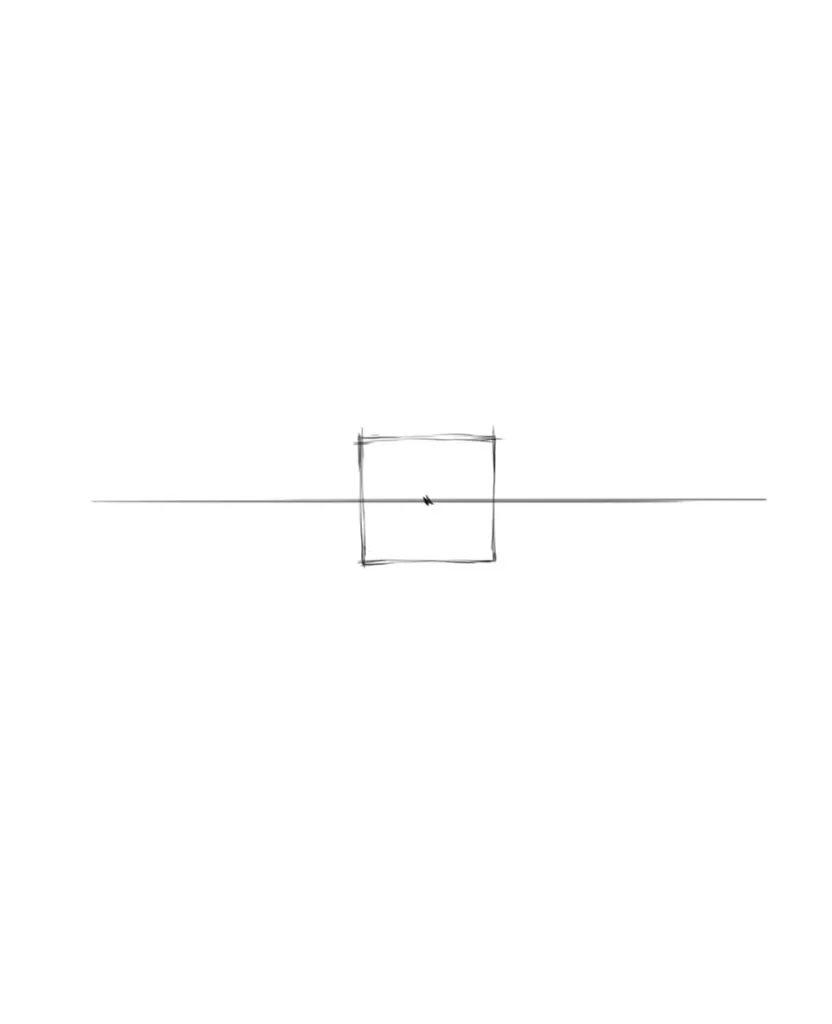
The first perspective is called frontal. First, we must draw a horizon line—this is a line that is always at the height of our eye level. Therefore, the location of the horizon line is directly related to the angle of view and how our object will be depicted.
Draw a horizon line and put a point in the middle of it. This is our first vanishing point, a very important point in the topic of perspective. Now draw a small square so that the point is in its center. We have drawn the front wall of our future cube.
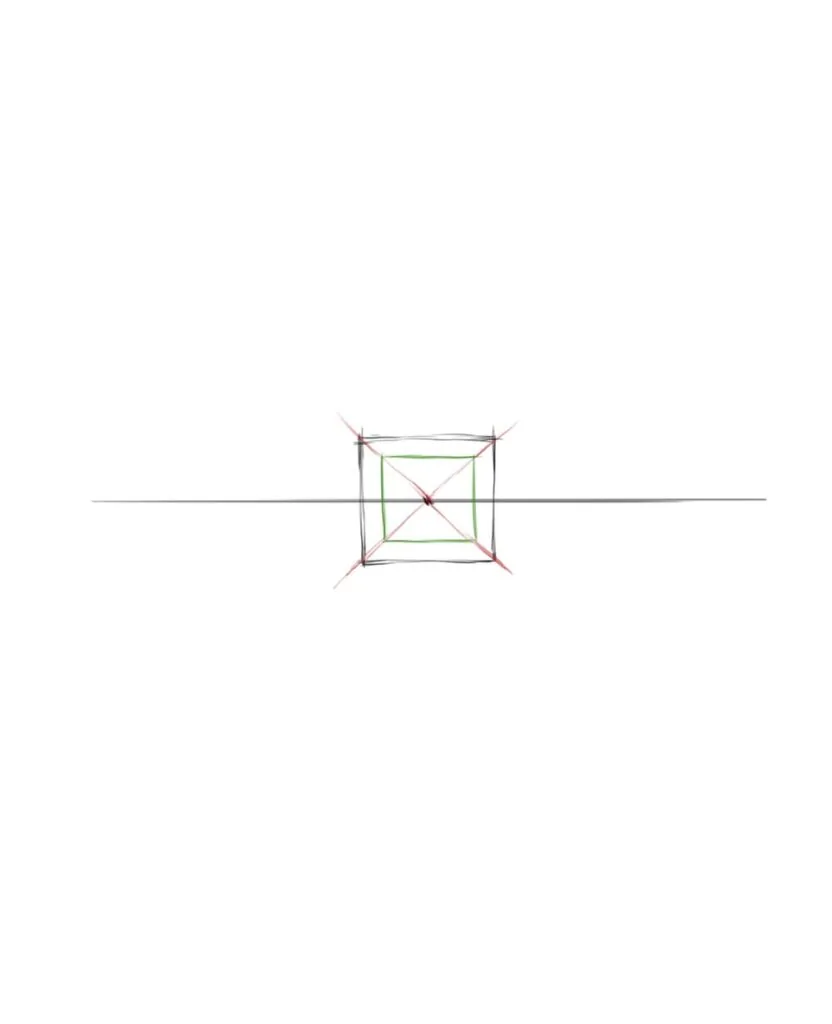
Next, draw lines from each vertex of the square to the vanishing point, as shown in the diagram. Now we need to step back a little into the square and draw a smaller square, which is shown in green on the diagram. This way we got a cube, the walls of which we see through. We can say that we have drawn a room without a front wall and can observe the back and side walls, as well as the floor and ceiling. Let's weaken those construction lines that we no longer need and draw the rest.
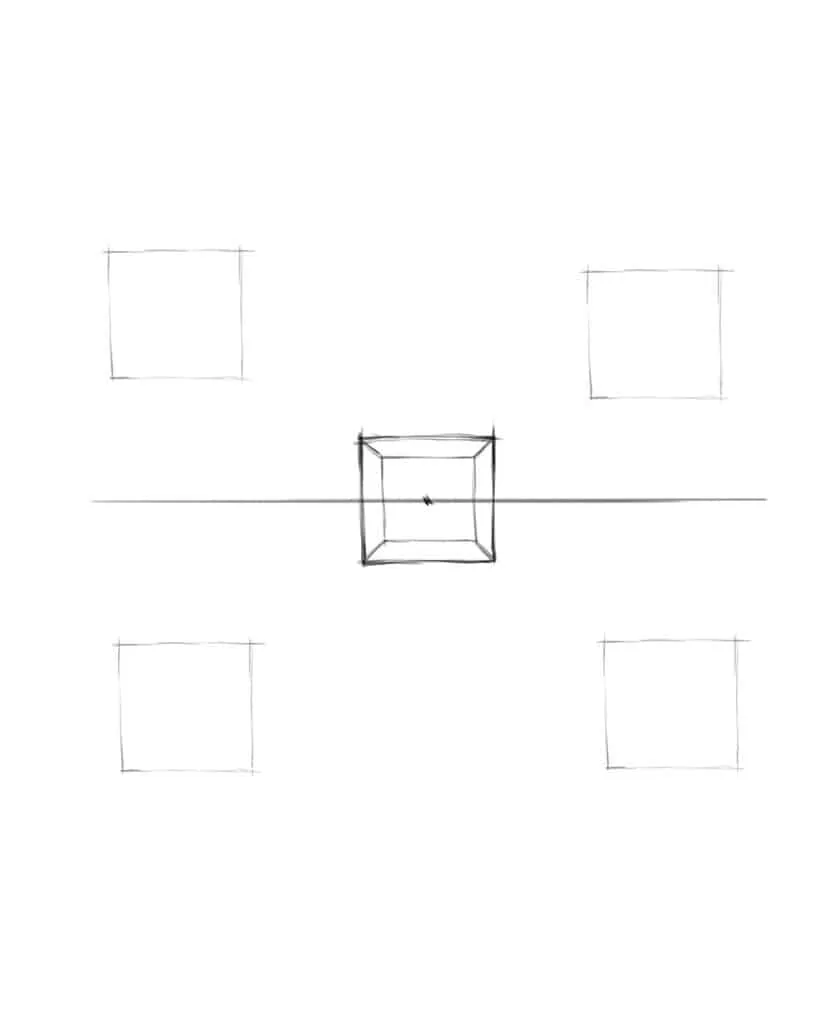
Let's continue the topic of frontal perspective and see what the cubes will look like if they are placed below or above the horizon line. Outline 4 squares on top and bottom closer to the edge of the canvas and draw lines from each vertex of the squares to the vanishing point.
After that, measure a slight shift into the depth in the directions that the lines going to the vanishing point gave us. Look at how it is done in the diagram—the back wall in the form of a green square has moved a short distance into the depth. Do this with each object and clean up the drawing so that the construction lines become weaker.
Let's draw the roofs of our figures to get 4 houses with gable roofs. To do this, we need to draw triangles on top of each cube. Draw them up against the squares that we had a few steps ago when we just outlined the front walls of the cubes.
Since the upper cubes in such a perspective, which does not allow you to see the roof from above, then we will not draw anything there. And for the lower cubes, you need to complete the roof. Draw a line from the top of the triangle to the vanishing point, and on the back wall draw a smaller triangle so that its vertex touches the ridge line—this is the upper edge of the roof.
Now you have learned how to build objects in frontal perspective and as a result you have drawn 4 simple houses. Let's practice drawing windows on them, and at the same time we will master a useful method with which you can find the middle of any figure. Draw diagonal lines from the 4 vertices on the front wall of the house. The center of this square is at the intersection of the diagonals, and now we will draw a window in the center of the house.
If you wish, you can decorate the houses with textures and practice drawing architectural elements, but the main topic now is perspective, so let's move on to the next method.
Angular perspective
For the next method, we will need two vanishing points. Draw a horizon line and mark 2 vanishing points on it closer to the edges of your sheet of paper or digital canvas. In the center of the horizon line, draw a small vertical segment.
Draw lines from the top and bottom vertices of the segment to the vanishing points. These are the first planes of the cube, imagine that they are moving very far away and decreasing so much that they themselves turn into points in the distance. We need to limit the length of the planes, for this draw vertical lines as shown in the diagram in green.
Next, let's draw the roof for our cube, for this draw diagonals on the right wall and find the center. Raise a construction line from the center on which the top of the triangle will be. Draw a triangle and extend the roof into the depth to the back wall of our cubic house.
After you have drawn the first house, let's draw 2 more to consolidate this construction method. Outline two segments that will be the front corners of the houses. Now we will choose areas closer to the vanishing points and draw one house from below and the other from above. Further actions are repeated according to the example described above.
It's time to draw conclusions and compare the two methods of perspective construction. The frontal angle should be chosen if you want to depict the front wall of the house, and all the others are not so important to you. Or if you want to depict a group of separate houses to show the depth of space. Perspective with two vanishing points is attractive because we depict the house in a more dynamic angle. This type of perspective is more often used to depict houses.
Three-point perspective
It is worth mentioning one more type of perspective—three-point. This type of perspective involves a third vanishing point. The vanishing point is located under or above the object, depending on the location of the object in relation to the horizon line. Let's try to draw objects with three vanishing points.
We will need a horizon line, two vanishing points and to start we will build two planes, one above and the other below the horizon line.
Having found the center of the plane, we extend the segments under and above the planes vertically. Almost at the very edge of the sheet, put a point at the end of the segment—this is the third vanishing point for each object.
Draw lines to the 3rd point from the vertices of our planes. Then you need to limit the length of the planes, and you will get cubes that you can turn into houses.
So, we have become acquainted with the most frequently used types of perspectives, and we advise you to practice drawing simple figures using the knowledge you have acquired, but now without visible vanishing points on a sheet of paper, but imagining them beyond the edges of the sheet. Try to combine simple figures with each other, you can subtract one figure from another. Experiment with sizes, angles and composition.
This stage may seem difficult to you, especially if you are a beginner artist, but it is very important and it's okay if you make a lot of mistakes. The main thing in this matter is practice, and the result will make itself felt in the near future. And if you still want to study the construction methods described here in more detail, then join our groups, in which you will be able to learn how to draw not only houses, but also a lot of other things in a short time. Experienced teachers will help you, with whom you will succeed! (link to courses)
Step-by-step drawing of a house
Well, it's time to start drawing a house. First, you need to have an idea of what it will be like — the number of floors, size, room layout, and so on, but now we can limit ourselves to general ideas. Let's draw schematic projections of the house from two sides. We will have a modern minimalist house in the Scandinavian style. The first and second floors are made up of rectangular blocks, and there is a gable roof above part of the second floor. Let's get started!
To fit into the format and get the proportions right, we need to determine the dimensions of our projections. Look at the example on the diagram above to see how to do this. Now that we know the proportions of the dimensions, we should outline the drawing of a parallelepiped.
Next, we need to clarify the shape, but without specifics. You can estimate the shape of the house as one tall parallelepiped and another smaller one. Focus on the projections of the house from the front and side.
Next, we need to clarify the volumes by subtracting pieces of the shape from the mass that was obtained before. Now we can designate a gable roof, and try not to go too far beyond the dimensions that have already been determined. This method will allow us to more accurately control the proportions of the house and not find out at the last stages that we have drawn something completely different from what we planned.
So, at this stage, we need to double-check the proportions of our drawings and the correctness of the perspective reduction, and finally it's time to work magic and turn our geometric object into a real house. You can follow our drawing, or you can come up with your own design, in any case, let's continue.
Now we will clarify the architectural elements of the house, but the shape should not change much. The lower floor will have panoramic windows, so we will make a recess from the front part and a little from the side of the house. The upper floor consists of a module with a gable roof, and part of the floor has a horizontal one. We make recesses in one and the other module for windows and a door as it will correspond to the idea of our design.
Next, more exterior elements are added to our drawing. Now we can draw frames with window joints. To make our house more cozy, we will draw a small terrace and some bushes around it.
Finally, we have reached the final stage. Now it's time to add the entourage to our architectural work by placing objects in the drawing that will create the presence of a person in this space. We will draw a table and bean bags on the terrace, and on the second floor a dining table with chairs. We need to draw objects very conditionally, since the scale does not allow us to draw them too подробно. You can also add textures to the materials of the house. The floor is laid with a terrace board, so we will draw longitudinal lines throughout the terrace on the first floor and the floor on the second floor. The texture of the glass is very easy to show with an inclined hatch, imitating the glare. Part of the walls can be decorated with decorative stone. You can also lay a path of stones in front of the house. To enhance the volume of our drawing of the house, we can draw shadows, but do not try to darken the shadow areas too much otherwise the drawing may become fractional. With textures, too, do not get carried away too much, just slightly suggest what material the elements of the house are made of.
Congratulations, you have learned how to draw a house! You have done a great job by studying several types of perspective. You can enjoy the results and do not worry if something did not work out the first time. And to enrich your visual library, you can often look at how other artists draw. We have chosen several examples of drawings by artists working in different styles.
Continue to draw, experiment with different techniques and perspectives, and soon you will notice how your work is getting better and better. Remember, the main thing is to enjoy the process and believe in yourself. You will definitely succeed!
Do you want to learn how to draw correctly? Then be sure to sign up for our cool Free courses We promise: after the courses, you will gently fall in love with drawing and will never call this topic difficult or boring!
Want to fit a house or village into a landscape under clouds? See how to draw clouds step by step, from composition to tone.
Related materials

Tutorial
Drawing stones
March 10, 2025
Tutorial
How to draw a nut
September 18, 2023

Tutorial
How to draw a child?
January 13, 2025

Tutorial
How to draw a torso
December 18, 2024

Tutorial
How to draw highlights
December 17, 2024

Article
3 tips for a beginner character artist. How to draw emotions
September 18, 2023

News
Прекрасные цветы в стиле аркейн, нарисованные вручную и воплощённые в 3D
May 15, 2026