TutorialUpdated: July 2, 2026
How to draw a torso
In short
Step-by-step instruction for drawing the torso of a man and a woman. Study proportions, anatomy and get tips for creating realistic drawings.
2D artist
 Did you know that the word TORs stands for: 'You must draw now too'? No? We didn't know that either, we just made it up. But we certainly like this motto. There is something creative in it... We so often see people in clothes that sometimes it seems that the human torso is one whole sweater or shirt. But it is very important to know the structure of the human body, especially for an artist. Let's start studying it!
The torso is built on the ribcage and pelvis, and it helps to study their framework in the master class How to draw a human skeleton.
Did you know that the word TORs stands for: 'You must draw now too'? No? We didn't know that either, we just made it up. But we certainly like this motto. There is something creative in it... We so often see people in clothes that sometimes it seems that the human torso is one whole sweater or shirt. But it is very important to know the structure of the human body, especially for an artist. Let's start studying it!
The torso is built on the ribcage and pelvis, and it helps to study their framework in the master class How to draw a human skeleton.
What the torso consists of
It would be strange if we started just drawing diagrams without referring to any nature. And the best nature is a still one. But an even better nature is a still and beautiful one! Therefore, we will immerse ourselves in the study of the structure and muscles of the torso on the example of two marble statues of the god Hermes and the graceful Bathers. A person rarely stands motionless like a pole, more often we meet people in motion or leaning on a handrail, slightly curved in a turn. Standing straight at attention is a very difficult task: muscles get tired quickly, and such a posture is unnatural. Therefore, we chose just such heroes: with slight turns and bends in the body.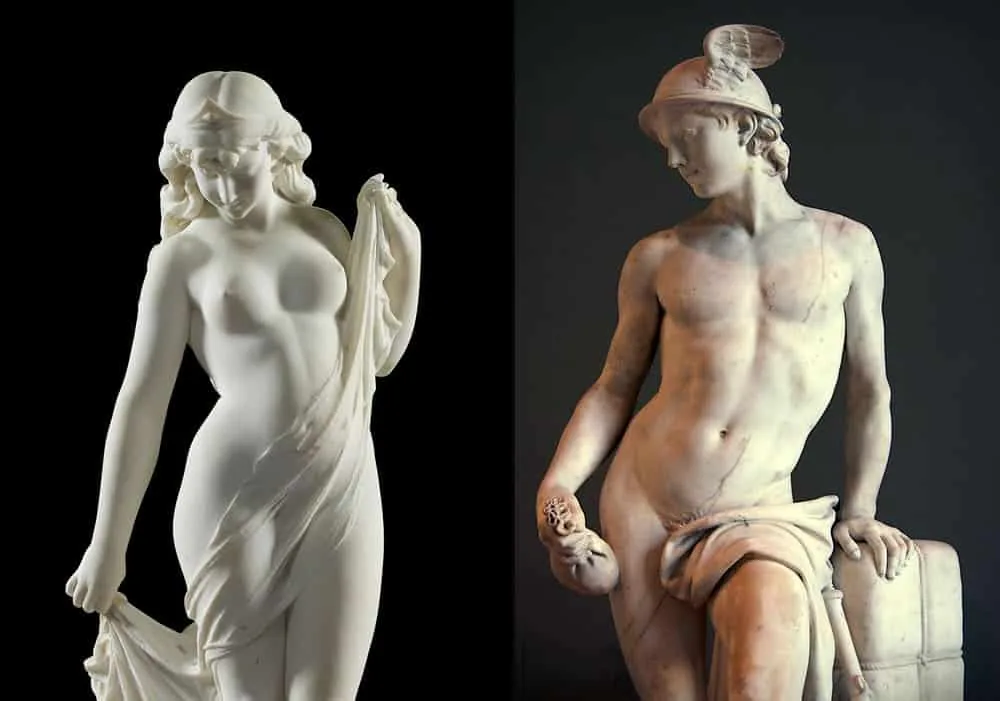 Yes, yes, you guessed it! We will abstract and divide the torso into departments from simple geometric figures. Many small and larger muscles are collected into one mechanism, and mechanisms into a single autobot. Therefore, it is important not to focus your attention on such trifles. The torso itself cannot exist, it is part of the whole body. Therefore, it captures part of the pelvis (green cylinder below) and ends with the neck. The torso itself can be divided into 2 large halves: the abdominal region with the core (yellow cylinder above the pelvis) and the chest (rich yellow ellipse). The chest is crowned by a bundle of roundnesses of the shoulder girdle (orange ellipses), epaulettes of trapezius muscles (red areas, similar in shape to ellipsoids) and neck (pink cylinders).
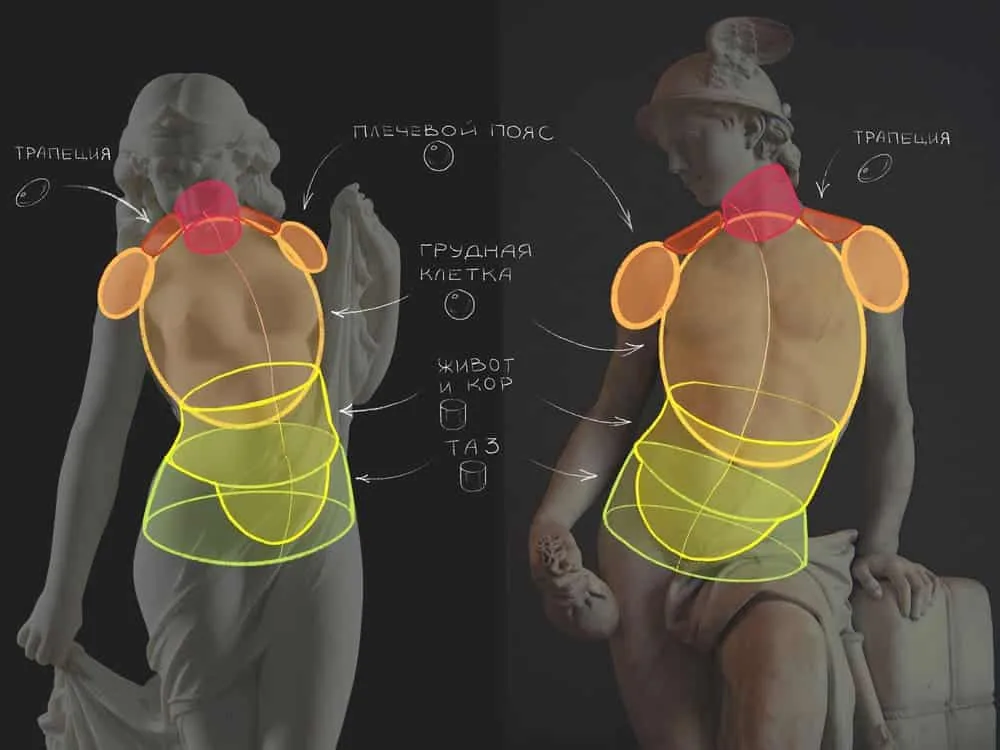 Using such a scheme, we see how each of the details of the torso is connected to the next and the previous one. The pelvis and abdomen serve as a kind of stand into which the "egg" of the chest is immersed. The neck spire emerges from it, and the shoulders are like a rocker. Now we are ready to move on to a more detailed study of the torso, let's start dividing our geometric figures into groups.
Analysis of anatomical features
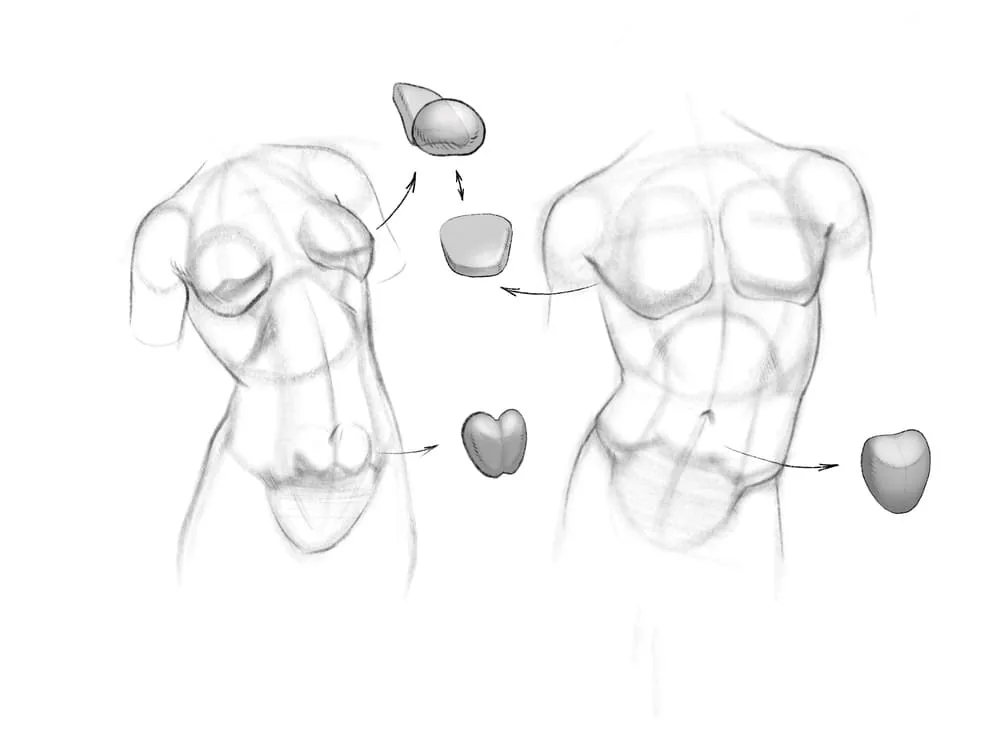
What exactly does the torso consist of, and are there differences between the set of elements in a woman and a man in their anatomy? And now let's look at the "tiger in section" diagram. Oh, more precisely, at the diagram of two torsos, we are not the heroes of the film "Striped рейс". In fact, the set of elements is absolutely identical, both in women and in men. But nature has added two additional details to the ladies in the thoracic section - this is the bust. We have highlighted it with white areas. Pectoral muscles do not go anywhere, but are under this volume. Differences are noticeable only in the shape and size of muscle blocks. Men's are larger and wider, women's are miniature and graceful.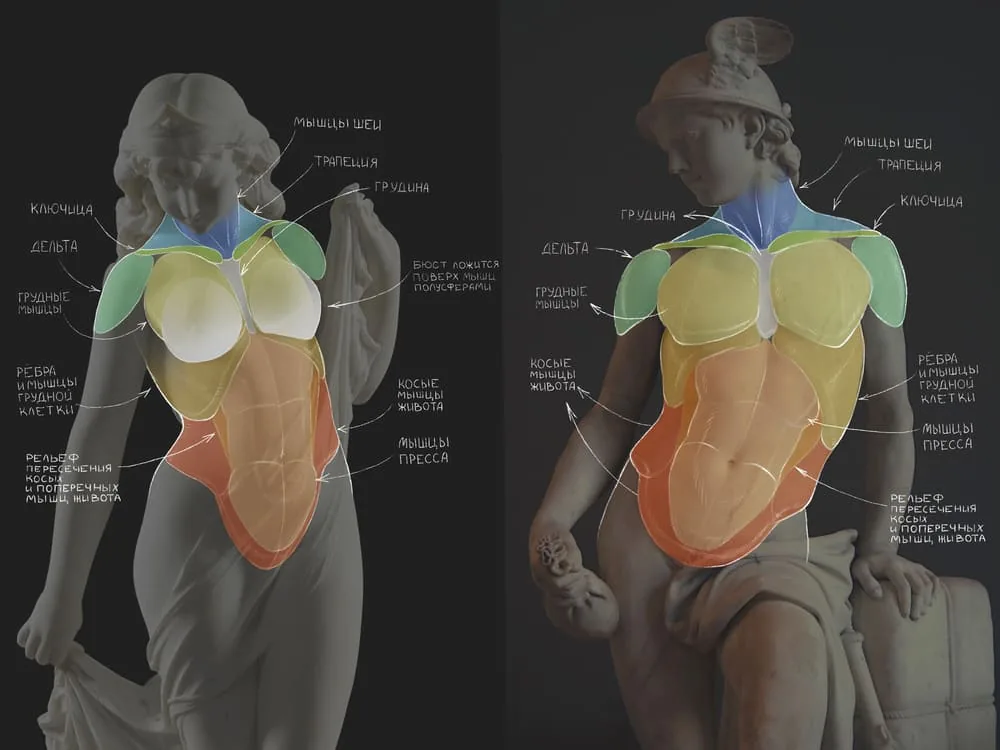 Let's try to analyze the details among themselves:
- the girl's delta is smaller and rounder than the male one
- pectoral muscles hidden under the breast are also smaller and less textured than men's
- the visible area of the girl's chest is smaller than that of a young man
- female abdominal muscles are also smaller in width and relief than men's
Torso proportions
We suggest you use 2 basic principles to find proportions. They are quite simple, but apply to any parts of the body, including the torso. The proportions of the human body discovered by Polykleitos were found using exactly the same scheme: measure and compare! Let's start with two large parts of the torso: the chest and the core with the press. The distance from the top of the chest to the waist is almost equal to the height from the waist to the edge of the press. For a girl, these distances are very close, but for a young man the chest is slightly larger than the lower height. Well, now let's look at the second very necessary proportion. We have already compared the heights, and now it's time for widths. We compare 3 key widths: shoulders, waist and upper edge of the pelvis. In the female figure we can derive a decreasing formula: shoulders are the widest, the upper edge of the pelvis is a little narrower, and the waist is the narrowest place. For a young man, the shoulders are also the widest, but the waist and upper edge of the pelvis can be considered equal. Similar ratios can be found in other people, but they cannot be considered absolute. Body types are different: more massive and voluminous, or, conversely, more frail.
 In our lessons Human drawing and Human figure in online and offline workshops, we spend a lot of time on the topic of proportions. We measure and compare anatomical details with each other for a long time and persistently. We depict not only torsos, but also heads, hands, feet, and even male and female figures as a whole! Join us to sing the beauty of the human body:
Differences in the structure of the male and female torso
Related courses
All courses
from 3 900 ₽
-57%
Book illustration: The first page page
9 000 ₽3 900 ₽
Learn more

from 12 000 ₽
-20%
Векторная иллюстрация для начинающих
15 000 ₽12 000 ₽
Learn more

from 4 500 ₽
-55%
Character Concept: My First Hero
10 000 ₽4 500 ₽
Learn more
We have already mentioned one of the main distinctive features - the presence of breasts in women. Let's talk about several other important inconsistencies.
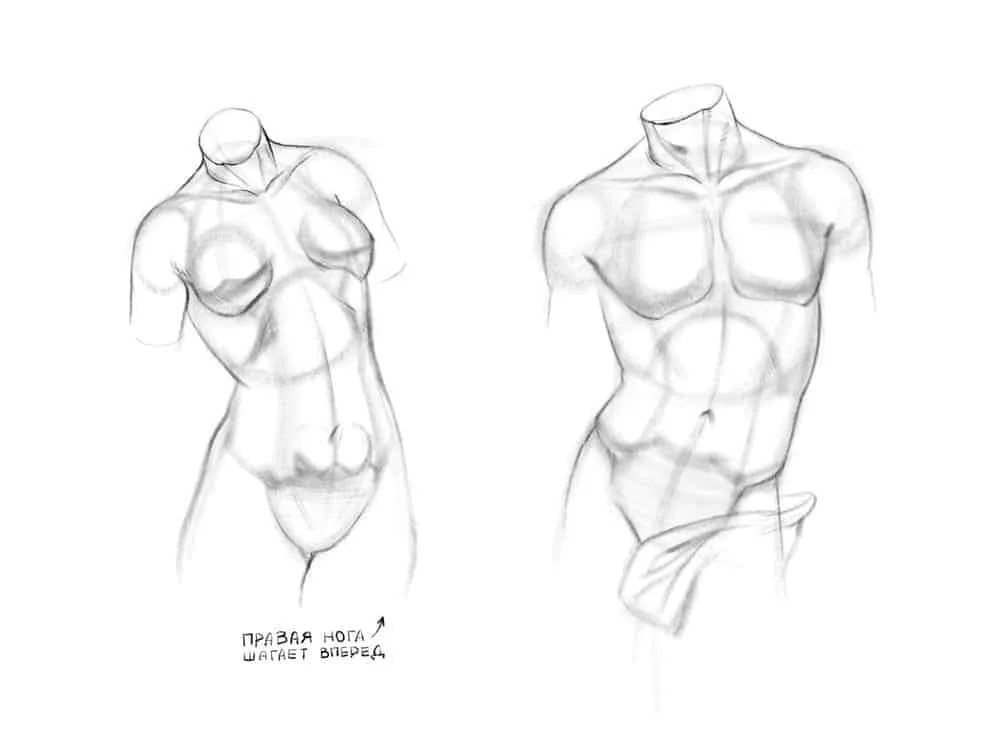
The width of the shoulders in men is greater than the width of the pelvis, in women these lengths are either equal or the width of the pelvis is greater than the shoulder размаха. Because of this, the waist of the female torso is much narrower and more pronounced compared to the male figure. Therefore, the silhouette of the male torso expands upward, resembling an inverted triangle. And the female torso is the silhouette of a violin or a bouquet tied with a ribbon. We see how different the orange silhouette of the girl is from the turquoise young man.
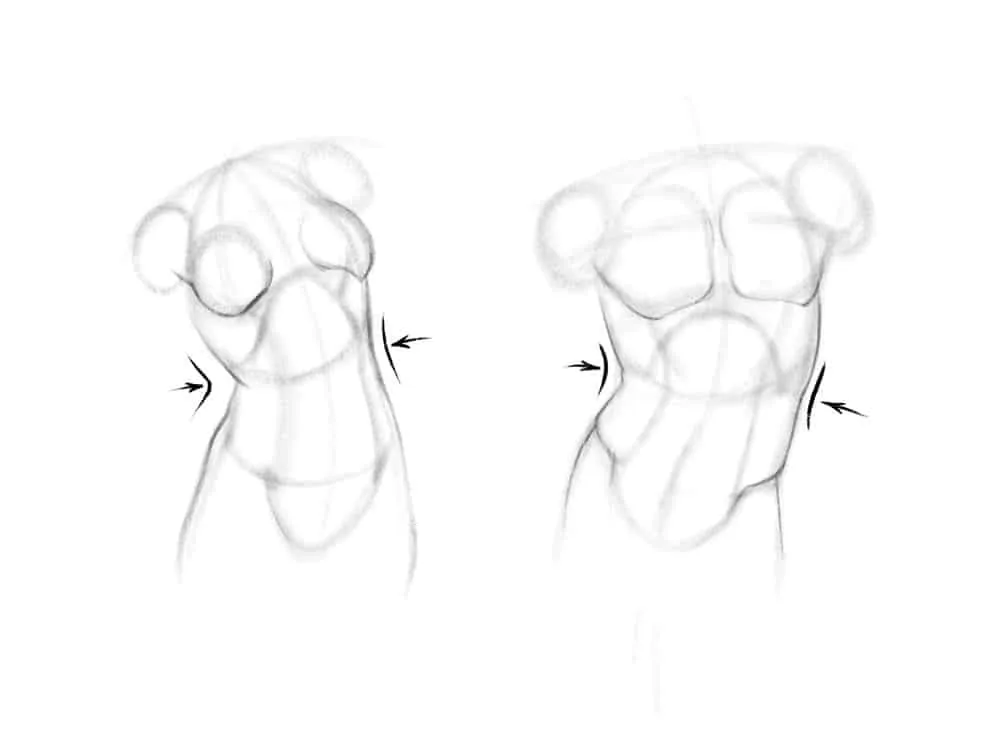
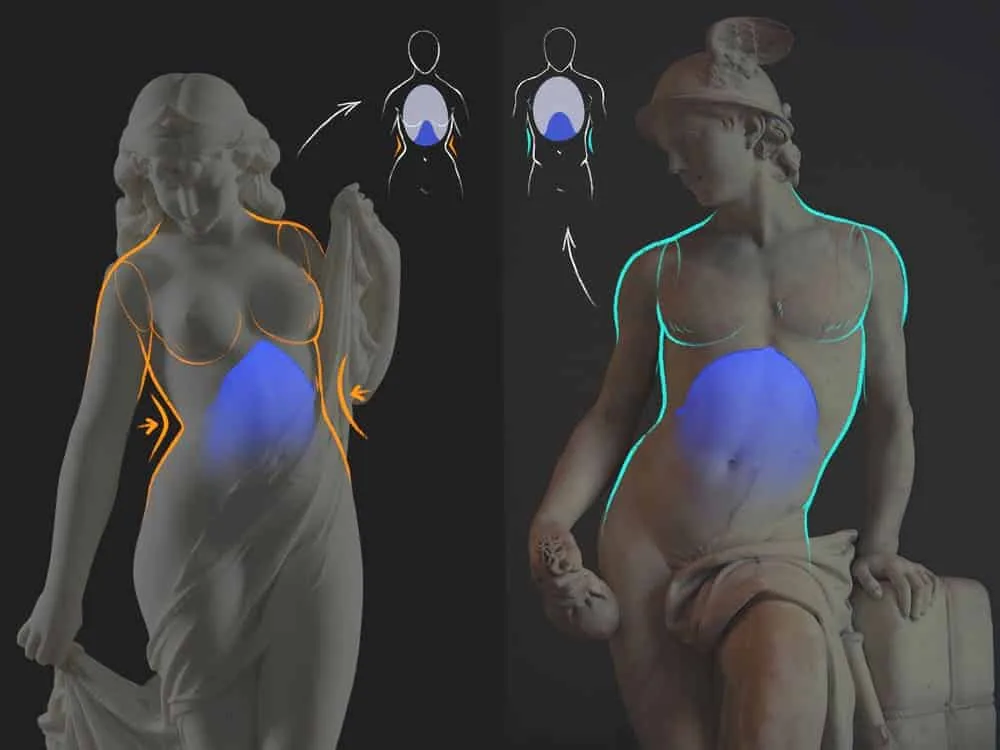 The female chest is smaller and has a narrower opening - this is the void between the ribs. Its shape is a bit like a sharp corner. The opening of the male cell is wider and looks like part of a semicircle. The two blue areas are very different from each other. Do not forget that the abdominal muscles, abdominal muscles and organs are built into this void. Therefore, it is not so empty in fact.
 Since men have more muscle mass, the external silhouette of the torso becomes more рельефным. The difference is especially noticeable in the shoulders and pelvic area. The shoulder muscles of women are more rounded and soft, and the men's ones have sharp protrusions of fascia. Also, the oblique abdominal muscles of men hang over the pelvis with rounded eaves. Women have soft rolls-rollers over the pelvis in this place. In general, a large angularity, quadraticity and sharpness is characteristic of the male silhouette. Therefore, if you want to create the image of a warrior hero, then boldly enhance the roughness of the lines.
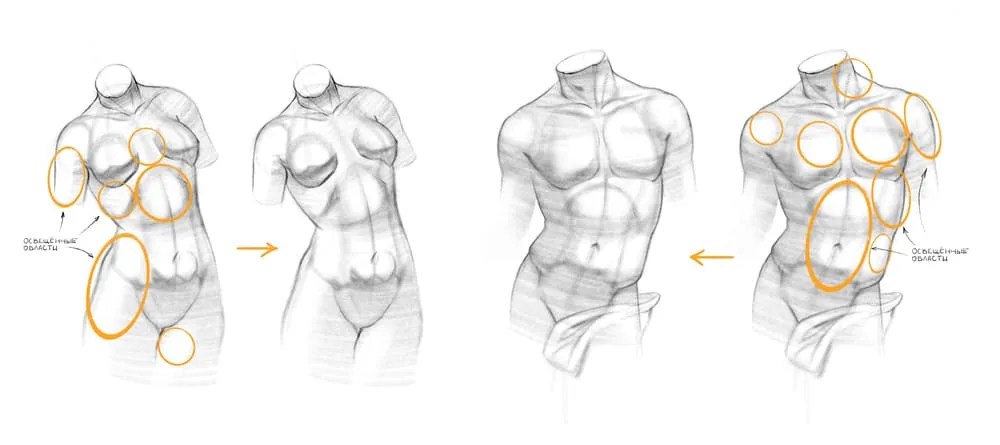
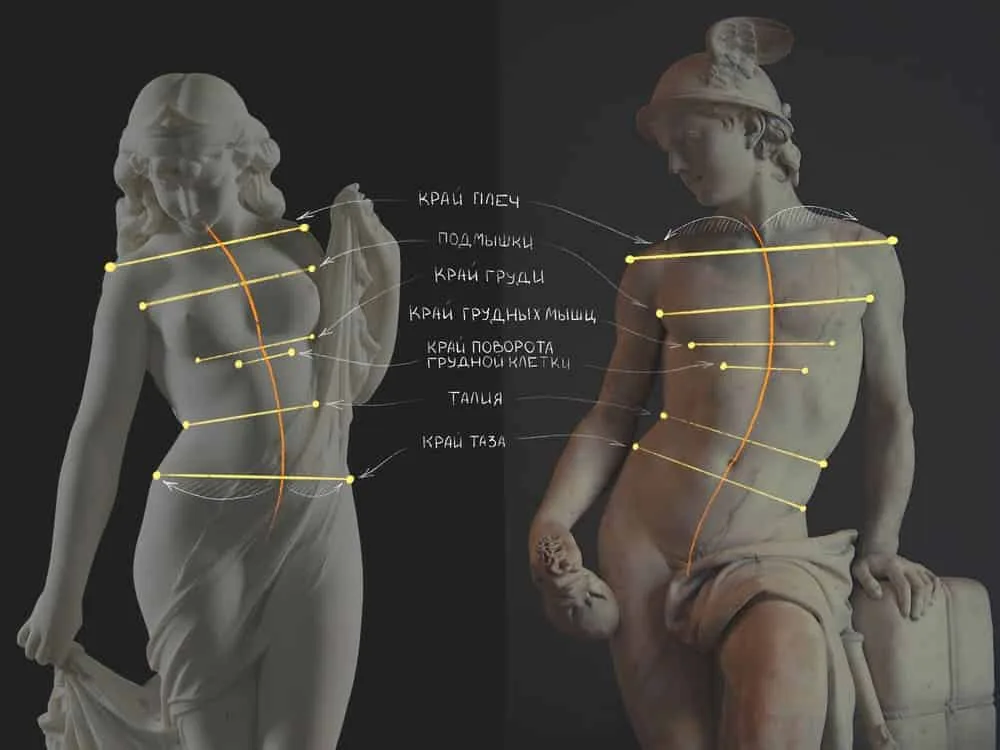 It will never be superfluous to use axes and additional lines for comparison. We have marked the constructive protrusions and depressions on the torsos of the girl and the young man with yellow levels. Thanks to this, the difference in the widths of the ratios in women and men becomes noticeable.
Bathers:
It will never be superfluous to use axes and additional lines for comparison. We have marked the constructive protrusions and depressions on the torsos of the girl and the young man with yellow levels. Thanks to this, the difference in the widths of the ratios in women and men becomes noticeable.
Bathers:
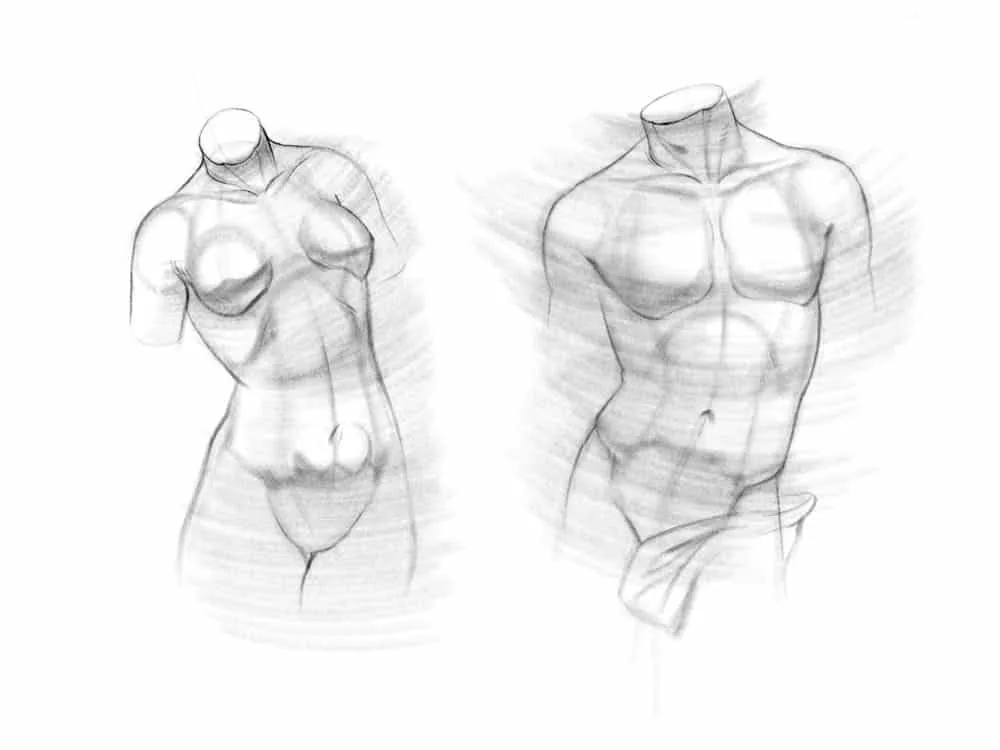
 2 STEP
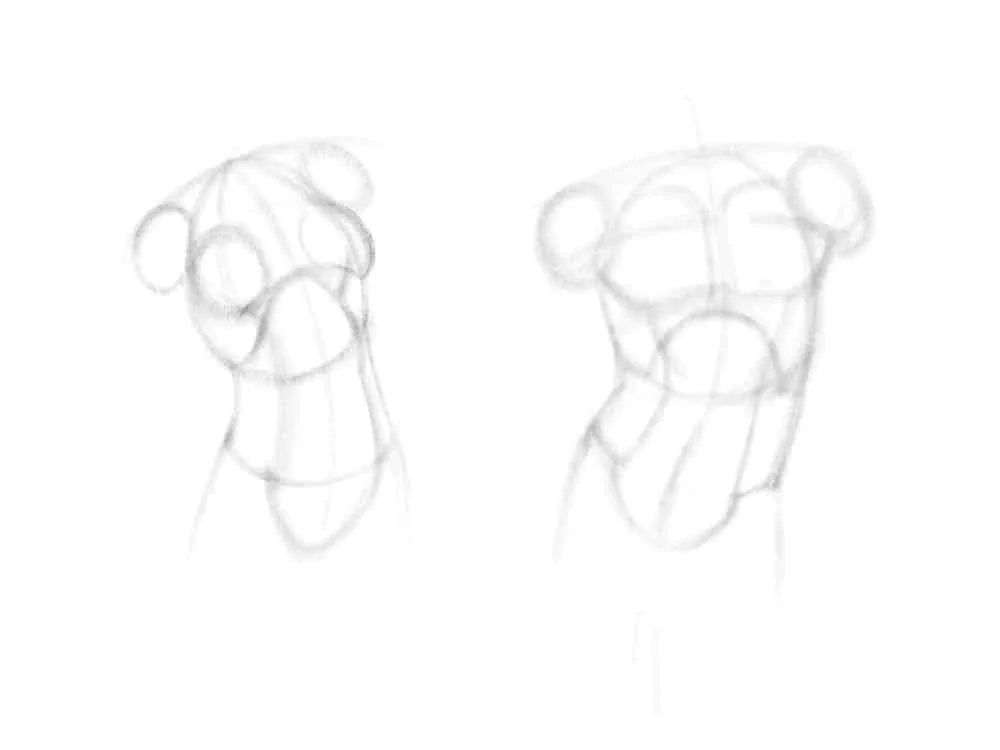
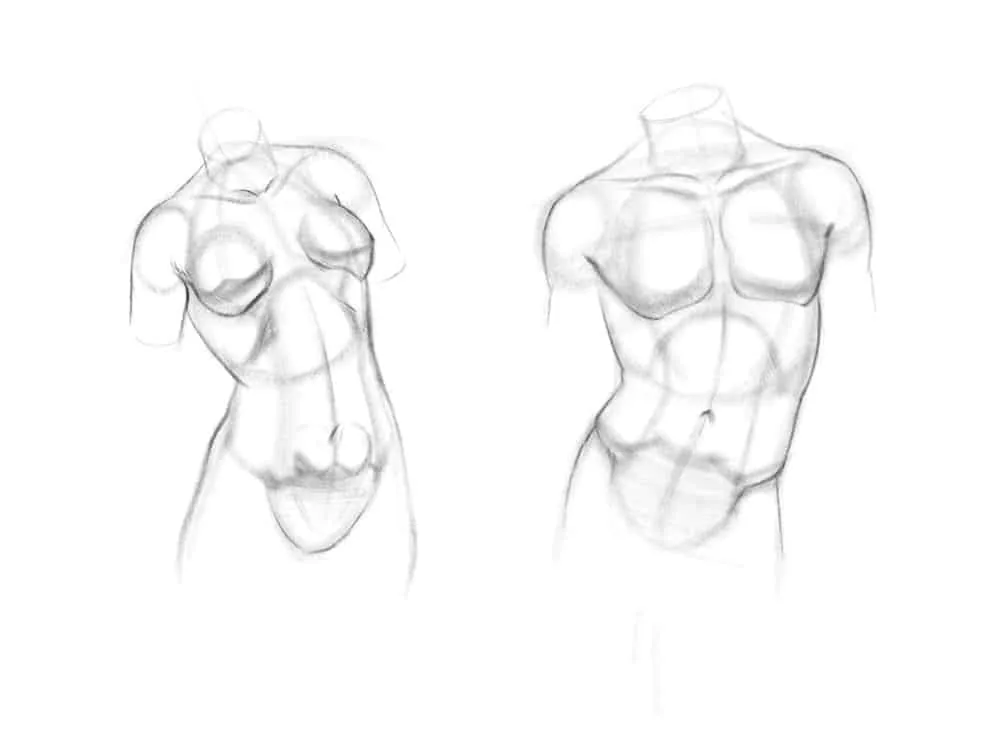
Now we've got to the crucial moment: we'll start laying down the details! We mark the volume of the breasts with hemispheres for the girl, and the quadratic volumes of the pectoral muscles for the boy. Do not forget about the arc of the chest раскрытие and the general outline of the abdominal muscles. Remember the scheme: female muscles are thinner, male ones are more massive. Keep in mind the proportions, compare the parameters of the details of our torsos with each other.
2 STEP
Now we've got to the crucial moment: we'll start laying down the details! We mark the volume of the breasts with hemispheres for the girl, and the quadratic volumes of the pectoral muscles for the boy. Do not forget about the arc of the chest раскрытие and the general outline of the abdominal muscles. Remember the scheme: female muscles are thinner, male ones are more massive. Keep in mind the proportions, compare the parameters of the details of our torsos with each other.
 3 STEP
We start putting more contrasting silhouette lines, taking into account the features of the female and male waists. We outline the female breasts and the male chest muscles more clearly. We also mark the noticeable lines of the diagonals of the oblique abdominal muscles hanging over the pelvis for the male torso. We do not show them for the girl, as they are invisible.
3 STEP
We start putting more contrasting silhouette lines, taking into account the features of the female and male waists. We outline the female breasts and the male chest muscles more clearly. We also mark the noticeable lines of the diagonals of the oblique abdominal muscles hanging over the pelvis for the male torso. We do not show them for the girl, as they are invisible.
 4 STEP
Oh, and now we are slowly starting to use tone! Try to put the pencil sideways to get wide strokes, or take a graphite crayon for a similar effect. We catch the female breast with the shadow more actively than the male one. After all, its relief and volume are much greater. We fill the lower part of the press with shadow. For a girl, it resembles an apple more, and for a boy it is a less convex "pillow". We put the contour of the shoulders with more sonorous lines and mark the location of the navels. Yes, they are also important.
4 STEP
Oh, and now we are slowly starting to use tone! Try to put the pencil sideways to get wide strokes, or take a graphite crayon for a similar effect. We catch the female breast with the shadow more actively than the male one. After all, its relief and volume are much greater. We fill the lower part of the press with shadow. For a girl, it resembles an apple more, and for a boy it is a less convex "pillow". We put the contour of the shoulders with more sonorous lines and mark the location of the navels. Yes, they are also important.
 5 STEP
You and I have already collected the main volume and silhouette, but have not decorated the tops of the torsos. It's time for the neck and collarbones. The neck starts where the collarbones end. And the collarbones, in turn, lie above the pectoral muscles. They are clearly visible in a boy, but not in a girl. Therefore, we put a small distance from the chest up and put the line of the collarbones. We do all the manipulations with light strokes, without strong pressure yet.
5 STEP
You and I have already collected the main volume and silhouette, but have not decorated the tops of the torsos. It's time for the neck and collarbones. The neck starts where the collarbones end. And the collarbones, in turn, lie above the pectoral muscles. They are clearly visible in a boy, but not in a girl. Therefore, we put a small distance from the chest up and put the line of the collarbones. We do all the manipulations with light strokes, without strong pressure yet.
 6 STEP
Now that the approximate outline of the neck has been drawn and it suits us in terms of masses, we can make them noticeable, with a visible contour. We mark the boy's neck with a slight shadow in the place of the protruding Adam's apple, girlish necks are not typical of this, so no hints are needed there. We also mark the movement of the muscles diagonally from the edge of the neck to the collarbones with two sharp wedges - these are the sternocleidomastoid muscles. They always actively protrude on the surface of the neck and are noticeable. That's it, now you know this funny name and can surprise your friends). To make the torsos look cute and complete, we will add a hint of legs to the girl from below, and cover the boy's groin with drapery.
6 STEP
Now that the approximate outline of the neck has been drawn and it suits us in terms of masses, we can make them noticeable, with a visible contour. We mark the boy's neck with a slight shadow in the place of the protruding Adam's apple, girlish necks are not typical of this, so no hints are needed there. We also mark the movement of the muscles diagonally from the edge of the neck to the collarbones with two sharp wedges - these are the sternocleidomastoid muscles. They always actively protrude on the surface of the neck and are noticeable. That's it, now you know this funny name and can surprise your friends). To make the torsos look cute and complete, we will add a hint of legs to the girl from below, and cover the boy's groin with drapery.
 7 STEP
We very easily shade the torsos with an arc stroke in the shadow areas. We can safely go beyond the boundaries of the bodies or run into the light areas. We have an omnipresent friend — an eraser! We will need it at the next stage.
7 STEP
We very easily shade the torsos with an arc stroke in the shadow areas. We can safely go beyond the boundaries of the bodies or run into the light areas. We have an omnipresent friend — an eraser! We will need it at the next stage.
 8 STEP
We carefully compare the drawing with the references and find the illuminated places on the body. These are all areas turned with their faces frontally and a little up, just facing the light sources. The Bathers and Hermes have different light sources, do not forget about that. Well, now, armed with an eraser or formoplast, we erase the tone in the light areas.
8 STEP
We carefully compare the drawing with the references and find the illuminated places on the body. These are all areas turned with their faces frontally and a little up, just facing the light sources. The Bathers and Hermes have different light sources, do not forget about that. Well, now, armed with an eraser or formoplast, we erase the tone in the light areas.
 9 STEP
We could have stopped there, because we have drawn 2 torsos in a proportional and pleasant light sketching manner. But we are going further and continuing the research. The general shadow has been found, we need to pay attention to its border. At the junction of light and shadow, we show the turns with light strokes, we emphasize the emphasis on them. And we make the silhouette line of the torsos even more contrasting.
9 STEP
We could have stopped there, because we have drawn 2 torsos in a proportional and pleasant light sketching manner. But we are going further and continuing the research. The general shadow has been found, we need to pay attention to its border. At the junction of light and shadow, we show the turns with light strokes, we emphasize the emphasis on them. And we make the silhouette line of the torsos even more contrasting.
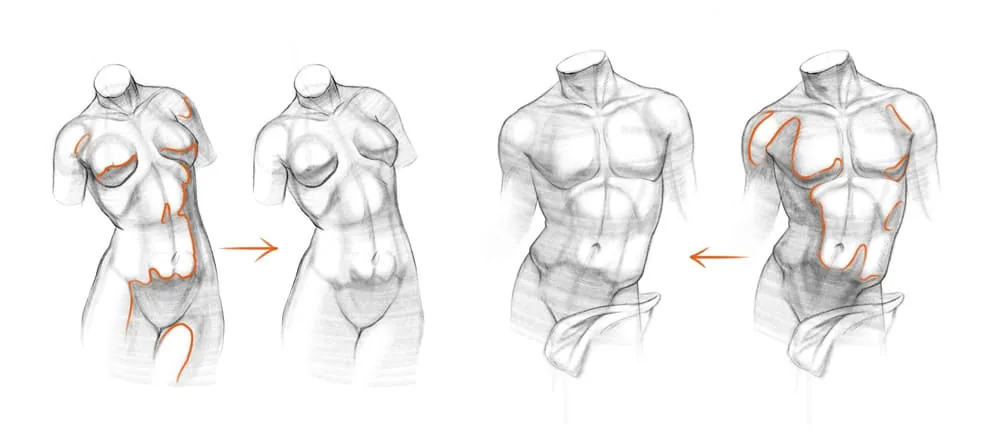 10 STEP
We have smoothly approached the treasure of the drawing world — contrasts. Up to this point, we have not used dark tone with you, we tried to add it little by little and in small doses. Now we need to put the final chord that will complete our drawing and make it especially expressive. We need an effect that is created at the end of the 7th Symphony by Dmitry Shostakovich. We put the turning stroke more noticeably and confidently along the boundaries of the light and shade, so that we get a dark accent on the light border. And then we smoothly stretch it with a soft tone into the shadow.
10 STEP
We have smoothly approached the treasure of the drawing world — contrasts. Up to this point, we have not used dark tone with you, we tried to add it little by little and in small doses. Now we need to put the final chord that will complete our drawing and make it especially expressive. We need an effect that is created at the end of the 7th Symphony by Dmitry Shostakovich. We put the turning stroke more noticeably and confidently along the boundaries of the light and shade, so that we get a dark accent on the light border. And then we smoothly stretch it with a soft tone into the shadow.
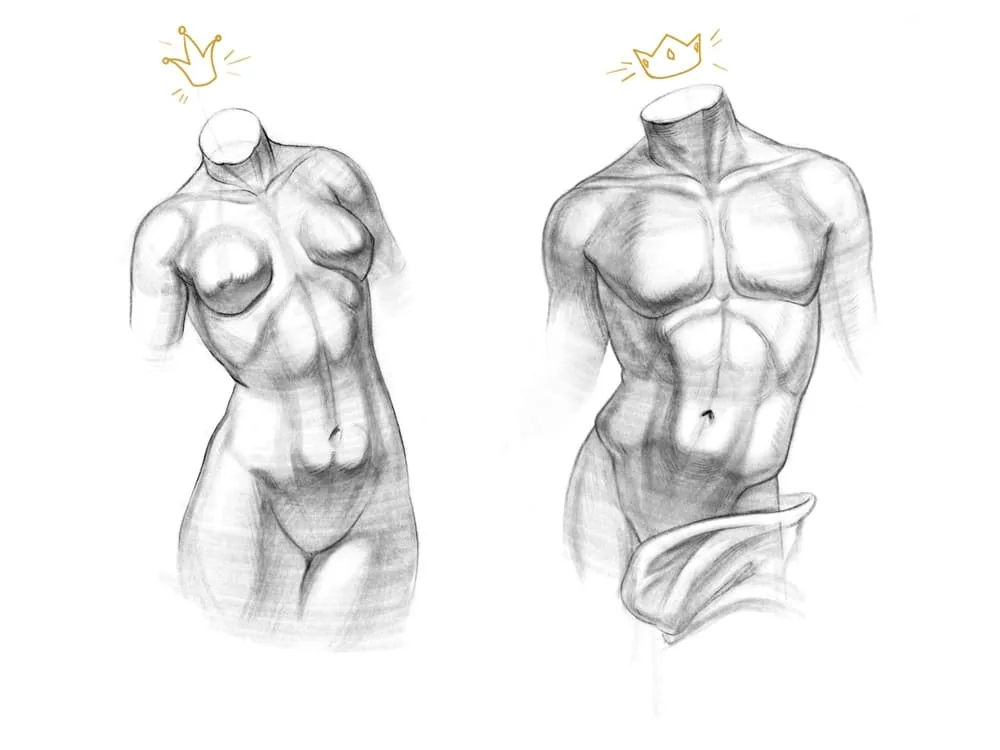 Ugh! That's how we managed to draw 2 charming torsos. It's time to take a break, wipe the sweat from your forehead, "have some tea and eat some more of these French rolls". Well, after a short break, we still have something to please you with.
 We have analyzed with you how to draw a male and female torso from the front, but a coin always has two sides! That's why we recommend watching the lesson on drawing a torso from the back from our school founder Azat Nurgaleev. It's one thing to follow the advice of stage-by-stage pictures, and quite another to watch the process live, follow the magic of the hands and notice the features of using the drawing tool. Especially since the lesson covers not only the torso, but the whole figure from the back!
The female chest is smaller and has a narrower opening - this is the void between the ribs. Its shape is a bit like a sharp corner. The opening of the male cell is wider and looks like part of a semicircle. The two blue areas are very different from each other. Do not forget that the abdominal muscles, abdominal muscles and organs are built into this void. Therefore, it is not so empty in fact.
Since men have more muscle mass, the external silhouette of the torso becomes more рельефным. The difference is especially noticeable in the shoulders and pelvic area. The shoulder muscles of women are more rounded and soft, and the men's ones have sharp protrusions of fascia. Also, the oblique abdominal muscles of men hang over the pelvis with rounded eaves. Women have soft rolls-rollers over the pelvis in this place. In general, a large angularity, quadraticity and sharpness is characteristic of the male silhouette. Therefore, if you want to create the image of a warrior hero, then boldly enhance the roughness of the lines.
It will never be superfluous to use axes and additional lines for comparison. We have marked the constructive protrusions and depressions on the torsos of the girl and the young man with yellow levels. Thanks to this, the difference in the widths of the ratios in women and men becomes noticeable.
Bathers:
- the waist is much narrower than the pelvis
- the shoulders are almost equal to the width of the pelvis
- the edge of the chest practically touches the edge of the chest
- cell
- the armpit line is visually in the middle
- between the edge of the chest and the shoulder line
- the waist is slightly smaller than the pelvis
- the shoulders are much wider than the pelvis
- the edge of the pectoral muscles is further
- from the edge of the chest cell
- the armpit line is visually closer
- to the bottom of the pectoral muscles
Pipeline for drawing the torso of a woman and a man
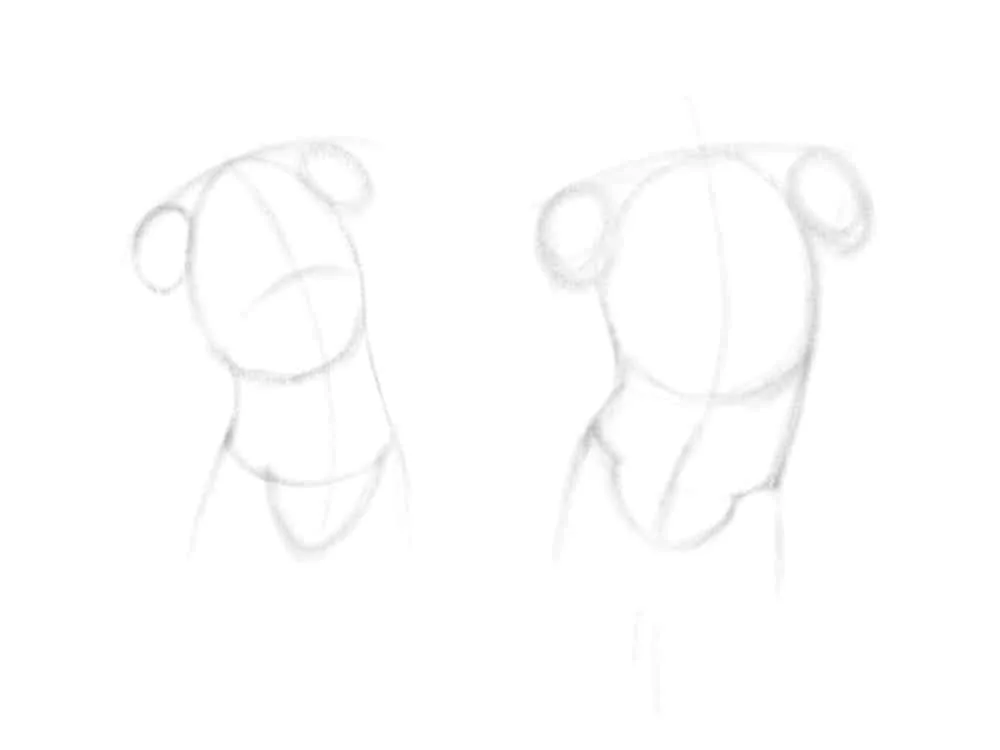
Having carefully studied the anatomy of the torsos of a young man and a girl, we are ready to move on to practice. Successful completion of the task is preceded by good preparation. And we have the last stages of it left — to choose the tool we will be working with. You can draw with a graphite pencil of hardness HB or B (it is not worth using a fatter one, the pencil will start to stain the paper) on thick drawing paper. You can also draw with us on a tablet in Photoshop or Procreate. Well, now, friends, let's go! 1 STEP We didn't study the torsos in simple geometric shapes for nothing at the very beginning. That's exactly what we'll start with. With light translucent strokes, we mark the outline of the ellipse of the chest, the cylinder of the pelvis, the провал of the semicircle of the abdominal muscles below the edge of the pelvis, and the volume of the shoulders. Be sure to connect the shoulders with an arc. This way we will keep them at the same level. We observe the narrowing of the waist in the female figure and the massive largeness of the shoulders in the male one.
2 STEP
Now we've got to the crucial moment: we'll start laying down the details! We mark the volume of the breasts with hemispheres for the girl, and the quadratic volumes of the pectoral muscles for the boy. Do not forget about the arc of the chest раскрытие and the general outline of the abdominal muscles. Remember the scheme: female muscles are thinner, male ones are more massive. Keep in mind the proportions, compare the parameters of the details of our torsos with each other.
3 STEP
We start putting more contrasting silhouette lines, taking into account the features of the female and male waists. We outline the female breasts and the male chest muscles more clearly. We also mark the noticeable lines of the diagonals of the oblique abdominal muscles hanging over the pelvis for the male torso. We do not show them for the girl, as they are invisible.
4 STEP
Oh, and now we are slowly starting to use tone! Try to put the pencil sideways to get wide strokes, or take a graphite crayon for a similar effect. We catch the female breast with the shadow more actively than the male one. After all, its relief and volume are much greater. We fill the lower part of the press with shadow. For a girl, it resembles an apple more, and for a boy it is a less convex "pillow". We put the contour of the shoulders with more sonorous lines and mark the location of the navels. Yes, they are also important.
5 STEP
You and I have already collected the main volume and silhouette, but have not decorated the tops of the torsos. It's time for the neck and collarbones. The neck starts where the collarbones end. And the collarbones, in turn, lie above the pectoral muscles. They are clearly visible in a boy, but not in a girl. Therefore, we put a small distance from the chest up and put the line of the collarbones. We do all the manipulations with light strokes, without strong pressure yet.
6 STEP
Now that the approximate outline of the neck has been drawn and it suits us in terms of masses, we can make them noticeable, with a visible contour. We mark the boy's neck with a slight shadow in the place of the protruding Adam's apple, girlish necks are not typical of this, so no hints are needed there. We also mark the movement of the muscles diagonally from the edge of the neck to the collarbones with two sharp wedges - these are the sternocleidomastoid muscles. They always actively protrude on the surface of the neck and are noticeable. That's it, now you know this funny name and can surprise your friends). To make the torsos look cute and complete, we will add a hint of legs to the girl from below, and cover the boy's groin with drapery.
7 STEP
We very easily shade the torsos with an arc stroke in the shadow areas. We can safely go beyond the boundaries of the bodies or run into the light areas. We have an omnipresent friend — an eraser! We will need it at the next stage.
8 STEP
We carefully compare the drawing with the references and find the illuminated places on the body. These are all areas turned with their faces frontally and a little up, just facing the light sources. The Bathers and Hermes have different light sources, do not forget about that. Well, now, armed with an eraser or formoplast, we erase the tone in the light areas.
9 STEP
We could have stopped there, because we have drawn 2 torsos in a proportional and pleasant light sketching manner. But we are going further and continuing the research. The general shadow has been found, we need to pay attention to its border. At the junction of light and shadow, we show the turns with light strokes, we emphasize the emphasis on them. And we make the silhouette line of the torsos even more contrasting.
10 STEP
We have smoothly approached the treasure of the drawing world — contrasts. Up to this point, we have not used dark tone with you, we tried to add it little by little and in small doses. Now we need to put the final chord that will complete our drawing and make it especially expressive. We need an effect that is created at the end of the 7th Symphony by Dmitry Shostakovich. We put the turning stroke more noticeably and confidently along the boundaries of the light and shade, so that we get a dark accent on the light border. And then we smoothly stretch it with a soft tone into the shadow.
Ugh! That's how we managed to draw 2 charming torsos. It's time to take a break, wipe the sweat from your forehead, "have some tea and eat some more of these French rolls". Well, after a short break, we still have something to please you with.
We have analyzed with you how to draw a male and female torso from the front, but a coin always has two sides! That's why we recommend watching the lesson on drawing a torso from the back from our school founder Azat Nurgaleev. It's one thing to follow the advice of stage-by-stage pictures, and quite another to watch the process live, follow the magic of the hands and notice the features of using the drawing tool. Especially since the lesson covers not only the torso, but the whole figure from the back!
Video lesson on drawing a torso from the back
Tips and life hacks
- We'll reveal a secret to you: paradoxically, but people (both men and women, and children!!!) are symmetrical. Therefore, make sure that the size of the muscles, their length are the same, both on the left and on the right. And also do not forget that if you draw a body part on one side, then it should appear on the other side.
- Observe the proportions. Violating the ratios of volumes, you will create a funny caricature. If, of course, this was not the main goal. When stylizing and creating cartoon characters, transformations of proportions are often used. But then such drawings are far from the original, and their main task is emotions and character hidden in the body.
- Be sure to go to live sketches. It is important to be able to go around a person from different sides, look at the dynamics of his movements, the features of the bends and turns of the body. A photograph of the torso will not be able to fully reveal the potential of a living body.
- Try to draw different types of physique. Ectomorphs — prone to thinness, tendon types of figure, endomorphs — stocky, full or pumped physiques, mesomorphic — transitional types, neither large nor thin. By drawing only one type of figure, you deprive yourself of the happiness of understanding the characteristics of each type and the ability to portray them all.
- Always measure the ratios of widths and heights among themselves. Find your own proportions. Additional verification of body volumes against each other will never be superfluous.
- Try to observe lightness in tone. Very often you just want to shade all the shadows as dark as possible, so that a mole hole of galactic proportions is obtained. But try to add dark tones little by little and gradually. This way the drawing will turn out to be voluminous and not exhausted.
- Study books on anatomy, theory is also important as practice. We really recommend reading the books by Bern Hogarth "Drawing a person in motion" and Gottfried Bammes "Image of a person".
Related materials

Tutorial
Drawing stones
March 10, 2025
Tutorial
How to draw a nut
September 18, 2023

Tutorial
How to draw a child?
January 13, 2025

Tutorial
How to draw highlights
December 17, 2024
Tutorial
How to draw a chest
November 29, 2024

Article
3 tips for a beginner character artist. How to draw emotions
September 18, 2023

News
Прекрасные цветы в стиле аркейн, нарисованные вручную и воплощённые в 3D
May 15, 2026