TutorialUpdated: July 2, 2026
How to draw highlights
In short
Free lesson on drawing highlights and shadows: learn to add realistic light effects to hair, eyes, water and waves. Simple and useful techniques!
2D artist
Do you see the glint? No? But it is there! And sometimes it happens the other way around: there is no glint, but someone sees it. Everyone's third eye and vision are individual, but there are physical laws. And the question arises: when should the glint be drawn, and when not? How bright and noticeable should it be? What is its difference from light and reflection, maybe they are the same things? Now we will figure it out, stock up on tea and cookies before an excursion into the world of glints.
I show highlights on a live example, cool and not too sharp, in the master class How to draw a flower.
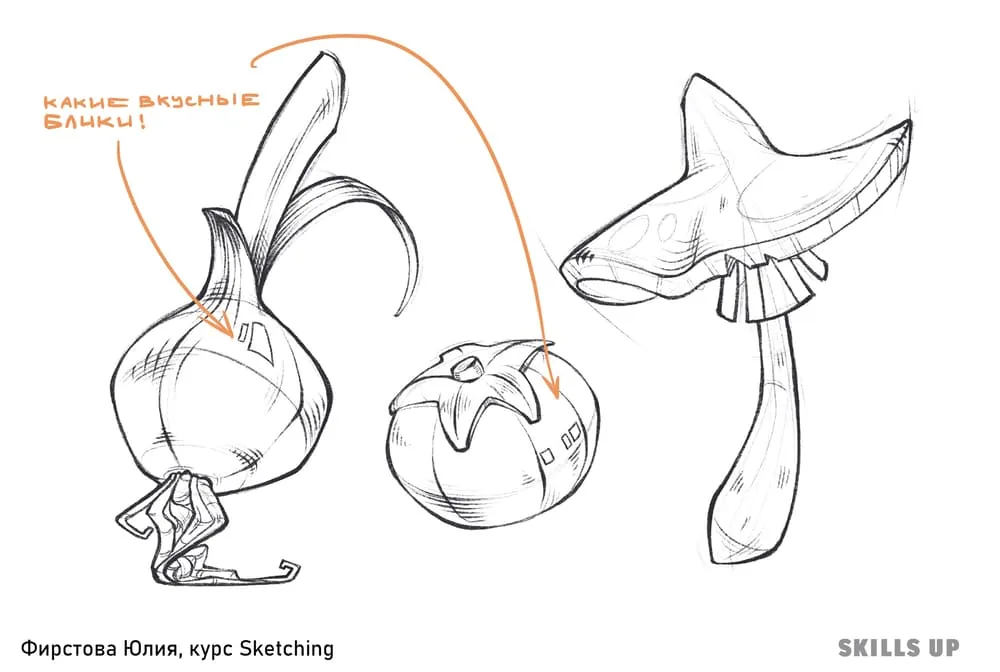
 In order to draw a glint on the surface of an object, it needs to create a certain landing place. You can use the tracing, as on our schemes of objects or jugs. But it will look schematic and not voluminous. Around the glint, a slightly darkened area is created with the help of small neat strokes. There is no such need on dark objects, more often this technique is used on light or completely white objects. For example, in Figure 1, the glint is highlighted by a darker tone of the pear itself. And in Figure 2, it was given a diffuse shading along the contour to make it visible against the white porcelain.
 In order to draw a glint on the surface of an object, it needs to create a certain place of landing. You can use the tracing, as on our schemes of objects or jugs. But it will look schematic and not voluminous. Around the glint, a slightly darkened area is created with the help of small neat strokes. There is no such need on dark objects, more often this technique is used on light or completely white objects. For example, in Figure 1, the glint is highlighted by a darker tone of the pear itself. And in Figure 2, it was given a diffuse shading along the contour to make it visible against the white porcelain.
What are shadows and glints
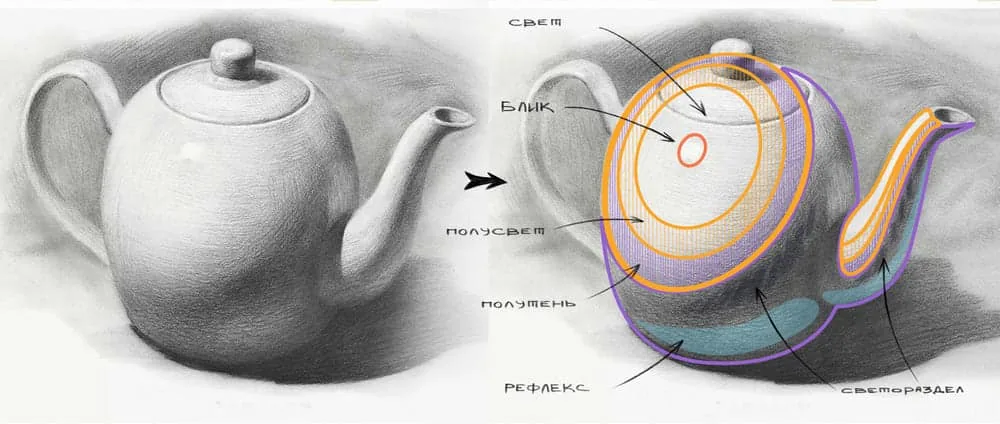
We perceive objects as voluminous phenomena thanks to light and its absence. The illuminated area of an object can be divided into three components - it is half-light, light and glint. The glint is the brightest area on the object among all this trio. From this point, light does not scatter in different directions, but is reflected almost at 90 degrees. This reflection hits right into the observer's eye, that is, us. The rest of the object is occupied by penumbra, light-and-shade boundary or light-and-shadow boundary, shadow and reflex. Reflex can be considered a kind of shadow glint. Because a glint is reflected light from a light source. And the reflex is the reflection of light from surrounding objects. Therefore, it is important to consider this fact: glints are located only in the light, reflexes only in the shadow. They are like penguins and polar bears: they also never meet, because they live on different poles.
Types of reflections
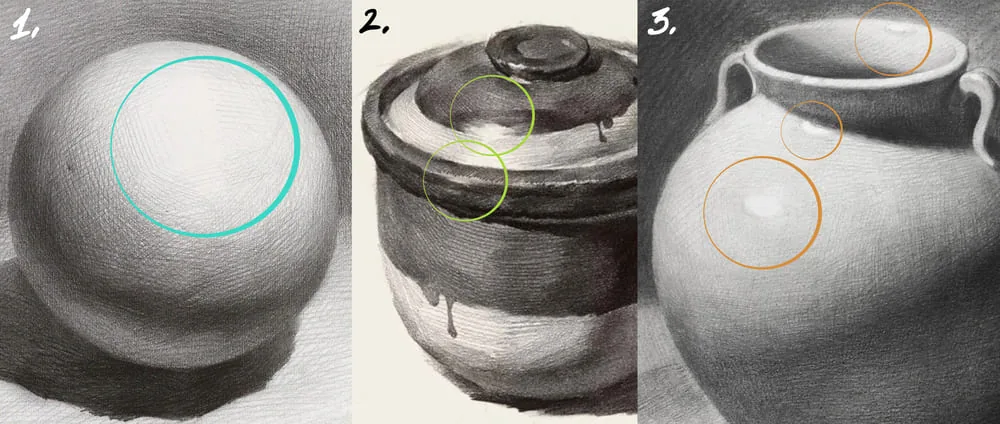
First of all, do not confuse glints and reflections. A glint is reflected light, and reflections in the usual sense for us are the reproduction of the environment on the surface of an object. Reflection of light can be mirror or diffuse. Smooth objects with a glossy surface are characterized by mirror reflections. This means that we will accurately see the boundaries and shape of the glint, as well as the silhouettes of surrounding objects. The angle of incidence of the ray when it hits such a surface is equal to the angle of reflection, so the reflections become as clear as the guys in the neighborhood. Imagine a car window: you can clearly see the reflected circle of the sun on a clear day, people, houses and trees around. Diffuse reflection occurs on objects with an uneven surface. Rays are reflected in arbitrary directions, which is why the clarity of what is visible deteriorates or disappears completely. A boulder in the forest or the surface of a book in a fabric binding have illuminated reflecting areas, but they are so weak that you will not see the glints. In addition to these two types, there is mixed reflection - this is a transitional state between mirror and diffuse. It always turns out that there is someone third in a couple. For example, a tree or unglazed ceramics will reflect light, you can even see a weak glint, but blurry and unclear.
- On a plaster ball, a scattered glint appears, we see a large illuminated area, on which it is difficult to identify a clear boundary of the glint.
- On a ceramic pot, the glint has already taken shape more strongly, but still has fuzzy edges and is very weak in some places. It is of a mixed type.
- On a porcelain vase, the mirror glint is a clearly readable luminous point.
How to learn to draw glints with a pencil
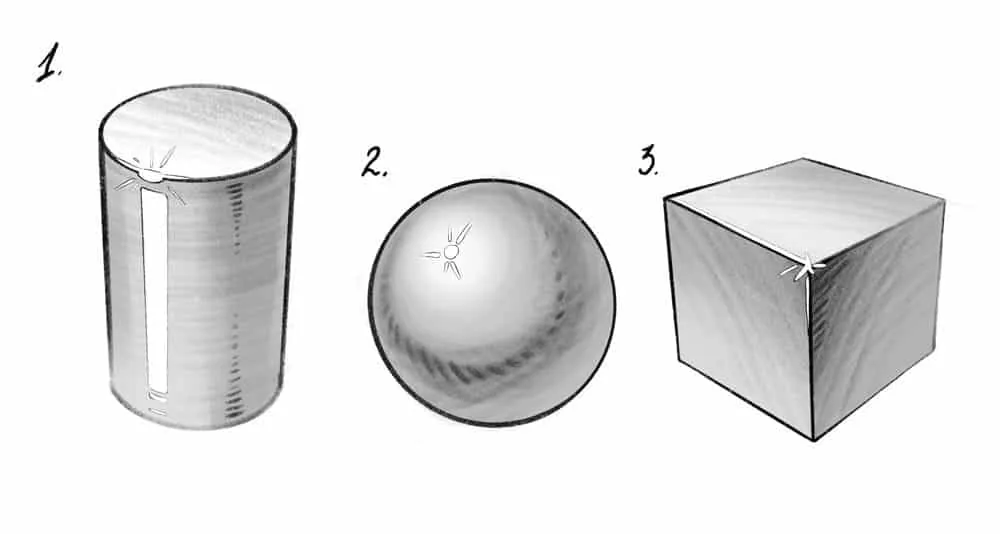
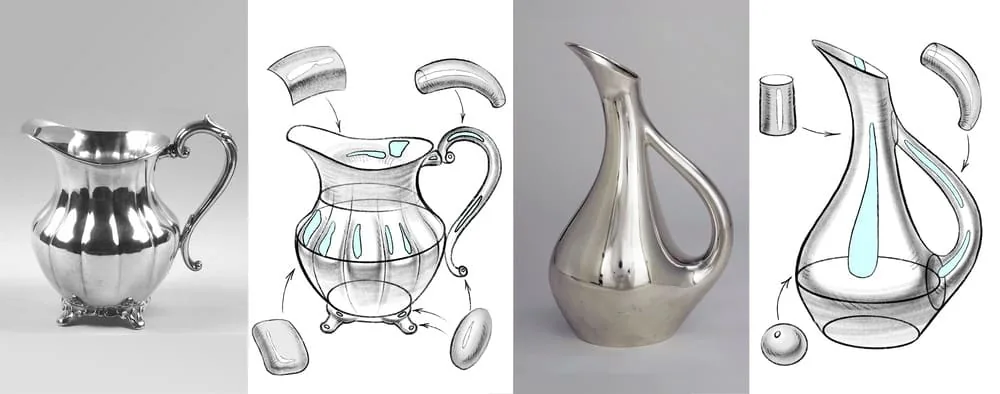
To understand the glint, you need to think like a glint. Where would you like to be reflected? Unlikely from some insignificant area hidden around the bend, so that no one could see it. That's right, the glint thinks the same way: that's why always put the glint on the most voluminous and convex place of the object. In cylindrical figures, the glint will be located at the peak of the turn of the wall and the break of the грань between the vertical surface and the horizontal lid (1). In spherical objects, it will be a rounded point on the shoulder or tummy (2). And 2 cubes - the break of the грань or angle (3). The glint is not an independent structure, it is a repeater: on the one hand, it repeats the contour of the silhouette of the light source, on the other hand, it adapts to the shape of the object on which it was formed. However, we do not always draw simple geometry. Dishes, household items, technical devices, transport, plants, figures of animals and people - all these are complex forms. Therefore, it is important to analyze the plasticity of the particular area of the object's surface on which the reflected light turned out to be. Let's analyze two vessels of different shapes. We marked the glints on the objects with a bluish tint. The left jug is assembled like a tangerine from segments, so there will be its own rounded glint on each segment. The handle is a curved tube, the neck is also a cylinder, but curved, the legs are ellipsoidal shapes. Since its surface is riddled with hollows, instead of one glint there are more: one per turn of the грань. The right jug is less рельефный, resembles a drop. The neck and handle are cylinders, the body is a combination of a cylinder and a ball. Their glints do not split into many reflections, but merge into a single stream.
In order to draw a glint on the surface of an object, it needs to create a certain landing place. You can use the tracing, as on our schemes of objects or jugs. But it will look schematic and not voluminous. Around the glint, a slightly darkened area is created with the help of small neat strokes. There is no such need on dark objects, more often this technique is used on light or completely white objects. For example, in Figure 1, the glint is highlighted by a darker tone of the pear itself. And in Figure 2, it was given a diffuse shading along the contour to make it visible against the white porcelain.
In order to draw a glint on the surface of an object, it needs to create a certain place of landing. You can use the tracing, as on our schemes of objects or jugs. But it will look schematic and not voluminous. Around the glint, a slightly darkened area is created with the help of small neat strokes. There is no such need on dark objects, more often this technique is used on light or completely white objects. For example, in Figure 1, the glint is highlighted by a darker tone of the pear itself. And in Figure 2, it was given a diffuse shading along the contour to make it visible against the white porcelain.
Lesson: how to draw glints on hair
Related courses
All courses
from 3 900 ₽
-57%
Book illustration: The first page page
9 000 ₽3 900 ₽
Learn more

from 12 000 ₽
-20%
Векторная иллюстрация для начинающих
15 000 ₽12 000 ₽
Learn more

from 4 500 ₽
-55%
Character Concept: My First Hero
10 000 ₽4 500 ₽
Learn more
Well, now we take pencils or styluses. By the way, you can try to draw not with an ordinary graphite pencil, but try watercolor black or brown. It gives a pleasant oily dense imprint. Well, we also do not forget to take a fighting mood, without a positive mood the result will not be so great.
Step 1
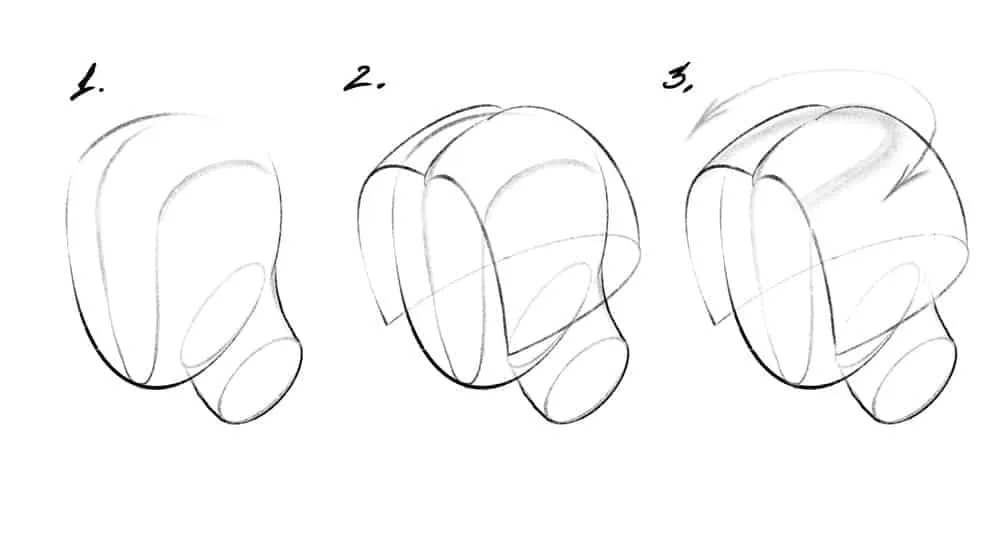
Plants grow on the ground, ships sail on water, so we need to create a base for our hairstyle. Therefore, we draw a simple head dummy without portrait features. And for grace we will put it on a neck leg.
Step 2
We will make a simple каре. The central axis of the head will be our parting. From it in two sides we draw halves of the hairstyle, and we limit its edge with an ellipse.
 Step 3
We erase the unnecessary construction lines that will мешать create volume. In order to create a convincing glint, we will need to tint our hairstyle. We have already made sure with examples that the glint cannot exist by itself. With a light tone we show the rounded area of the перелом of the hair. Our reflected light will be located on it.
Step 4
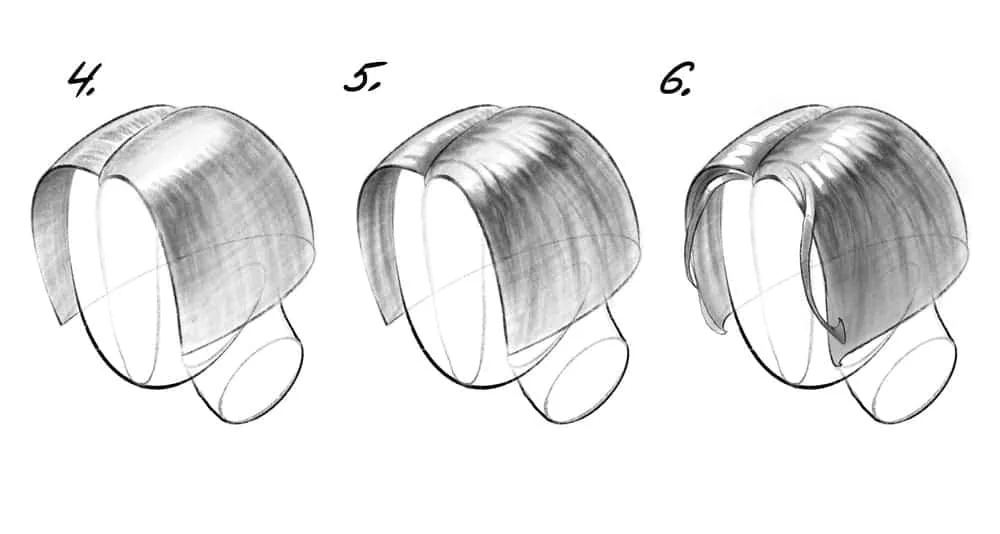
We shade the volume of the hairstyle with wide strokes, give shading in front of the designated перелом. And on the left strand of hair peeking out from behind the face, we designate the bend of the arc of the curls with shading from below. We designate the rise of the hairstyle from the parting to the left and to the right and on the temple of the right half with turning strokes. This technique will imitate the structure of the hair.
Step 3
We erase the unnecessary construction lines that will мешать create volume. In order to create a convincing glint, we will need to tint our hairstyle. We have already made sure with examples that the glint cannot exist by itself. With a light tone we show the rounded area of the перелом of the hair. Our reflected light will be located on it.
Step 4
We shade the volume of the hairstyle with wide strokes, give shading in front of the designated перелом. And on the left strand of hair peeking out from behind the face, we designate the bend of the arc of the curls with shading from below. We designate the rise of the hairstyle from the parting to the left and to the right and on the temple of the right half with turning strokes. This technique will imitate the structure of the hair.
 Step 5
With a darker tone and contrasting strokes, we begin to break the edge of the illuminated area. We add a couple of arcuate lines vertically of our каре to create the illusion of curls in the shadow.
Step 6
We have collected everything we need for the glint to materialize. Add a couple of strands protruding forward, we also put glints on them. A little more shading of the hairstyle in the light and in the topic, and now we erase the tone on the перелом. The erased areas are outlined with a light contour. Dexterity of the pencil and no fraud: the glint has appeared! Well, now let's try to draw a glint on a smoother and shiny surface.
Step 5
With a darker tone and contrasting strokes, we begin to break the edge of the illuminated area. We add a couple of arcuate lines vertically of our каре to create the illusion of curls in the shadow.
Step 6
We have collected everything we need for the glint to materialize. Add a couple of strands protruding forward, we also put glints on them. A little more shading of the hairstyle in the light and in the topic, and now we erase the tone on the перелом. The erased areas are outlined with a light contour. Dexterity of the pencil and no fraud: the glint has appeared! Well, now let's try to draw a glint on a smoother and shiny surface.
 Step 3
We add thickness to the eyelids, suggesting their opening with a section along the central axis. At this stage, we give meaning to the look. We draw the iris and pupil. In the right corner of the eye we show a small roundness of the meat of the tear. We will assume that the light source is located to the right from above at 45 degrees.
Step 4
Lightly and naturally we shade the eyelids and eye in the shape of the Ball. Above the right corner of the eye we put a light shadow: in this place the eye and the eye socket are joined, the transition to the nasal bone. Therefore, the bends begin to catch the shadow, not the light.
Step 5
With more sonorous strokes we emphasize the boundaries of light and shade, you can use a thin accurate tracing. We strengthen the tone of the falling shadows. Now safely we more strongly outline the edges of the eyelids, the contour of the iris and the pupil. We do not bring the left edges of the eyelids to a point, but hide them behind the eye. We designate the places where we will have the glints. On the opposite edge of the iris, opposite the glint, a backlight will form - this is a kind of diffuse glint on the back side of the wall of the eye.
Step 6
We shade the pupil, iris, eye body, tear meat, so that our glints and backlight appear. You can stop at the reception with their designation with contours, but then they look drawn and schematic, and in this way we will be able to give lightness to our sketch and remove the extra contour.
Three, four, we finished the exercise! Let's move on to the next exercise: glints on the water.
Step 3
We add thickness to the eyelids, suggesting their opening with a section along the central axis. At this stage, we give meaning to the look. We draw the iris and pupil. In the right corner of the eye we show a small roundness of the meat of the tear. We will assume that the light source is located to the right from above at 45 degrees.
Step 4
Lightly and naturally we shade the eyelids and eye in the shape of the Ball. Above the right corner of the eye we put a light shadow: in this place the eye and the eye socket are joined, the transition to the nasal bone. Therefore, the bends begin to catch the shadow, not the light.
Step 5
With more sonorous strokes we emphasize the boundaries of light and shade, you can use a thin accurate tracing. We strengthen the tone of the falling shadows. Now safely we more strongly outline the edges of the eyelids, the contour of the iris and the pupil. We do not bring the left edges of the eyelids to a point, but hide them behind the eye. We designate the places where we will have the glints. On the opposite edge of the iris, opposite the glint, a backlight will form - this is a kind of diffuse glint on the back side of the wall of the eye.
Step 6
We shade the pupil, iris, eye body, tear meat, so that our glints and backlight appear. You can stop at the reception with their designation with contours, but then they look drawn and schematic, and in this way we will be able to give lightness to our sketch and remove the extra contour.
Three, four, we finished the exercise! Let's move on to the next exercise: glints on the water.
 Step 3
We prompt ourselves the area of reflection of the sun. The glint will not be round, it will stretch into a light track. The closer it approaches us, the more dense and long blocks it will consist of. But at a certain point, this effect will end and the stripe of the glint will also dissipate and disappear.
Step 4
We arm ourselves with an eraser and erase the extra tone. We save the breaks with a gray tone of our light strip to simulate waves.
Step 5
We add light and thin arcs and ellipses to imitate small ripples on the water. On small ripples of ripples too it is necessary to put glints, they too are in our light plot. And also with a light contour a little we underline and we will show the glint a column of reflection of the sun.
Step 3
We prompt ourselves the area of reflection of the sun. The glint will not be round, it will stretch into a light track. The closer it approaches us, the more dense and long blocks it will consist of. But at a certain point, this effect will end and the stripe of the glint will also dissipate and disappear.
Step 4
We arm ourselves with an eraser and erase the extra tone. We save the breaks with a gray tone of our light strip to simulate waves.
Step 5
We add light and thin arcs and ellipses to imitate small ripples on the water. On small ripples of ripples too it is necessary to put glints, they too are in our light plot. And also with a light contour a little we underline and we will show the glint a column of reflection of the sun.
 Step 3
With sections we showed the shapes of the waves in the shadows. These are smooth rolls of hills without sharp corners. And now we will strengthen the shadows taking into account this section. We will mark the darkest areas with silhouettes similar to ellipses and rounded crescents.
Step 4
We create the rhythm of dark sections of the waves with the help of hatching. We do not shade all the dark crescents. This way we will create visual vibration of medium density of shadows and more intense ones. We will slightly shade the whole square with a light gray tone so that the glints do not merge with the color of the paper or layer.
Step 3
With sections we showed the shapes of the waves in the shadows. These are smooth rolls of hills without sharp corners. And now we will strengthen the shadows taking into account this section. We will mark the darkest areas with silhouettes similar to ellipses and rounded crescents.
Step 4
We create the rhythm of dark sections of the waves with the help of hatching. We do not shade all the dark crescents. This way we will create visual vibration of medium density of shadows and more intense ones. We will slightly shade the whole square with a light gray tone so that the glints do not merge with the color of the paper or layer.
 Step 5
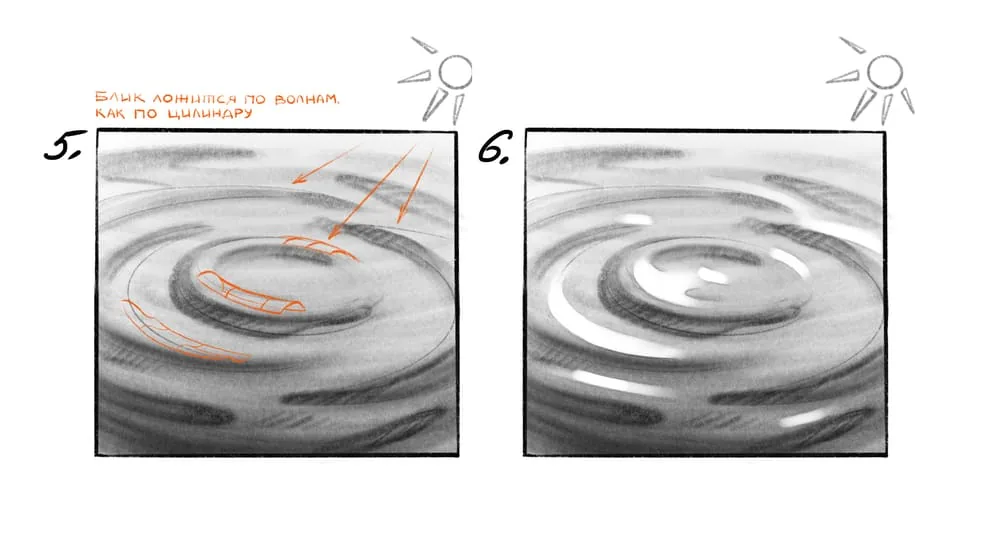
Now let's analyze the areas turned towards the light. These are exactly the same rolls of hills. In some way they remind parts of the walls of cylinders. And so, the glints will be formed on the surface of the waves according to the principle of a cylinder, only curved.
Step 6
We erase the stripes of the glints on the light areas with an eraser. And in the central bun we note a small irregularity of the rise of the water surface with a glint. This will be a hint of a drop that disappeared in the water.
At some point the waves will calm down and dissolve in the smooth surface of the water. So we came to the end of the sketch of the glints on the water.
Step 5
Now let's analyze the areas turned towards the light. These are exactly the same rolls of hills. In some way they remind parts of the walls of cylinders. And so, the glints will be formed on the surface of the waves according to the principle of a cylinder, only curved.
Step 6
We erase the stripes of the glints on the light areas with an eraser. And in the central bun we note a small irregularity of the rise of the water surface with a glint. This will be a hint of a drop that disappeared in the water.
At some point the waves will calm down and dissolve in the smooth surface of the water. So we came to the end of the sketch of the glints on the water.
 Glints are an ode to light, an ode to reflections. Sometimes you want to draw them endlessly on objects, but now you know their essence and the principle of appearance on different materials and different figures. And we want to show off to you. Yes, that's right, to show off, because we draw glints all the time on glass bottles, ceramic pots, ripe fruits and vegetables, on satin and rough draperies. You can not even list and not convey in words the whole range of objects and textures explored and drawn by us. And you can join us and study not only the specifics of the glint, but also the light, shadows, reflexes, shaping, composition, graphic techniques and other important aspects of the drawing.
This is far from all that happens and is studied in our course Master of Drawing.
Everyone of us sees the beautiful, that's why draw more, share the beautiful with the world. And we will continue to share with you life hacks for artists, practical techniques and a cheerful atmosphere of Skills Up School!
Glints are an ode to light, an ode to reflections. Sometimes you want to draw them endlessly on objects, but now you know their essence and the principle of appearance on different materials and different figures. And we want to show off to you. Yes, that's right, to show off, because we draw glints all the time on glass bottles, ceramic pots, ripe fruits and vegetables, on satin and rough draperies. You can not even list and not convey in words the whole range of objects and textures explored and drawn by us. And you can join us and study not only the specifics of the glint, but also the light, shadows, reflexes, shaping, composition, graphic techniques and other important aspects of the drawing.
This is far from all that happens and is studied in our course Master of Drawing.
Everyone of us sees the beautiful, that's why draw more, share the beautiful with the world. And we will continue to share with you life hacks for artists, practical techniques and a cheerful atmosphere of Skills Up School!
Step 3
We erase the unnecessary construction lines that will мешать create volume. In order to create a convincing glint, we will need to tint our hairstyle. We have already made sure with examples that the glint cannot exist by itself. With a light tone we show the rounded area of the перелом of the hair. Our reflected light will be located on it.
Step 4
We shade the volume of the hairstyle with wide strokes, give shading in front of the designated перелом. And on the left strand of hair peeking out from behind the face, we designate the bend of the arc of the curls with shading from below. We designate the rise of the hairstyle from the parting to the left and to the right and on the temple of the right half with turning strokes. This technique will imitate the structure of the hair.
Step 5
With a darker tone and contrasting strokes, we begin to break the edge of the illuminated area. We add a couple of arcuate lines vertically of our каре to create the illusion of curls in the shadow.
Step 6
We have collected everything we need for the glint to materialize. Add a couple of strands protruding forward, we also put glints on them. A little more shading of the hairstyle in the light and in the topic, and now we erase the tone on the перелом. The erased areas are outlined with a light contour. Dexterity of the pencil and no fraud: the glint has appeared! Well, now let's try to draw a glint on a smoother and shiny surface.
Lesson: how to draw glints on the eyes
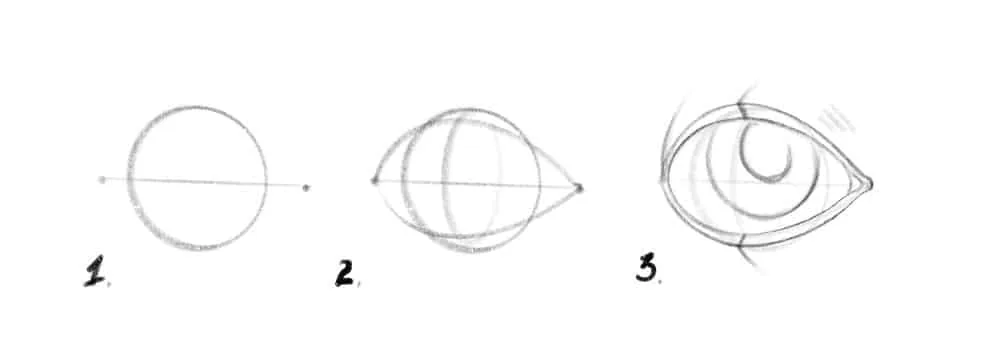
Step 1 We will need to build an eye first. Therefore, we put a horizontal axis, we mark the corners of the future eye with dots. We draw a circle in the center of the created axis. Step 2 We mark the central axis of the circle with an ellipse, so our circle will turn from a flat figure into a volumetric sphere. We will mark the edges of the eyelids with arcs. Do not forget that we draw all the lines lightly and semi-transparently.
Step 3
We add thickness to the eyelids, suggesting their opening with a section along the central axis. At this stage, we give meaning to the look. We draw the iris and pupil. In the right corner of the eye we show a small roundness of the meat of the tear. We will assume that the light source is located to the right from above at 45 degrees.
Step 4
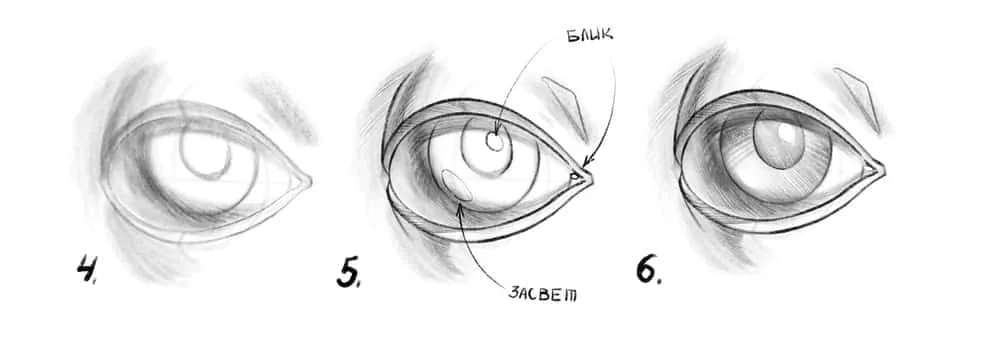
Lightly and naturally we shade the eyelids and eye in the shape of the Ball. Above the right corner of the eye we put a light shadow: in this place the eye and the eye socket are joined, the transition to the nasal bone. Therefore, the bends begin to catch the shadow, not the light.
Step 5
With more sonorous strokes we emphasize the boundaries of light and shade, you can use a thin accurate tracing. We strengthen the tone of the falling shadows. Now safely we more strongly outline the edges of the eyelids, the contour of the iris and the pupil. We do not bring the left edges of the eyelids to a point, but hide them behind the eye. We designate the places where we will have the glints. On the opposite edge of the iris, opposite the glint, a backlight will form - this is a kind of diffuse glint on the back side of the wall of the eye.
Step 6
We shade the pupil, iris, eye body, tear meat, so that our glints and backlight appear. You can stop at the reception with their designation with contours, but then they look drawn and schematic, and in this way we will be able to give lightness to our sketch and remove the extra contour.
Three, four, we finished the exercise! Let's move on to the next exercise: glints on the water.
Lesson: how to draw glints on water
We will tell you 2 stories about drawing glints on water. We have all seen full calm and a mirror-like water surface. But more often the water is disturbed by the wind, and ripples, waves and even waves are formed on its surface! We will analyze 2 principles of the formation of glints on smooth water and on waves.Reflection of the sun in calm water
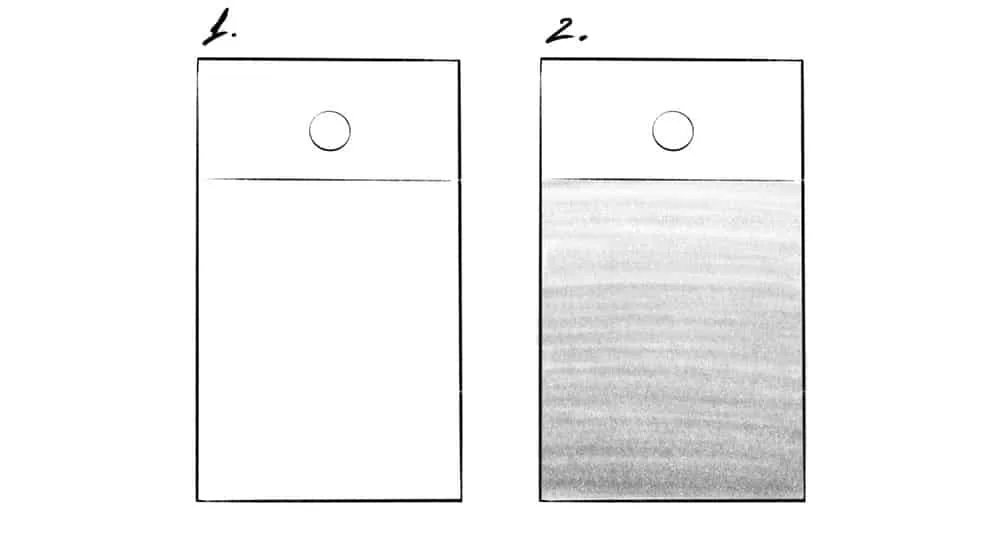
Step 1 We will limit the area of water with a rectangle. We will mark the horizon line and the sun with a circle. Step 2 With wide and light strokes we shade the area of water. Towards the top we try to make it lighter, towards the bottom we keep a darker gradient.
Step 3
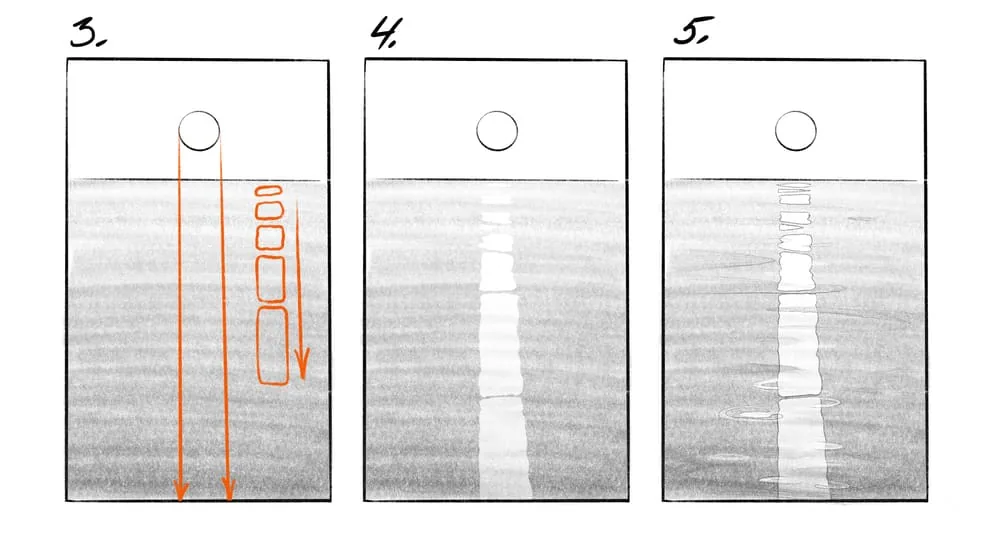
We prompt ourselves the area of reflection of the sun. The glint will not be round, it will stretch into a light track. The closer it approaches us, the more dense and long blocks it will consist of. But at a certain point, this effect will end and the stripe of the glint will also dissipate and disappear.
Step 4
We arm ourselves with an eraser and erase the extra tone. We save the breaks with a gray tone of our light strip to simulate waves.
Step 5
We add light and thin arcs and ellipses to imitate small ripples on the water. On small ripples of ripples too it is necessary to put glints, they too are in our light plot. And also with a light contour a little we underline and we will show the glint a column of reflection of the sun.
Glints on waves
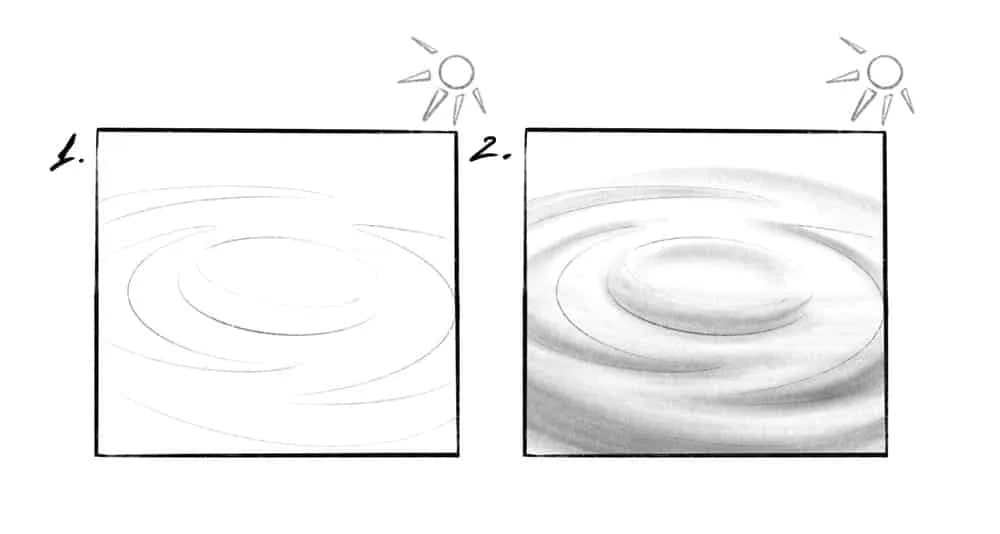
Step 1 We draw the contour of a square. Let's imagine that a drop fell into the water and created concentric waves. Very easily we show the central bun of the wave and the crescents spreading from it to the sides. The sun will illuminate the water from the right from above from a distance. Step 2 First we create a simple volume with a light tone. The areas closest to us turned away from the sun, so we fill them with shadows.
Step 3
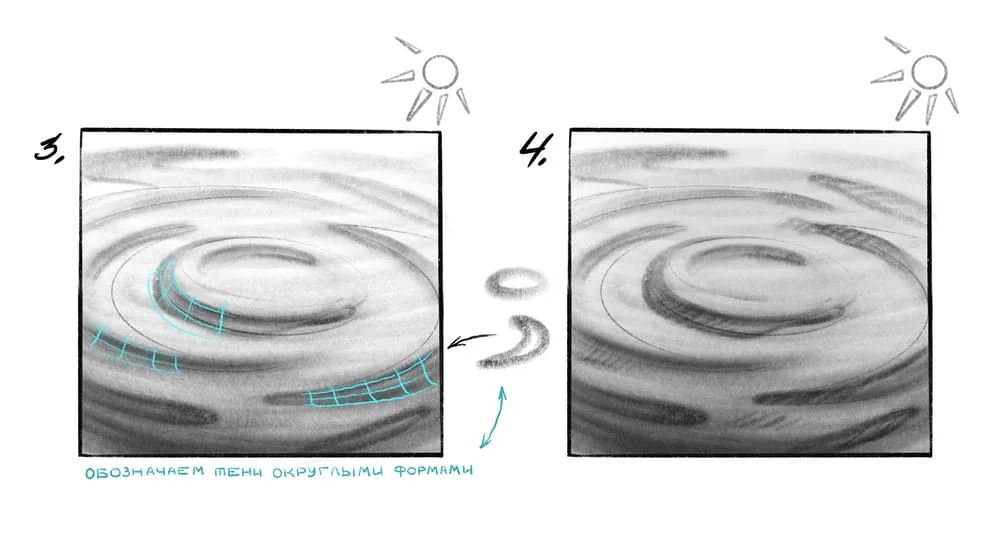
With sections we showed the shapes of the waves in the shadows. These are smooth rolls of hills without sharp corners. And now we will strengthen the shadows taking into account this section. We will mark the darkest areas with silhouettes similar to ellipses and rounded crescents.
Step 4
We create the rhythm of dark sections of the waves with the help of hatching. We do not shade all the dark crescents. This way we will create visual vibration of medium density of shadows and more intense ones. We will slightly shade the whole square with a light gray tone so that the glints do not merge with the color of the paper or layer.
Step 5
Now let's analyze the areas turned towards the light. These are exactly the same rolls of hills. In some way they remind parts of the walls of cylinders. And so, the glints will be formed on the surface of the waves according to the principle of a cylinder, only curved.
Step 6
We erase the stripes of the glints on the light areas with an eraser. And in the central bun we note a small irregularity of the rise of the water surface with a glint. This will be a hint of a drop that disappeared in the water.
At some point the waves will calm down and dissolve in the smooth surface of the water. So we came to the end of the sketch of the glints on the water.
Glints are an ode to light, an ode to reflections. Sometimes you want to draw them endlessly on objects, but now you know their essence and the principle of appearance on different materials and different figures. And we want to show off to you. Yes, that's right, to show off, because we draw glints all the time on glass bottles, ceramic pots, ripe fruits and vegetables, on satin and rough draperies. You can not even list and not convey in words the whole range of objects and textures explored and drawn by us. And you can join us and study not only the specifics of the glint, but also the light, shadows, reflexes, shaping, composition, graphic techniques and other important aspects of the drawing.
This is far from all that happens and is studied in our course Master of Drawing.
Everyone of us sees the beautiful, that's why draw more, share the beautiful with the world. And we will continue to share with you life hacks for artists, practical techniques and a cheerful atmosphere of Skills Up School!
Related materials

Tutorial
Drawing stones
March 10, 2025
Tutorial
How to draw a palm tree
September 18, 2023

Tutorial
How to draw a child?
January 13, 2025

Tutorial
How to draw a torso
December 18, 2024
Tutorial
How to draw a chest
November 29, 2024

Article
3 tips for a beginner character artist. How to draw emotions
September 18, 2023

News
Прекрасные цветы в стиле аркейн, нарисованные вручную и воплощённые в 3D
May 15, 2026