TutorialUpdated: July 2, 2026
How to draw a child?
In short
What to consider when drawing a child: step-by-step lessons with techniques, proportions and life hacks for creating an expressive drawing of a child's figure
2D artist (illustrator)
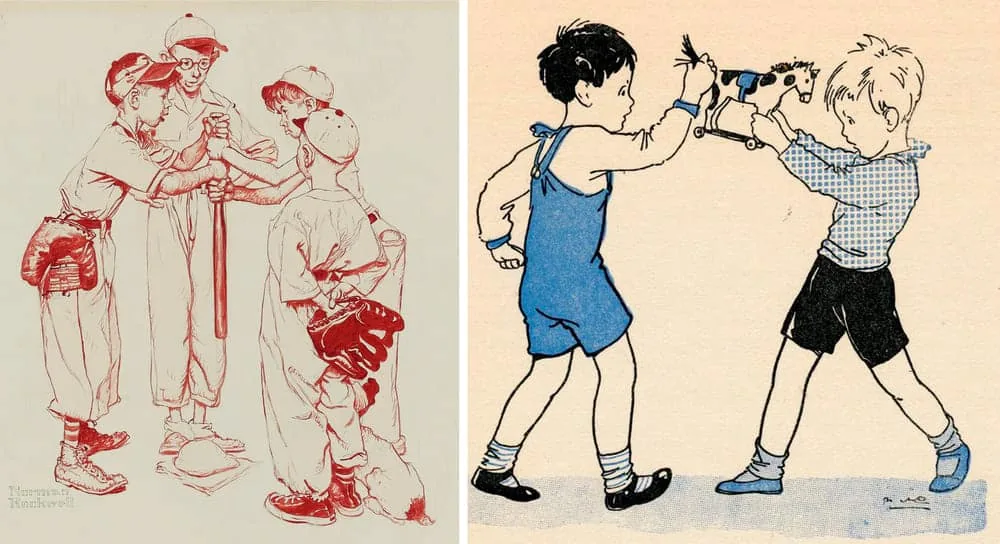
 We often talk about drawing people, the proportions of the female and male body, figure in motion and complex perspectives. Regularly we invite the most beautiful, graceful and textured models for you. We constantly collect magnificent productions with environment and figures. But what about the child's figure and children's proportions? Let's figure it out, and the best way to do it is in practice.
The volume of the ribcage defines the whole upper part of the figure, so we recommend studying it separately in the master class How to draw the ribcage.
We often talk about drawing people, the proportions of the female and male body, figure in motion and complex perspectives. Regularly we invite the most beautiful, graceful and textured models for you. We constantly collect magnificent productions with environment and figures. But what about the child's figure and children's proportions? Let's figure it out, and the best way to do it is in practice.
The volume of the ribcage defines the whole upper part of the figure, so we recommend studying it separately in the master class How to draw the ribcage.
What to consider when drawing a child
Before starting to draw a child, we must turn to the study of proportions, because we cannot do without them. In the process of drawing a children's figure, we will measure them by reference and try to keep them in our drawing. Children are constantly growing, stretching, gaining mass or, conversely, losing it. Therefore, there are no constant absolute proportions. You need to always check and measure in the process. But there are some patterns. We talked about them in more detail in the article about Proportions in drawing, person, child, face, objects.How to draw a child step by step with a pencil
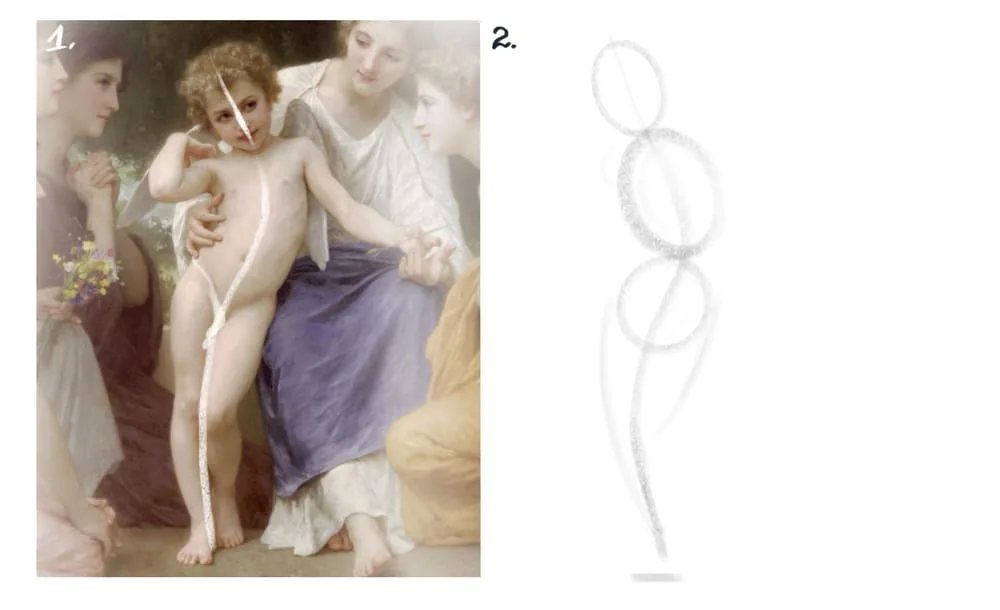
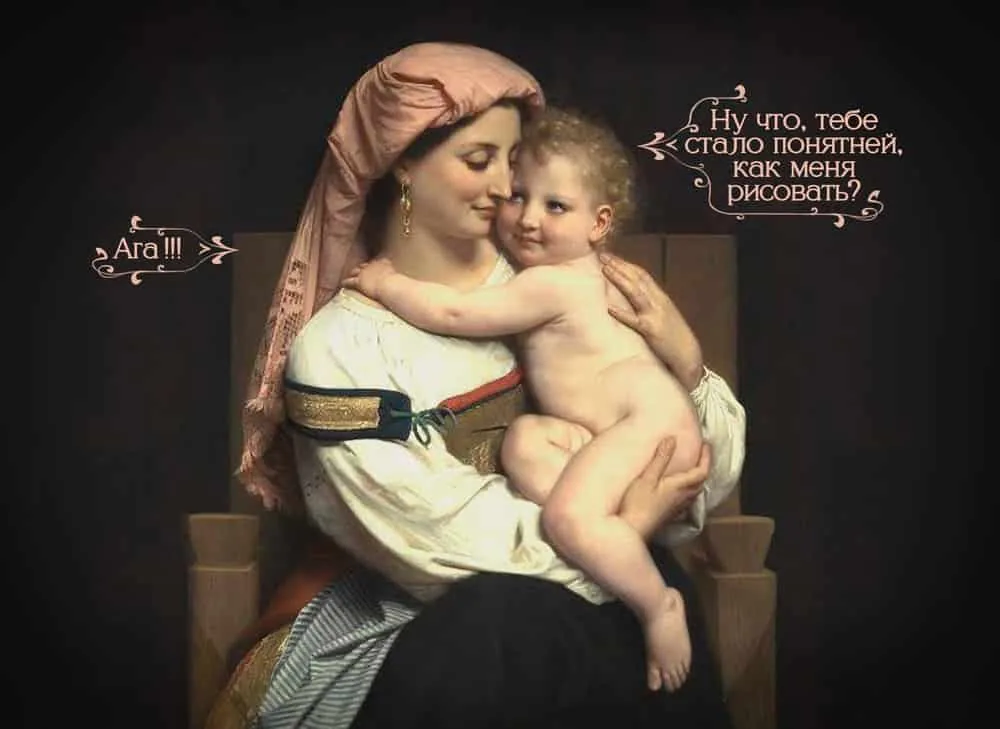
It is generally accepted that children are the flowers of life or little angels. Do you know how many angels have been written and drawn by artists? And we don't even know, we're afraid to imagine, let alone count. But why not increase their number, especially when our young model will be a little angel painted by William Bouguereau. He was a great master of drawing and painting people, so we can safely trust his paintings and not doubt the accuracy of the proportions. First of all, we need to understand what volumes the body consists of. We have drawn a scheme of simple geometric shapes on top of our lovely winged child. Always try to simplify the shape to see the essence (and shake your hand with a pinch in Italian). A lot of muscles or articular protrusions will only confuse us during the analysis. Represent the joints in the form of ball-hinges, the limbs - a little bloated barrels-cylinders. The pelvis is also a cylinder. The abdomen and lower back - a cylinder, and on top of them sits an egg-shaped volume of the chest and shoulders. Well, this whole body structure is crowned by a similar spherical volume of the head.
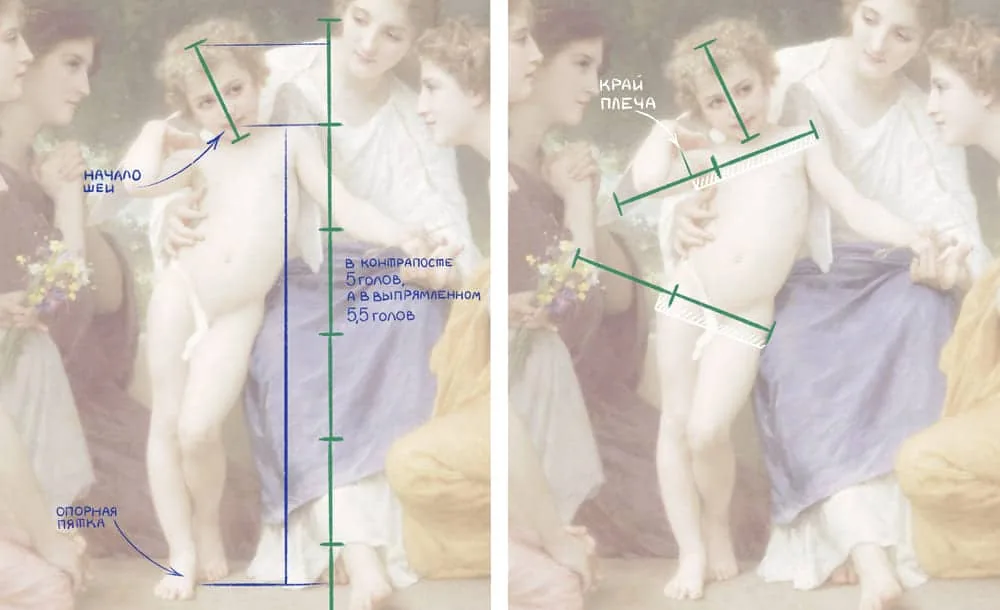 Aha, we figured out the shape and the principle of body shaping, and now let's look for proportions. Now we are interested in the left picture. Our little cupid has a very curly hairstyle, so we will make a discount and mark the top of the head inside this tufted hat. We mark the place where the neck begins: in a calm vertical position, the chin line coincides with the beginning of the neck. That is why we will put the size of the head vertically upward from this point. We got it that in a calm state the head fits in the height of the body in the contra-post position 5 times, and if our baby straightens up and stands straight, then all 5.5. We remind you that we measure the ratio of the height of the head to the body from the top of the head to the base of the heel of the supporting leg.
These are not all the measurements that are important to us. Pay attention to the right picture. Let's check the ratio of the head to the width of the pelvis and to the width of the shoulders. The head fits completely into both sizes. However, the width of the shoulders is slightly more than the width of the pelvis. At first, the proportions of girls and boys are very similar in childhood. Gradually, with growth and development, physiological changes occur: boys become more brawny, and girls become more figured with thin waists and wide hips. And while we are children, we are all very similar.
Well, in order to draw our beautiful young man with a pencil, what do we need? Exactly! We need a pencil and paper, or a stylus and a tablet. Choose not very fat softness, otherwise you can overdraw the drawing. The best option would be HB or B. Thin paper will tear and get dirty, it is better to always choose thick paper. Whatman or drawing paper формата A4 will be just right. Well, we have made a step-by-step drawing in Procreate with a brush that imitates the texture of a pencil.
Aha, we figured out the shape and the principle of body shaping, and now let's look for proportions. Now we are interested in the left picture. Our little cupid has a very curly hairstyle, so we will make a discount and mark the top of the head inside this tufted hat. We mark the place where the neck begins: in a calm vertical position, the chin line coincides with the beginning of the neck. That is why we will put the size of the head vertically upward from this point. We got it that in a calm state the head fits in the height of the body in the contra-post position 5 times, and if our baby straightens up and stands straight, then all 5.5. We remind you that we measure the ratio of the height of the head to the body from the top of the head to the base of the heel of the supporting leg.
These are not all the measurements that are important to us. Pay attention to the right picture. Let's check the ratio of the head to the width of the pelvis and to the width of the shoulders. The head fits completely into both sizes. However, the width of the shoulders is slightly more than the width of the pelvis. At first, the proportions of girls and boys are very similar in childhood. Gradually, with growth and development, physiological changes occur: boys become more brawny, and girls become more figured with thin waists and wide hips. And while we are children, we are all very similar.
Well, in order to draw our beautiful young man with a pencil, what do we need? Exactly! We need a pencil and paper, or a stylus and a tablet. Choose not very fat softness, otherwise you can overdraw the drawing. The best option would be HB or B. Thin paper will tear and get dirty, it is better to always choose thick paper. Whatman or drawing paper формата A4 will be just right. Well, we have made a step-by-step drawing in Procreate with a brush that imitates the texture of a pencil.
Practice: drawing a child step by step
Related courses
All courses
from 3 900 ₽
-57%
Book illustration: The first page page
9 000 ₽3 900 ₽
Learn more

from 12 000 ₽
-20%
Векторная иллюстрация для начинающих
15 000 ₽12 000 ₽
Learn more

from 4 500 ₽
-55%
Character Concept: My First Hero
10 000 ₽4 500 ₽
Learn more
Stage 1
We will draw an axis on our boy (1) and repeat a similar line on our sheet (2). Remember, we marked the volumes of the body with simple geometric volumes? They are what we need now. We string the volume of a ball head, chest and pelvis on the axis. It is not necessary to try to draw an accurate silhouette, it is important for us to catch a similar volume with the roundnesses. As you can see, people are wonderful caterpillars!
 Stage 2
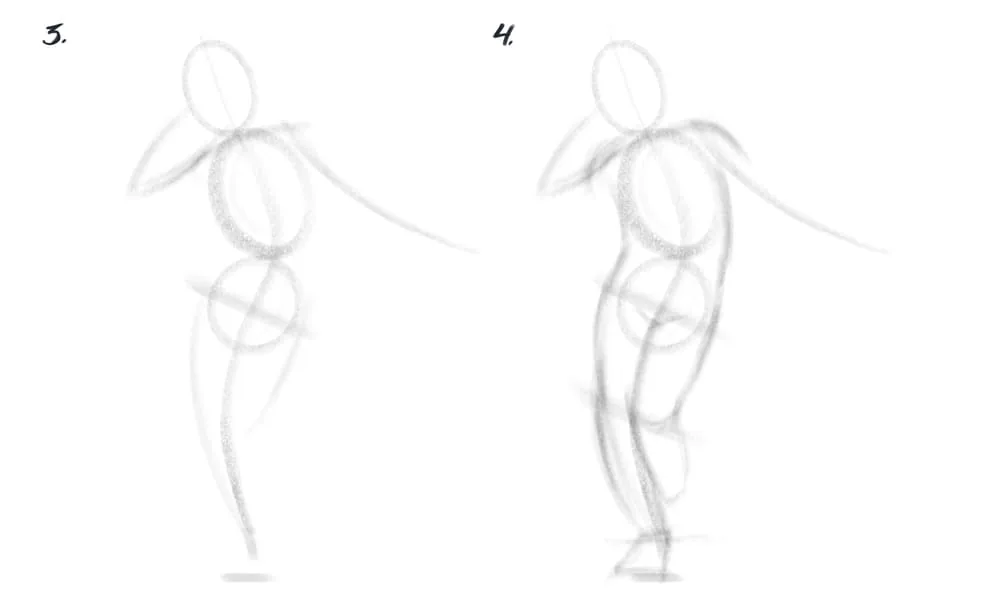
We draw the directions of the arms and legs with lines (3). Imagine a wire man, our drawing should resemble it at this stage. We will also add the tilts of the pelvis and the tilts of the shoulders relative to the vertical curved axis. Well, now we will fill our marionette with muscle volumes and connect the roundish ones to each other. As if sticking clay or plasticine on the frame we have created. Now you will feel like Prometheuses: in Greek myths it was he who molded people from clay. We mark the width of the shoulders and pelvis with dash-arcs (4). Compare them with the size of the head in the same way as we measured them recently. We mark the width of the hips and shins with lines. Children are roundish-sturdy, they do not have a narrow waist, so our torso flows evenly with a bend into the pelvis.
Stage 2
We draw the directions of the arms and legs with lines (3). Imagine a wire man, our drawing should resemble it at this stage. We will also add the tilts of the pelvis and the tilts of the shoulders relative to the vertical curved axis. Well, now we will fill our marionette with muscle volumes and connect the roundish ones to each other. As if sticking clay or plasticine on the frame we have created. Now you will feel like Prometheuses: in Greek myths it was he who molded people from clay. We mark the width of the shoulders and pelvis with dash-arcs (4). Compare them with the size of the head in the same way as we measured them recently. We mark the width of the hips and shins with lines. Children are roundish-sturdy, they do not have a narrow waist, so our torso flows evenly with a bend into the pelvis.
 Stage 3
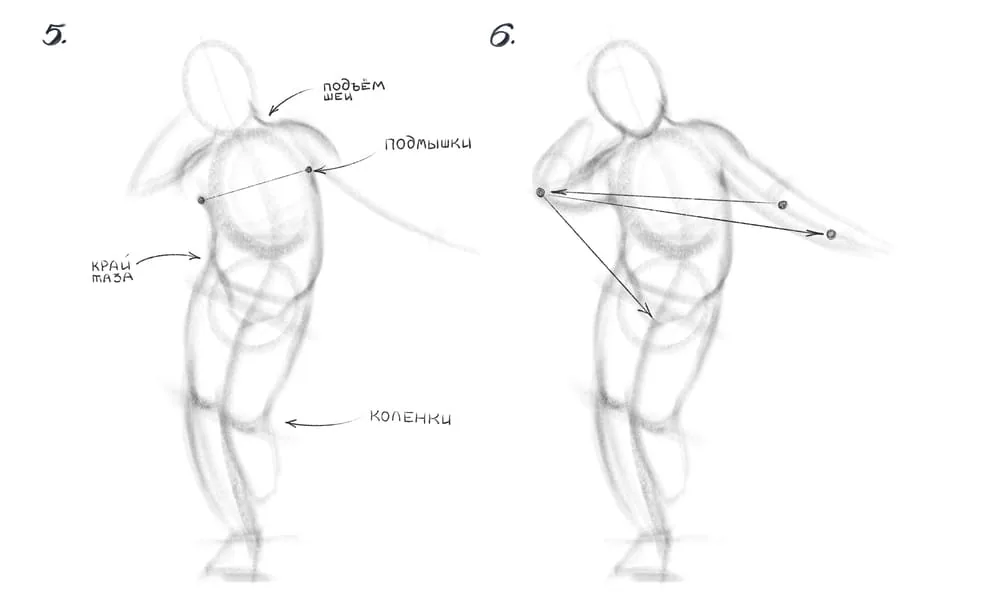
We begin to add details little by little (5): we mark the knees, the turn of the abdominal muscles along the edge of the pelvis, the rise of the neck from the shoulders and armpits. They should be on the same axis parallel to the line of the shoulders (we marked it before). We will draw arms, but first we will check ourselves with additional lines (6). We draw lines between the elbow and elbow, between the left elbow and the right wrist, between the left elbow and the groin. Why? Draw exactly the same lines on our reference and compare the resulting diagonals. If the tilts and lengths of the lines are similar, then you did an excellent job. And if not - no problem, just adjust our directions. Do not forget to check that the length of the shoulders and forearms is the same.
Stage 3
We begin to add details little by little (5): we mark the knees, the turn of the abdominal muscles along the edge of the pelvis, the rise of the neck from the shoulders and armpits. They should be on the same axis parallel to the line of the shoulders (we marked it before). We will draw arms, but first we will check ourselves with additional lines (6). We draw lines between the elbow and elbow, between the left elbow and the right wrist, between the left elbow and the groin. Why? Draw exactly the same lines on our reference and compare the resulting diagonals. If the tilts and lengths of the lines are similar, then you did an excellent job. And if not - no problem, just adjust our directions. Do not forget to check that the length of the shoulders and forearms is the same.
 Stage 4
We have approached an exciting moment: we begin to mark with a bolder line. We start with the torso and hips (7). Gradually we begin to expand and capture the shoulders, we mark the armpits with checkmarks, the navel and the edges of the knees with dots (8).
Stage 4
We have approached an exciting moment: we begin to mark with a bolder line. We start with the torso and hips (7). Gradually we begin to expand and capture the shoulders, we mark the armpits with checkmarks, the navel and the edges of the knees with dots (8).
 Stage 5
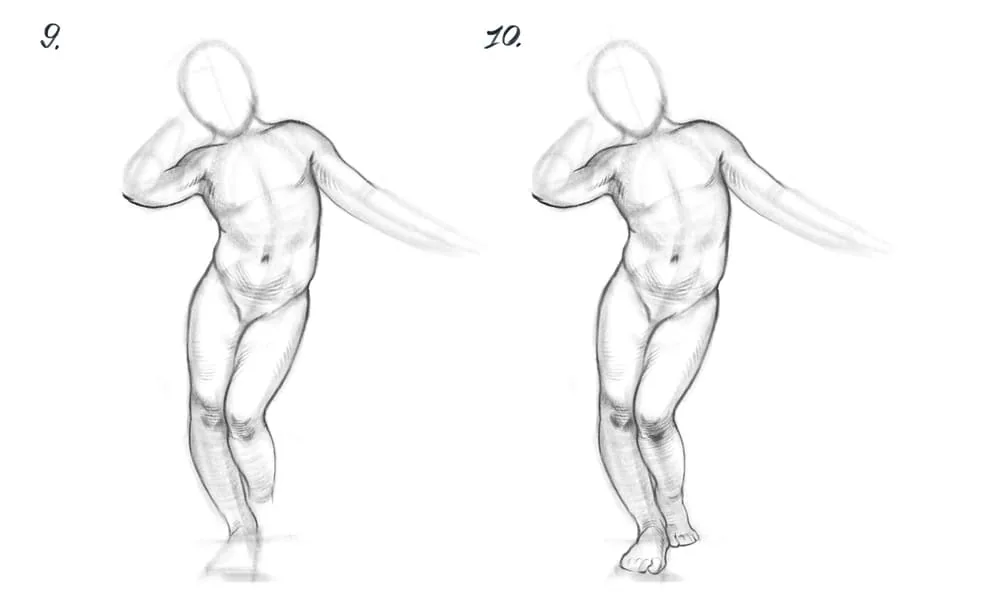
And now let's return to the legs again, we have unfinished shins left (9). We draw not only the line of the silhouette of the legs, but shade the area below the knees with light strokes, and also pick up the press. Add a simple silhouette of the feet. Our task is to draw a similar silhouette without going into complex details. After all, we are still making a sketch! (10).
Stage 5
And now let's return to the legs again, we have unfinished shins left (9). We draw not only the line of the silhouette of the legs, but shade the area below the knees with light strokes, and also pick up the press. Add a simple silhouette of the feet. Our task is to draw a similar silhouette without going into complex details. After all, we are still making a sketch! (10).
 Stage 6
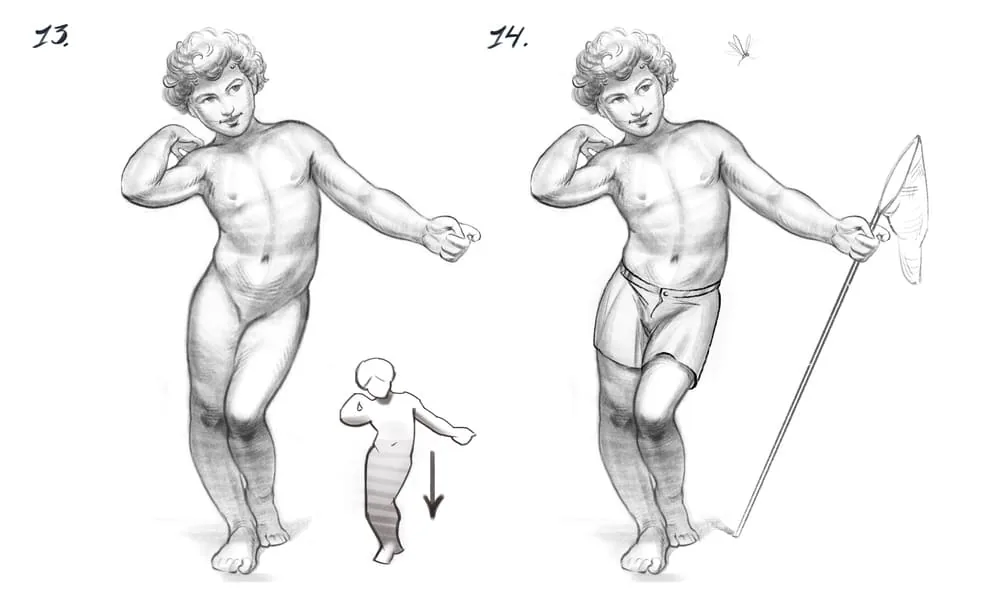
Since we have drawn the feet, let's move on to the hands and head. But first, we will draw the lines of the forearms from the elbows to the wrists (11). The secret of drawing hands is that there is “no secret ingredient”! We do not need complex designs, we need to create a similar sign or silhouette. The left hand is hidden behind the turn, and the right hand is folded into a fist. Gently mark the fingers with simple lines. We have determined the size of the head. We need to mark the contour of the chin with a thin line and divide our head into 3 equal parts. From the top of the head to the eyebrow line, from the eyebrows to the base of the nose and from the nose to the chin - these are our identical thirds. We put the ears in the central third on the sides of the head. Well, now we will add the curls of the hairstyle with semi-circular thin strokes (12).
Stage 6
Since we have drawn the feet, let's move on to the hands and head. But first, we will draw the lines of the forearms from the elbows to the wrists (11). The secret of drawing hands is that there is “no secret ingredient”! We do not need complex designs, we need to create a similar sign or silhouette. The left hand is hidden behind the turn, and the right hand is folded into a fist. Gently mark the fingers with simple lines. We have determined the size of the head. We need to mark the contour of the chin with a thin line and divide our head into 3 equal parts. From the top of the head to the eyebrow line, from the eyebrows to the base of the nose and from the nose to the chin - these are our identical thirds. We put the ears in the central third on the sides of the head. Well, now we will add the curls of the hairstyle with semi-circular thin strokes (12).
 Stage 7
We draw eyebrows, eyes, nose and mouth along the marked thirds on the head (13). And also we shade the figure with a general tone downwards, as on a small scheme. This effect adds volume to the figure and lands the legs. The illusion is created when our child confidently stands on the ground, and does not float in the air (14). Although our angel was created to fly. We can turn him into a simple boy - a butterfly catcher with a light movement of the pencil. Let's draw shorts for him and put a net in his hand. Well, let the little dragonfly fly next to the head (14). C'est tout, our drawing is ready!
Stage 7
We draw eyebrows, eyes, nose and mouth along the marked thirds on the head (13). And also we shade the figure with a general tone downwards, as on a small scheme. This effect adds volume to the figure and lands the legs. The illusion is created when our child confidently stands on the ground, and does not float in the air (14). Although our angel was created to fly. We can turn him into a simple boy - a butterfly catcher with a light movement of the pencil. Let's draw shorts for him and put a net in his hand. Well, let the little dragonfly fly next to the head (14). C'est tout, our drawing is ready!
 That's how we came to the end of our tutorial on drawing children and even drew a boy! Do not be afraid of mistakes - they are part of the process of research and drawing, it is thanks to them that the skill grows. Any nature is subject to the artist, the main thing is to draw, draw and draw again!
Stage 2
We draw the directions of the arms and legs with lines (3). Imagine a wire man, our drawing should resemble it at this stage. We will also add the tilts of the pelvis and the tilts of the shoulders relative to the vertical curved axis. Well, now we will fill our marionette with muscle volumes and connect the roundish ones to each other. As if sticking clay or plasticine on the frame we have created. Now you will feel like Prometheuses: in Greek myths it was he who molded people from clay. We mark the width of the shoulders and pelvis with dash-arcs (4). Compare them with the size of the head in the same way as we measured them recently. We mark the width of the hips and shins with lines. Children are roundish-sturdy, they do not have a narrow waist, so our torso flows evenly with a bend into the pelvis.
Stage 3
We begin to add details little by little (5): we mark the knees, the turn of the abdominal muscles along the edge of the pelvis, the rise of the neck from the shoulders and armpits. They should be on the same axis parallel to the line of the shoulders (we marked it before). We will draw arms, but first we will check ourselves with additional lines (6). We draw lines between the elbow and elbow, between the left elbow and the right wrist, between the left elbow and the groin. Why? Draw exactly the same lines on our reference and compare the resulting diagonals. If the tilts and lengths of the lines are similar, then you did an excellent job. And if not - no problem, just adjust our directions. Do not forget to check that the length of the shoulders and forearms is the same.
Stage 4
We have approached an exciting moment: we begin to mark with a bolder line. We start with the torso and hips (7). Gradually we begin to expand and capture the shoulders, we mark the armpits with checkmarks, the navel and the edges of the knees with dots (8).
Stage 5
And now let's return to the legs again, we have unfinished shins left (9). We draw not only the line of the silhouette of the legs, but shade the area below the knees with light strokes, and also pick up the press. Add a simple silhouette of the feet. Our task is to draw a similar silhouette without going into complex details. After all, we are still making a sketch! (10).
Stage 6
Since we have drawn the feet, let's move on to the hands and head. But first, we will draw the lines of the forearms from the elbows to the wrists (11). The secret of drawing hands is that there is “no secret ingredient”! We do not need complex designs, we need to create a similar sign or silhouette. The left hand is hidden behind the turn, and the right hand is folded into a fist. Gently mark the fingers with simple lines. We have determined the size of the head. We need to mark the contour of the chin with a thin line and divide our head into 3 equal parts. From the top of the head to the eyebrow line, from the eyebrows to the base of the nose and from the nose to the chin - these are our identical thirds. We put the ears in the central third on the sides of the head. Well, now we will add the curls of the hairstyle with semi-circular thin strokes (12).
Stage 7
We draw eyebrows, eyes, nose and mouth along the marked thirds on the head (13). And also we shade the figure with a general tone downwards, as on a small scheme. This effect adds volume to the figure and lands the legs. The illusion is created when our child confidently stands on the ground, and does not float in the air (14). Although our angel was created to fly. We can turn him into a simple boy - a butterfly catcher with a light movement of the pencil. Let's draw shorts for him and put a net in his hand. Well, let the little dragonfly fly next to the head (14). C'est tout, our drawing is ready!
Life hacks and tips
We have already used some tricks with you in the process of drawing a boy with a net. But let's list them.- Measure the proportions of the body
- Use smooth soft lines.
- Hyperbolize
- Draw sketches more often
- Look at how others draw
That's how we came to the end of our tutorial on drawing children and even drew a boy! Do not be afraid of mistakes - they are part of the process of research and drawing, it is thanks to them that the skill grows. Any nature is subject to the artist, the main thing is to draw, draw and draw again!
Related materials

Tutorial
Drawing stones
March 10, 2025
Tutorial
How to draw a house
October 25, 2024

Tutorial
How to draw a torso
December 18, 2024

Tutorial
How to draw highlights
December 17, 2024
Tutorial
How to draw a chest
November 29, 2024

Article
3 tips for a beginner character artist. How to draw emotions
September 18, 2023

News
Прекрасные цветы в стиле аркейн, нарисованные вручную и воплощённые в 3D
May 15, 2026