TutorialUpdated: July 2, 2026
How to learn to draw
In short
Learn how to draw from scratch: define a goal, choose materials and style, develop a learning plan and start your creative journey.
Artist, founder and ideologist of Skills Up School
```
How to learn to draw from scratch? This task can sometimes be overwhelming, as it's not entirely clear where to start.
Those who attended an art studio, drawing school, or worked with a tutor in their childhood have a general idea of the learning process. But what if you didn't have such an experience?
 For convenience, limit the working area with a rectangle. Try making vertical strokes with uniform pressure. Try to keep the line width the same and the lines — parallel (1).
Then try setting the rhythm of the distances between the lines, increasing it and then decreasing it, while keeping the pressure the same (2).
Try changing the pressure — you'll get the dynamics of a lighter and darker tone of the line. Press lightly until the middle of the area, then, without lifting your hand, press harder. You'll get a continuous line of the same width with different tones (3).
You can also try combining pressure and tilts (4) , create a fine grid (5), draw arcs with different pressure at the beginning, middle, and end (6). Experiment and look for new combinations of arcs and straight lines.
For convenience, limit the working area with a rectangle. Try making vertical strokes with uniform pressure. Try to keep the line width the same and the lines — parallel (1).
Then try setting the rhythm of the distances between the lines, increasing it and then decreasing it, while keeping the pressure the same (2).
Try changing the pressure — you'll get the dynamics of a lighter and darker tone of the line. Press lightly until the middle of the area, then, without lifting your hand, press harder. You'll get a continuous line of the same width with different tones (3).
You can also try combining pressure and tilts (4) , create a fine grid (5), draw arcs with different pressure at the beginning, middle, and end (6). Experiment and look for new combinations of arcs and straight lines.
 Now let's try practicing pressure. Enable shape dynamics for the line and Transfer. If you've chosen a graphite pencil for your work, then change the pressure more actively.
 Try changing the pressure: first press lightly on the stylus/pencil/material, then gradually increase the pressure and then release it again.
Draw a series of vertical parallel lines with the same spacing between them (1). After that, try changing the pressure more actively. Gradually, with each new line, apply less pressure, but at some point, increase the interval of strong pressure again — then our lines, drawn at equal distances from each other, will create a sinusoidal pattern (2).
Try changing the shape of the line and reducing the complexity of the pressure: draw identical arcs. At first, the pressure is light, it increases towards the center of the line, and then weakens towards the end. The line appears smoothly and fades away smoothly (3).
Try complicating the task and modeling more complex lines: an S-shaped line, a curl, continuous figure eights, and so on. Don't limit your imagination and don't forget about the pressure!
Try changing the pressure: first press lightly on the stylus/pencil/material, then gradually increase the pressure and then release it again.
Draw a series of vertical parallel lines with the same spacing between them (1). After that, try changing the pressure more actively. Gradually, with each new line, apply less pressure, but at some point, increase the interval of strong pressure again — then our lines, drawn at equal distances from each other, will create a sinusoidal pattern (2).
Try changing the shape of the line and reducing the complexity of the pressure: draw identical arcs. At first, the pressure is light, it increases towards the center of the line, and then weakens towards the end. The line appears smoothly and fades away smoothly (3).
Try complicating the task and modeling more complex lines: an S-shaped line, a curl, continuous figure eights, and so on. Don't limit your imagination and don't forget about the pressure!
 The second group of exercises will introduce you to perspective using simple primitives.
Make a plan!
`````` If you want to learn how to ride a bicycle, it's quite simple: you need a bicycle and practice. But in art, as they say, «there are no objective criteria». In fact, there are criteria, or rather, a plan. And it depends on your ultimate goal — what do you want to learn to draw? There are many directions in drawing: portrait, animalistic, concept, illustration, or still life, for example. Or maybe you are interested in a narrow field: learning to draw only in anime style or only horses. When we know the final point, we can adjust the path. It's also a good idea to figure out why you need this: a hobby for the soul, a professional занятие, a new profession, or skill enhancement. The next important point — is to choose the medium you will draw with: graphics, painting, or author's technique. Or perhaps there is an artist who draws in a special technique, and you want to learn to draw in that technique. The next point of the plan — is to determine the style. There are a lot of styles in traditional and digital drawing. It's great when you like a certain style. But if there is no such style, don't be discouraged: there are basic techniques for beginners, in the process of learning which you will learn about styles and be able to choose one for yourself or develop your own unique one. Drawing — is a field that requires a lot of time to learn. Your brain will learn to see and analyze reality in a non-standard way, and also teach your hands new motor skills and movements. Don't be upset if something doesn't work out the first time: learning takes different amounts of time — some people need a year, while others — three. For example, in art schools, courses are designed for four or six years. Drawing — is not making pies, and quick results may not happen, and that's completely normal. In drawing, as in sports, it's advisable to train regularly: the more often you have drawing sessions, the faster you will move towards your goal. Consistency is especially important in the beginning, when your mind and fingers are getting used to new knowledge and techniques. Remember: without regular practice, a new skill quickly weakens. There are simpler exercises of a mechanical nature, for example, to establish a confident stroke, an elegant line, or a beautiful отпечаток of a stroke. There are more complex ones — on imagination, concept development, harmonization of many elements of the drawing. It's necessary to alternate simple and complex exercises, so as not to overload the brain and not lose the desire to engage in creativity. Self-study — is a useful and valuable process. However, a professional's view, their advice, feedback on your work will help you progress faster in learning. You can choose a private artist or an art school — the choice of learning method depends on your individual characteristics, as does the format of learning (online or offline). Also, being in a team of like-minded people and communicating with masters enhances motivation: sometimes it disappears, and then support from the gurus is very important for its restoration. Go to exhibitions, visit galleries, look at art publications, read books on the history of art or articles about modern authors. The more you learn, the more you look, the faster you develop taste and understanding of current trends in the world of drawing. This is especially important to navigate the modern gallery world or the world of game development, illustration. This is what our plan will look like:- Set a goal ``````
- Answer the question, why do I want to draw?
- Choose a medium
- Determine your style
- Be prepared for a long journey
- Train regularly
- Alternate between simple and complex exercises
- Communicate and consult with professionals
- Develop your visual skills
Exercises and techniques to start drawing from scratch
Let's look at some useful exercises for beginner artists. The first group of exercises will help get to know and understand the medium you are going to work with.Techniques for understanding the medium
Try these exercises with different media: pencil, charcoal, marker, and in a graphic editor. The tasks will help you understand the specifics of the tool and feel how each medium differs from the other, what unique properties it has. Examples are done in Adobe Photoshop and Procreate.Line pressure training
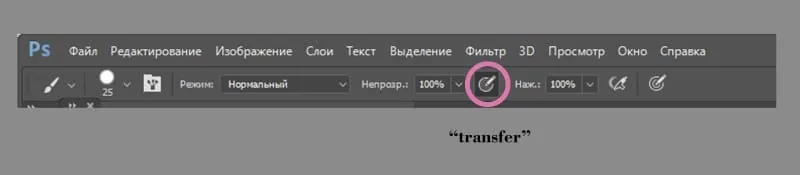
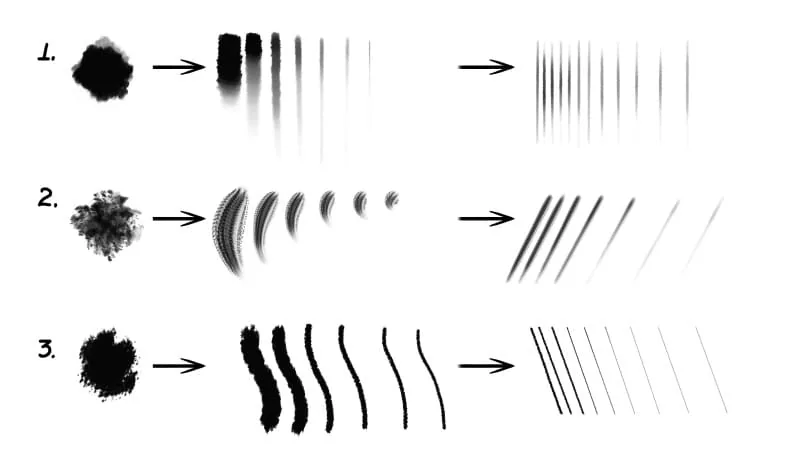
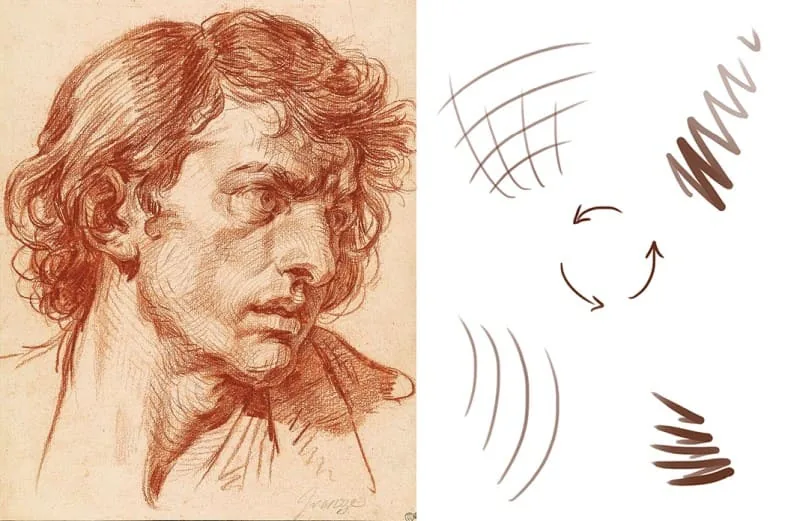
`````` Try working with a line of uniform pressure (without shape dynamics) and Transfer enabled. You can use a charcoal or graphite pencil with HB softness— it's universal and will prevent you from making lines that are either too thick and black or too thin and light.
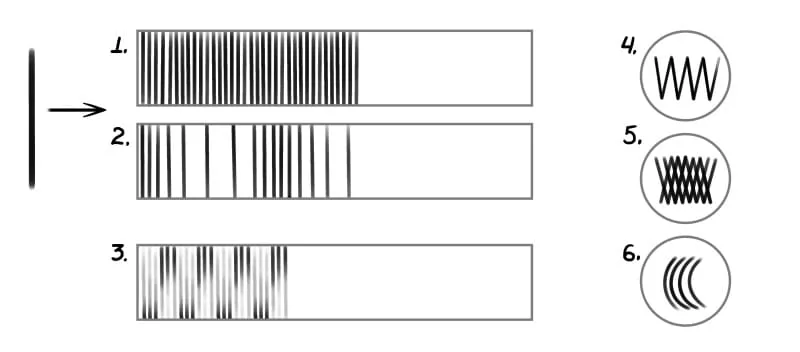
For convenience, limit the working area with a rectangle. Try making vertical strokes with uniform pressure. Try to keep the line width the same and the lines — parallel (1).
Then try setting the rhythm of the distances between the lines, increasing it and then decreasing it, while keeping the pressure the same (2).
Try changing the pressure — you'll get the dynamics of a lighter and darker tone of the line. Press lightly until the middle of the area, then, without lifting your hand, press harder. You'll get a continuous line of the same width with different tones (3).
You can also try combining pressure and tilts (4) , create a fine grid (5), draw arcs with different pressure at the beginning, middle, and end (6). Experiment and look for new combinations of arcs and straight lines.
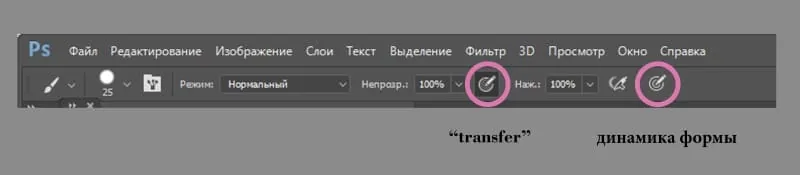
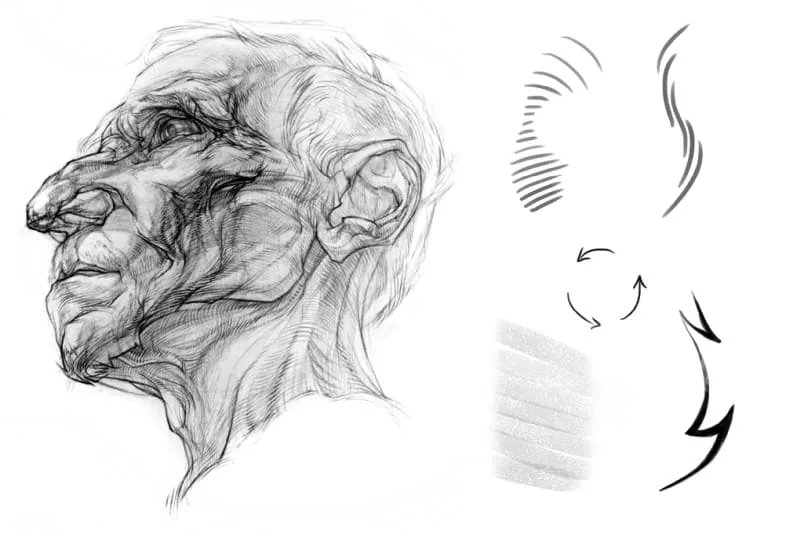
Now let's try practicing pressure. Enable shape dynamics for the line and Transfer. If you've chosen a graphite pencil for your work, then change the pressure more actively.
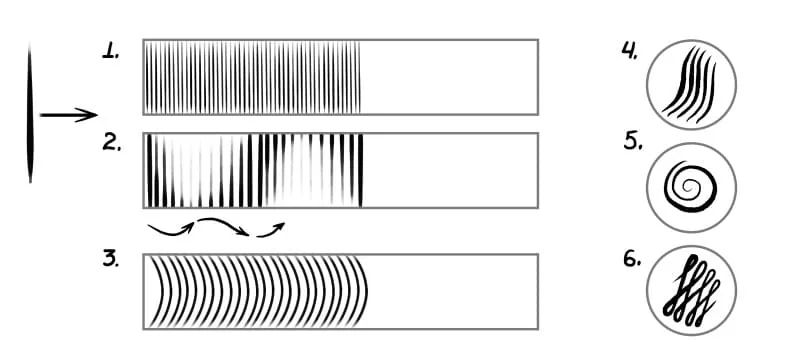
Try changing the pressure: first press lightly on the stylus/pencil/material, then gradually increase the pressure and then release it again.
Draw a series of vertical parallel lines with the same spacing between them (1). After that, try changing the pressure more actively. Gradually, with each new line, apply less pressure, but at some point, increase the interval of strong pressure again — then our lines, drawn at equal distances from each other, will create a sinusoidal pattern (2).
Try changing the shape of the line and reducing the complexity of the pressure: draw identical arcs. At first, the pressure is light, it increases towards the center of the line, and then weakens towards the end. The line appears smoothly and fades away smoothly (3).
Try complicating the task and modeling more complex lines: an S-shaped line, a curl, continuous figure eights, and so on. Don't limit your imagination and don't forget about the pressure!
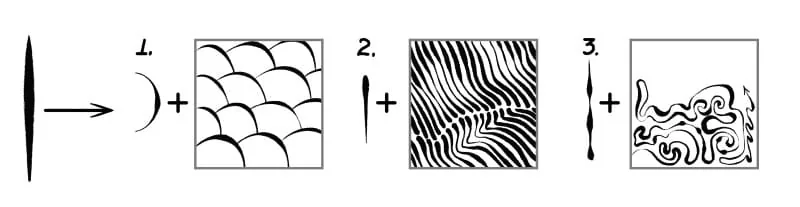
Filling shapes with hatching
`````` Drawing straight lines and filling in rows is quite simple. But what if we fill in a shape with hatching?—We will use pressure, dynamic shapes, and rhythms. To complete the exercise, choose any material that is convenient for you. Use familiar hatching techniques to fill in squares or circles (any shape). Try not just to shade, but to create an interesting system. Arcs with varying pressure create scales (1).Press hard at the beginning, ease up in the middle, and press harder at the end to create a droplet.Constantly change the interval between narrow and wide sections of the line to make the task more difficult or easier (2).Try filling in a square with a single line without lifting the stylus from the tablet. Constantly change the pressure and make it even more frivolous than in the previous square (3).This way, you can create a pattern consisting of curls and arcs.
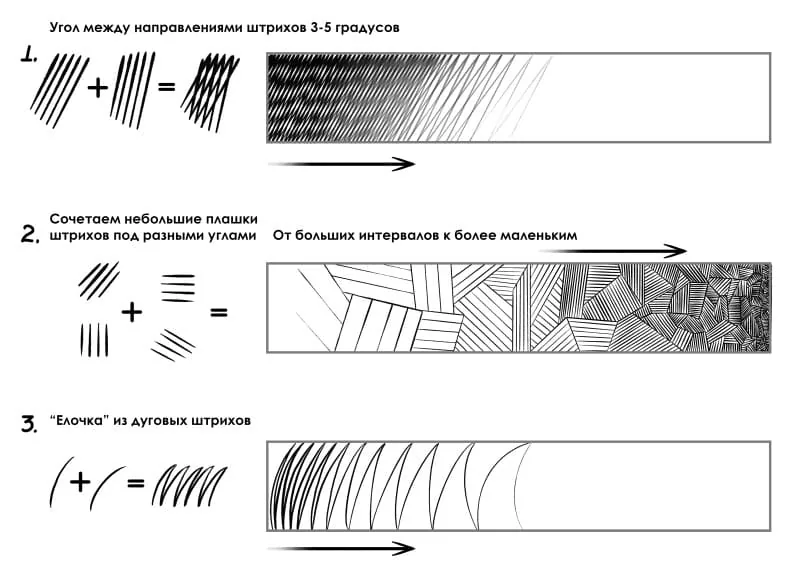
Hatching gradients
Create a tone gradientby combining hatching techniques. Apply the hatching very densely, then lighter and with more space between each other (1).Or you can try the opposite, going from light to dark shading. Start with a larger gap between the hatching, then gradually reduce it while increasing the pressure on the stroke (2). Experiment with the shape of the hatching, such as arc hatching (3).Improvise: you can do the exercise with curls, grids, or a combination of straight and arc hatching.
Shapes made of lines
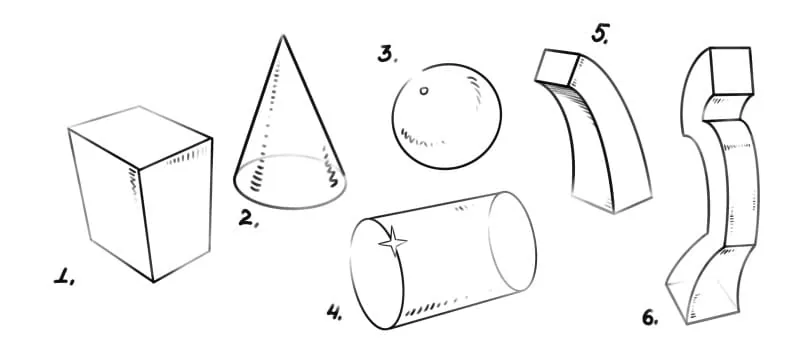
Try drawing the simplest shapes with a limited number of lines:one edge —one line. In some places, you can draw through the bases of the objects. Choose a variety of shapes: ordinary circles, cubes, pyramids (1,2,3,4),you can bend a parallelepiped in an arc (5),create abstract shapes (6).Add mini-hatching along the edges or around the shapes, mark the highlights —these small details can create a sense of volume.
Combining lines and hatching
Try making the hatching a continuation of the line—this will help us transform the line into a solid tone in the future. You can also apply this exercise when drawing geometric primitives, objects, animals, and even people. It's great to do it in different materials, not just with a pencil or stylus on a tablet.
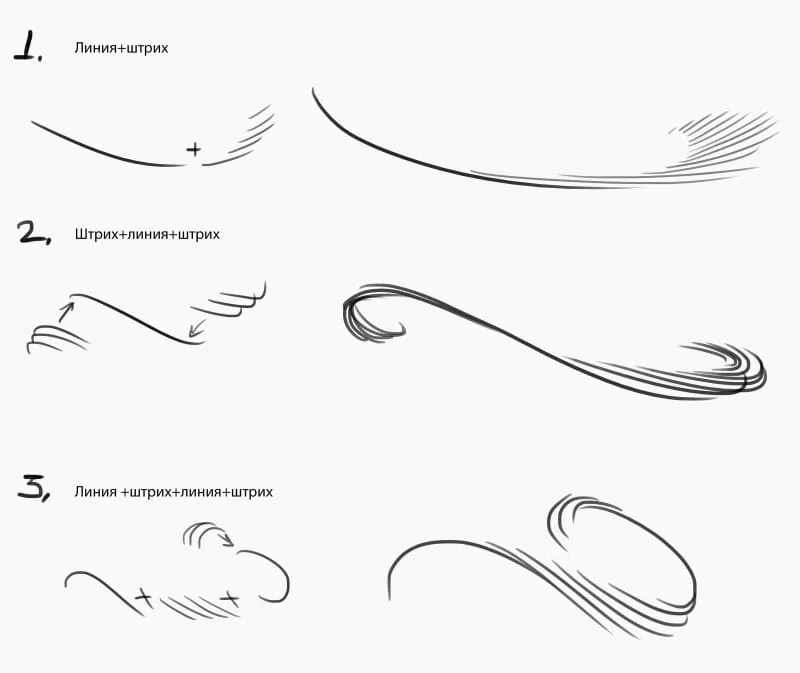
Textured strokes
`````` A line can become more interesting, not just a monotonous little stripe with the same fill. Take basic texture brushes in Photoshop or Procreate, or place different materials in front of you (pencil, brush, sanguine chalk, graphite bar, etc.). Draw a short stroke, then try to make a long one, then curve it. You will see how much more interesting the line's imprint has become, and how richer the graphics are. The variety of sizes and textures of the material will leave strokes and marks that are not alike. In examples 1,2,3 each line and its movements are unique, both in large size and in fine lines.
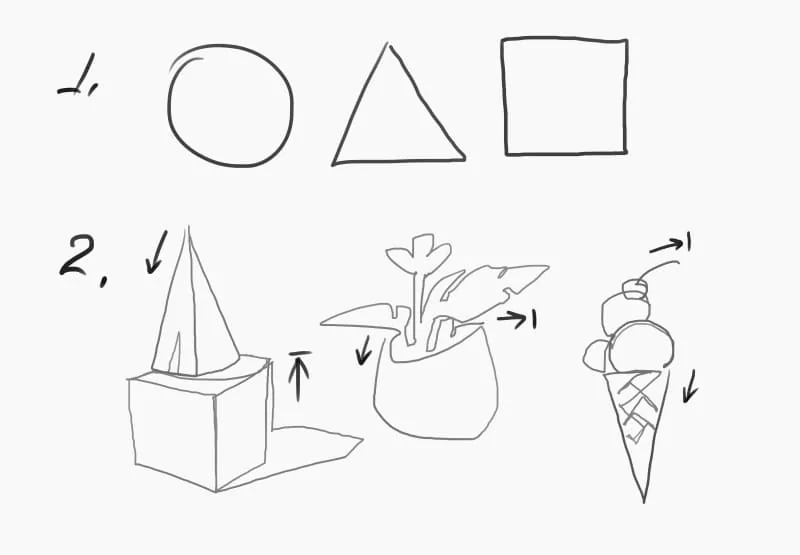
Drawing with one line
A very useful exercise for hand control that will make your line clean and bold. Try starting with simple squares, circles, triangles. Draw a cone, cube, or ball with one line. Without lifting the line, let it flow as its own or a cast shadow on the objects, duplicating their contours. The main thing is not to lift the stylus and get a recognizable silhouette in the end. Choose simple objects: ice cream, mug, potted plant, scissors, Christmas tree, etc.).
The second group of exercises will introduce you to perspective using simple primitives.
Learning perspective on simple primitives
Related courses
All courses
from 3 900 ₽
-57%
Book illustration: The first page page
9 000 ₽3 900 ₽
Learn more

from 12 000 ₽
-20%
Векторная иллюстрация для начинающих
15 000 ₽12 000 ₽
Learn more

from 4 500 ₽
-55%
Character Concept: My First Hero
10 000 ₽4 500 ₽
Learn more
It's better to start this exercise with simple geometric shapes, such as a cube. We live in a perspective world, where non-perspective cubes upset artists. For the exercise, let's take three types of reductions: with one, two, and three vanishing points.
 The third group of exercises is devoted to proportions and how to find them.

 Step 2
Mark the edges of our future cube with more pressure.
Step 2
Mark the edges of our future cube with more pressure.
 Step 3
Round the edges of our cube — this will make the turns more interesting. With small strokes, we will indicate hints of the turning faces.
Step 3
Round the edges of our cube — this will make the turns more interesting. With small strokes, we will indicate hints of the turning faces.
 Step 4
Indicate the light source on the left and imagine that it is slightly in front of our object. With a wider stroke, shade the shadowed faces. Hold the pencil or stylus more horizontally and shade with the side surface of the lead/the end of the stylus — this way we will get a gentle and wide stroke.
Not all brushes in digital editors will give such an imprint when you change the position of the stylus: in this case, simply increase the size of the brush and with a weaker pressure, "stroke" the cube in the shadows.
With thin strokes, we will add a slight emphasis on the central protruding face. Try not to make the strokes into a grid at 90 degrees: leave the maximum angle between them about five degrees — this way the style of the stroke will look more elegant.
Step 4
Indicate the light source on the left and imagine that it is slightly in front of our object. With a wider stroke, shade the shadowed faces. Hold the pencil or stylus more horizontally and shade with the side surface of the lead/the end of the stylus — this way we will get a gentle and wide stroke.
Not all brushes in digital editors will give such an imprint when you change the position of the stylus: in this case, simply increase the size of the brush and with a weaker pressure, "stroke" the cube in the shadows.
With thin strokes, we will add a slight emphasis on the central protruding face. Try not to make the strokes into a grid at 90 degrees: leave the maximum angle between them about five degrees — this way the style of the stroke will look more elegant.
 Step 5
With light strokes, draw lines of rays through the corners of the cube and mark the shadow of the object on the surface. Lightly shade it with wide movements, like the cube at the beginning. We try to direct the hatching in the direction of the strokes on the cube so that the "patchwork quilt" effect does not appear. We will thicken the tone of the right vertical face of the cube a little more.
Step 5
With light strokes, draw lines of rays through the corners of the cube and mark the shadow of the object on the surface. Lightly shade it with wide movements, like the cube at the beginning. We try to direct the hatching in the direction of the strokes on the cube so that the "patchwork quilt" effect does not appear. We will thicken the tone of the right vertical face of the cube a little more.
 Step 6
Darken the shadow closer to the cube with light strokes. Near the base of the cube, we create ambient occlusion, that is, darkening the space next to the object.
Step 6
Darken the shadow closer to the cube with light strokes. Near the base of the cube, we create ambient occlusion, that is, darkening the space next to the object.
 Step 7
Erase or turn off the layers with auxiliary lines and leave only the cube with the shadow. The cube sketch is ready!
Step 7
Erase or turn off the layers with auxiliary lines and leave only the cube with the shadow. The cube sketch is ready!
 Now let's construct a sphere and make it volumetric.
 Step 3
Using a more noticeable line, we outline the silhouette of the future sphere. We erase the auxiliary lines.
Step 4
Let's designate the light source and its direction. On the sphere, we note the highlight and the self-shadow of the "crescent". With the side edge of the pencil, we shade the shadow with strokes in one direction, and also apply light strokes around the highlight to set it off from the rest of the illuminated part.
Step 3
Using a more noticeable line, we outline the silhouette of the future sphere. We erase the auxiliary lines.
Step 4
Let's designate the light source and its direction. On the sphere, we note the highlight and the self-shadow of the "crescent". With the side edge of the pencil, we shade the shadow with strokes in one direction, and also apply light strokes around the highlight to set it off from the rest of the illuminated part.
 Step 5
With light, neat hatching in the direction of the movement of the boundary of the light and shadow, we set the tonal stretch. We move from weak strokes in the light to more contrasting ones, and then disperse them again in the shadows. On the illuminated part, we also set the penumbra with light strokes to feel the turn of the form. The main thing is to leave a light strip between the silhouette line and the hatching in the shadow — this is the reflex.
Step 6
We shade the self-shadow: with longitudinal strokes along the shape of the sphere, we lead the hatching to the light part — this technique will help to show the roundness of the sphere and set a soft half-light. Then the highlight will become the brightest spot on the object.
Step 5
With light, neat hatching in the direction of the movement of the boundary of the light and shadow, we set the tonal stretch. We move from weak strokes in the light to more contrasting ones, and then disperse them again in the shadows. On the illuminated part, we also set the penumbra with light strokes to feel the turn of the form. The main thing is to leave a light strip between the silhouette line and the hatching in the shadow — this is the reflex.
Step 6
We shade the self-shadow: with longitudinal strokes along the shape of the sphere, we lead the hatching to the light part — this technique will help to show the roundness of the sphere and set a soft half-light. Then the highlight will become the brightest spot on the object.
 Step 7
Using auxiliary lines, we designate the trajectory of the falling rays of light. We mark the shadow and tone it with light, wide strokes. We maintain the slope of the strokes used on the sphere.
Step 8
We darken the cast shadow under the sphere, and lighten its right part to create the feeling of depth in the space. The sphere is ready!
Step 7
Using auxiliary lines, we designate the trajectory of the falling rays of light. We mark the shadow and tone it with light, wide strokes. We maintain the slope of the strokes used on the sphere.
Step 8
We darken the cast shadow under the sphere, and lighten its right part to create the feeling of depth in the space. The sphere is ready!
 Step 3
In the right vertical face, we will make a small square recess in the center. The lines of the niche should repeat the perspective reduction of the entire cube to look convincing.
Step 4
We will insert a cylinder into our cube also in the center. We will embed it by drawing an ellipse from a parallelogram, as in the example of drawing a circle from a square. We will extrude it by two depths of the recess on the right to avoid a symmetrical feeling.
Step 3
In the right vertical face, we will make a small square recess in the center. The lines of the niche should repeat the perspective reduction of the entire cube to look convincing.
Step 4
We will insert a cylinder into our cube also in the center. We will embed it by drawing an ellipse from a parallelogram, as in the example of drawing a circle from a square. We will extrude it by two depths of the recess on the right to avoid a symmetrical feeling.
 Step 5
We will change the top face, but we will not make recesses or extrude shapes from it, but change its configuration itself. We will widen the base of the face and give it thickness. We will do it unevenly: we will raise the left corners higher, place the right ones lower — a bevel will be obtained.
Step 6
We erase the auxiliary construction lines and give volume to our new elements. We shade the cylinder with arcuate movements along the shape of the section: we take its left edge into a light shadow, the same in tone as the left face of the cube.
We will slightly shade the largest visible face of the niche on the right with a shadow from above to give the feeling of depth. We will do the same with its right narrow wall. We will distribute the tone over the top element, as over the main body of the cube, place the cast shadows from the overhanging edge of the cylinder and lightly outline the shadow of the cube.
We use three types of hatching: wide light ones with the end of the pencil, thin arcuate ones and small straight notches at the turns. Our complex geometric shape is ready!
Step 5
We will change the top face, but we will not make recesses or extrude shapes from it, but change its configuration itself. We will widen the base of the face and give it thickness. We will do it unevenly: we will raise the left corners higher, place the right ones lower — a bevel will be obtained.
Step 6
We erase the auxiliary construction lines and give volume to our new elements. We shade the cylinder with arcuate movements along the shape of the section: we take its left edge into a light shadow, the same in tone as the left face of the cube.
We will slightly shade the largest visible face of the niche on the right with a shadow from above to give the feeling of depth. We will do the same with its right narrow wall. We will distribute the tone over the top element, as over the main body of the cube, place the cast shadows from the overhanging edge of the cylinder and lightly outline the shadow of the cube.
We use three types of hatching: wide light ones with the end of the pencil, thin arcuate ones and small straight notches at the turns. Our complex geometric shape is ready!
 The school's channel has a detailed video lesson on how to create complex composite objects:
 Step 3
Erase unnecessary details and clarify the final forms. Create a niche for the entrance and mark the step to it under the canopy with thin lines. Clarify the details of the sign, make the bracket line thicker, add a slanted crossbar. Inside the sign, mark the frame with thin lines and attach it to the bracket with a couple of triangles.
In the window on the right, draw the blinds stripes with louder lines. Draw the wave of the slate — pull the sine wave of the line down and up to the notches.
Step 3
Erase unnecessary details and clarify the final forms. Create a niche for the entrance and mark the step to it under the canopy with thin lines. Clarify the details of the sign, make the bracket line thicker, add a slanted crossbar. Inside the sign, mark the frame with thin lines and attach it to the bracket with a couple of triangles.
In the window on the right, draw the blinds stripes with louder lines. Draw the wave of the slate — pull the sine wave of the line down and up to the notches.
 Step 4
Erase unnecessary auxiliary lines, clarify the new forms of the canopy, window, roof. Try to make the lines in the foreground thicker and more saturated, and in the background — lighter, without strong pressure.
Step 5
Let's add some small details: shadows falling under the slate and longitudinal shadows in its differences, a shadow in the window between the blinds stripes, texture of sheets on the protruding part of the eave. Also, with very light strokes, we will indicate the bushes and the path to our house in more detail.
Our transformation is complete, and the sketch by imagination is ready!
Step 4
Erase unnecessary auxiliary lines, clarify the new forms of the canopy, window, roof. Try to make the lines in the foreground thicker and more saturated, and in the background — lighter, without strong pressure.
Step 5
Let's add some small details: shadows falling under the slate and longitudinal shadows in its differences, a shadow in the window between the blinds stripes, texture of sheets on the protruding part of the eave. Also, with very light strokes, we will indicate the bushes and the path to our house in more detail.
Our transformation is complete, and the sketch by imagination is ready!
 Step 2
Turn the ellipses into more bionic curls of the wood texture. Mark the cracks.
Step 3
Make the contour thicker and add cracks and holes — this will make the silhouette more interesting.
Step 2
Turn the ellipses into more bionic curls of the wood texture. Mark the cracks.
Step 3
Make the contour thicker and add cracks and holes — this will make the silhouette more interesting.
 Step 4
Draw the final curls, combine the line that turns into a stroke — this will enrich our texture.
Step 5
Fill the background with very fine strokes. The stroke here — are the fibers of the wood. Try to carefully fill the areas following the movement of the curls.
Rotate the sheet/canvas to make it comfortable for your hand. Use arc strokes, short and fine, and long and fine.
Step 6
Add additional cracks with a thicker line — you don't need many of them, don't overload the work. Vary the size: small thick ones, thin long ones, medium ones, because the same scale of cracks will create a monotonous boring rhythm.
Step 4
Draw the final curls, combine the line that turns into a stroke — this will enrich our texture.
Step 5
Fill the background with very fine strokes. The stroke here — are the fibers of the wood. Try to carefully fill the areas following the movement of the curls.
Rotate the sheet/canvas to make it comfortable for your hand. Use arc strokes, short and fine, and long and fine.
Step 6
Add additional cracks with a thicker line — you don't need many of them, don't overload the work. Vary the size: small thick ones, thin long ones, medium ones, because the same scale of cracks will create a monotonous boring rhythm.
 Step 7
Darken some areas and add акцентные small strokes at the turns — this technique will give a glossy feel. A darker tone will highlight the curls, and we will get a wood texture. Hurray!
Step 7
Darken some areas and add акцентные small strokes at the turns — this technique will give a glossy feel. A darker tone will highlight the curls, and we will get a wood texture. Hurray!
 Step 2
In the outlines of the resulting spot, we look for images of objects, animals or plants. For example, here the contours of the resulting spot resemble a sheep — this correspondence was not предполагалась in advance, the imagination suggested the image.
Create a new layer. On it, with a light rough line, draw the contour, muzzle, ears, and legs. If you are working with traditional materials, then outline the silhouette with translucent lines directly on the spot.
Step 3
Clarify the contour with a thick line on a new layer, use semicircular movements to depict the wool. Draw the eyes, eyebrows, and nose with a couple of strokes. You can go beyond the boundaries of the spot if necessary. Delete the rough line or erase it with an eraser.
Step 4
Lighten the layer with the spot: it is too bright, and strokes and lines will be poorly visible on it. Add neat uniform shading to show shadows and turns of the forms.
We got a nice sketch of a sheep from an ordinary spot!
Step 2
In the outlines of the resulting spot, we look for images of objects, animals or plants. For example, here the contours of the resulting spot resemble a sheep — this correspondence was not предполагалась in advance, the imagination suggested the image.
Create a new layer. On it, with a light rough line, draw the contour, muzzle, ears, and legs. If you are working with traditional materials, then outline the silhouette with translucent lines directly on the spot.
Step 3
Clarify the contour with a thick line on a new layer, use semicircular movements to depict the wool. Draw the eyes, eyebrows, and nose with a couple of strokes. You can go beyond the boundaries of the spot if necessary. Delete the rough line or erase it with an eraser.
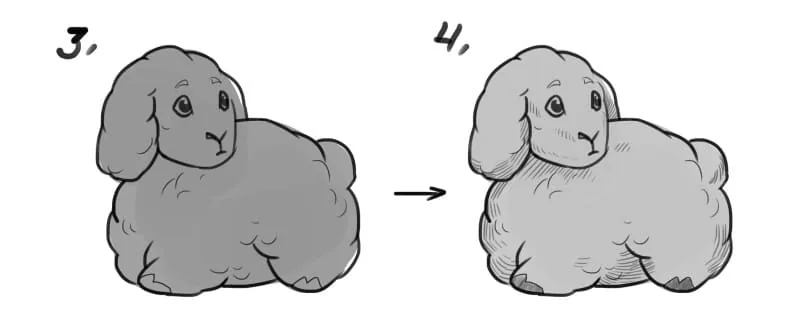
Step 4
Lighten the layer with the spot: it is too bright, and strokes and lines will be poorly visible on it. Add neat uniform shading to show shadows and turns of the forms.
We got a nice sketch of a sheep from an ordinary spot!
 Step 3
We refine the silhouette of the leaves, handles, sharpen the turns to add dynamics. We make a hole in the leaf and with a couple of strokes indicate the turns of the shape and highlights. Make sure that the line alternates between thinning and widening with pressure.
Step 4
We clean our line, strengthen the thickness of the lines in the most interesting places, erase the excess. We add glaze with a curved line and lightly shade it evenly. We put light strokes to suggest shadows on the handle, neck, turns of the leaves and the belly.
The simple sketch is ready, we will not develop it further. Let's move on to the background.
Step 3
We refine the silhouette of the leaves, handles, sharpen the turns to add dynamics. We make a hole in the leaf and with a couple of strokes indicate the turns of the shape and highlights. Make sure that the line alternates between thinning and widening with pressure.
Step 4
We clean our line, strengthen the thickness of the lines in the most interesting places, erase the excess. We add glaze with a curved line and lightly shade it evenly. We put light strokes to suggest shadows on the handle, neck, turns of the leaves and the belly.
The simple sketch is ready, we will not develop it further. Let's move on to the background.
 Step 5
Let's darken the tone closer to our subject. We place strokes, pushing them with a gradient stretch from the edge and repeating its movement: the closer to it, the denser the strokes and the stronger the pressure, and the farther, the lighter, until it dissolves into the white sheet. With this technique, we seem to embrace our sketch and focus attention on it.
We leave a void between the strokes and the pot. We will not completely shade along the contour, leaving some blank space at the bottom of the sheet.
Step 6
Let's add the surface on which the pot will stand — let it be boards. We draw lines for them, taking into account perspective reductions, outline the texture of the wood, but do not complicate it, so as not to divert attention from the flower.
We got a sketch with a graphic background. Our strokes have enriched the sketch, set two types of tone and even the depth of space!
Step 5
Let's darken the tone closer to our subject. We place strokes, pushing them with a gradient stretch from the edge and repeating its movement: the closer to it, the denser the strokes and the stronger the pressure, and the farther, the lighter, until it dissolves into the white sheet. With this technique, we seem to embrace our sketch and focus attention on it.
We leave a void between the strokes and the pot. We will not completely shade along the contour, leaving some blank space at the bottom of the sheet.
Step 6
Let's add the surface on which the pot will stand — let it be boards. We draw lines for them, taking into account perspective reductions, outline the texture of the wood, but do not complicate it, so as not to divert attention from the flower.
We got a sketch with a graphic background. Our strokes have enriched the sketch, set two types of tone and even the depth of space!
 Step 2
We place the final silhouette of the fish over the sketch using dynamic, clear lines. We erase the initial lines, refine the shape to show the volume, transform the belly from a ball into a puffed, slightly square volume. We find the edge of the turn on the back and tail, the thickness on the head of the fish. We show the turns with lines and light strokes.
Step 3
We fill in the edges with shadow using a thin, light stroke. All edges facing downwards are shaded — we shade them. The fins are a thin structure similar to fabric. We use hatching to show its bends — this will give a feeling of lightness and airiness.
Step 2
We place the final silhouette of the fish over the sketch using dynamic, clear lines. We erase the initial lines, refine the shape to show the volume, transform the belly from a ball into a puffed, slightly square volume. We find the edge of the turn on the back and tail, the thickness on the head of the fish. We show the turns with lines and light strokes.
Step 3
We fill in the edges with shadow using a thin, light stroke. All edges facing downwards are shaded — we shade them. The fins are a thin structure similar to fabric. We use hatching to show its bends — this will give a feeling of lightness and airiness.
 Step 4
We add a few scales on the belly and tail. We make them as simple arc lines as possible, add a bit of shading to create a shiny effect. On the turning edges, we strengthen the most accentuated strokes. We clean up the fish's eye, leaving only a couple of lines. We add the final details — bubbles around for ambiance.
For more details on how to sketch animals, watch the video lesson by artist Anna Pacha:
Step 4
We add a few scales on the belly and tail. We make them as simple arc lines as possible, add a bit of shading to create a shiny effect. On the turning edges, we strengthen the most accentuated strokes. We clean up the fish's eye, leaving only a couple of lines. We add the final details — bubbles around for ambiance.
For more details on how to sketch animals, watch the video lesson by artist Anna Pacha:
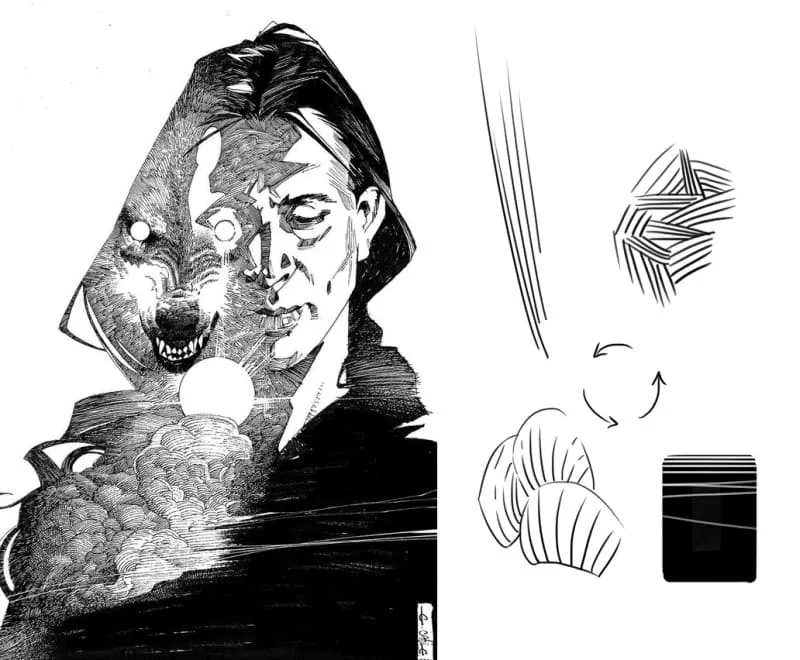 In the work of artist Evan Cagle we see a combination of some engraved hatching and dense filling. If you look closely at his work, you can see that the line is sometimes inhomogeneous and breaks into a dotted line. It creates a feeling of patches or mosaic tesserae, from which the illustration is assembled. The filling along the edges turns into hatching, which gives a smooth edge in some places.
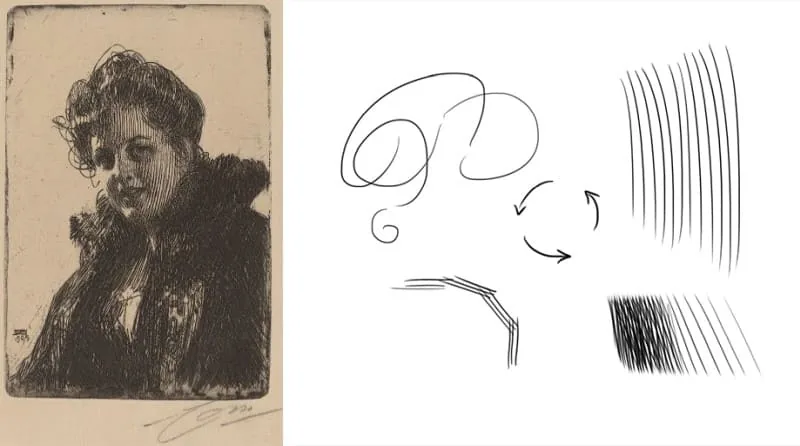 Anders Zorn combines long parallel monotonous strokes with frivolous curls, and also adds fine hatching at a different angle. A denser tone is created from such hatching.
 Jean-Baptiste Greuze applied strokes across the section of the form — it looked like a mesh. The strict homogeneous mass of such techniques was interrupted by more picturesque and thick systems of zigzags and ticks, linear curls are visible in some places. The artist also varied the pressure and obtained thin and thick strokes.
 In the portrait created by Yelizaveta Parfenova, not only short thin strokes and turn marks are used, but also shading. A gray tone of half-shadows is created with wide strokes. The line of the border is very expressive and looks like lightning.
Don't forget that different materials provide different effects and possibilities. Try drawing with charcoal, sanguine, pencil, pen and ink, marker, stylus, feel what suits you. Combine different techniques, but don't mix all the techniques you know, otherwise it will turn out to be kitsch.
In the portrait created by Yelizaveta Parfenova, not only short thin strokes and turn marks are used, but also shading. A gray tone of half-shadows is created with wide strokes. The line of the border is very expressive and looks like lightning.
Don't forget that different materials provide different effects and possibilities. Try drawing with charcoal, sanguine, pencil, pen and ink, marker, stylus, feel what suits you. Combine different techniques, but don't mix all the techniques you know, otherwise it will turn out to be kitsch.
 Author: Darya Kostomarova
Course: Drawing Basic
In the course, we study key laws of perspective, composition, harmony, and proportions. With knowledge and mastery of these fundamentals, your drawing will become stronger and more confident. The course develops an understanding of stylization and its areas of use, because drawing is needed not only for academic school but also in animation, game development, post-production, and illustration.
Author: Darya Kostomarova
Course: Drawing Basic
In the course, we study key laws of perspective, composition, harmony, and proportions. With knowledge and mastery of these fundamentals, your drawing will become stronger and more confident. The course develops an understanding of stylization and its areas of use, because drawing is needed not only for academic school but also in animation, game development, post-production, and illustration.
 Author: Yan Borodetsky
Course: Drawing Basic
Author: Yan Borodetsky
Course: Drawing Basic
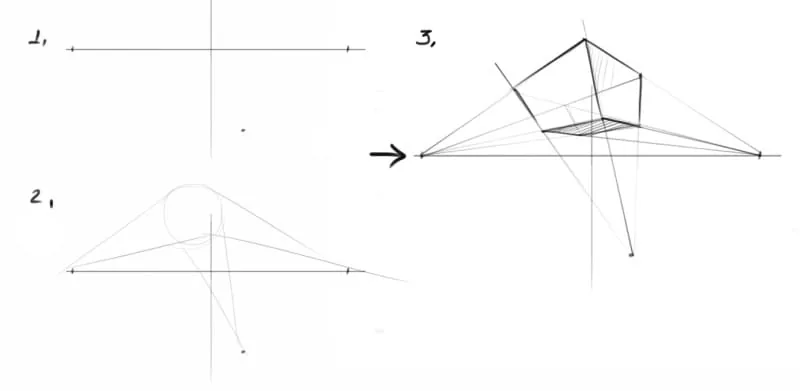
Perspective with one vanishing point
We place a horizontal axis and a point on it, to which all the guides will converge (1). We play with the location of the cube: raise it higher, move it closer, push it strongly to the side and down from this point (2). We draw the front and back faces as perfect squares from the frontal angle. We draw lines from the corners to the vanishing point (3), and we get a cube from different angles.
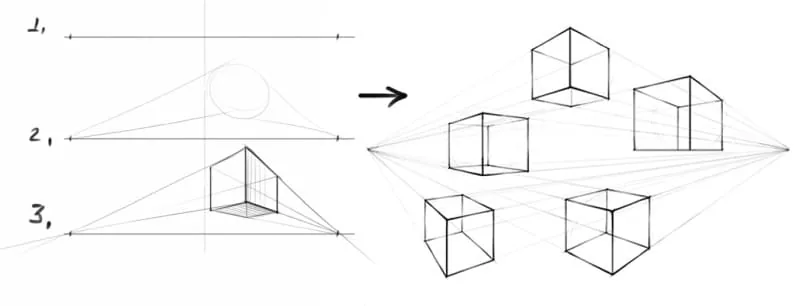
Perspective with two vanishing points
We draw a horizontal axis, place a vertical axis in the center (1). You can move the object relative to it: it's an auxiliary guide. We set the vanishing points to the left and right at equal distances (2). You can experiment with the distance of the vanishing points from the center, make them asymmetric — this will give interesting and dynamic reductions of the object. We mark the corners of the cube and draw lines from them to the vanishing points (3).
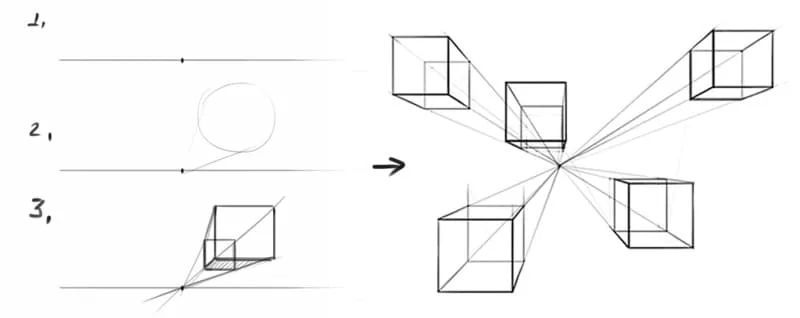
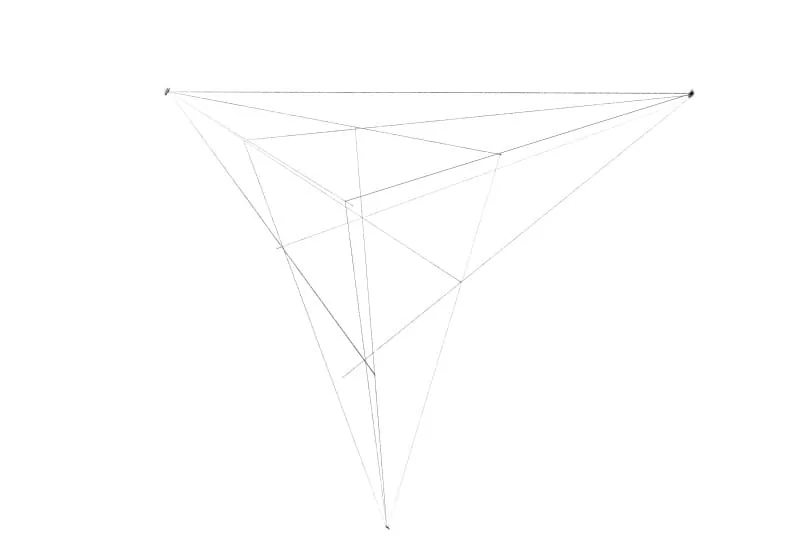
Perspective with three vanishing points
``` Draw a horizontal axis, mark the axis and two vanishing points on it (1). Add a third point from below and outline the location of the object (2). Mark the corners and draw lines from them to the vanishing points horizontally and downwards (3).
The third group of exercises is devoted to proportions and how to find them.
Proportions and how to find them
We often draw what we see. We can be greatly inspired by a cup of coffee with a lemon tart on a saucer, or a bouquet of flowers, or a stranger's profile in the subway: we want to take out a notebook, a pencil and quickly sketch it. But it's not possible to get into the silhouette right away. To train your eyes and hands to instantly capture the character, you need to understand how to find proportions. Try to break down a complex shape (1) into simple circles, rectangles, triangles. Don't pay attention to small complex details — simplify everything to a scheme (2). Find the central axes vertically and horizontally, limit the contour with the axes. See if the elements of the object fall on half height, quarters or eighths (3).Simplifying and finding axes, dividing shapes into multiples will help you find proportional relationships.
Author: Vera Lositskaya Course: Drawing
Copy practice
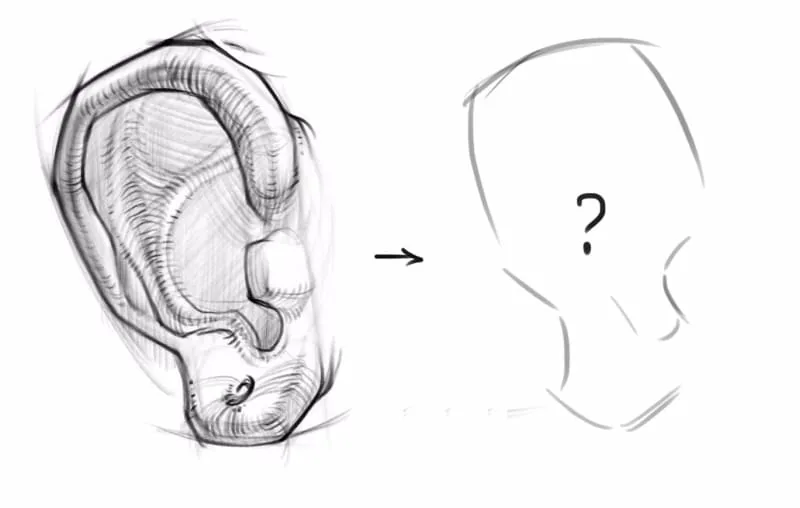
It's very useful to practice by copying the work of other artists. By copying, you see the ready-made solution of how to draw, what technique and material to use. It's convenient if you see not just the result, but the drawing process itself. On our YouTube channel, there are similar tutorial videos: for example, a video about drawing a very architectural and intricate part of the human body — the ear. It consists of simple primitives, and it's great to practice finding proportions, line, and stroke. There, on our YouTube channel, you will find many other useful video lessons on drawing the human body, geometric shapes, animals, and plants.
Sketching
`````` It's useful to give yourself the task of quick drawing: you can limit yourself to 30 minutes (15/7/5/2 minutes). The less time you have, the faster you'll have to draw, depicting fewer details. Start with simpler objects: a jar of cream, a box, a mug, or a stylus. Sketch a simple shape, and then complicate it with details and silhouette. This exercise helps to sketch proportionally completely different shapes from our surroundings at great speed. Author: Firsova Yulia Course: Sketching
How to draw three-dimensional shapes
Drawing lesson 1. Drawing a cube
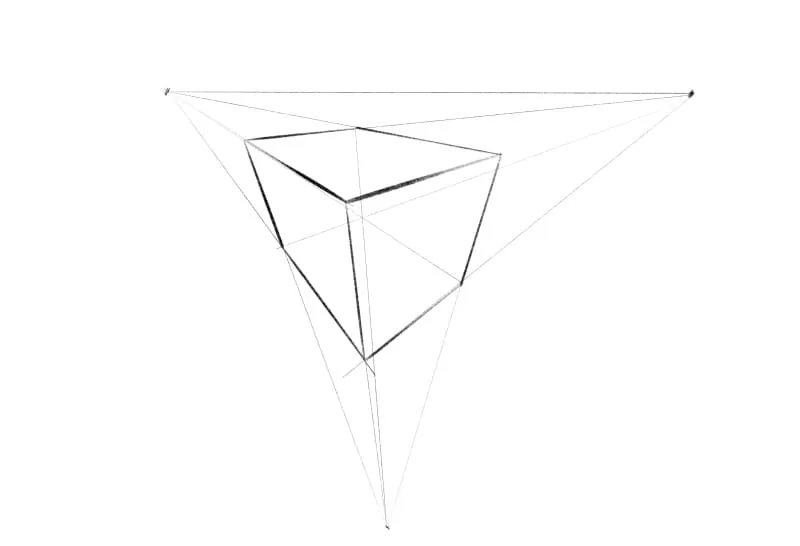
`````` Step 1 To draw a cube, we need to mark the horizon line and three vanishing points. Let's try to make the visible shortenings more dynamic. Draw lines from the vanishing points, find the location of the future cube. Draw the lines very lightly and thinly, as we will erase them later.
Step 2
Mark the edges of our future cube with more pressure.
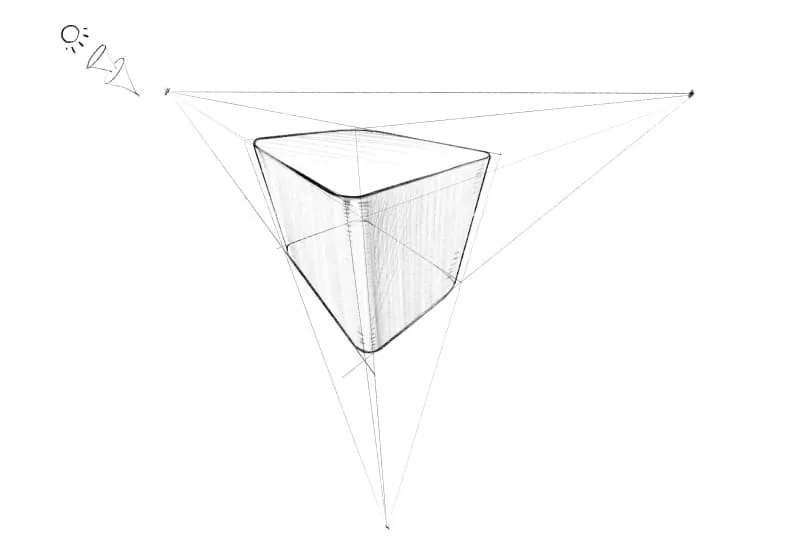
Step 3
Round the edges of our cube — this will make the turns more interesting. With small strokes, we will indicate hints of the turning faces.
Step 4
Indicate the light source on the left and imagine that it is slightly in front of our object. With a wider stroke, shade the shadowed faces. Hold the pencil or stylus more horizontally and shade with the side surface of the lead/the end of the stylus — this way we will get a gentle and wide stroke.
Not all brushes in digital editors will give such an imprint when you change the position of the stylus: in this case, simply increase the size of the brush and with a weaker pressure, "stroke" the cube in the shadows.
With thin strokes, we will add a slight emphasis on the central protruding face. Try not to make the strokes into a grid at 90 degrees: leave the maximum angle between them about five degrees — this way the style of the stroke will look more elegant.
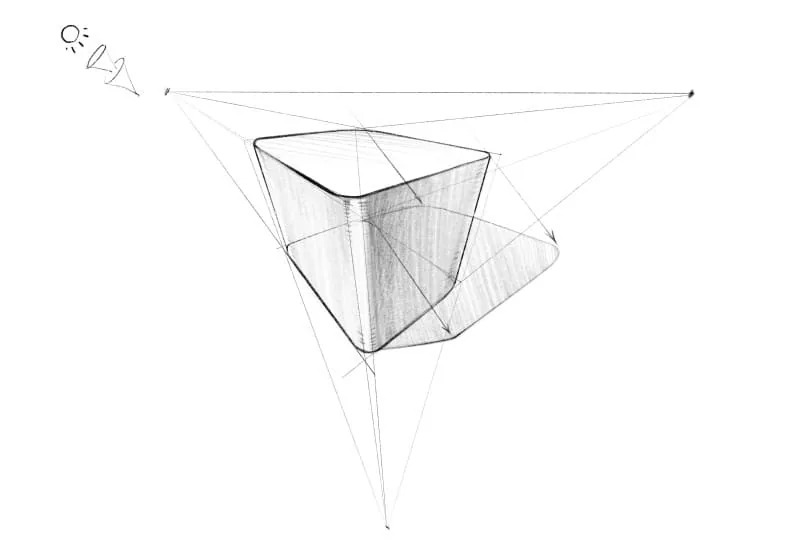
Step 5
With light strokes, draw lines of rays through the corners of the cube and mark the shadow of the object on the surface. Lightly shade it with wide movements, like the cube at the beginning. We try to direct the hatching in the direction of the strokes on the cube so that the "patchwork quilt" effect does not appear. We will thicken the tone of the right vertical face of the cube a little more.
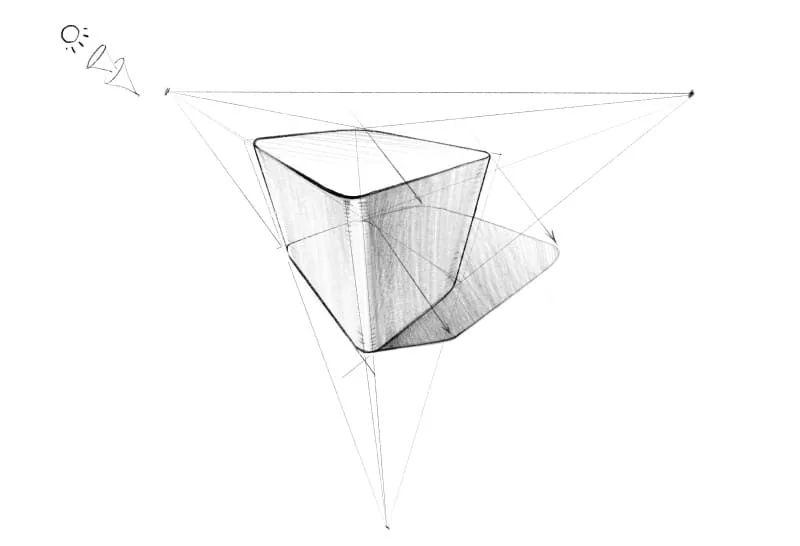
Step 6
Darken the shadow closer to the cube with light strokes. Near the base of the cube, we create ambient occlusion, that is, darkening the space next to the object.
Step 7
Erase or turn off the layers with auxiliary lines and leave only the cube with the shadow. The cube sketch is ready!
Now let's construct a sphere and make it volumetric.
Drawing lesson 2. Drawing a sphere
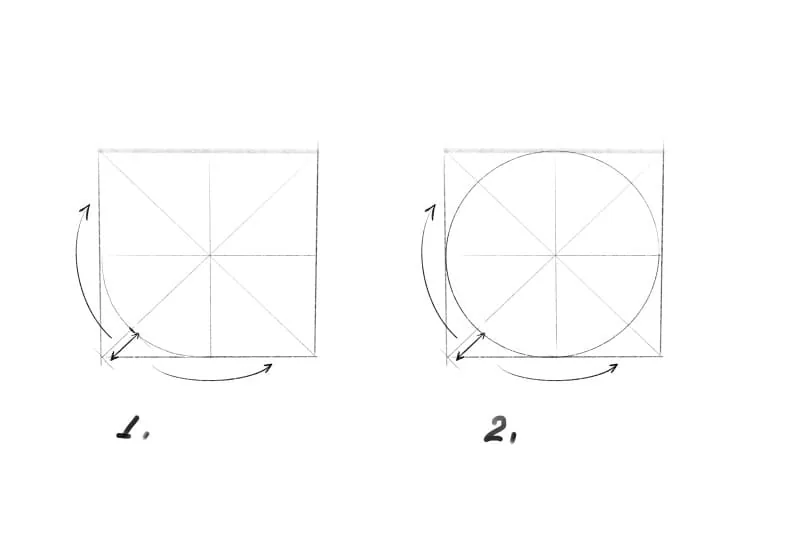
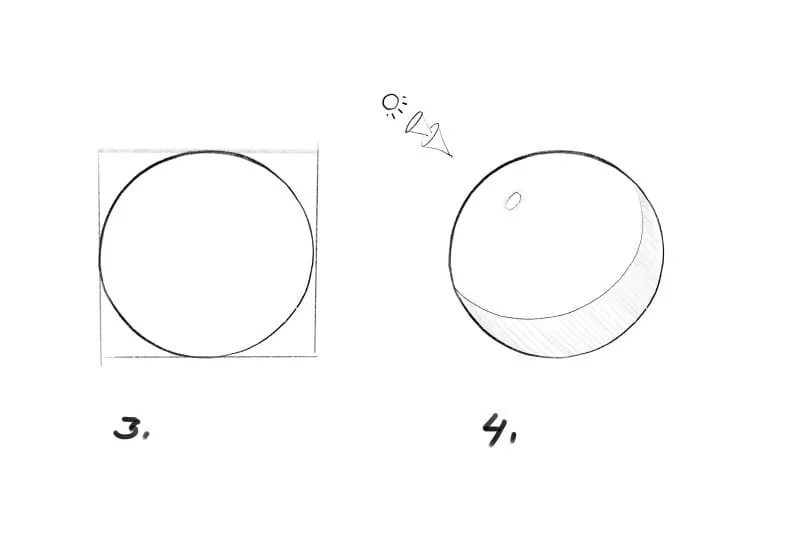
`````` Step 1 Draw light lines to create a square, then draw vertical, horizontal axes and diagonals in it — they will help us construct a circle as accurately as possible.—they will help to build the circle as accurately as possible. We draw an arc between the points on the edges of the cube from its axes. The distance from the corner to the arc will be the same along all diagonals: we can mark these lengths and draw arcs with light lines between the found points. Step 2 We get a smooth circle.
Step 3
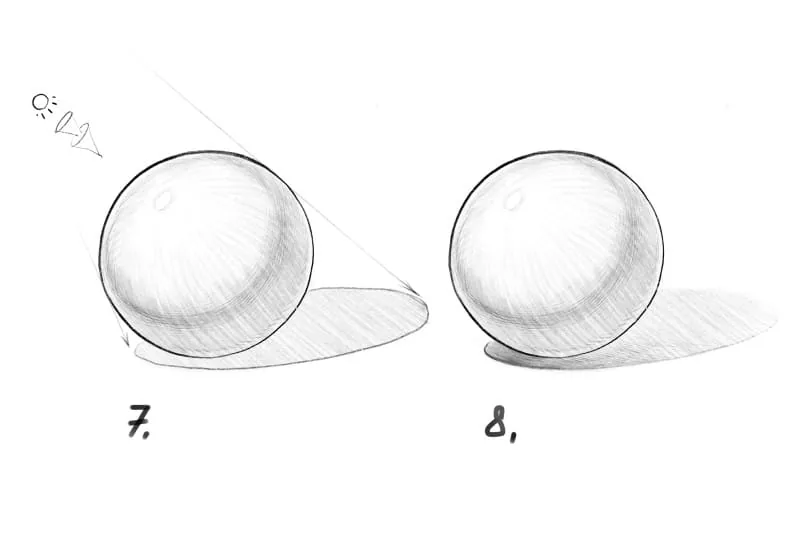
Using a more noticeable line, we outline the silhouette of the future sphere. We erase the auxiliary lines.
Step 4
Let's designate the light source and its direction. On the sphere, we note the highlight and the self-shadow of the "crescent". With the side edge of the pencil, we shade the shadow with strokes in one direction, and also apply light strokes around the highlight to set it off from the rest of the illuminated part.
Step 5
With light, neat hatching in the direction of the movement of the boundary of the light and shadow, we set the tonal stretch. We move from weak strokes in the light to more contrasting ones, and then disperse them again in the shadows. On the illuminated part, we also set the penumbra with light strokes to feel the turn of the form. The main thing is to leave a light strip between the silhouette line and the hatching in the shadow — this is the reflex.
Step 6
We shade the self-shadow: with longitudinal strokes along the shape of the sphere, we lead the hatching to the light part — this technique will help to show the roundness of the sphere and set a soft half-light. Then the highlight will become the brightest spot on the object.
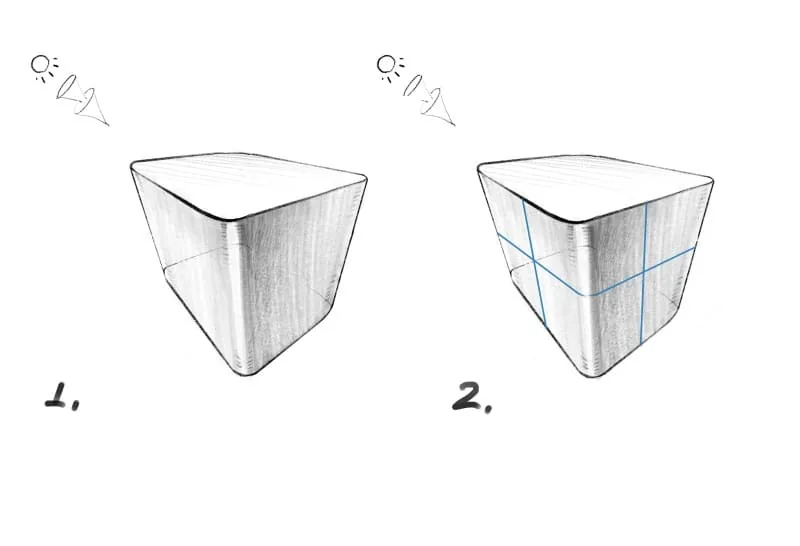
Step 7
Using auxiliary lines, we designate the trajectory of the falling rays of light. We mark the shadow and tone it with light, wide strokes. We maintain the slope of the strokes used on the sphere.
Step 8
We darken the cast shadow under the sphere, and lighten its right part to create the feeling of depth in the space. The sphere is ready!
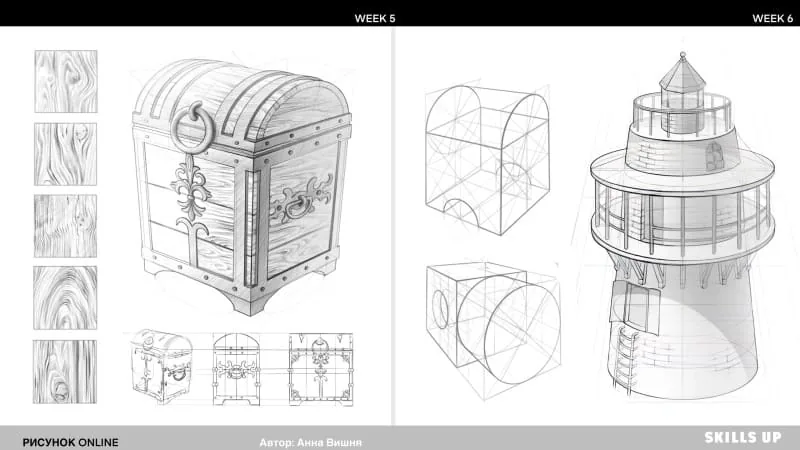
Drawing lesson 3. Drawing complex shapes from simple geometry
`````` Step 1 Let's take our cube as a basis and try to transform it. Let's add a recess to it, cut in a cylinder and change the shape of one face. Step 2 We will draw axes along the vertical faces of the cube to find the centers of the faces.
Step 3
In the right vertical face, we will make a small square recess in the center. The lines of the niche should repeat the perspective reduction of the entire cube to look convincing.
Step 4
We will insert a cylinder into our cube also in the center. We will embed it by drawing an ellipse from a parallelogram, as in the example of drawing a circle from a square. We will extrude it by two depths of the recess on the right to avoid a symmetrical feeling.
Step 5
We will change the top face, but we will not make recesses or extrude shapes from it, but change its configuration itself. We will widen the base of the face and give it thickness. We will do it unevenly: we will raise the left corners higher, place the right ones lower — a bevel will be obtained.
Step 6
We erase the auxiliary construction lines and give volume to our new elements. We shade the cylinder with arcuate movements along the shape of the section: we take its left edge into a light shadow, the same in tone as the left face of the cube.
We will slightly shade the largest visible face of the niche on the right with a shadow from above to give the feeling of depth. We will do the same with its right narrow wall. We will distribute the tone over the top element, as over the main body of the cube, place the cast shadows from the overhanging edge of the cylinder and lightly outline the shadow of the cube.
We use three types of hatching: wide light ones with the end of the pencil, thin arcuate ones and small straight notches at the turns. Our complex geometric shape is ready!
The school's channel has a detailed video lesson on how to create complex composite objects:
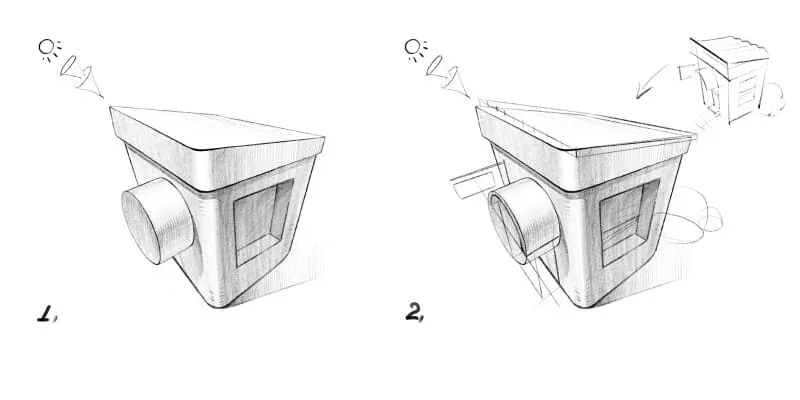
Drawing lesson 4. Drawing from imagination
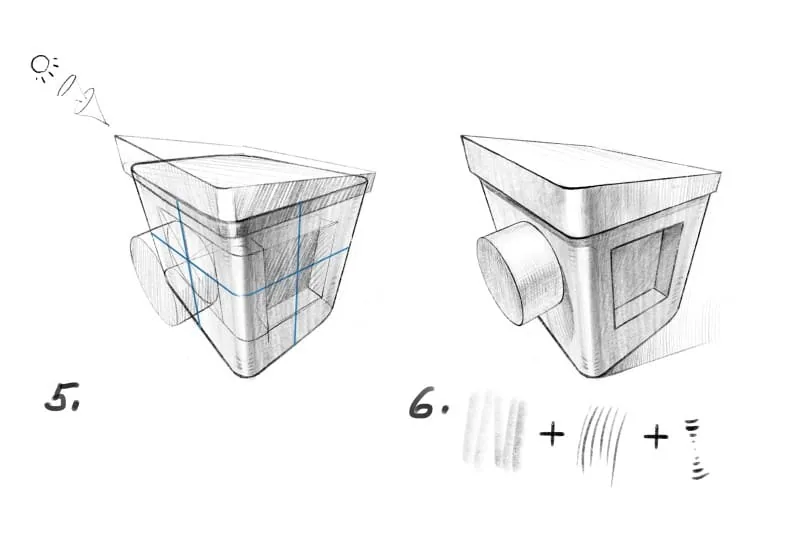
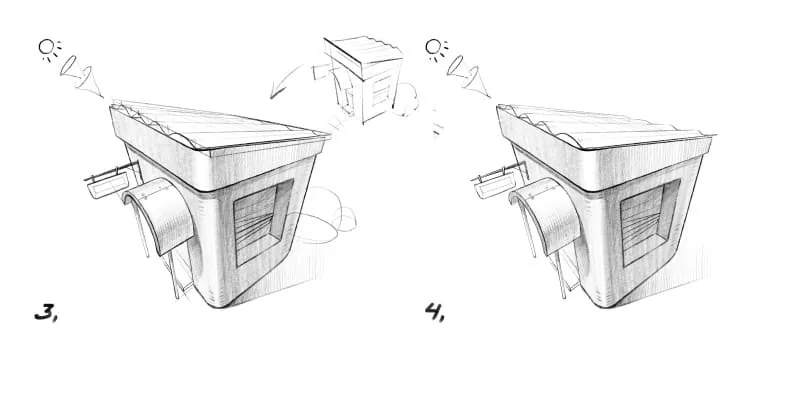
`````` We have a wonderful object made from a cube: let's try to find an image in it and transform it into a simple object. Step 1 Take our previous sketch and look at it abstractly. In its shape and volumes, we catch signs of objects, architecture, plants — everything that surrounds us. The world we live in will suggest ideas with images to us :) Step 2 The resulting simple geometric transformation resembles a house or a kiosk. Make a small auxiliary sketch from the side to capture the image and peek at the further development of the form. We complement our sketch with thin transformation lines: in the recess on the right — lines of blinds, the cylinder — a canopy on pillars, under it — a step, to the left of it — a sign, and on the roof we draw a parallelepiped under the slate sheet. On the left face of the future slate, we mark the bending points of the shape with notches: the farther from us, the smaller the distance between the notches. Try to place all new lines taking into account perspective reductions. Their directions will be indicated by the existing edges. Let's denote two bushes behind the house with hemispheres. We draw new lines semi-transparently so that they can be easily erased.
Step 3
Erase unnecessary details and clarify the final forms. Create a niche for the entrance and mark the step to it under the canopy with thin lines. Clarify the details of the sign, make the bracket line thicker, add a slanted crossbar. Inside the sign, mark the frame with thin lines and attach it to the bracket with a couple of triangles.
In the window on the right, draw the blinds stripes with louder lines. Draw the wave of the slate — pull the sine wave of the line down and up to the notches.
Step 4
Erase unnecessary auxiliary lines, clarify the new forms of the canopy, window, roof. Try to make the lines in the foreground thicker and more saturated, and in the background — lighter, without strong pressure.
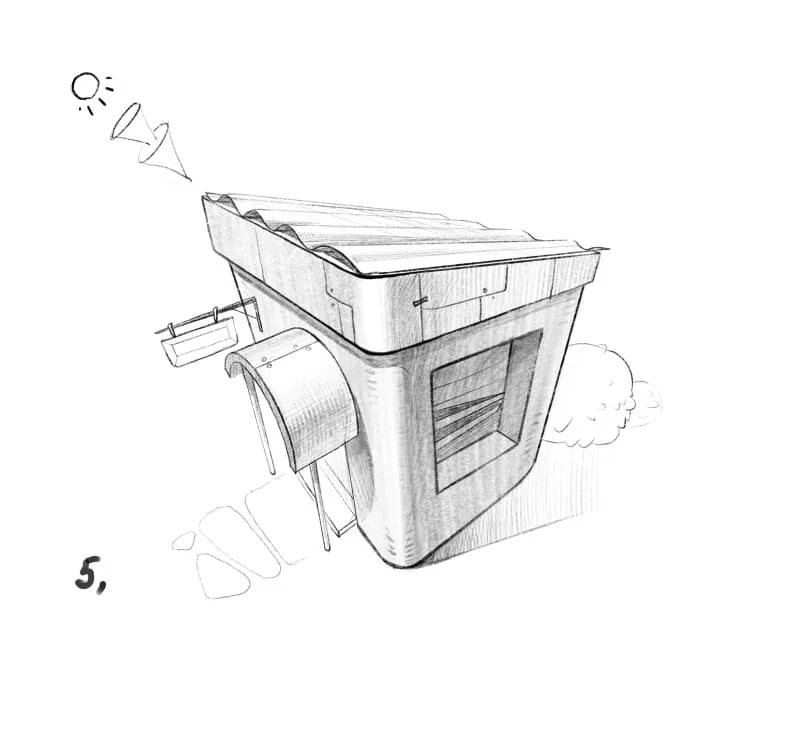
Step 5
Let's add some small details: shadows falling under the slate and longitudinal shadows in its differences, a shadow in the window between the blinds stripes, texture of sheets on the protruding part of the eave. Also, with very light strokes, we will indicate the bushes and the path to our house in more detail.
Our transformation is complete, and the sketch by imagination is ready!
Drawing lesson 5. Drawing texture
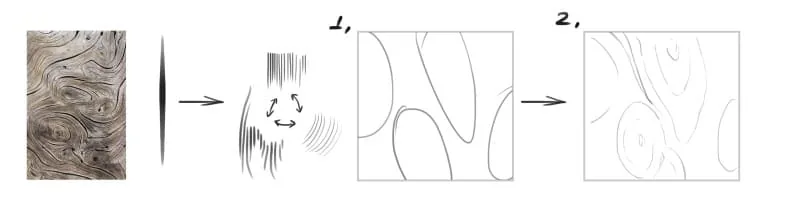
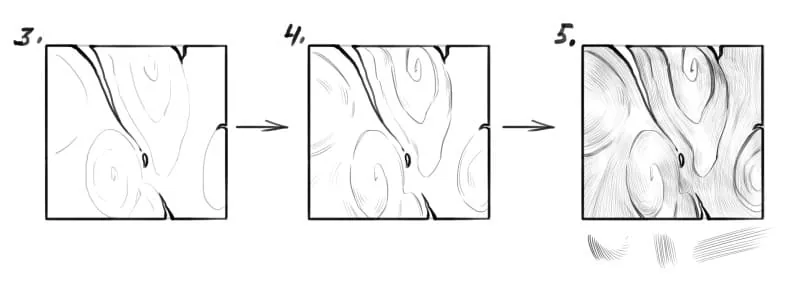
`````` It's more interesting to practice lines and strokes not on an abstract background, so to make the task more creative and exciting, let's try to draw a wood texture using the simplest basic brush or any other material of your choice. Step 1 Choose an interesting cut with cracks: it's not necessary to copy, you can improvise based on the reference. We will need three types of strokes: thin straight, thin arc, and larger thick strokes for contours and accents. Limit the area with a square and find the rhythm of the curls within it using ellipses.
Step 2
Turn the ellipses into more bionic curls of the wood texture. Mark the cracks.
Step 3
Make the contour thicker and add cracks and holes — this will make the silhouette more interesting.
Step 4
Draw the final curls, combine the line that turns into a stroke — this will enrich our texture.
Step 5
Fill the background with very fine strokes. The stroke here — are the fibers of the wood. Try to carefully fill the areas following the movement of the curls.
Rotate the sheet/canvas to make it comfortable for your hand. Use arc strokes, short and fine, and long and fine.
Step 6
Add additional cracks with a thicker line — you don't need many of them, don't overload the work. Vary the size: small thick ones, thin long ones, medium ones, because the same scale of cracks will create a monotonous boring rhythm.
Step 7
Darken some areas and add акцентные small strokes at the turns — this technique will give a glossy feel. A darker tone will highlight the curls, and we will get a wood texture. Hurray!
Drawing lesson 6. Drawing from a spot
`````` This exercise helps to develop imagination and non-standard vision. Step 1 Make random spots with a large brush, without lifting the stylus from the tablet. You can use graphic editors, paints, soft materials to create a spot. Try to make it light, otherwise the drawing will not be visible on it later.
Step 2
In the outlines of the resulting spot, we look for images of objects, animals or plants. For example, here the contours of the resulting spot resemble a sheep — this correspondence was not предполагалась in advance, the imagination suggested the image.
Create a new layer. On it, with a light rough line, draw the contour, muzzle, ears, and legs. If you are working with traditional materials, then outline the silhouette with translucent lines directly on the spot.
Step 3
Clarify the contour with a thick line on a new layer, use semicircular movements to depict the wool. Draw the eyes, eyebrows, and nose with a couple of strokes. You can go beyond the boundaries of the spot if necessary. Delete the rough line or erase it with an eraser.
Step 4
Lighten the layer with the spot: it is too bright, and strokes and lines will be poorly visible on it. Add neat uniform shading to show shadows and turns of the forms.
We got a nice sketch of a sheep from an ordinary spot!
Drawing lesson 7. Drawing a beautiful background
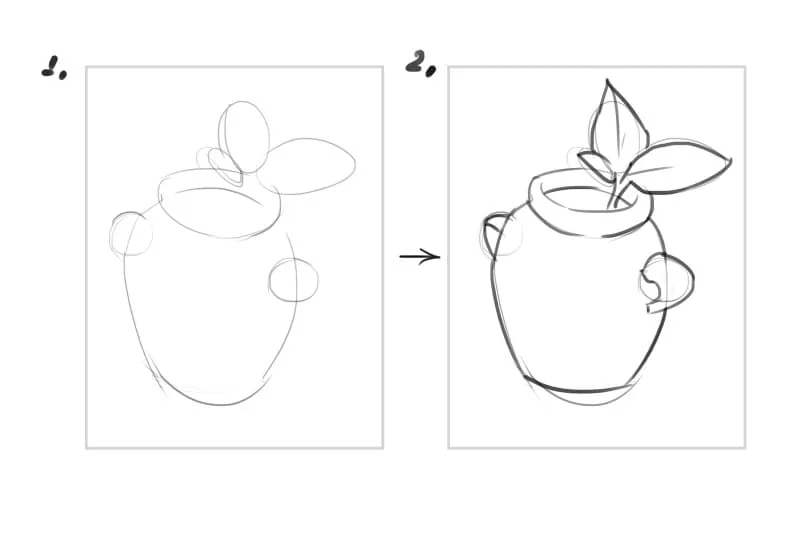
`````` The background can be a very important helper, enriching our sketch. Let's draw a pot with a flower and try to create a background for it. Step 1 On the sheet format, we outline the position of the pot and its silhouette using simple ellipses. Step 2 We draw the pot more детально, the handles, the neck, the leaves. We use light strokes, draw the line once, trying to keep it clean.
Step 3
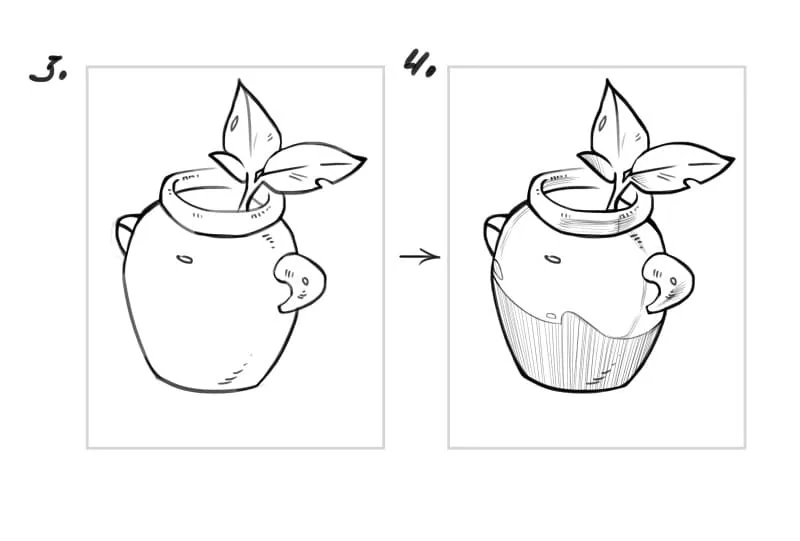
We refine the silhouette of the leaves, handles, sharpen the turns to add dynamics. We make a hole in the leaf and with a couple of strokes indicate the turns of the shape and highlights. Make sure that the line alternates between thinning and widening with pressure.
Step 4
We clean our line, strengthen the thickness of the lines in the most interesting places, erase the excess. We add glaze with a curved line and lightly shade it evenly. We put light strokes to suggest shadows on the handle, neck, turns of the leaves and the belly.
The simple sketch is ready, we will not develop it further. Let's move on to the background.
Step 5
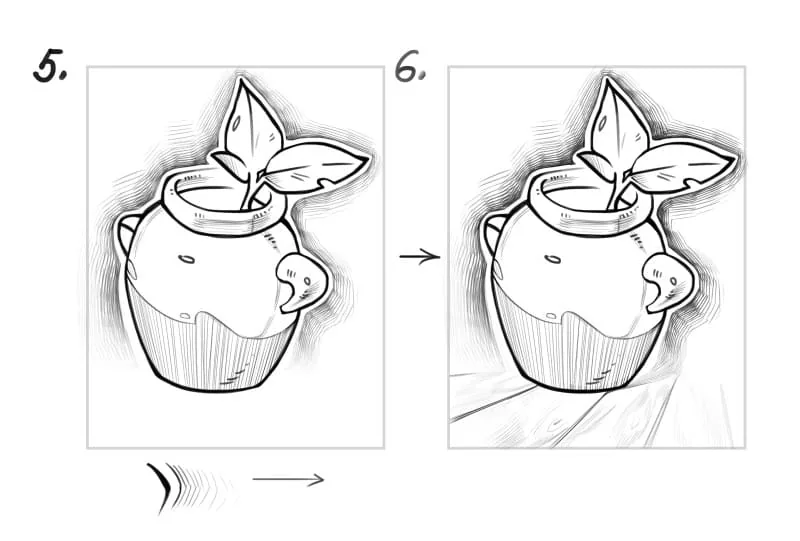
Let's darken the tone closer to our subject. We place strokes, pushing them with a gradient stretch from the edge and repeating its movement: the closer to it, the denser the strokes and the stronger the pressure, and the farther, the lighter, until it dissolves into the white sheet. With this technique, we seem to embrace our sketch and focus attention on it.
We leave a void between the strokes and the pot. We will not completely shade along the contour, leaving some blank space at the bottom of the sheet.
Step 6
Let's add the surface on which the pot will stand — let it be boards. We draw lines for them, taking into account perspective reductions, outline the texture of the wood, but do not complicate it, so as not to divert attention from the flower.
We got a sketch with a graphic background. Our strokes have enriched the sketch, set two types of tone and even the depth of space!
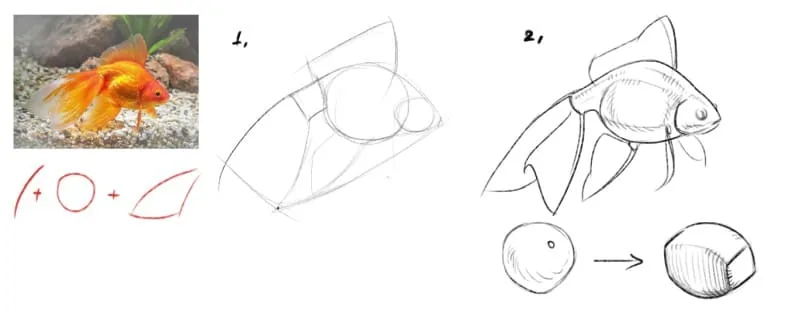
Drawing lesson 8. Drawing a sketch of a goldfish
`````` Step 1 First, we analyze the selected reference. We look at what shapes our fish consists of: it is round, so we will need circles, ellipses, arcs, and their combinations. We connect the lines to the most protruding edges of the shapes: the corner of the tail end and the fin on the belly, and then connect it to the nose. These lines will help us more accurately copy the proportions. We make a quick sketch using simple shapes and guides.
Step 2
We place the final silhouette of the fish over the sketch using dynamic, clear lines. We erase the initial lines, refine the shape to show the volume, transform the belly from a ball into a puffed, slightly square volume. We find the edge of the turn on the back and tail, the thickness on the head of the fish. We show the turns with lines and light strokes.
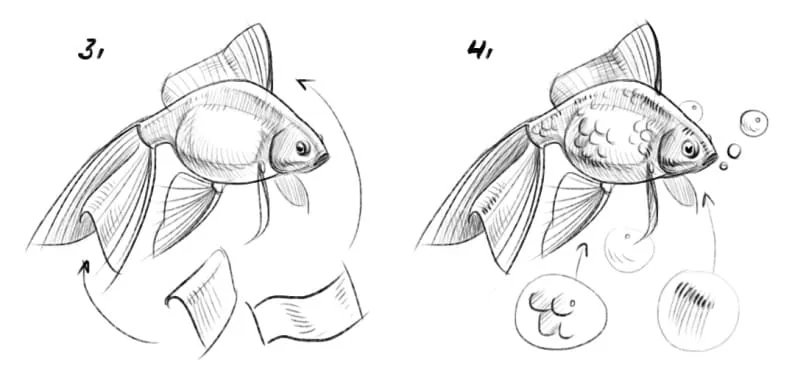
Step 3
We fill in the edges with shadow using a thin, light stroke. All edges facing downwards are shaded — we shade them. The fins are a thin structure similar to fabric. We use hatching to show its bends — this will give a feeling of lightness and airiness.
Step 4
We add a few scales on the belly and tail. We make them as simple arc lines as possible, add a bit of shading to create a shiny effect. On the turning edges, we strengthen the most accentuated strokes. We clean up the fish's eye, leaving only a couple of lines. We add the final details — bubbles around for ambiance.
For more details on how to sketch animals, watch the video lesson by artist Anna Pacha:
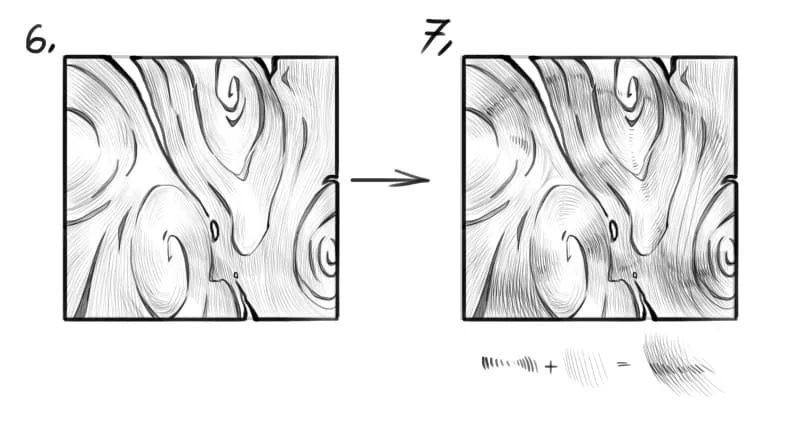
How to develop your own style
`````` We appreciate artists for the uniqueness and individuality of their style. Let's look at several graphic examples of style differences. All the artists whose styles we will consider use line, stroke, and tone. But their combinations and techniques create the character that works as a business card. The visual language developed by each creator depends on their personal qualities. You can also show your character and views through drawing. For example, a softer and more tender character — smooth movements of strokes, an expressive one — sharp and dynamic strokes.
In the work of artist Evan Cagle we see a combination of some engraved hatching and dense filling. If you look closely at his work, you can see that the line is sometimes inhomogeneous and breaks into a dotted line. It creates a feeling of patches or mosaic tesserae, from which the illustration is assembled. The filling along the edges turns into hatching, which gives a smooth edge in some places.
Anders Zorn combines long parallel monotonous strokes with frivolous curls, and also adds fine hatching at a different angle. A denser tone is created from such hatching.
Jean-Baptiste Greuze applied strokes across the section of the form — it looked like a mesh. The strict homogeneous mass of such techniques was interrupted by more picturesque and thick systems of zigzags and ticks, linear curls are visible in some places. The artist also varied the pressure and obtained thin and thick strokes.
In the portrait created by Yelizaveta Parfenova, not only short thin strokes and turn marks are used, but also shading. A gray tone of half-shadows is created with wide strokes. The line of the border is very expressive and looks like lightning.
Don't forget that different materials provide different effects and possibilities. Try drawing with charcoal, sanguine, pencil, pen and ink, marker, stylus, feel what suits you. Combine different techniques, but don't mix all the techniques you know, otherwise it will turn out to be kitsch.
Drawing Basic, or a course where you will learn to draw from scratch
`````` We have collected techniques, drawing skills, and a large number of useful assignments and theory in the Drawing Basic course from Skills Up School. This is a course for those who are just starting their drawing journey and for those who want to improve their skills. It includes exercises for hand coordination, exercises to unlock the potential of graphic materials: lines and strokes will become obedient and able to transform from simple geometric silhouettes into complex shapes and compositions. The program will help you go from drawing basic exercises to creating complex multi-component objects, bionic forms, developing interior elements, and architectural concepts.
Author: Darya Kostomarova
Course: Drawing Basic
In the course, we study key laws of perspective, composition, harmony, and proportions. With knowledge and mastery of these fundamentals, your drawing will become stronger and more confident. The course develops an understanding of stylization and its areas of use, because drawing is needed not only for academic school but also in animation, game development, post-production, and illustration.
Author: Yan Borodetsky
Course: Drawing Basic
Useful lessons for beginning artists
- Sketching with pencil for beginners — types of sketches, materials, and step-by-step exercises
- Drawing with pencil for beginners — step by step to drawing mastery
- Sketching for beginners — basics of quick drawing and sketching
Related materials

Tutorial
How to learn to draw on a tablet. Tips and lessons for beginners
December 31, 2023
Tutorial
How to draw fur
August 8, 2024

Tutorial
How to draw a crystal. Step-by-step guide for artists
March 24, 2025

Tutorial
Learning to draw glow
March 21, 2025

Tutorial
Drawing stones
March 10, 2025

Article
How to draw armor
December 27, 2024

News
Эта уютная игра-рисовалка позволяет исследовать созданные вами пейзажи
May 22, 2026