TutorialUpdated: July 2, 2026
How to draw lips
In short
Free lesson on how to draw lips with a pencil for начинающих artists, as well as a video lesson of the process by Azat Nurgaleev.
2D artist
It's hard to look at lips that you can't kiss, but it's much harder to look at them when you
don't know how to draw them, but you really want to do it 🙂
Lips are an important part of a portrait, without which a human face cannot exist. Lips can be пухлыми and thin, wide and narrow, but
The ear is built with the same logic of forms and breaks. A separate step-by-step guide is in the master class How to Draw an Ear.the internal structure does not change from their external configuration — it will be identical for different types.
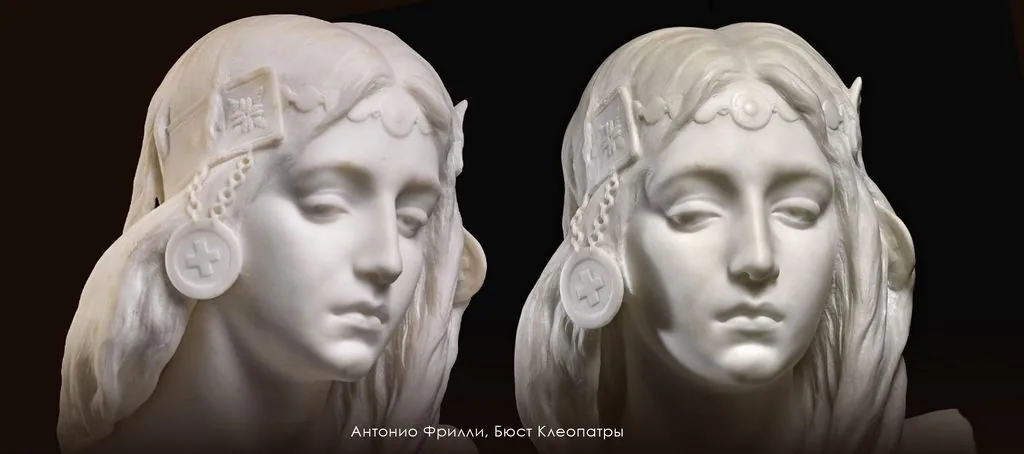 Antonio Frilli's Cleopatra has sensual lips with well-defined shapes. Let's see how to draw lips using their example.
It is important to understand the elements of the mouth, since lips do not exist on their own, but are part of the face. Let's study these details before we start drawing.
Antonio Frilli's Cleopatra has sensual lips with well-defined shapes. Let's see how to draw lips using their example.
It is important to understand the elements of the mouth, since lips do not exist on their own, but are part of the face. Let's study these details before we start drawing.
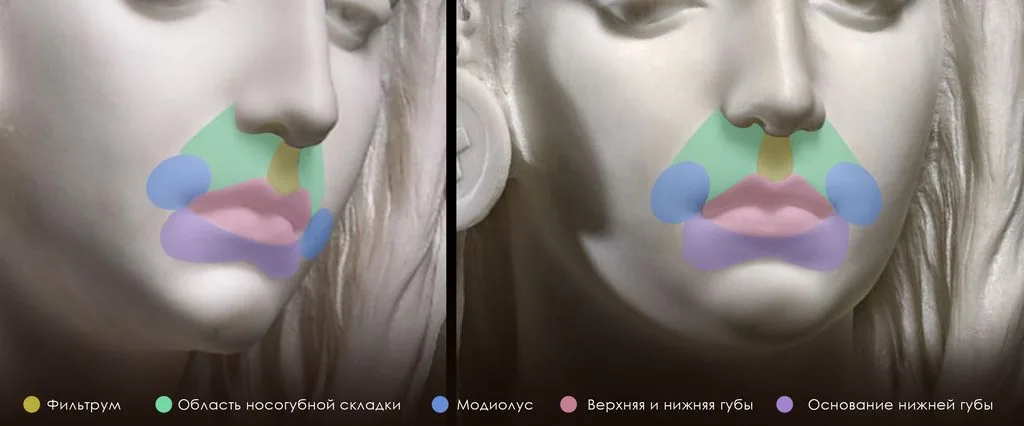 The lips are joined to the turns of the nasolabial fold area and a small hollow — the philtrum. The corners of the lips form modiolus — this is a group of muscles and soft tissues similar to a donut. In this «donut» the corner of the mouth is its center and deepening, and the lower lip rests on two semicircular structures — the base of the lower lip.
 It is incredibly valuable to understand the relief of the combination of these elements with each other and the section of forms. It's easy to outline a hexagonal area that all parts of the mouth fit into, and study the plasticity of the face.
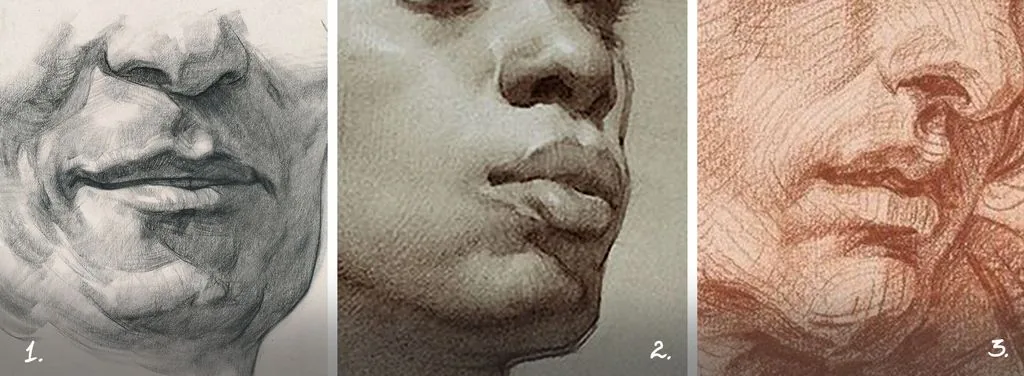 Let's see how artists draw lips with pencils. All of them have a slightly different style of shading, but this does not cancel the same approach to the structure, and Stan Prokopenko (1) and Colleen Barry (2) are modern artists, and Jean-Baptiste Greuze (3) is a master of the Rococo era.
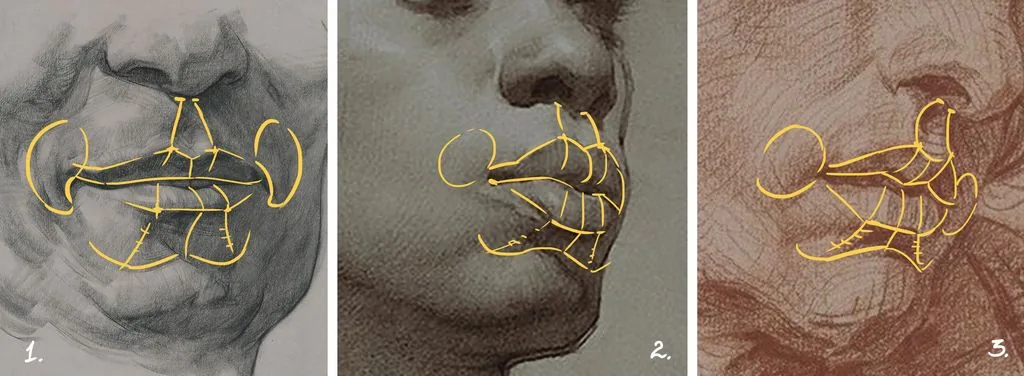 If we mark the outlines of the lips, modiolus, bases, nasolabial slopes and philtrum on top of their works, we will see that the constituent elements are the same. They only have slight differences in shape: for example, the modiolus in figure 1 looks more like a cashew in shape, and the modiolus in figures 2 and 3 are closer to the ideal. The fullest lips are the second ones, compared to the others.
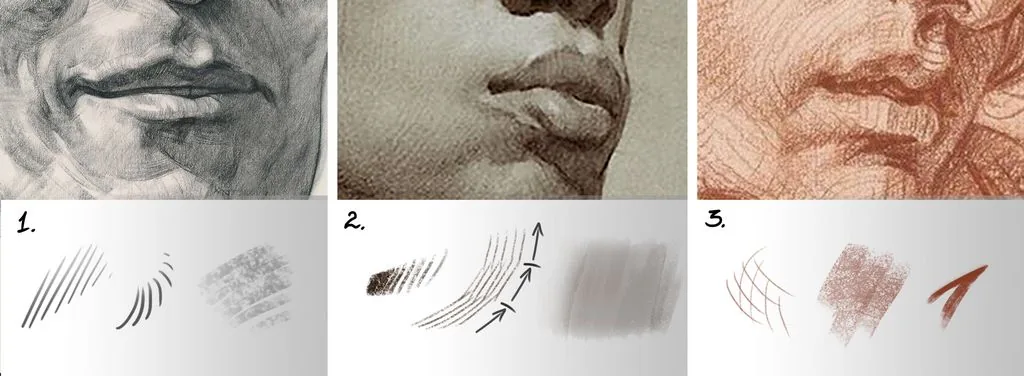 Different shading techniques are also visible. It can be more harsh, angular, or softer and shaded.
How to draw human lips?
Antonio Frilli's Cleopatra has sensual lips with well-defined shapes. Let's see how to draw lips using their example.
It is important to understand the elements of the mouth, since lips do not exist on their own, but are part of the face. Let's study these details before we start drawing.
The lips are joined to the turns of the nasolabial fold area and a small hollow — the philtrum. The corners of the lips form modiolus — this is a group of muscles and soft tissues similar to a donut. In this «donut» the corner of the mouth is its center and deepening, and the lower lip rests on two semicircular structures — the base of the lower lip.
It is incredibly valuable to understand the relief of the combination of these elements with each other and the section of forms. It's easy to outline a hexagonal area that all parts of the mouth fit into, and study the plasticity of the face.
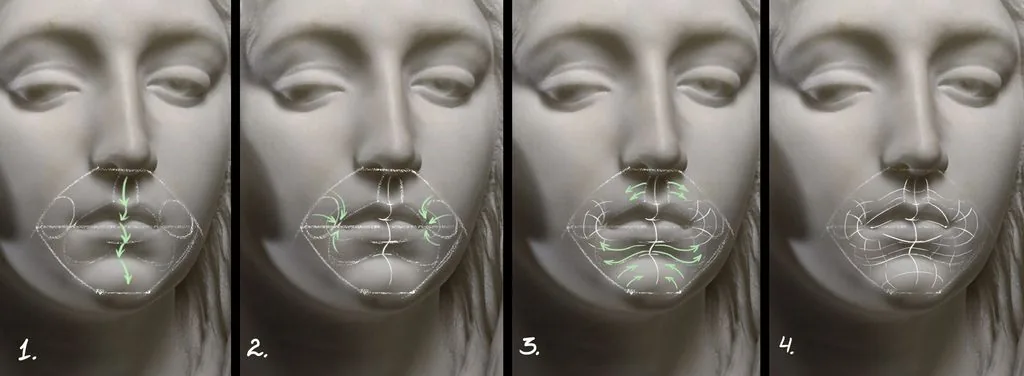
- The vertical axis of the mouth is not straight: it flows from the philtrum to the chin, like a mountain stream. The movement of this line turns closer to the horizontal (along the philtrum, lower lip and chin), then rushes downwards on a vertical slope (along the upper lip, base of the lower lip).
- Modiolus forms rounded niches in the corners of the mouth, as if a spherical ice cream spoon had formed two ball-shaped pits.
- Sections of the nasolabial zone and the base of the lower lip encircle the mouth with soft smooth movements, and the chin looks like a protruding ball.
- We connect the resulting sections and get a grid that prompts the depressions and protrusions of the lip silhouette.
How to draw lips with a pencil
Let's see how artists draw lips with pencils. All of them have a slightly different style of shading, but this does not cancel the same approach to the structure, and Stan Prokopenko (1) and Colleen Barry (2) are modern artists, and Jean-Baptiste Greuze (3) is a master of the Rococo era.
If we mark the outlines of the lips, modiolus, bases, nasolabial slopes and philtrum on top of their works, we will see that the constituent elements are the same. They only have slight differences in shape: for example, the modiolus in figure 1 looks more like a cashew in shape, and the modiolus in figures 2 and 3 are closer to the ideal. The fullest lips are the second ones, compared to the others.
Different shading techniques are also visible. It can be more harsh, angular, or softer and shaded.
- Stan Prokopenko combines straight thin strokes, small arc-shaped shading and wide strokes with the side of the lead in the shadows.
- Colleen Barry uses gradient stretches from dark tone to thin shading. With fine shading, he forms turns, and with a soft tone he fills in shadows and half-shadows.
- Jean-Baptiste Greuze shows the direction of the shape with thin strokes — these strokes intersect, and a grid is obtained. He softens the grid with a wide stroke with the side of the lead, and thicker and brighter lines emphasize the edges of the forms in the shadows.
Related courses
All courses
from 3 900 ₽
-57%
Book illustration: The first page page
9 000 ₽3 900 ₽
Learn more

from 12 000 ₽
-20%
Векторная иллюстрация для начинающих
15 000 ₽12 000 ₽
Learn more

from 4 500 ₽
-55%
Character Concept: My First Hero
10 000 ₽4 500 ₽
Learn more
You always want to look into the artist's workshop and peep how he works: how does he build, put lines, hatch? You can do this and spy on the process of drawing lips from Azat Nurgaleev on the YouTube channel of our school at the link:
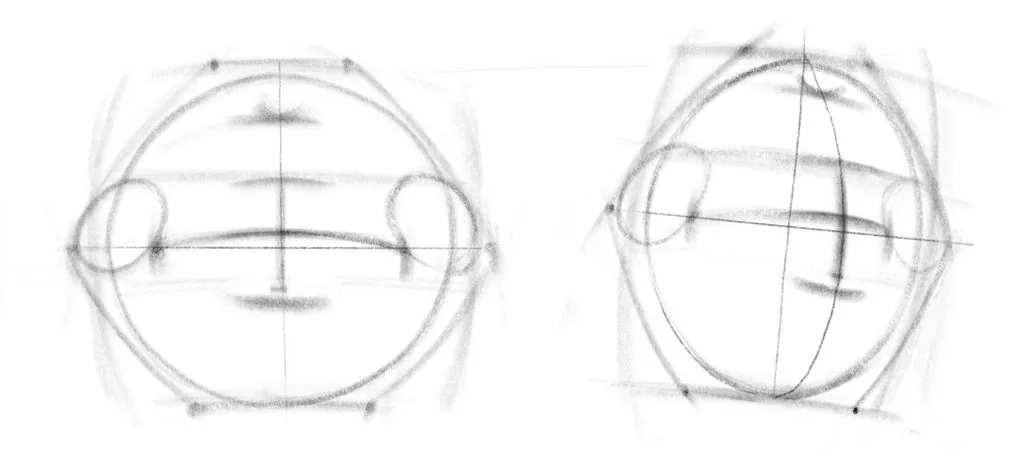
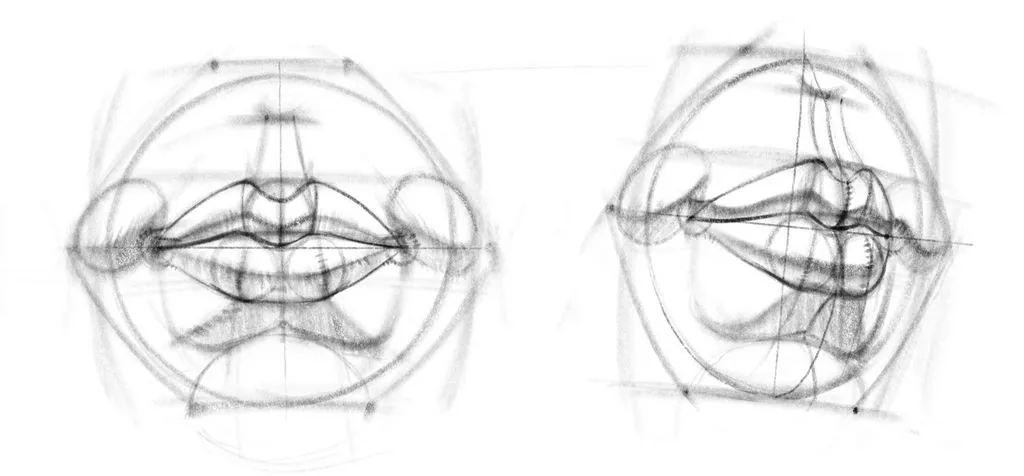
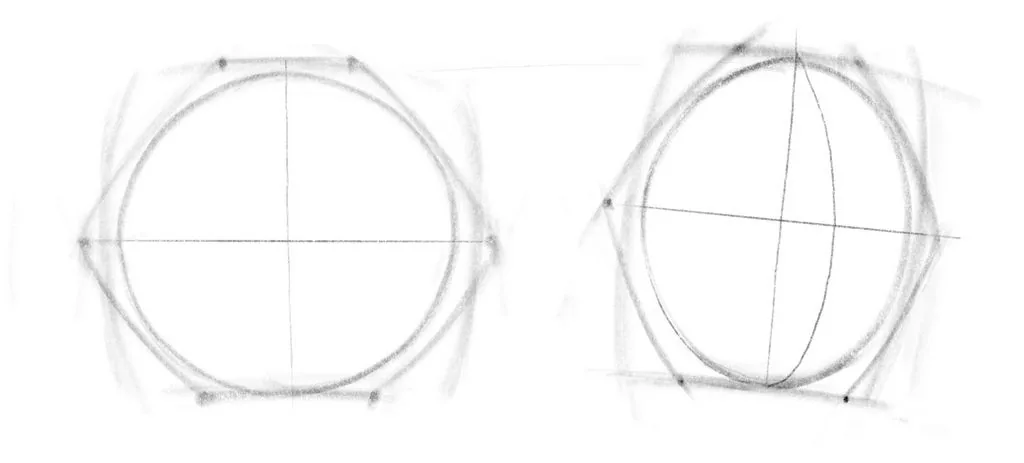 We designate the area of future lips with a hexagon. We inscribe a circle in the front view, and an ellipse in the 3/4 view. The horizontal angles of the hexagon will occupy the modiolus.
We mark the vertical and horizontal axes, and we bend the vertical axis in the 3/4 position with an arc, since our lips have a strong relief and protrude like a sphere barrel. The circle and ellipse that we have marked will remind us of the strong protruding nature of this facial element.
Stage 2
We designate the area of future lips with a hexagon. We inscribe a circle in the front view, and an ellipse in the 3/4 view. The horizontal angles of the hexagon will occupy the modiolus.
We mark the vertical and horizontal axes, and we bend the vertical axis in the 3/4 position with an arc, since our lips have a strong relief and protrude like a sphere barrel. The circle and ellipse that we have marked will remind us of the strong protruding nature of this facial element.
Stage 2
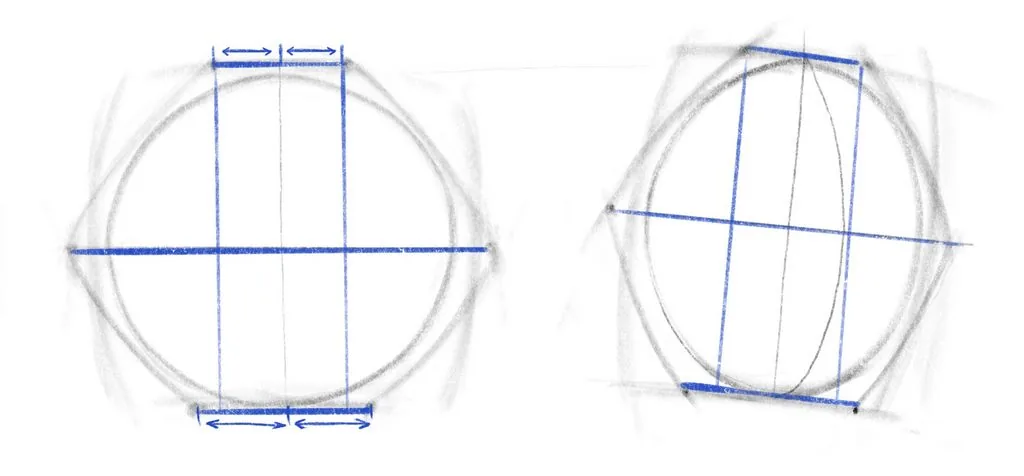 We check the parallelism of the horizontal faces and axes. The lower angles of the hexagon are slightly wider than the distance between the upper ones. The upper corners indicate the edges of the wings of the nose, and the lower ones indicate the width of the chin.
Stage 3
We check the parallelism of the horizontal faces and axes. The lower angles of the hexagon are slightly wider than the distance between the upper ones. The upper corners indicate the edges of the wings of the nose, and the lower ones indicate the width of the chin.
Stage 3
 We mark the modiolus with circles and place the mouth axis between them. We bend it with an arc in both perspectives, since the mouth is a rounded structure. We mark the edge of the upper and lower lip with light strokes and add the line of the beginning of the philtrum under the nose.
Stage 4
We mark the modiolus with circles and place the mouth axis between them. We bend it with an arc in both perspectives, since the mouth is a rounded structure. We mark the edge of the upper and lower lip with light strokes and add the line of the beginning of the philtrum under the nose.
Stage 4
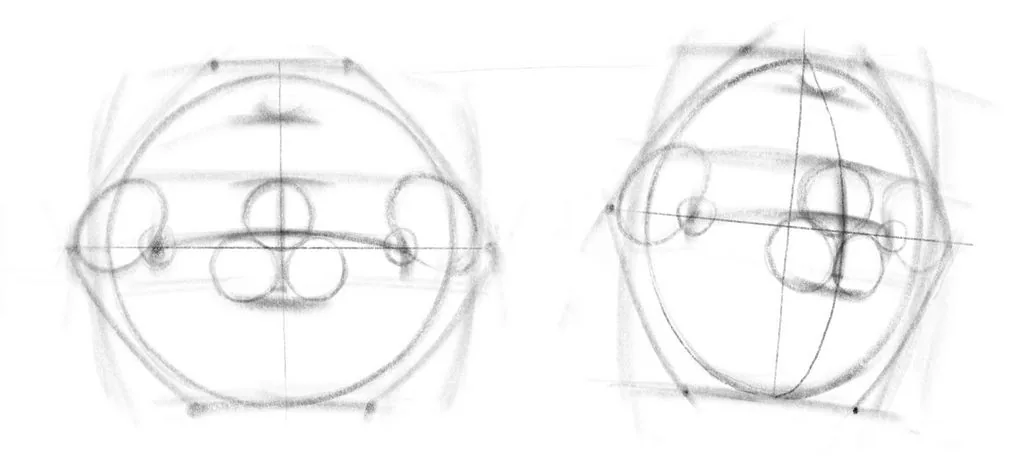 Add three circles: one in the center of the upper lip, two on the sides of the central axis on the lower lip. These circles show the protruding curves of the lips.
Stage 5
Add three circles: one in the center of the upper lip, two on the sides of the central axis on the lower lip. These circles show the protruding curves of the lips.
Stage 5
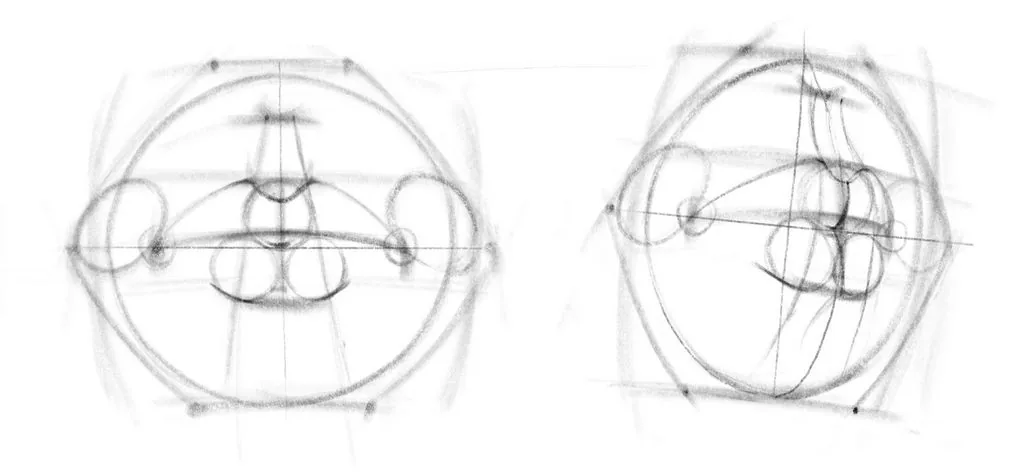 We connect the arcs of the circles on the lower lip with a curved line. At the top of the circle, between the corners of the lip, we bend the rounded hollow of the philtrum. We connect the upper corners of the lips with the corners of the mouth with a line, and around the corners of the mouth we mark small circles indicating the pits of the modiolus.
Stage 6
We connect the arcs of the circles on the lower lip with a curved line. At the top of the circle, between the corners of the lip, we bend the rounded hollow of the philtrum. We connect the upper corners of the lips with the corners of the mouth with a line, and around the corners of the mouth we mark small circles indicating the pits of the modiolus.
Stage 6
 We close the line of the lower lip from the corner of the lip curve to the corners of the mouth. We mark the halves of the base of the lower lip with semicircles, and also show the bends of this structure with inclined lines. We draw a semicircle between the two lower angles of the hexagon — this is the chin.
Stage 7
We close the line of the lower lip from the corner of the lip curve to the corners of the mouth. We mark the halves of the base of the lower lip with semicircles, and also show the bends of this structure with inclined lines. We draw a semicircle between the two lower angles of the hexagon — this is the chin.
Stage 7
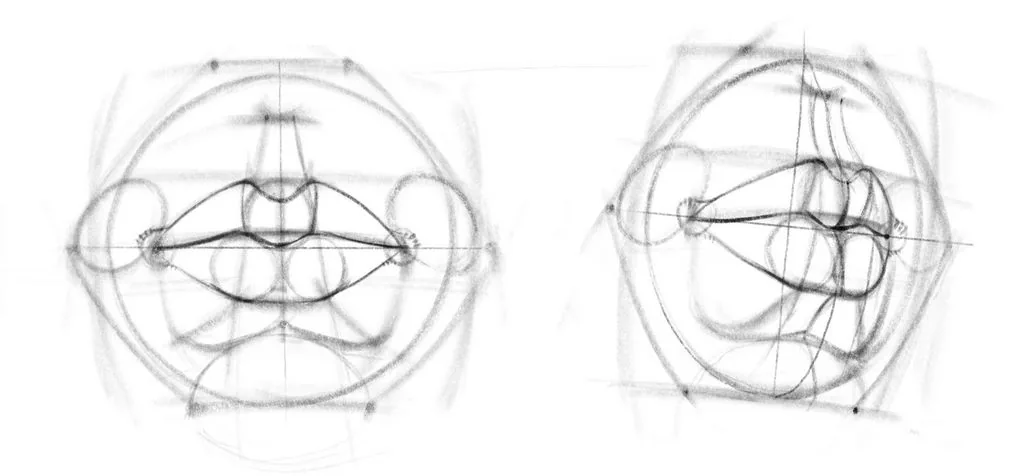
 We add a light tone with the side of the pencil lead with wide strokes along the shadow faces. We emphasize the turns of the shape from shadow to light with small strokes.
Stage 8
We add a light tone with the side of the pencil lead with wide strokes along the shadow faces. We emphasize the turns of the shape from shadow to light with small strokes.
Stage 8
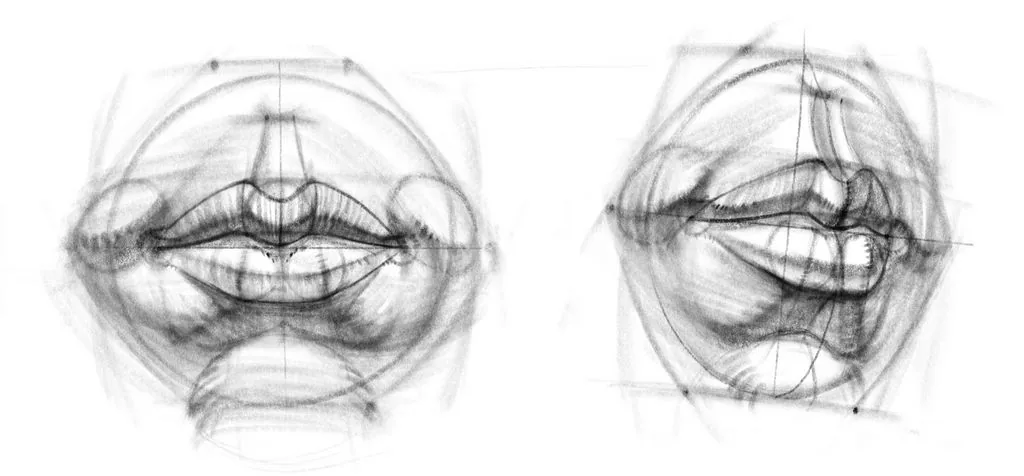 We add darker and lighter strokes to make our lips consist of three tones: light, medium and dark. The upper lip is more hidden from the light, so we shade it compared to the lower lip. At this stage, we can more boldly show the turns of the chin, base of the lower lip, lip curve, and therefore we make the turning stroke more noticeable.
Stage 9
We add darker and lighter strokes to make our lips consist of three tones: light, medium and dark. The upper lip is more hidden from the light, so we shade it compared to the lower lip. At this stage, we can more boldly show the turns of the chin, base of the lower lip, lip curve, and therefore we make the turning stroke more noticeable.
Stage 9
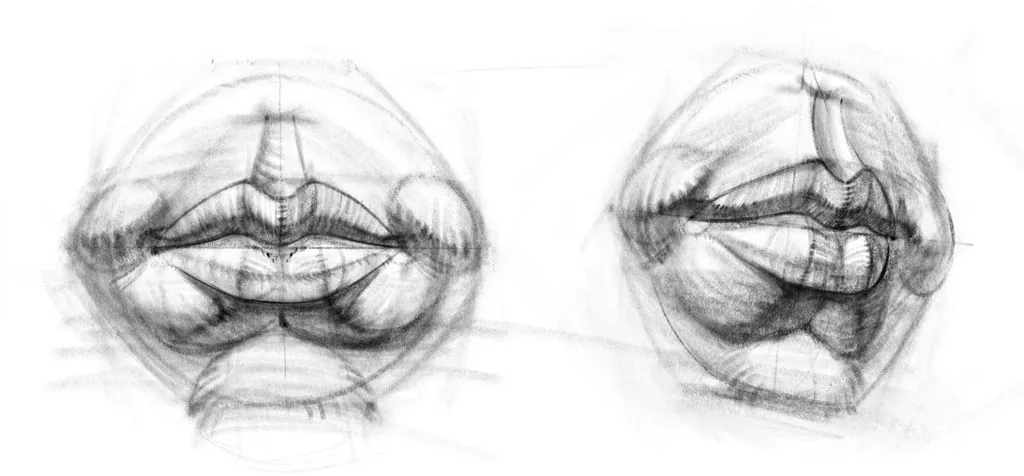 We erase the extra construction lines and add contrasting tone hits along the boundaries of the highlight and shape breaks. Voila! L'image des levres est pret!
We managed to draw Cleopatra's lips. Knowing the stages of their drawing, you can now practice on other references. Try to choose thinner lips or lips with low corners of the mouth.
And if you want to study not only lips, but also other parts of the face, then in our course Portrait sketching you can explore the structure of the face in detail, and most importantly, you will learn how to combine all the elements of the face and assemble a complete portrait. And not one 🙂
Recommendation: study the cool article from our curators «how to draw a human face».
Do you want to learn how to draw lips correctly? Then be sure to sign up for our cool Free course «Basics of portrait».
We promise: after the course you will gently fall in love with drawing lips and will never call this topic difficult or boring!
We erase the extra construction lines and add contrasting tone hits along the boundaries of the highlight and shape breaks. Voila! L'image des levres est pret!
We managed to draw Cleopatra's lips. Knowing the stages of their drawing, you can now practice on other references. Try to choose thinner lips or lips with low corners of the mouth.
And if you want to study not only lips, but also other parts of the face, then in our course Portrait sketching you can explore the structure of the face in detail, and most importantly, you will learn how to combine all the elements of the face and assemble a complete portrait. And not one 🙂
Recommendation: study the cool article from our curators «how to draw a human face».
Do you want to learn how to draw lips correctly? Then be sure to sign up for our cool Free course «Basics of portrait».
We promise: after the course you will gently fall in love with drawing lips and will never call this topic difficult or boring!
Video lesson «How to draw lips correctly»
Drawing lips step by step with a pencil
Let's start drawing lips in two perspectives at once! We choose views from the front and a little from the side: the front view demonstrates the symmetry of the elements well, and in the side view it is convenient to study the silhouette of the lip curve. Choose a graphite pencil with softness HB or B for drawing: softer pencils will start to blacken the drawing too much. You can also use the simplest round brush in Procreate or Photoshop or a brush that imitates a pencil. Stage 1
We designate the area of future lips with a hexagon. We inscribe a circle in the front view, and an ellipse in the 3/4 view. The horizontal angles of the hexagon will occupy the modiolus.
We mark the vertical and horizontal axes, and we bend the vertical axis in the 3/4 position with an arc, since our lips have a strong relief and protrude like a sphere barrel. The circle and ellipse that we have marked will remind us of the strong protruding nature of this facial element.
Stage 2
We check the parallelism of the horizontal faces and axes. The lower angles of the hexagon are slightly wider than the distance between the upper ones. The upper corners indicate the edges of the wings of the nose, and the lower ones indicate the width of the chin.
Stage 3
We mark the modiolus with circles and place the mouth axis between them. We bend it with an arc in both perspectives, since the mouth is a rounded structure. We mark the edge of the upper and lower lip with light strokes and add the line of the beginning of the philtrum under the nose.
Stage 4
Add three circles: one in the center of the upper lip, two on the sides of the central axis on the lower lip. These circles show the protruding curves of the lips.
Stage 5
We connect the arcs of the circles on the lower lip with a curved line. At the top of the circle, between the corners of the lip, we bend the rounded hollow of the philtrum. We connect the upper corners of the lips with the corners of the mouth with a line, and around the corners of the mouth we mark small circles indicating the pits of the modiolus.
Stage 6
We close the line of the lower lip from the corner of the lip curve to the corners of the mouth. We mark the halves of the base of the lower lip with semicircles, and also show the bends of this structure with inclined lines. We draw a semicircle between the two lower angles of the hexagon — this is the chin.
Stage 7
We add a light tone with the side of the pencil lead with wide strokes along the shadow faces. We emphasize the turns of the shape from shadow to light with small strokes.
Stage 8
We add darker and lighter strokes to make our lips consist of three tones: light, medium and dark. The upper lip is more hidden from the light, so we shade it compared to the lower lip. At this stage, we can more boldly show the turns of the chin, base of the lower lip, lip curve, and therefore we make the turning stroke more noticeable.
Stage 9
We erase the extra construction lines and add contrasting tone hits along the boundaries of the highlight and shape breaks. Voila! L'image des levres est pret!
We managed to draw Cleopatra's lips. Knowing the stages of their drawing, you can now practice on other references. Try to choose thinner lips or lips with low corners of the mouth.
And if you want to study not only lips, but also other parts of the face, then in our course Portrait sketching you can explore the structure of the face in detail, and most importantly, you will learn how to combine all the elements of the face and assemble a complete portrait. And not one 🙂
Recommendation: study the cool article from our curators «how to draw a human face».
Do you want to learn how to draw lips correctly? Then be sure to sign up for our cool Free course «Basics of portrait».
We promise: after the course you will gently fall in love with drawing lips and will never call this topic difficult or boring!Related materials

Tutorial
How to draw a crystal. Step-by-step guide for artists
March 24, 2025
Tutorial
How to draw magical fire
September 18, 2023

Tutorial
Learning to draw glow
March 21, 2025

Tutorial
Drawing stones
March 10, 2025

Tutorial
How to draw basic emotions
February 12, 2025

Article
How to draw armor
December 27, 2024

News
Эта уютная игра-рисовалка позволяет исследовать созданные вами пейзажи
May 22, 2026