TutorialUpdated: July 2, 2026
How to draw fur
In short
Step-by-step lesson on drawing fur in Photoshop and Procreate. Master rendering techniques, working with light and shadow, textures and highlights.
2D artist (illustrator)
Here before you is the softest and fluffiest lesson in the history of Skills Up! So don't be surprised if you get goosebumps while drawing 🙂
To draw fur, you will need Photoshop or Procreate and basic skills in these programs. Rendering from a ready-made line will take about 50 minutes, and if you want to draw your own line, it will take about 1.5 hours.
Tools, settings, layer styles — all this will be analyzed step by step. In the meantime, you need to download the source files, open them and start drawing according to the tutorial. At the end, we will tell you how to evaluate the quality of the work.
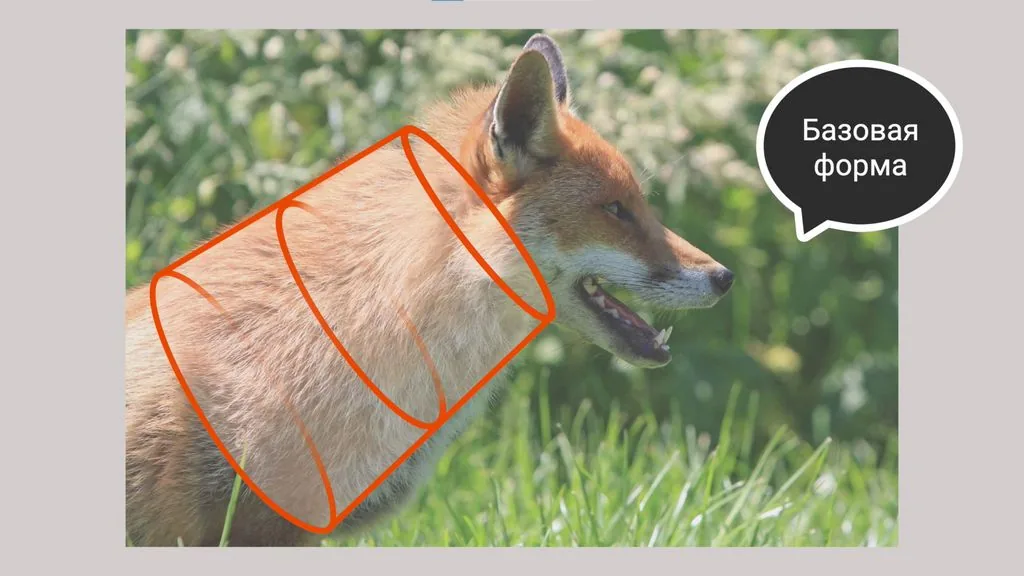
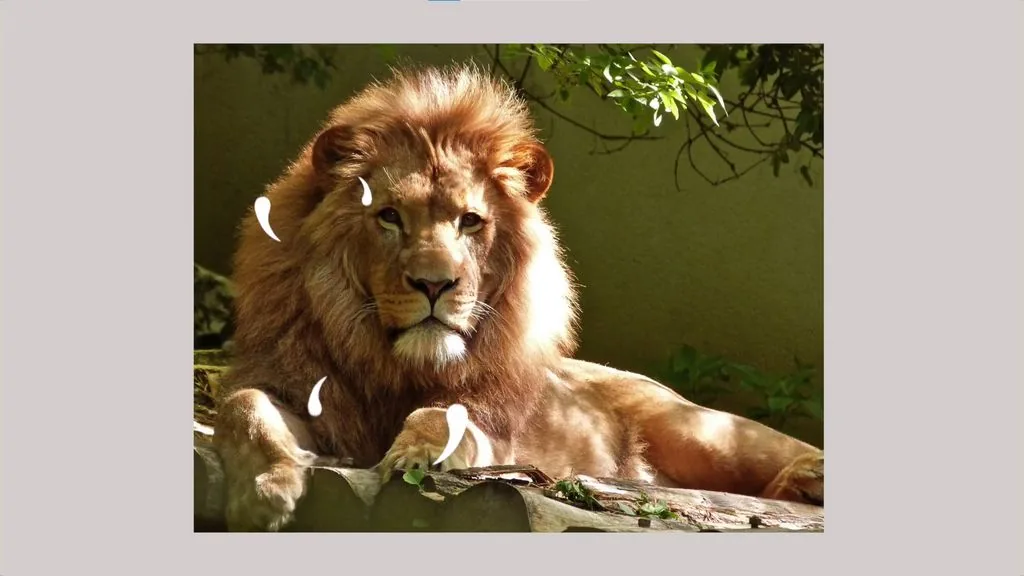
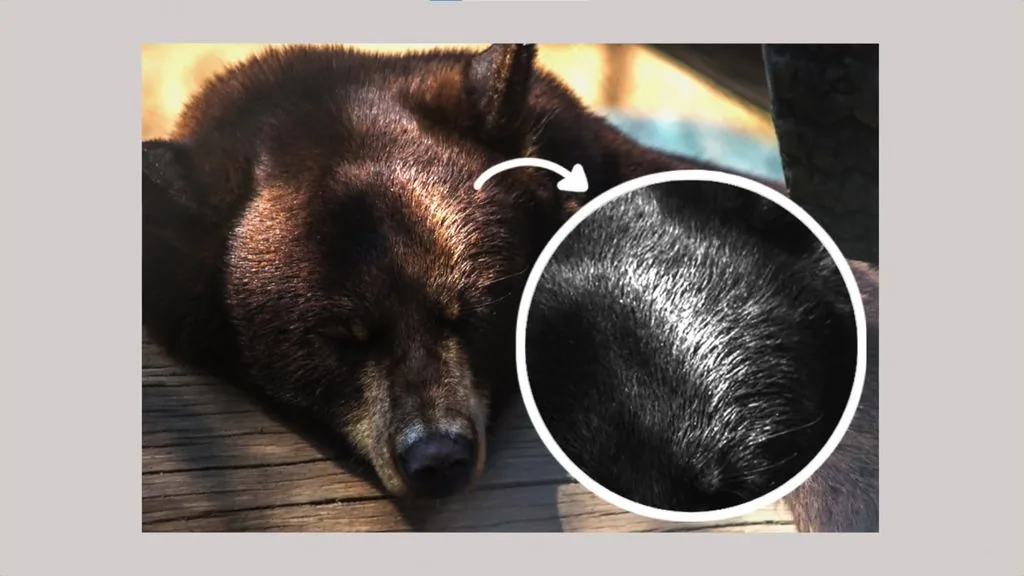
 Let's analyze it on the example of real fur. Look at the photo: despite the apparent complexity of the material, the approach to drawing fur consists of just three points.
Everything is subject to the basic form. In other words, when drawing fur, imagine what primitive, cylinder, sphere or their derivatives lie at the basis of the depicted object — this will make it clear how the total volume is formed.
Let's analyze it on the example of real fur. Look at the photo: despite the apparent complexity of the material, the approach to drawing fur consists of just three points.
Everything is subject to the basic form. In other words, when drawing fur, imagine what primitive, cylinder, sphere or their derivatives lie at the basis of the depicted object — this will make it clear how the total volume is formed.
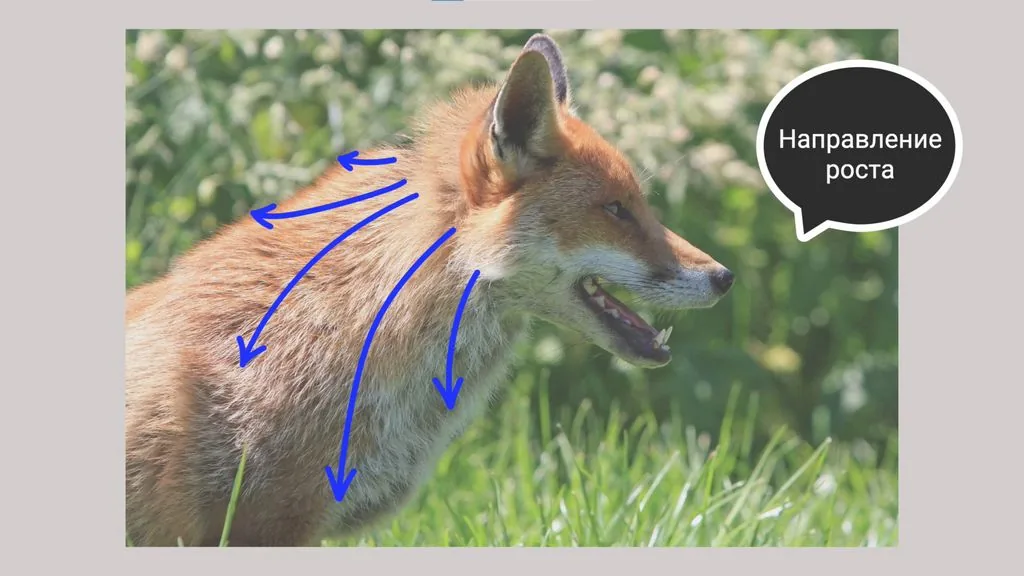
 Fur always has a general growth direction, which depends on the basic form it is on and the length of the hair.
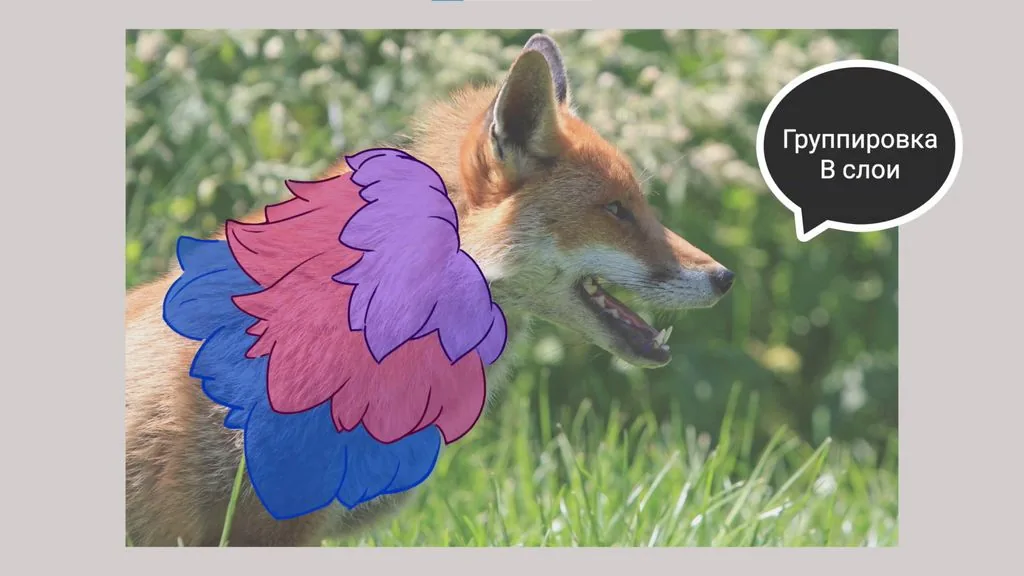
 Fur grows in bunches, which, in turn, combine into layers.
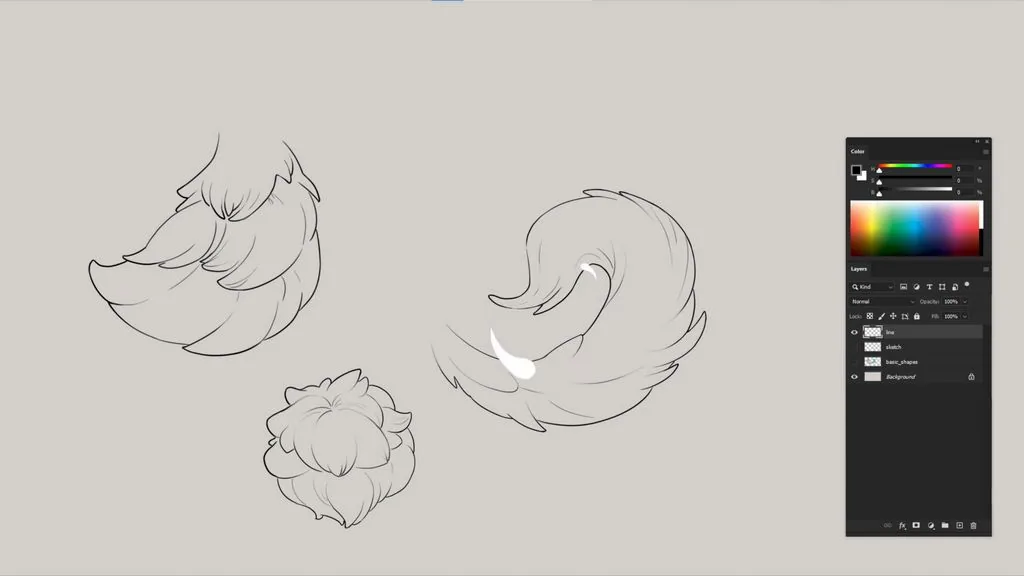
 We start with quick sketches — this is necessary so as not to go into excessive detailing. A standard round brush with transfer will be suitable for the work.
The shape is divided into several rows, the main captures are identified for each bunch. Be sure to make sure that the shape of the намеченных elements has development, that is, it gradually contracts or expands, follows the general direction of fur growth.
We start with quick sketches — this is necessary so as not to go into excessive detailing. A standard round brush with transfer will be suitable for the work.
The shape is divided into several rows, the main captures are identified for each bunch. Be sure to make sure that the shape of the намеченных elements has development, that is, it gradually contracts or expands, follows the general direction of fur growth.
 After all the main forms have been намечены, you can proceed to the line on a separate layer. We clarify the silhouette of the fur bunches: for short and medium fur it will be mainly those parts that are closer to the middle of the shape.
For long fur, it is important to distribute accents and rest areas at the end of the shape, so as not to create excessive visual load. Therefore, we add small exits from the silhouette, thereby showing that the objects consist of a large number of strands. This is enough for the viewer to understand what material is depicted.
After all the main forms have been намечены, you can proceed to the line on a separate layer. We clarify the silhouette of the fur bunches: for short and medium fur it will be mainly those parts that are closer to the middle of the shape.
For long fur, it is important to distribute accents and rest areas at the end of the shape, so as not to create excessive visual load. Therefore, we add small exits from the silhouette, thereby showing that the objects consist of a large number of strands. This is enough for the viewer to understand what material is depicted.
 Let's move on to local fills. We recommend using a pen or lasso — these are simple but effective tools that help to avoid frequent problems. These include, for example, various artifacts on the silhouette and incompletely colored areas that you have to constantly return to on a separate layer.
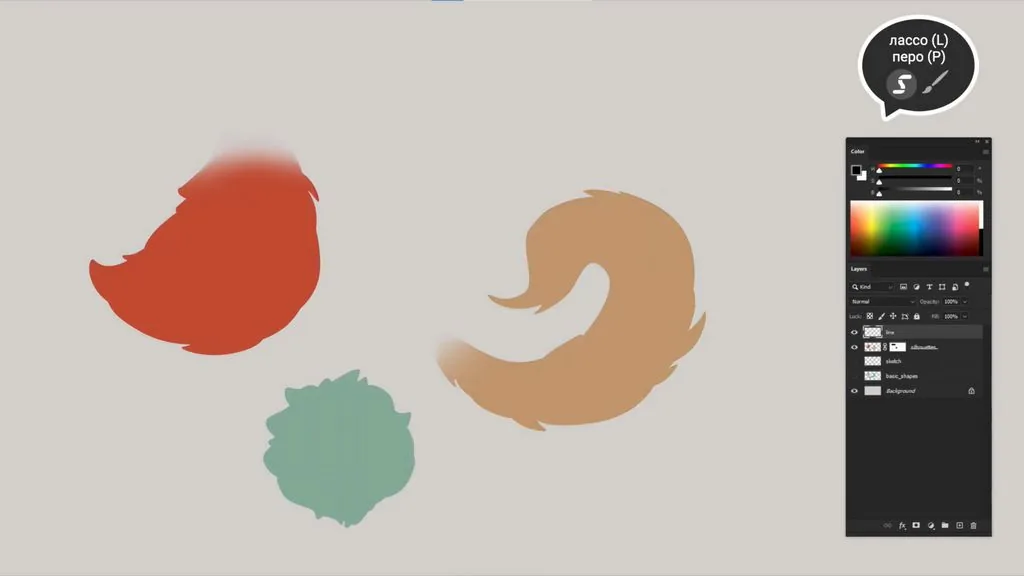 With a large soft brush we add a gradient to the transition. Fur is rarely homogeneous, it always has additional shades, so this — an excellent chance to experiment with transitions in the spectrum and tone in local заливах.
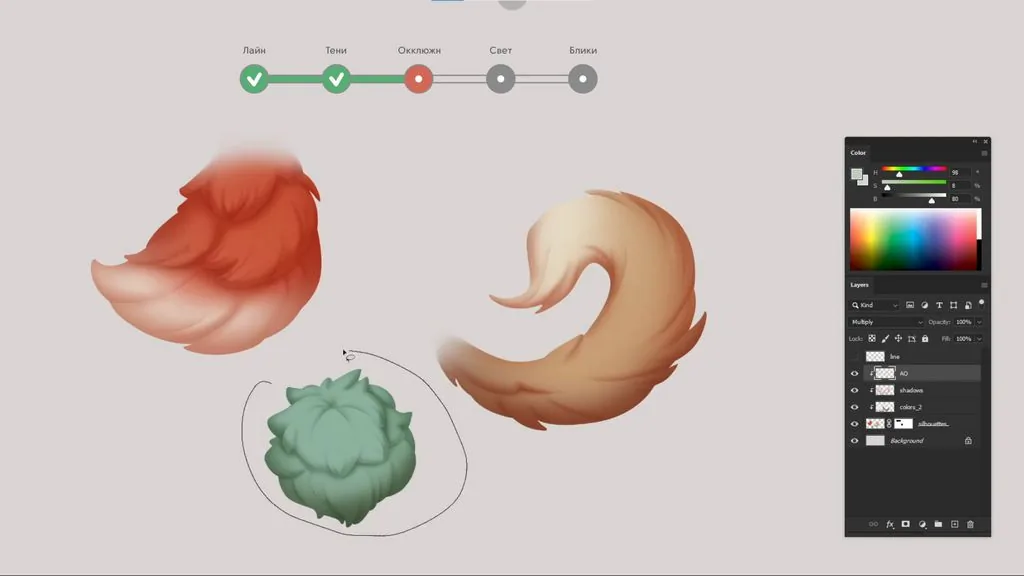
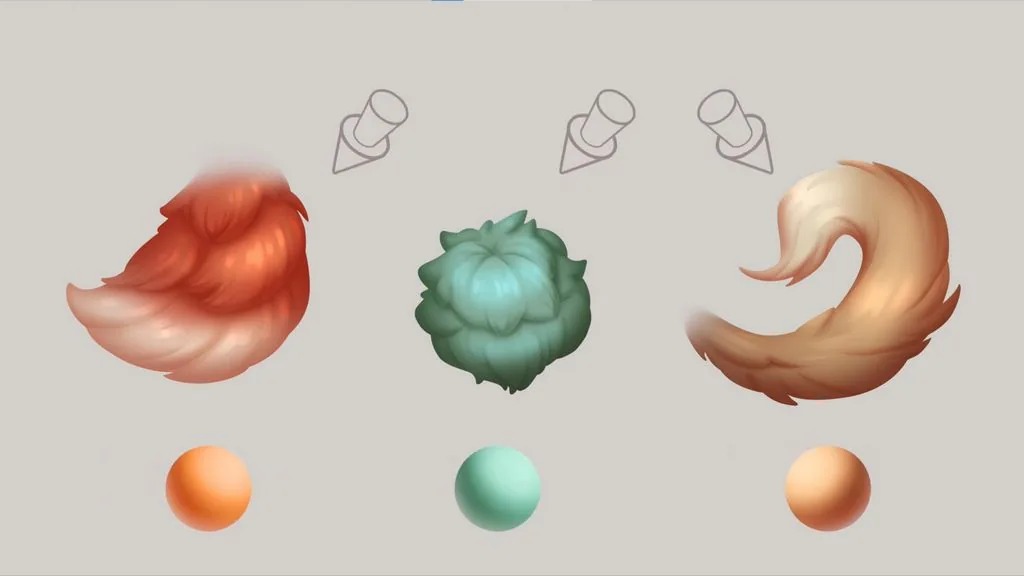 For rendering, only four layers will be required. We will divide shadows from the light source, ambient occlusion, light and highlights.
Light, as a rule, is placed from above, to the left or to the right of the object, in order to emphasize the volume of the shape well.
For rendering, only four layers will be required. We will divide shadows from the light source, ambient occlusion, light and highlights.
Light, as a rule, is placed from above, to the left or to the right of the object, in order to emphasize the volume of the shape well.
 Ambient occlusion — these are the deepest areas in places where neither directed nor reflected light reaches, that is, at the points of contact of the object with the plane, at the corners and at the joints.
 Highlights — these are reflections of the light source.
What is important to know about fur before drawing it
Fur is often found in concepts and illustrations — these are real animals, and fictional creatures, and even fur upholstery on a character's clothes. In order to depict it correctly, you need to understand the structure of the material.
Let's analyze it on the example of real fur. Look at the photo: despite the apparent complexity of the material, the approach to drawing fur consists of just three points.
Everything is subject to the basic form. In other words, when drawing fur, imagine what primitive, cylinder, sphere or their derivatives lie at the basis of the depicted object — this will make it clear how the total volume is formed.
Fur always has a general growth direction, which depends on the basic form it is on and the length of the hair.
Fur grows in bunches, which, in turn, combine into layers.
Now let's get down to practice, drawing fur!
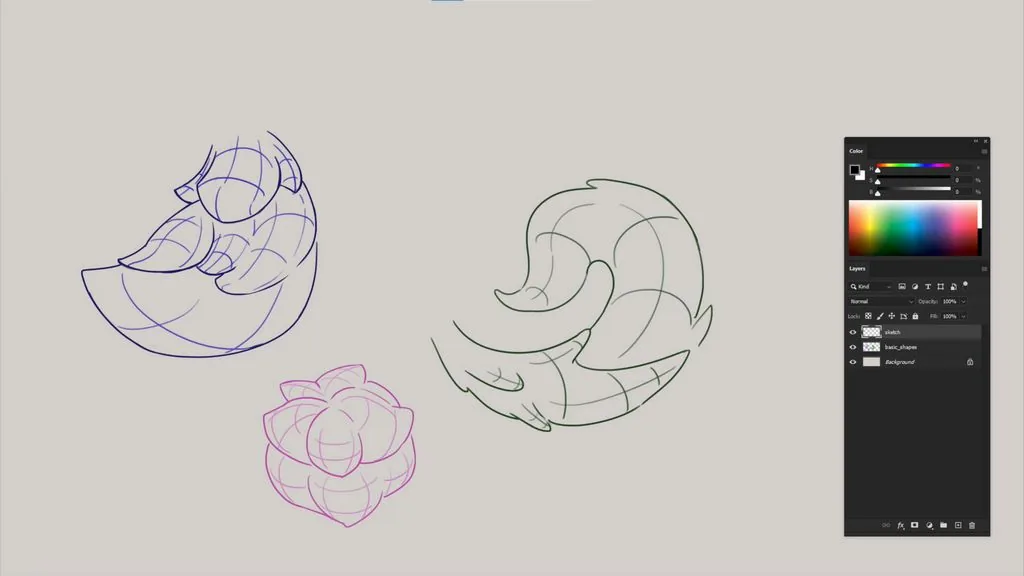
Open the template — we will practice on the basis of these figures.
We start with quick sketches — this is necessary so as not to go into excessive detailing. A standard round brush with transfer will be suitable for the work.
The shape is divided into several rows, the main captures are identified for each bunch. Be sure to make sure that the shape of the намеченных elements has development, that is, it gradually contracts or expands, follows the general direction of fur growth.
After all the main forms have been намечены, you can proceed to the line on a separate layer. We clarify the silhouette of the fur bunches: for short and medium fur it will be mainly those parts that are closer to the middle of the shape.
For long fur, it is important to distribute accents and rest areas at the end of the shape, so as not to create excessive visual load. Therefore, we add small exits from the silhouette, thereby showing that the objects consist of a large number of strands. This is enough for the viewer to understand what material is depicted.
Let's move on to local fills. We recommend using a pen or lasso — these are simple but effective tools that help to avoid frequent problems. These include, for example, various artifacts on the silhouette and incompletely colored areas that you have to constantly return to on a separate layer.
With a large soft brush we add a gradient to the transition. Fur is rarely homogeneous, it always has additional shades, so this — an excellent chance to experiment with transitions in the spectrum and tone in local заливах.
For rendering, only four layers will be required. We will divide shadows from the light source, ambient occlusion, light and highlights.
Light, as a rule, is placed from above, to the left or to the right of the object, in order to emphasize the volume of the shape well.
Ambient occlusion — these are the deepest areas in places where neither directed nor reflected light reaches, that is, at the points of contact of the object with the plane, at the corners and at the joints.
Highlights — these are reflections of the light source.
We draw shadows for fur
Related courses
All courses
from 3 900 ₽
-57%
Book illustration: The first page page
9 000 ₽3 900 ₽
Learn more

from 12 000 ₽
-20%
Векторная иллюстрация для начинающих
15 000 ₽12 000 ₽
Learn more

from 4 500 ₽
-55%
Character Concept: My First Hero
10 000 ₽4 500 ₽
Learn more
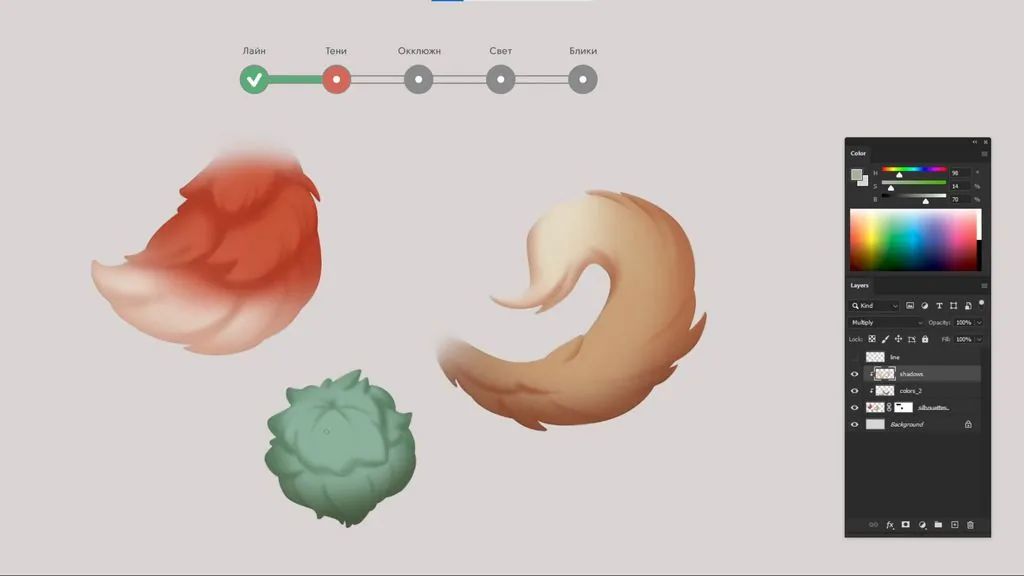
We translate the line into Multiply mode and set the opacity to 10%.
Shadows we will draw in the same mode on a new layer — we attach it with a clipping mask to the silhouette. We choose a warm color for the shadows, the brightness — about 90%.
We select the first layer of fur with the lasso to preserve a clear volume of the structure.
With a soft brush we draw our own shadows and mark several large strands inside the bunch.
We invert the selection and with the same brush we set the shadow under the first layer of fur. The edge will be soft, since on such material as fur, clear falling shadows with hard instructions do not occur.
 We work on the second layer of fur in a similar way. If something needs to be erased, use an eraser with the same shape imprint as the brush — soft, round, with transfer.
 For now, own and falling shadows are not separated. The simpler and stronger the light and shadow pattern is, the better the volume of the object will be read.
We hide the line to clarify the details, and by slightly increasing the stretch of the falling shadows, we emphasize the mass of each of the layers of fur.
For now, own and falling shadows are not separated. The simpler and stronger the light and shadow pattern is, the better the volume of the object will be read.
We hide the line to clarify the details, and by slightly increasing the stretch of the falling shadows, we emphasize the mass of each of the layers of fur.
 At the end of this stage, it is very important to go over the edges of the object with a large brush, to show the total volume, since often when working out individual details, fragmentation appears, and the shape can become flat.
 On long fur, we also select individual strands with the lasso and create their own shadows with a soft brush. Additionally, with a large brush with a very weak pressure, so as not to completely cover the individual heels, we draw the own shadow of the entire object. We do the same with the top part.
 The shadows of the first and second rows of short fur are created in turn. And after that, with a very weak pressure the volume of the entire mass of fur is set.
 To show the growth point of the fur, we select individual areas through the lasso along the line and show darkening to the center in each of them.
 If you often use zooming when drawing, do not forget at the end of each stage to move away the canvas and check the result, so that if necessary, make edits in time.
 First, we select the area under the fur bunches with a free lasso. After that, with a large brush we create a smooth darkening to the corner where one edge of the fur hangs over the other. As usual, we first work on the largest forms.
Additionally, we use a layer to separate several strands from each other. Here we also work with a soft brush to convey the lack of hard touches characteristic of the material. At the end, we slightly darken the edges of the entire object.
First, we select the area under the fur bunches with a free lasso. After that, with a large brush we create a smooth darkening to the corner where one edge of the fur hangs over the other. As usual, we first work on the largest forms.
Additionally, we use a layer to separate several strands from each other. Here we also work with a soft brush to convey the lack of hard touches characteristic of the material. At the end, we slightly darken the edges of the entire object.
 A similar study is carried out for long and short fur.
 If the object is loaded with numerous tufts of wool, then it is worth removing them, leaving details only in one point. Otherwise, there is an illusion that absolutely everything is right in the zone of attention, and such an image is difficult to perceive.
The structure of the wool is preserved, the general direction of growth is visible.
If you notice that the wool does not fit well on the volume of the base shape, then it is worth going back to the layer with the line and streamline the shape of the main elements.
If the object is loaded with numerous tufts of wool, then it is worth removing them, leaving details only in one point. Otherwise, there is an illusion that absolutely everything is right in the zone of attention, and such an image is difficult to perceive.
The structure of the wool is preserved, the general direction of growth is visible.
If you notice that the wool does not fit well on the volume of the base shape, then it is worth going back to the layer with the line and streamline the shape of the main elements.
 There is a division into light and shadows.
The volume is easy to check by converting the picture to b/w with the shortcut Ctrl+Y. To set this shortcut, open in the View menu — Proof Setup — Custom and in the Device to Simulate tab, select 20%. Now at any time with the shortcut Ctrl+Y you can look at the work in b/w and switch back to color.
There is a division into light and shadows.
The volume is easy to check by converting the picture to b/w with the shortcut Ctrl+Y. To set this shortcut, open in the View menu — Proof Setup — Custom and in the Device to Simulate tab, select 20%. Now at any time with the shortcut Ctrl+Y you can look at the work in b/w and switch back to color.
 Compare the light and shadow areas — they should be read immediately. If the boundary of the light section is not obvious, then it is worth going back to the layer with the shadows and, through the color correction panel, make the shadows more noticeable.
 If you notice discrepancies with this checklist, try to make the edits right away.
The material was prepared based on the video lesson by concept artist Anna Vinokurova
If you notice discrepancies with this checklist, try to make the edits right away.
The material was prepared based on the video lesson by concept artist Anna Vinokurova
We work on the second layer of fur in a similar way. If something needs to be erased, use an eraser with the same shape imprint as the brush — soft, round, with transfer.
For now, own and falling shadows are not separated. The simpler and stronger the light and shadow pattern is, the better the volume of the object will be read.
We hide the line to clarify the details, and by slightly increasing the stretch of the falling shadows, we emphasize the mass of each of the layers of fur.
At the end of this stage, it is very important to go over the edges of the object with a large brush, to show the total volume, since often when working out individual details, fragmentation appears, and the shape can become flat.
On long fur, we also select individual strands with the lasso and create their own shadows with a soft brush. Additionally, with a large brush with a very weak pressure, so as not to completely cover the individual heels, we draw the own shadow of the entire object. We do the same with the top part.
The shadows of the first and second rows of short fur are created in turn. And after that, with a very weak pressure the volume of the entire mass of fur is set.
To show the growth point of the fur, we select individual areas through the lasso along the line and show darkening to the center in each of them.
If you often use zooming when drawing, do not forget at the end of each stage to move away the canvas and check the result, so that if necessary, make edits in time.
We draw ambient occlusion
For ambient occlusion we use a soft brush and a slightly lighter color than the shadows. We will draw on a new layer in Multiply mode — added on top of the created shadows, it will emphasize the depths well and add a cut to the layers and individual bunches of fur.
First, we select the area under the fur bunches with a free lasso. After that, with a large brush we create a smooth darkening to the corner where one edge of the fur hangs over the other. As usual, we first work on the largest forms.
Additionally, we use a layer to separate several strands from each other. Here we also work with a soft brush to convey the lack of hard touches characteristic of the material. At the end, we slightly darken the edges of the entire object.
A similar study is carried out for long and short fur.
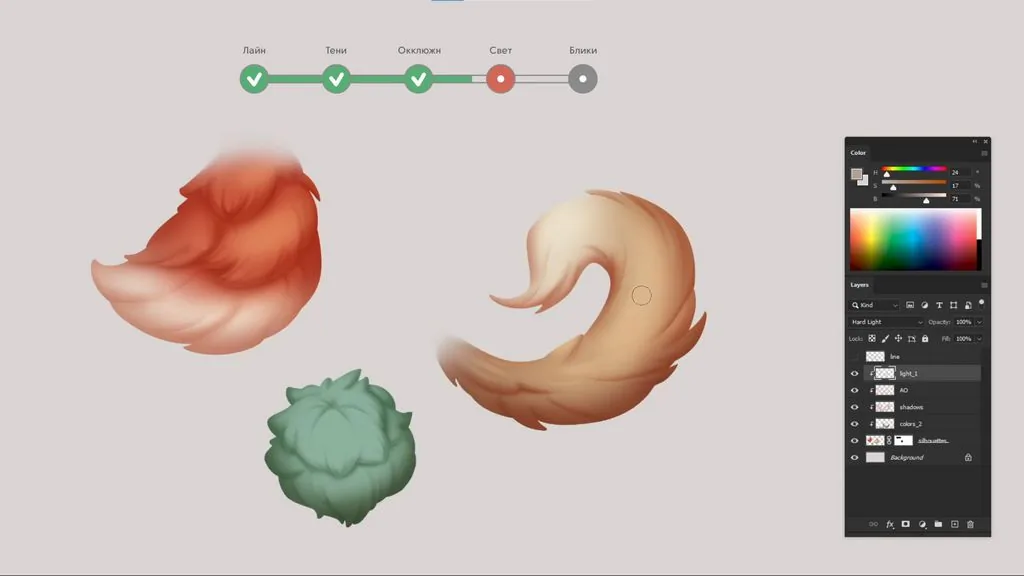
We draw light
We create a new layer in Hard Light mode. To begin with, it will be enough to add a small soft stretch in the most illuminated areas of the objects, while for long fur you can use the lasso selection area and create separate shapes, fill them with a stretch with a soft brush to show how individual strands reflect light in the total mass. At the end, we soften the hard touch with a couple of strokes — this will make the light spots stronger.
We draw highlights on the fur
The last and practically the most favorite part of the render for many is left — the highlights. We create a new layer in Color Dodge mode so that they turn out juicy. Double-click on the layer icon to open the layer effects and uncheck the second box in the tab. <The object includes both recreation areas and detailing areas Active rendering — in the most contrastingly lit part. The closer to the edges of the object, the fewer details it has.
If the object is loaded with numerous tufts of wool, then it is worth removing them, leaving details only in one point. Otherwise, there is an illusion that absolutely everything is right in the zone of attention, and such an image is difficult to perceive.
The structure of the wool is preserved, the general direction of growth is visible.
If you notice that the wool does not fit well on the volume of the base shape, then it is worth going back to the layer with the line and streamline the shape of the main elements.
There is a division into light and shadows.
The volume is easy to check by converting the picture to b/w with the shortcut Ctrl+Y. To set this shortcut, open in the View menu — Proof Setup — Custom and in the Device to Simulate tab, select 20%. Now at any time with the shortcut Ctrl+Y you can look at the work in b/w and switch back to color.
Compare the light and shadow areas — they should be read immediately. If the boundary of the light section is not obvious, then it is worth going back to the layer with the shadows and, through the color correction panel, make the shadows more noticeable.
If you notice discrepancies with this checklist, try to make the edits right away.
The material was prepared based on the video lesson by concept artist Anna Vinokurova
Video lesson on drawing wool
Related materials

Tutorial
How to draw a crystal. Step-by-step guide for artists
March 24, 2025
Tutorial
How to draw a house
October 25, 2024

Tutorial
Learning to draw glow
March 21, 2025

Tutorial
Drawing stones
March 10, 2025

Tutorial
How to draw basic emotions
February 12, 2025

Article
How to draw armor
December 27, 2024

News
Эта уютная игра-рисовалка позволяет исследовать созданные вами пейзажи
May 22, 2026