ArticleUpdated: July 2, 2026
Linear perspective: what it is and why it is needed
In short
In this article, we will discuss the basic rules for constructing linear perspective and become acquainted with its other types using examples of works.
2D artist (illustrator)
Perspective is one of the most important tools an artist should master. Using perspective correctly, you will be able to accurately depict any object, environment, or character. In this article, we will discuss the basic rules for constructing linear perspective and introduce you to its other types.
 Work of curators: Lisa Parfyonova, Azat Nurgaleev
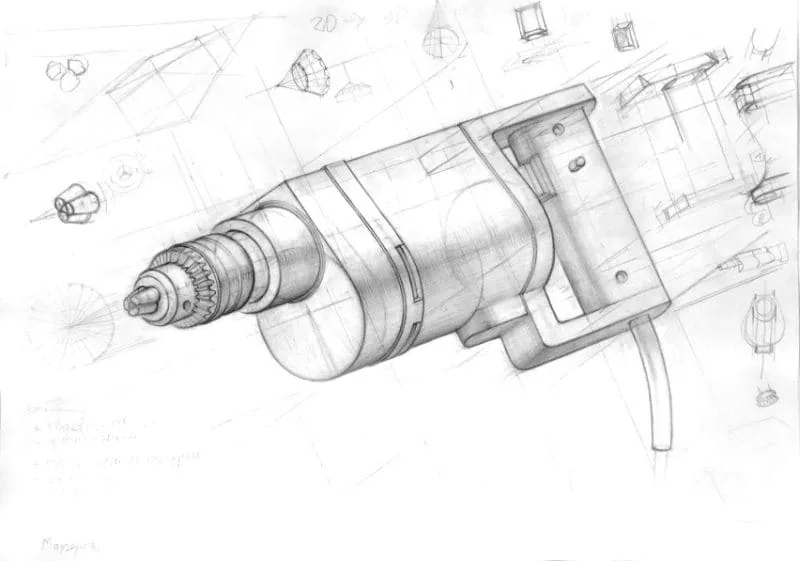 Drawing of an object in perspective. Author: Margarita Zaykina, Basic Drawing course
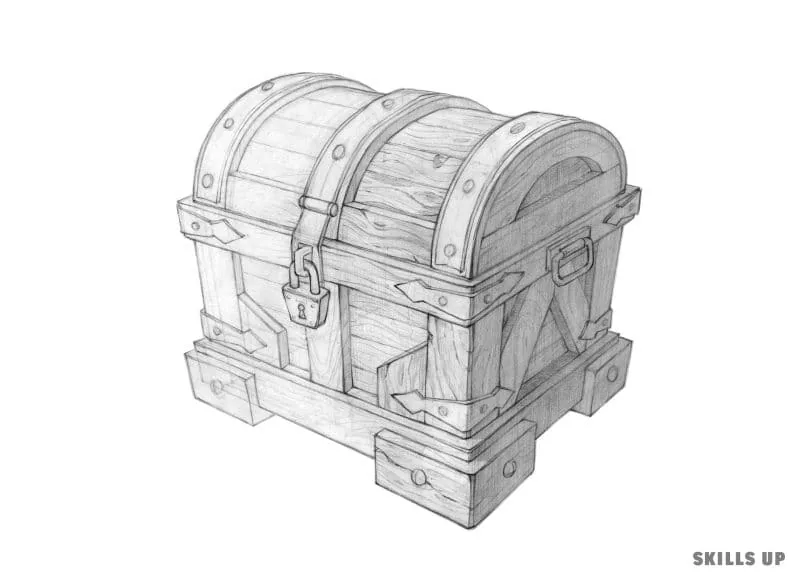 Chest in two-point perspective. Author: Darya Kostomarova, Basic Drawing course
3. Three-point perspective:
Chest in two-point perspective. Author: Darya Kostomarova, Basic Drawing course
3. Three-point perspective:
Work of curators: Lisa Parfyonova, Azat Nurgaleev
Linear perspective: what it is and why it is needed
Linear perspective is necessary for artists and architects to authentically convey space — this makes images more natural and believable. It is also used for compositional construction and creating a depth effect in the drawing. The image of an object directly depends on the perspective — it affects the perception of size, shape, distance, and location of the object in the image or in space, and also sets the angle from which we look at the object.
Drawing of an object in perspective. Author: Margarita Zaykina, Basic Drawing course
Basics of linear perspective in drawing
The basic principles of linear perspective include the following rules:- Convergence of lines. In linear perspective, parallel lines or edges of objects in the image converge at one or several points;
- Reduction in size. Objects that are farther from the point of view are depicted on a smaller scale than nearby objects to convey a sense of distance;
- Horizon line. Determining the level of the viewer's eyes relative to the depicted objects helps determine the angle of view and the vanishing point;
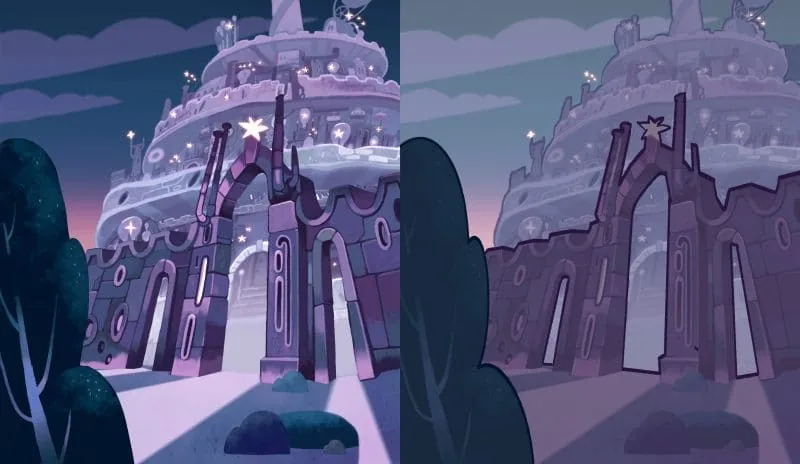
- Air perspective. Using changes in color, contrast, and clarity to convey a sense of distance and depth in space;
- Vanishing points. They determine the direction of converging lines and create a sense of depth and volume in the image.
Disadvantages of linear perspective
Despite the fact that linear perspective is a powerful tool for creating the impression of depth and space on a plane, it has its own disadvantages:- Distortion at large angles. At too large viewing angles or when depicting objects close to the vanishing point, linear perspective can create distortions and unrealistic proportions;
- Limitations in application. Linear perspective is focused on displaying space from the point of view of one viewer — this can become a limitation if it is required to convey visual information from several points of view or from different height levels;
- Difficulty in constructing unusual forms. When depicting objects with many details and surfaces, using linear perspective may require significant effort and accuracy to achieve a realistic effect;
- Inefficiency for abstract works. In the case of working with abstract or stylized images, linear perspective can limit the creative freedom and expressive possibilities of the artist.
Main types of linear perspective
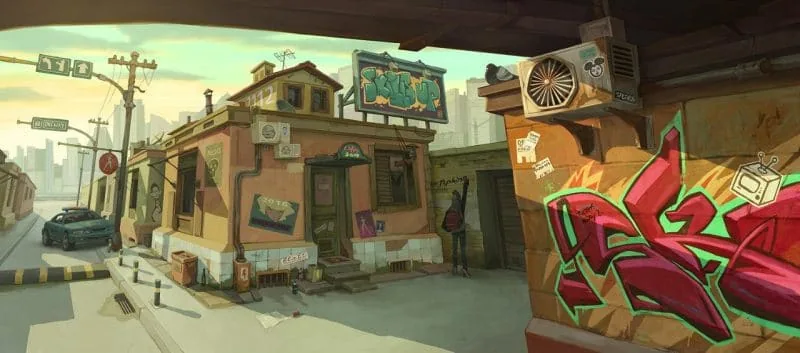
1. Frontal (one-point) perspective:- In one-point perspective, parallel lines coming from objects converge at one point on the horizon;
- This type of perspective is often used for images where the viewer looks directly at the object or scene, the objects are placed frontally and their sides are not visible to us.
- In two-point perspective, parallel lines converge to two different points on the horizon;
- This type of perspective is widely used for depicting streets, buildings, and other objects located at an angle to the observer.
Chest in two-point perspective. Author: Darya Kostomarova, Basic Drawing course
3. Three-point perspective:
- Three-point perspective is used for images where objects are located as if we are looking at them from below or above;
- In this type of perspective, vertical lines converge to one of the two vanishing points at the top or bottom of the image, and horizontal lines converge to two points on the horizon.
- Linear (geometric) perspective. One-point, two-point, and three-point perspectives, which were described earlier.
Related courses
All courses
from 3 900 ₽
-57%
Book illustration: The first page page
9 000 ₽3 900 ₽
Learn more

from 12 000 ₽
-20%
Векторная иллюстрация для начинающих
15 000 ₽12 000 ₽
Learn more

from 4 500 ₽
-55%
Character Concept: My First Hero
10 000 ₽4 500 ₽
Learn more
- Air perspective. This type of perspective uses changes in color, contrast, and clarity of objects to convey a sense of distance and depth. Objects at a greater distance are usually depicted more blurred, less contrasty and saturated, while nearby objects are more contrasty and detailed.
- Reverse perspective. Its особенность in the том, that objects that are farther from the viewer are depicted larger, and those that are closer are depicted smaller. Such perspective can show the object from several points of view at once. Perspective lines in this case converge not on the horizon, but tend towards the viewer.
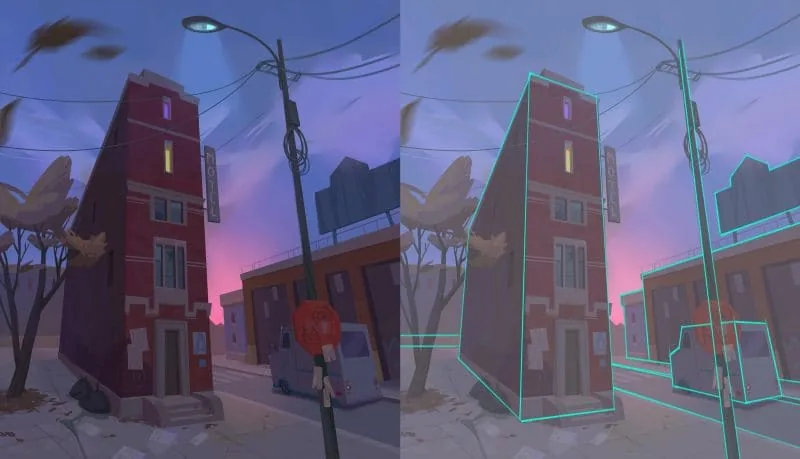 Linear three-point perspective. Author: Valeria Lugovaya
 Air perspective. Author: Azat Nurgaleev, Elizaveta Titova
 Reverse perspective. Author: Andrey Rublev
Important concepts for building perspective
Horizon line — the viewer's line of sight. It changes along with the change in the viewer's position in space, for example, if the viewer sits down, his horizon line will also drop. In nature, we can see the horizon line by looking into the distance. In a drawing, we denote the horizon as a line used in construction. Objects can be located above the horizon line, then we will see their lower plane. If the object is below the horizon line, we will see its upper platform. If the object is exactly on the viewer's line of sight, we will not see its lower and upper planes, but only its sides.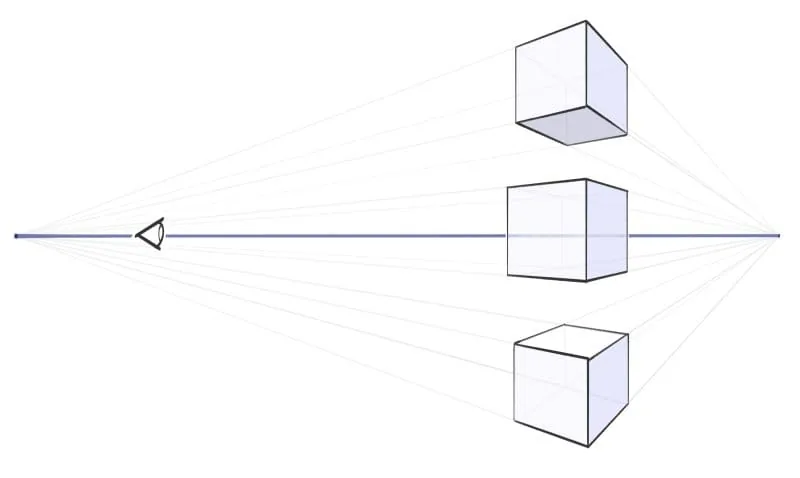 Vanishing points — they are called points on the horizon line, where parallel lines tend. This effect can be observed in nature by standing in the center of the road: look how the edges of the road tend into the distance, merging into a point on the horizon — this is our vanishing point.
 Convergence lines — these are the horizontal edges of the object that go to the vanishing point. Before starting the drawing, decide where the horizon line and points on it are, and then submit all the objects in the drawing to these rules. Parallel lines will definitely converge at the vanishing point.
Perspective laws are a set of rules and principles used in drawing. The basic rules for constructing perspective are:
Convergence lines — these are the horizontal edges of the object that go to the vanishing point. Before starting the drawing, decide where the horizon line and points on it are, and then submit all the objects in the drawing to these rules. Parallel lines will definitely converge at the vanishing point.
Perspective laws are a set of rules and principles used in drawing. The basic rules for constructing perspective are:
- Using the horizon line. Determining the level of the viewer's eyes relative to the depicted objects helps determine the angle of view and vanishing points.
- Convergence of lines. Parallel lines or edges of objects in space must converge at a point or points of convergence on the horizon.
- Reduction in size. Objects that are farther from the viewer should be depicted on a smaller scale than nearby objects.
- Change in color and contrast. At a greater distance, objects pale and fade.
- Reduction in clarity and detail as objects move away.
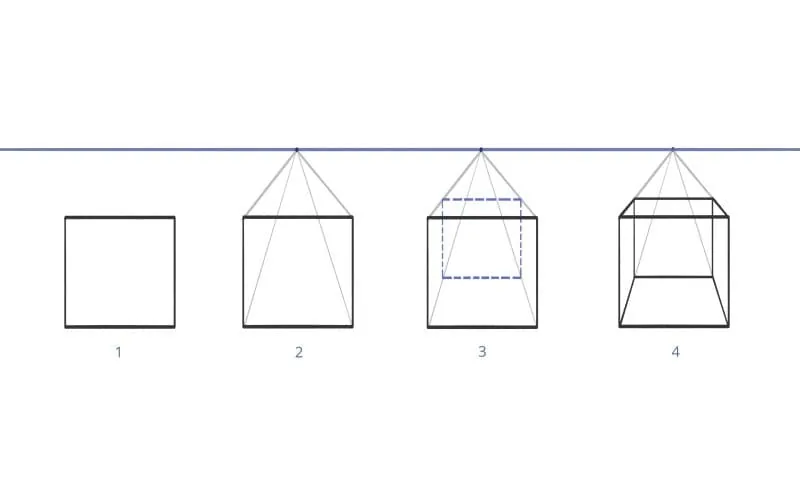
Specifics of drawing a cube to one vanishing point
The front and back walls of the cube do not have any perspective reductions — this type of perspective will help us convey simple volume, for example, it is suitable for sketching a room, conveying depth along with the static nature of the room. When we work on one vanishing point, but turn two facades to the viewer, we create a static picture, giving some distortion to space to convey our idea.Building a cube to one vanishing point
- Draw the front plane of the future cube — a square.
- From the vertices of the square, we draw convergence lines to a point on the horizon line.
- Cut off the back wall by eye. Pay attention to the base of the cube: if, cutting off the back wall, the base turns out to be too long or short, the shape will not look like a cube. We check ourselves by focusing on the most open plane — the base or the top platform.
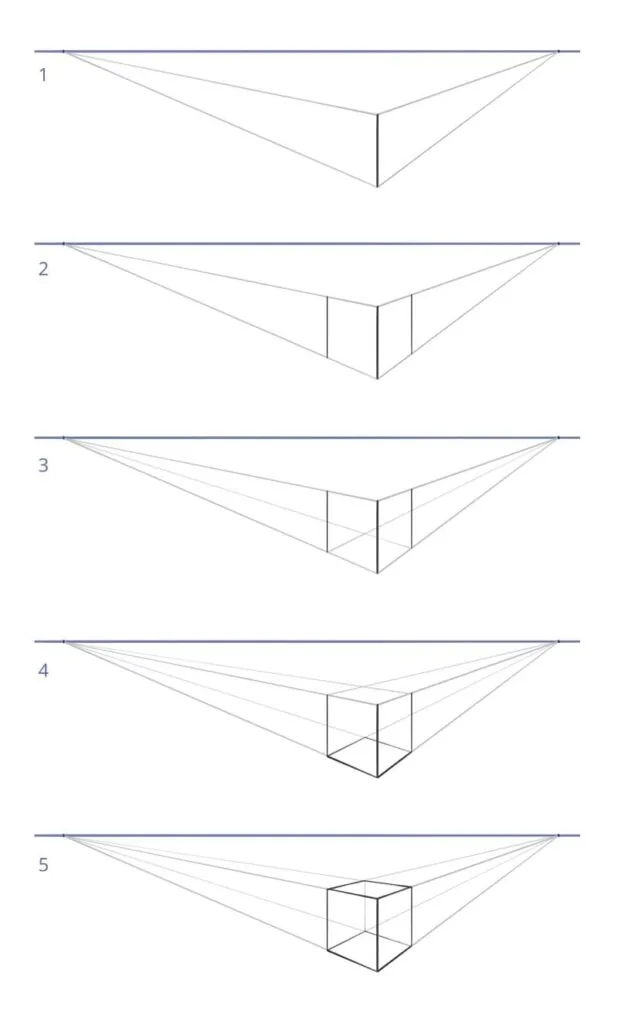
Specifics of drawing a cube to two vanishing points
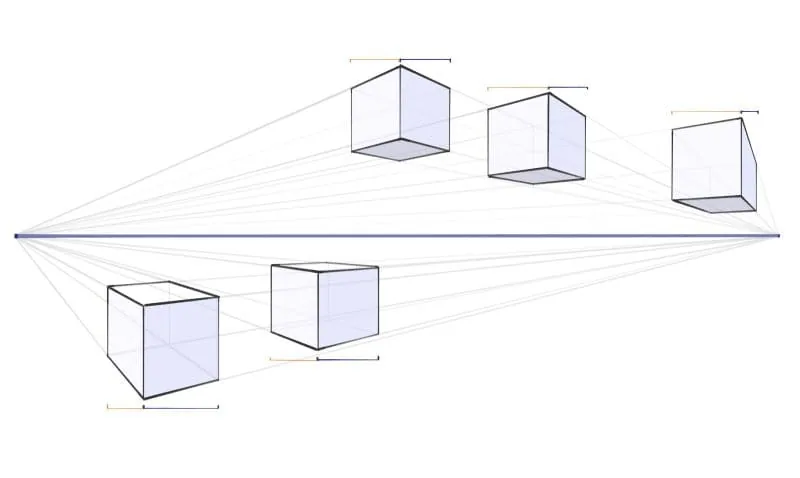
The side planes are also in perspective reductions. On the left and right of the horizon line, we have two vanishing points, and the left side of the object, reducing in perspective, tends to the left vanishing point, and the right side — to the right. By intersecting these lines, we will collect the full shape of the cube.Building a cube to two vanishing points
- We assign the location of the future cube: to do this, we draw the front face — a vertical line strictly perpendicular to the horizon line. Next, from the vertices of the vertical line, we draw lines to the left and right vanishing points.
- Cut off the side walls by eye, trying to make a square when the lines of convergence from the lower points of these verticals intersect in the base.
- Draw convergence lines from the vertices of the previously drawn verticals. When they intersect, we get the top plane of the cube.
- Determine the back face of the cube. When the lines of convergence intersect, we have already drawn the top and bottom planes of the cube, and now it is enough to connect the far corners of the bottom and top planes to each other with another vertical line.
 Ready, the cube to two vanishing points has been built!
The most important thing to watch: convergence lines are always fan-shaped and tend to their point on the horizon line. A common mistake is when the convergence lines of one side of the object begin to lead to different points, which distorts the shape and makes it unrealistic.
If you want to turn the cube in space, you also rotate the horizon line. Then it ceases to be the viewer's line of sight and becomes just another line for constructing our drawing.
Depending on how far the side of the cube is from the point on the horizon line, the opening of this side will change. If the cube is closer to the left point on the horizon line, its left face will have a strong perspective reduction and will be visually smaller, and the right side, located far from the right vanishing point, will have a smaller perspective reduction and will be more open to us. Thus, depending on the position of the cube closer or further from the vanishing points, the perspective reduction and opening of the sides of the cube will change.
Ready, the cube to two vanishing points has been built!
The most important thing to watch: convergence lines are always fan-shaped and tend to their point on the horizon line. A common mistake is when the convergence lines of one side of the object begin to lead to different points, which distorts the shape and makes it unrealistic.
If you want to turn the cube in space, you also rotate the horizon line. Then it ceases to be the viewer's line of sight and becomes just another line for constructing our drawing.
Depending on how far the side of the cube is from the point on the horizon line, the opening of this side will change. If the cube is closer to the left point on the horizon line, its left face will have a strong perspective reduction and will be visually smaller, and the right side, located far from the right vanishing point, will have a smaller perspective reduction and will be more open to us. Thus, depending on the position of the cube closer or further from the vanishing points, the perspective reduction and opening of the sides of the cube will change.
Building a cube to three vanishing points
- Build a square to two vanishing points — this will be the top plane of the future cube
- Next, by drawing diagonal lines from one corner of the square to the opposite one, in the intersection of the diagonals we find the center of the square. Through the center, we draw a straight line perpendicular to the horizon line — this will be the axis of our cube. On the same line we will have the third vanishing point, to which we will direct the convergence lines from the corners of our square.
- Next, we need to cut off the lower plane of the cube by eye, drawing another square to two vanishing points.
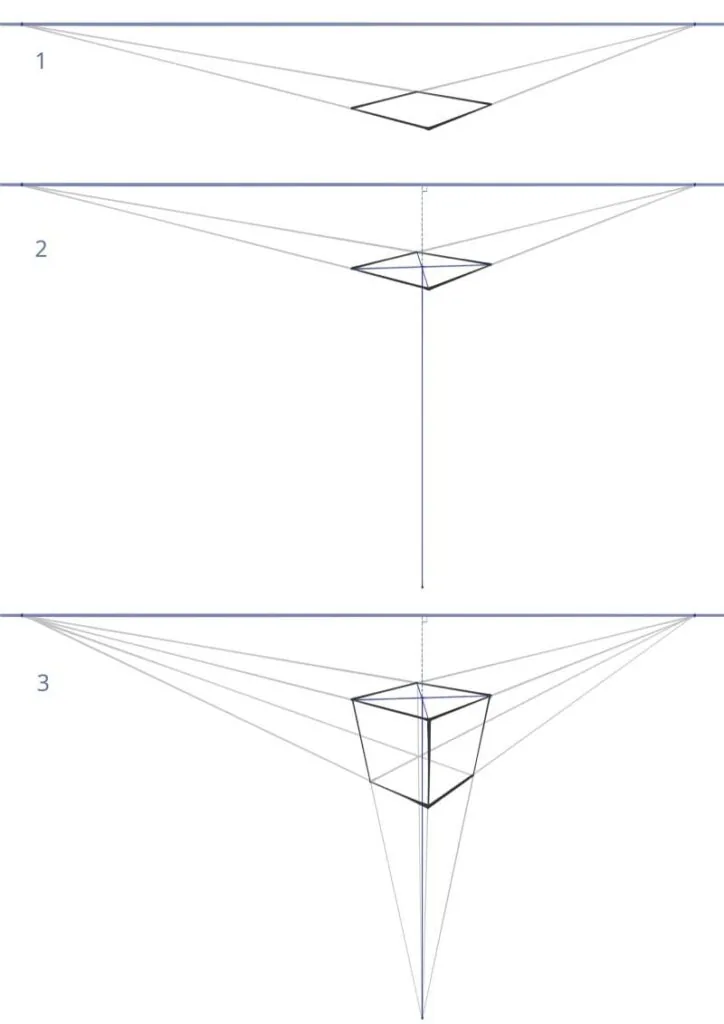 Thus, all the horizontal lines tend to two points on the horizon line, and the verticals — to a third point outside the horizon line. Done, the cube in perspective with three vanishing points has been constructed!
To create a more dynamic angle, you can move the third vanishing point slightly to the side relative to the center of the cube. But do not overdo it! The location of the vanishing points on the horizon line also affects the angle. If the points are far from each other, the angle will be more natural, and the perspective reduction of the sides of the object will not be so noticeable.
If the points are located close to each other, the angle will become active, and the perspective reduction will be very noticeable. Keep a balance to achieve the desired result and to ensure that the objects do not lose their naturalness.
Thus, all the horizontal lines tend to two points on the horizon line, and the verticals — to a third point outside the horizon line. Done, the cube in perspective with three vanishing points has been constructed!
To create a more dynamic angle, you can move the third vanishing point slightly to the side relative to the center of the cube. But do not overdo it! The location of the vanishing points on the horizon line also affects the angle. If the points are far from each other, the angle will be more natural, and the perspective reduction of the sides of the object will not be so noticeable.
If the points are located close to each other, the angle will become active, and the perspective reduction will be very noticeable. Keep a balance to achieve the desired result and to ensure that the objects do not lose their naturalness.
Perspective with multiple vanishing points
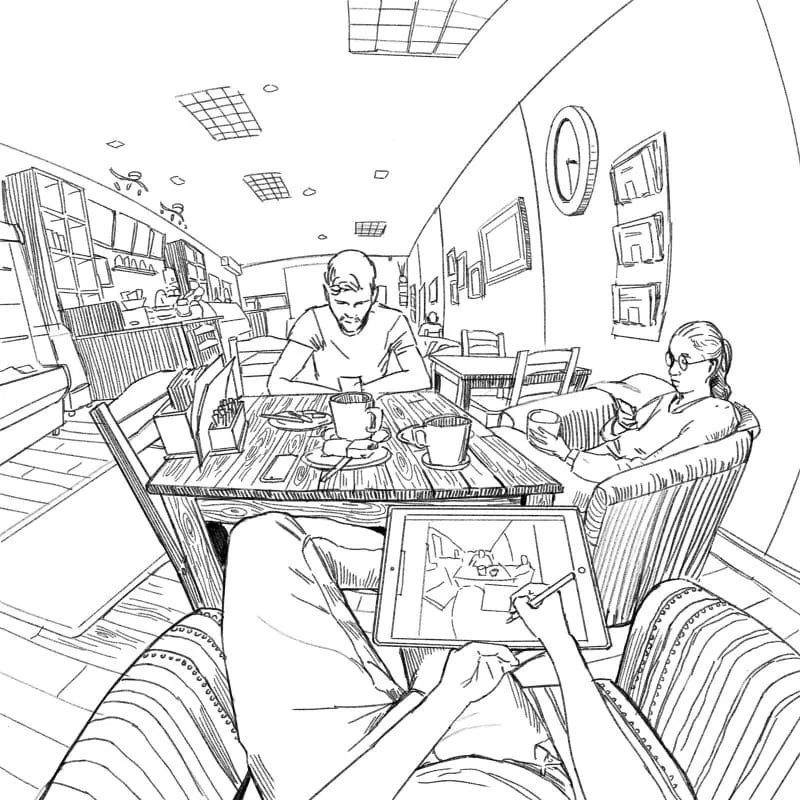
Perspective with multiple vanishing points is a type of spherical perspective. It is recommended to start with it when you have a good understanding of perspectives with one, two, and three vanishing points. Here our vanishing points form a spherical shape, and all contractions and distortions follow the spherical shape in the form of arcs. These types of perspective help us achieve the "Fish Eye" effect — a similar type of perspective is not visible to the human eye and is achieved using technology: special lenses, curved mirrors, etc. This type of perspective can often be found in photography.
 Often we draw perspective not as we see in life. As artists, we control the perspective to emphasize some movement (or its absence) in the picture, set the desired angle and rotation of objects.
We begin to study the laws of perspective in the course Basic Drawing. The knowledge gained will help to better understand and perceive the visual arts. You will use them in your creative works to create impressive and convincing realistic images with a sense of depth of space.
At the next levels of studying drawing — Middle, High and Pro, you will continue to work with perspective, but the task will become more complicated, and your view of objects and their image will become more creative, and the angles will be more unusual.
To make the process of studying applied drawing smooth and consistent, we recommend choosing a set of courses Master of Drawing. It includes all the flagship courses of the school in drawing — from express course in sketching, where you will learn to depict simple shapes (and learn how to hold a pencil correctly if you have never drawn before!), to the High Drawing course with an in-depth study of the plastics of natural objects and complex forms.
Often we draw perspective not as we see in life. As artists, we control the perspective to emphasize some movement (or its absence) in the picture, set the desired angle and rotation of objects.
We begin to study the laws of perspective in the course Basic Drawing. The knowledge gained will help to better understand and perceive the visual arts. You will use them in your creative works to create impressive and convincing realistic images with a sense of depth of space.
At the next levels of studying drawing — Middle, High and Pro, you will continue to work with perspective, but the task will become more complicated, and your view of objects and their image will become more creative, and the angles will be more unusual.
To make the process of studying applied drawing smooth and consistent, we recommend choosing a set of courses Master of Drawing. It includes all the flagship courses of the school in drawing — from express course in sketching, where you will learn to depict simple shapes (and learn how to hold a pencil correctly if you have never drawn before!), to the High Drawing course with an in-depth study of the plastics of natural objects and complex forms.Related materials

Article
Frontal perspective in drawing
October 1, 2025
Article
Texture and finish in the drawing
November 15, 2024

Article
Statics and dynamics in drawing: creating mood and movement
March 24, 2025

Article
All about brushes in digital drawing
February 13, 2025

Article
Stylization in drawing
January 27, 2025

Tutorial
Chiaroscuro in drawing
December 17, 2024

News
Вы неправильно ведёте разговор о совместной разработке арта окружения
June 11, 2026