How to Draw a Cylinder with a Pencil
How to draw a cylinder step by step: constructing from two ellipses in perspective, light and shadow (highlight, halftone, shadow, reflected light), hatching and cast shadow. A lesson for beginners.
A cylinder is one of those shapes that any drawing begins with. We draw it with the kids at art school at the very beginning, and if you've never drawn a cylinder or have drawn it a long time ago, it's worth repeating. It seems simple, but it's on this shape that you can see whether your hand is set or not. Let's break it down honestly, step by step.
What you will need
A pencil (I draw in Procreate, but the same works with a regular pencil), an eraser, and a simple setup. It's better to take side light, as the volume is more readable this way. Nothing else is needed, a cylinder doesn't require complex props.
Constructing the shape: a tube and two ovals
Look, what a cylinder consists of. It's a tube that has a beginning and an end, that is, two ovals: the first one is at the bottom, the second one is at the top. And here's the first important point. The lower oval should be wider, more open, and the upper one should be less open.
Why is that? It's all because of perspective. The closer the oval is to the eye level, to the horizon, the narrower it is, the more it flattens into a line. The farther from the horizon, the wider it opens, almost into a circle. Imagine a cut tree: at eye level, the cut is a thin strip, and higher or lower, it's wide.
I build ovals through the axis. And right away, about the most common mistake beginners make: the oval turns out like a fish, with sharp ends on the sides. This should never happen. An oval is always smooth, rounded. To catch this smoothness, a simple trick helps me: I mentally insert two circles into the oval, and the edges themselves become soft, without sharp corners.
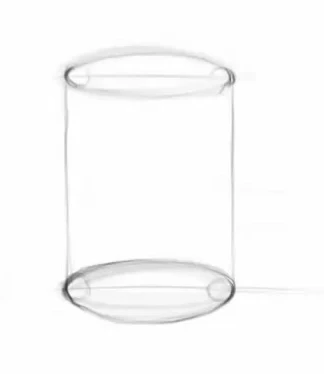
Another subtlety. The half of the oval that is closer to us is slightly larger, and the far half is slightly smaller, because it goes into perspective. The horizontal axis remains approximately in the middle, it's just that the far part opens up less. Draw everything in silhouette to understand what's happening with the shape.
I'll also tell you about the classic method of construction, which is used in academic drawing. First, we outline the vertical axis and set the height of the cylinder. Then we construct ellipses at the top and bottom ends through this axis. Many people find it easier to first draw a box in perspective, a kind of box that the cylinder will fit into, find the center of each face with diagonals, and then inscribe the ellipse there. It's almost impossible to get the ellipses wrong, they fall into place correctly. We set the proportions by eye from the setup: we estimate how many times the height is greater than the diameter, and keep this ratio.
Related courses
All courses
Моя первая фигура
5 000 ₽2 500 ₽

Book illustration: The first page page
9 000 ₽3 900 ₽

Prop concept: render and atmosphere
9 000 ₽3 900 ₽
Light and shadow: from the terminator to the reflex
We've constructed the shape, now it's the light. We have side lighting, so one side of the cylinder is light, the other is in shadow. First, I always separate the light from the shadow. The boundary between them is the terminator, the darkest place of the object's own shadow. We start with it. If you carefully outline this light-shadow boundary and immediately give it a soft velvet transition, it will be noticeably easier with the light later: half the work is done, you just need to correctly arrange the light areas.
Then I distribute the tone. The light on the cylinder doesn't live in one spot, but in a ridge: there's dark light, then medium tone, then light, then a highlight, and after the highlight, it goes back to light. It's as if there are ribs on the cylinder, soft tonal transitions along the shape. The highlight is not at the very edge, but a little inside the light side.
If you arrange it according to the classics, the light and shadow on the cylinder live in five parts: light, penumbra (soft transition from light to shadow), own shadow (the terminator is the darkest in it), reflex (highlight at the edge), and the cast shadow on the table. On the cylinder, all five are read as vertical stripes along the tube, so we lead the stroke vertically, along the shape.
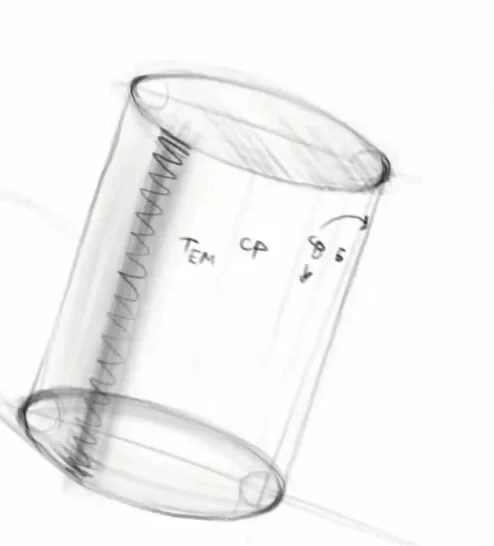
After the terminator, the tone goes into the own shadow, and at the very edge, the reflex appears, a slight highlight from the surroundings. The reflex is always slightly darker than the light, don't make it as bright, otherwise the edge of the object will fall off. And look closely at the upper oval: its tone is not uniform, somewhere it's darker, somewhere it's lighter towards the shadow. This beautifully stretches the volume, but don't overdo it, otherwise the shape will seem curved.
Hatching and modeling
I place the stroke along the shape, along it, so that it helps the volume. I make the gradient from dark to light smooth, so that the transitions between the zones of light and shadow are almost imperceptible. This is the most difficult and most important thing: the stroke should interlock, turn into a single velvet carpet, and not lie like straw. I usually start with the darkest areas and gradually build up the tone towards the light.
Don't be afraid to hatch in several directions. I place the stroke both vertically and diagonally, as it happens, in the end, it all merges into a single carpet, and multidirectional strokes are more lively than even vertical lines. The task is then to connect everything together, smooth out the transitions, so that the side of the cylinder is read as one solid surface. And keep in mind a simple rule of tone: the further the surface turns away from the light, the darker it is. The side of the cylinder turns smoothly, so the tone changes smoothly, without sudden jumps, but with a clear darkest place on the terminator.
Try not to tilt the top plane and the horizon line, keep them straight. It's useful from time to time to squint and look at the work as a whole: this way, unnecessary details disappear, and tonal spots become visible as they are, and it immediately becomes clear where the light has floated into the shadow or the shadow has become too motley. And if you want character, you can play with the nibbled edges of the plaster cylinder, it will add life to the work.
Cast shadow
When the own shadow is ready, we put the cast shadow. I draw it with a more neutral stroke, so that it separates from the own shadow in mood. And remember the main thing: the cast shadow should be denser and darker than the own shadow of the object. This is a common mistake when the cast shadow suddenly turns out to be lighter than the cylinder itself.
But dense doesn't mean black. The shadow should breathe, even in the deepest part, leave a little freshness. And one more thing: closer to the object, the cast shadow is hard, clear, and as it moves away, it becomes softer. There are also tonal moments inside it, denser towards the middle, lighter towards the edges.
Don't leave a clean white background around. Give a light medium tone, a gray environment, so that the object lives not in emptiness. If there's pure white next to the shadow and gray somewhere else, the drawing will break.
The main principle: first shape, then light
The whole pipeline is based on simple logic. First, we draw the shape. Then we separate the light from the shadow and sufficiently thicken the shadow so that it is indeed a shadow. Only then do we start to analyze the light. The light should always be lighter than the lightest place in the shadow. If you keep this rule, the drawing will turn out to be integral, and you won't get confused.
Common mistakes
- Sharp "fish" ends of the ovals. Insert circles, keep the edges smooth.
- Equally open upper and lower ovals. The lower one is always wider.
- The cast shadow is lighter than the own shadow. It should be denser and darker.
- Black dead shadow. Leave it some air, it should breathe.
- Tilted horizon and stroke across the shape.
A cylinder is the base on which everything else stands. When your hand learns to build ovals and pull the tone along the tube, it will be much easier for you with still life and figure. Draw several cylinders with different heights of the eye level, and the shape will settle in your hand.


