How to Draw Legs
Learning to draw legs from scratch: pelvic tilt, supporting and non-supporting leg, bones and volume of the leg, knee joint, quadriceps, adductor and sartorius muscles, gastrocnemius and soleus, shin and foot. Step-by-step video lesson by Azat Nurgaleev.
Hello, friends. Today we are drawing legs, and let's agree right away: I am drawing with a 6B pencil brush in Procreate, but you can easily repeat it on paper or digitally, whichever is more convenient. The principle is the same everywhere. Somebody asked for something more complicated, so we will tackle legs in a serious way: from the tilt of the pelvis and bones to the knee joint, thigh muscles, and calf muscles.
From the very beginning, we need to understand what the figure in the legs consists of. We have a pelvis, a supporting leg, and a non-supporting one. And the first thing we determine is the tilt of the pelvis. Without it, the legs will drift, and everything else will be built crookedly.
What you will need
A sheet of paper and a simple pencil, or a tablet with your favorite brush. I work digitally and keep the model at hand, but I don't draw strictly from a photograph, I design: I look at the reference for a push, then I build it myself. And one principle for the entire drawing: make all the lines very gray, light, almost weightless at the beginning. We will add accents, contrast, and pressure at the very end, when the shape has already been found.
Pelvis, supporting and non-supporting leg
First, we find the supporting leg, which bears the weight, and the non-supporting, free leg. Due to the tilt of the pelvis, one side starts lower. The pelvis is conveniently imagined as a bucket or drum that stands at an angle. The chest is turned in one direction, and the pelvis in the other, and this angle gives the opening of the pelvis. We need to see it and capture it from the very beginning.
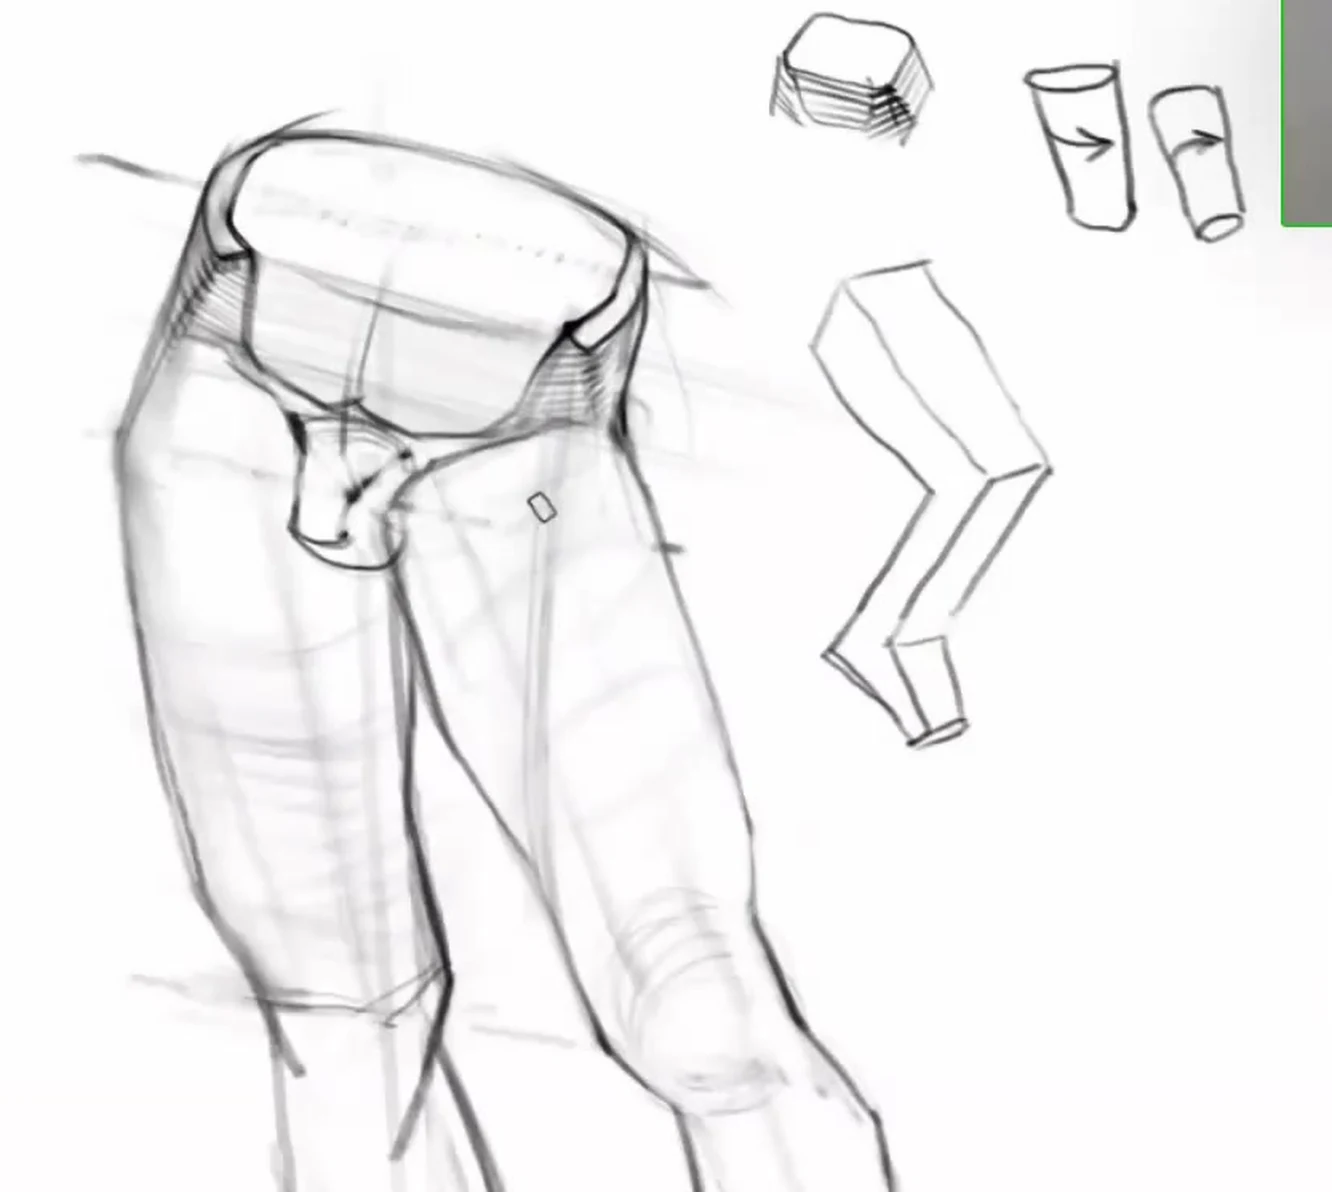
On the pelvis, we find the iliac crests, two points on the sides. They are not just marks, they have their own volume, voluminous bones, and this volume must be drawn, not left as flat ticks. Below we outline the pubis. The pubic bone is important for the shaping of the lower pelvis, without it the hips will not fit into place well. And we insert the hips into the pelvis like this: imagine that the pelvis is a barrel, and two downspouts are inserted into this barrel. That's how we think about the legs at the very beginning.
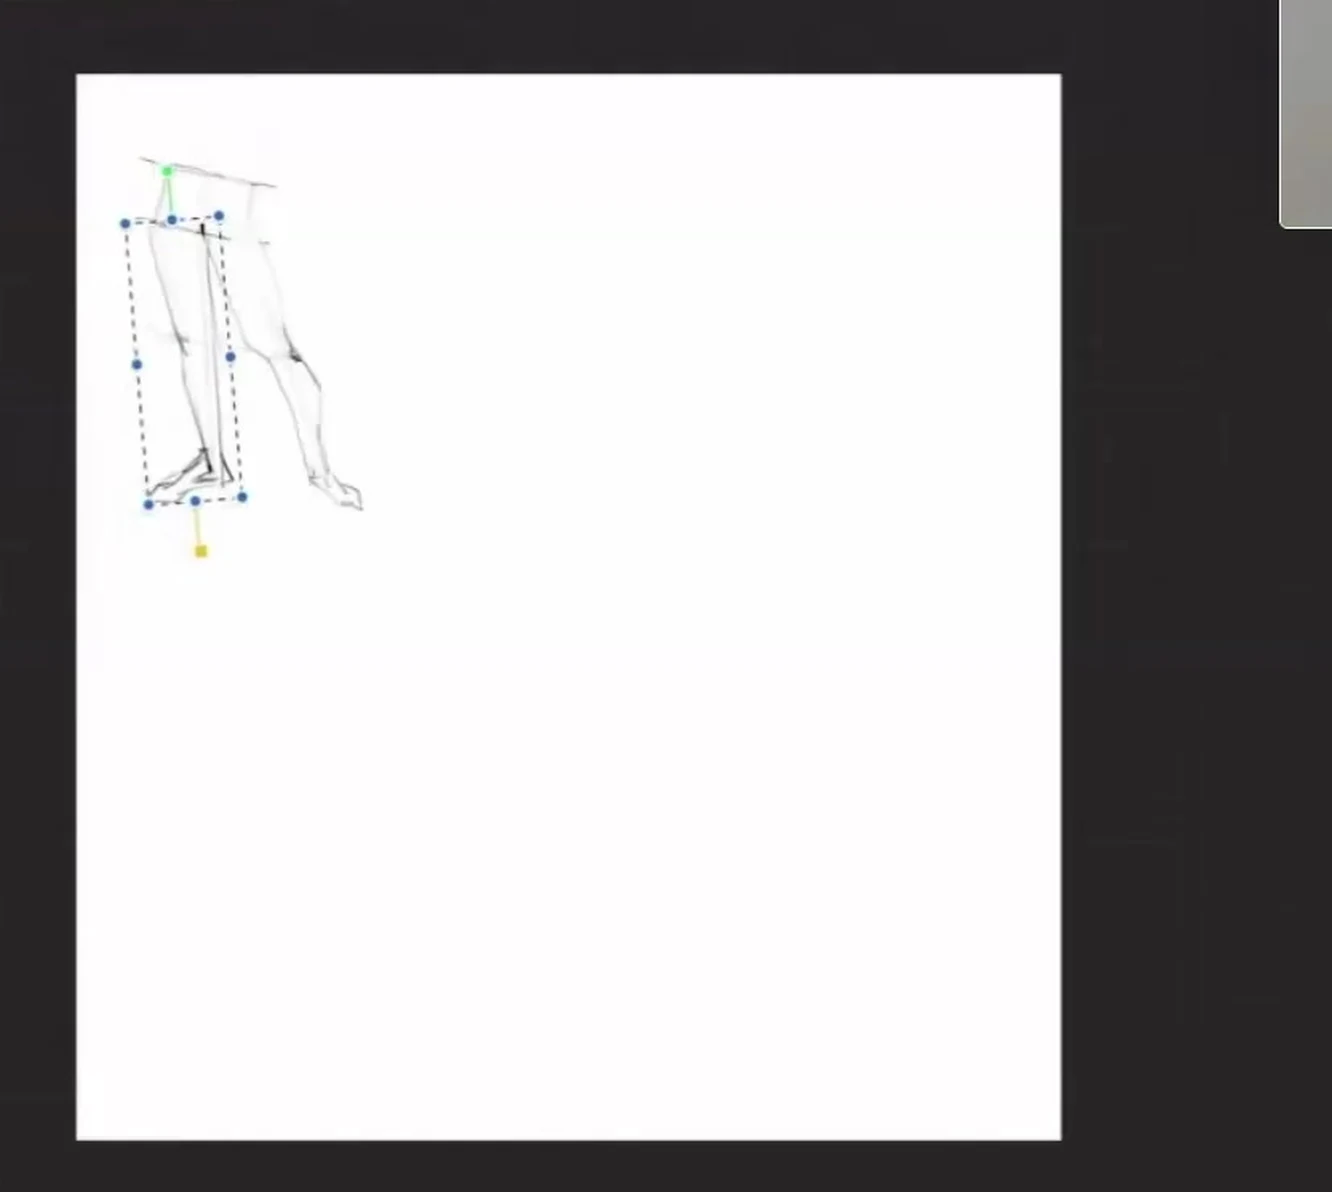
There is also an exact rule for proportions. The heel of the supporting leg should fall approximately on the same vertical line as the pubis. Draw a vertical line and check yourself. The slope of the hips repeats the slope of the pelvis, the hips start at the same heights. A very common mistake is when the pelvis is tilted, but the hips are drawn level for some reason. This does not happen.
A leg is a volume, not a plane
This is what people forget most often. The leg is not flat; the thigh has a front part and a side part, and there is a bend in the shape between them. From the very beginning, I cut everything a bit more cubically, faceted. It's like a sculptor carves a figure out of stone: first, he separates very simple, rough pieces, and only then gradually extracts smaller and more delicate ones. If you make it cubic at the beginning, it will be easy to complicate it later.
Related courses
All courses
Book illustration: The first page page
9 000 ₽3 900 ₽

Векторная иллюстрация для начинающих
15 000 ₽12 000 ₽

Character Concept: My First Hero
10 000 ₽4 500 ₽
Because of this volume, the two legs are hatched differently. The supporting leg is directed in one direction, the non-supporting leg in the other, so the hatching on one leg goes in one direction, and on the other in the opposite direction. From the front part, the shape is hatched in one direction, from the inner part in the other. This way, we help the eye to read that the legs are turned differently, and the shape comes to life immediately.
Constructing the silhouette of the legs
We outline the silhouettes of the legs right inside our scheme. The task is simple: to get a little person who looks like a person. There are not many super-strict rules here, it is important to feel the living movement and the correct masses. We make the thigh and the shin approximately equal in length to each other, and the foot itself is a bit smaller, the shin is a bit longer than the foot, this looks more correct. If you draw in numbers, the lasso is convenient: reduce something, enlarge something, move it around.
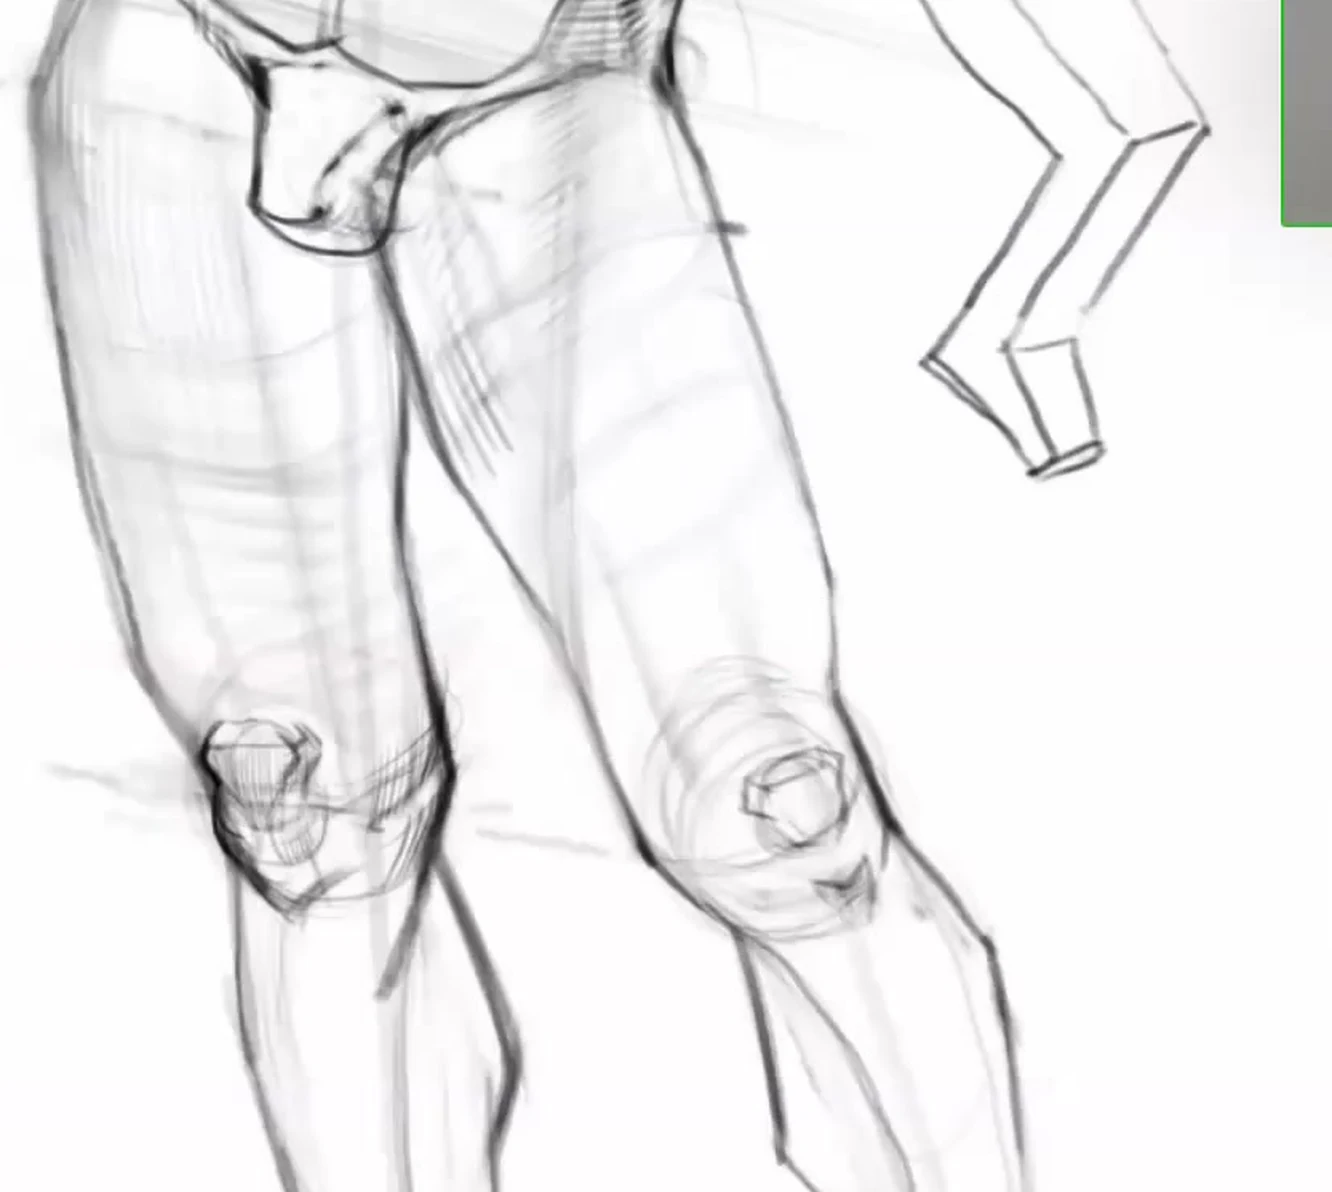
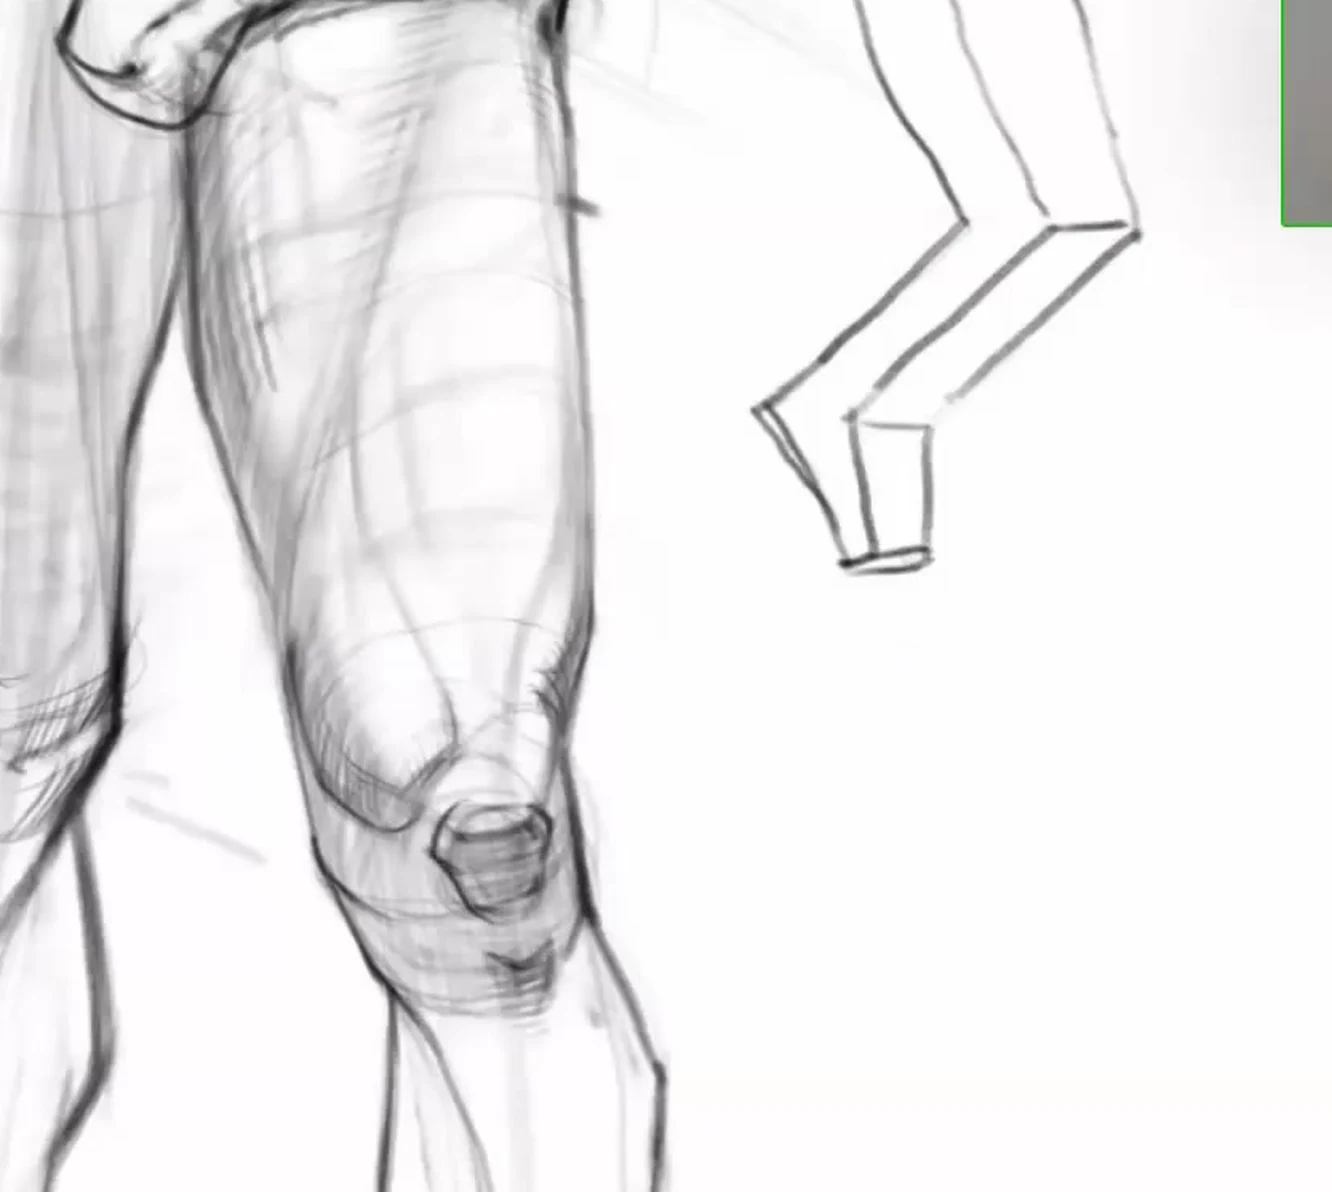
Knee joint
The knee is not just a ball, it's a whole node, and we draw it gradually. First, we outline the knee nodes with circles, then we turn the circles into balls, and then we slightly facet these balls, making more complex shapes out of them. If it were a female figure, the shapes would remain softer and rounder. But it's a male figure, so the knee caps should be quite brutal, and the overall shape is serious.
We draw the volume of the knee cap from above. The cap itself is slightly hidden behind two fatty lumps on the sides, as if they are covering a part of it. Under these lumps, we reveal the knobbiness of the tibia, and next to it, the capital of the tibia, which is also an important structure. There's also the patella, and in this area, there are completely separate shapes that need to be shown. On the bent leg that is closer to the viewer, the knee cap works more actively and contrastingly because it is closer to us. Cross-section helps a lot: we show how the shape is cut across, and it immediately becomes clear how to model it.
Thigh muscles
On the thigh, we show the quadriceps. This is the same shape that is divided into four heads, and they are directed towards the iliac crest: one like a droplet here, the second and third are higher, and the fourth is barely visible. On the inside, there are adductor muscles. And the quadriceps is separated from the adductors by the sartorius muscle. This is a flat muscle, imagine a ribbon or tailor's meter, such a ribbon lies from the iliac crest to the capital of the tibia. Above the sartorius muscle, the shape sinks a little, this is an important point that should not be forgotten. And all this time, we keep the lines inside the shape rather gray, without strict boundaries, otherwise the muscles will become dry and lifeless.
Shin
On the shin, we refine the silhouette and find two bones, the tibia and the fibula, showing them with lines. Among the muscles, we depict the gastrocnemius muscle, and below it, the soleus muscle. They also need to be shown in volume, not just drawn as a simple stick for the shin. These details may not seem super important, but the more precisely you capture all the nuances, the more lively and solid the leg will ultimately turn out.
Foot
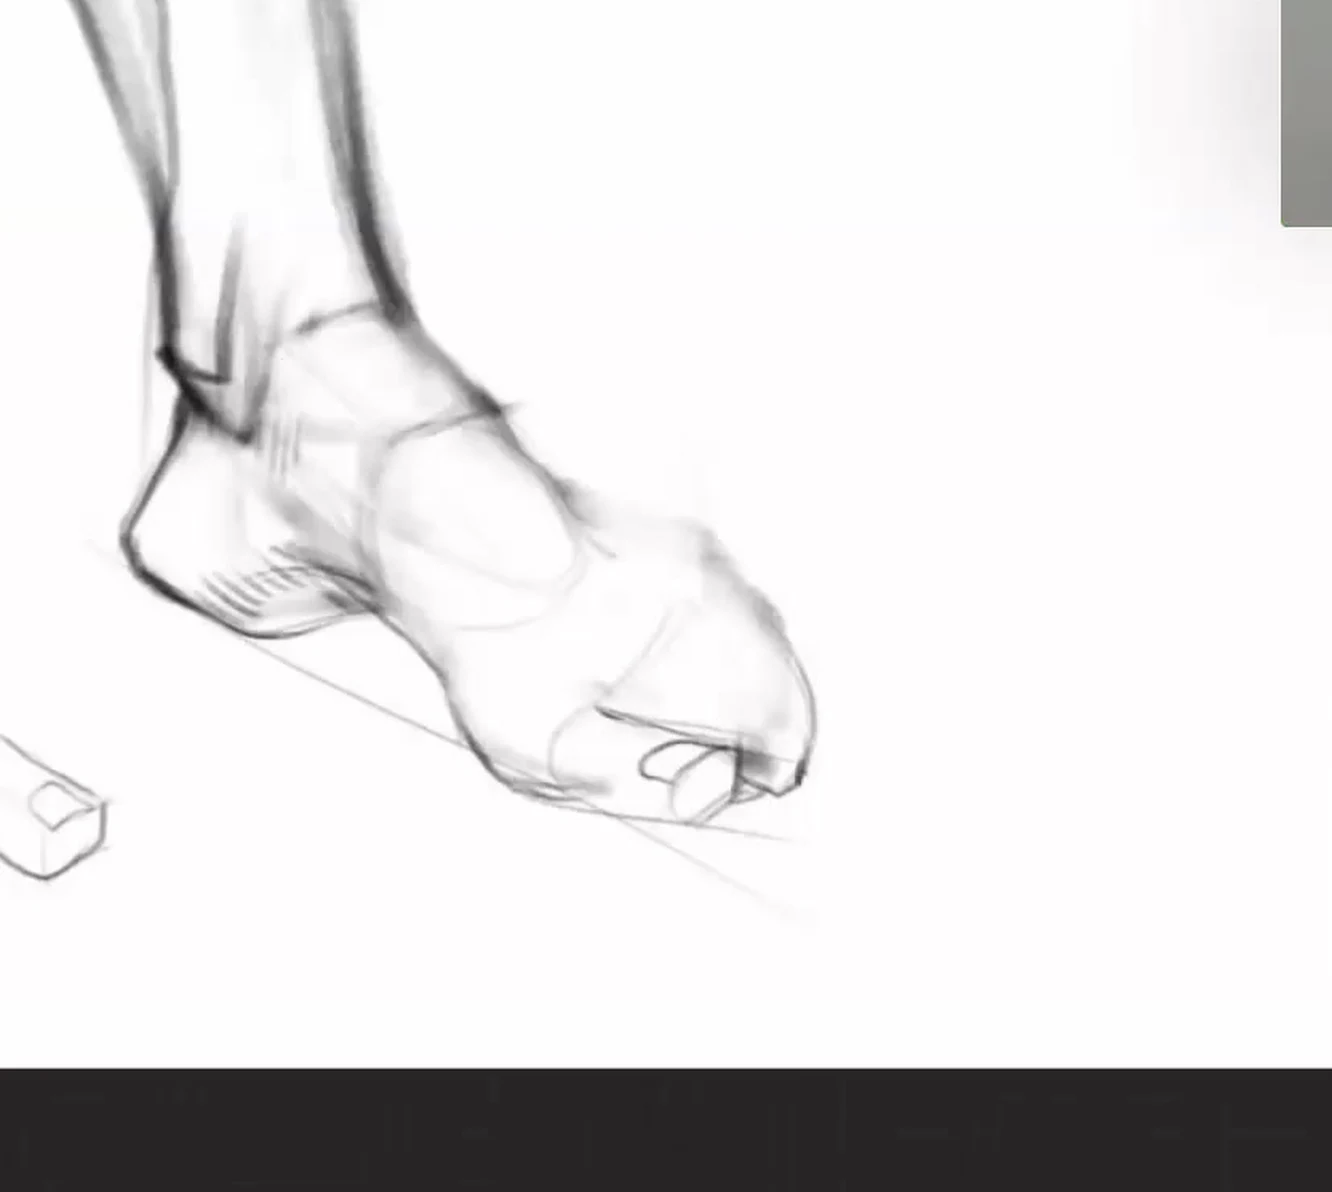
I'll give a brief overview of the foot here; a detailed analysis is a separate large topic. The silhouette of the foot is the easiest to just learn how to draw; it's hard to explain cleverly. We outline the arch of the foot and the heel; at the junction of the shin and the foot, there is a characteristic tendon, a kind of passageway like hockey goals. It's convenient to gather the toes along an arc: first, we draw the arc along which they will end, then we draw the toes themselves, each slightly shorter than the previous one. We draw the big toe as a block, then chisel it and insert the nail. Make the toes slightly different, then the foot looks alive. We cover the foot in detail in a separate lesson, How to draw a foot.
Tone, chiaroscuro, and accents
When the form is constructed, we work with tone. Squint and look where the light is. One leg will be shaded because it turns away from the light, and the other is illuminated, and on the shin, it goes back into shadow again. On the thigh, the part closer to the light is lighter, the far part is darker, and we show this on both the thigh and the shin, first with generalized broad hatching, you can take a wider brush. From the kneecap, we create chiaroscuro and modeling, at the joints, we place accents slightly more contrastingly, keeping everything else soft. If the leg is supporting and straight, then the lines and tone converge on the kneecap, and it reads more contrastingly. The far knee joint can be slightly reduced so that it doesn't stand out, while the front one, on the contrary, can be slightly elongated. We place the stroke quickly and confidently, processing the entire form at once, this is very disciplining and great for modeling.
Common mistakes
- Knees at the same level. Due to the tilt of the pelvis, one knee is lower. Start with the pelvis, then the knees follow.
- The leg is drawn flat. The thigh has a front and side part, with a bend between them. Think in volumes and build cubically.
- Incorrect tilt of the hips. The hips follow the tilt of the pelvis and start at the same heights.
- Copying instead of constructing. The model is needed for inspiration, then we design the shape ourselves.
- Rigid lines inside the muscles. Quadriceps, adductors, and sartorius are guided by soft gray lines.
- The foot is larger than the shin. The shin is slightly longer, the foot is slightly smaller.
- Knee like a simple ball. It's a joint: patella, fatty lumps, roughness, and capital of the tibia, patella.
Short advice finally
Draw lightly and in gray, construct rather than copy, and don't be afraid to work on the entire form quickly. Step away from your work often and look at the drawing from a distance, this way all proportion flaws are immediately visible: see them, correct them, step away again. We don't look for easy ways, and that's why the drawing eventually turns out great.


