How to Draw a Back
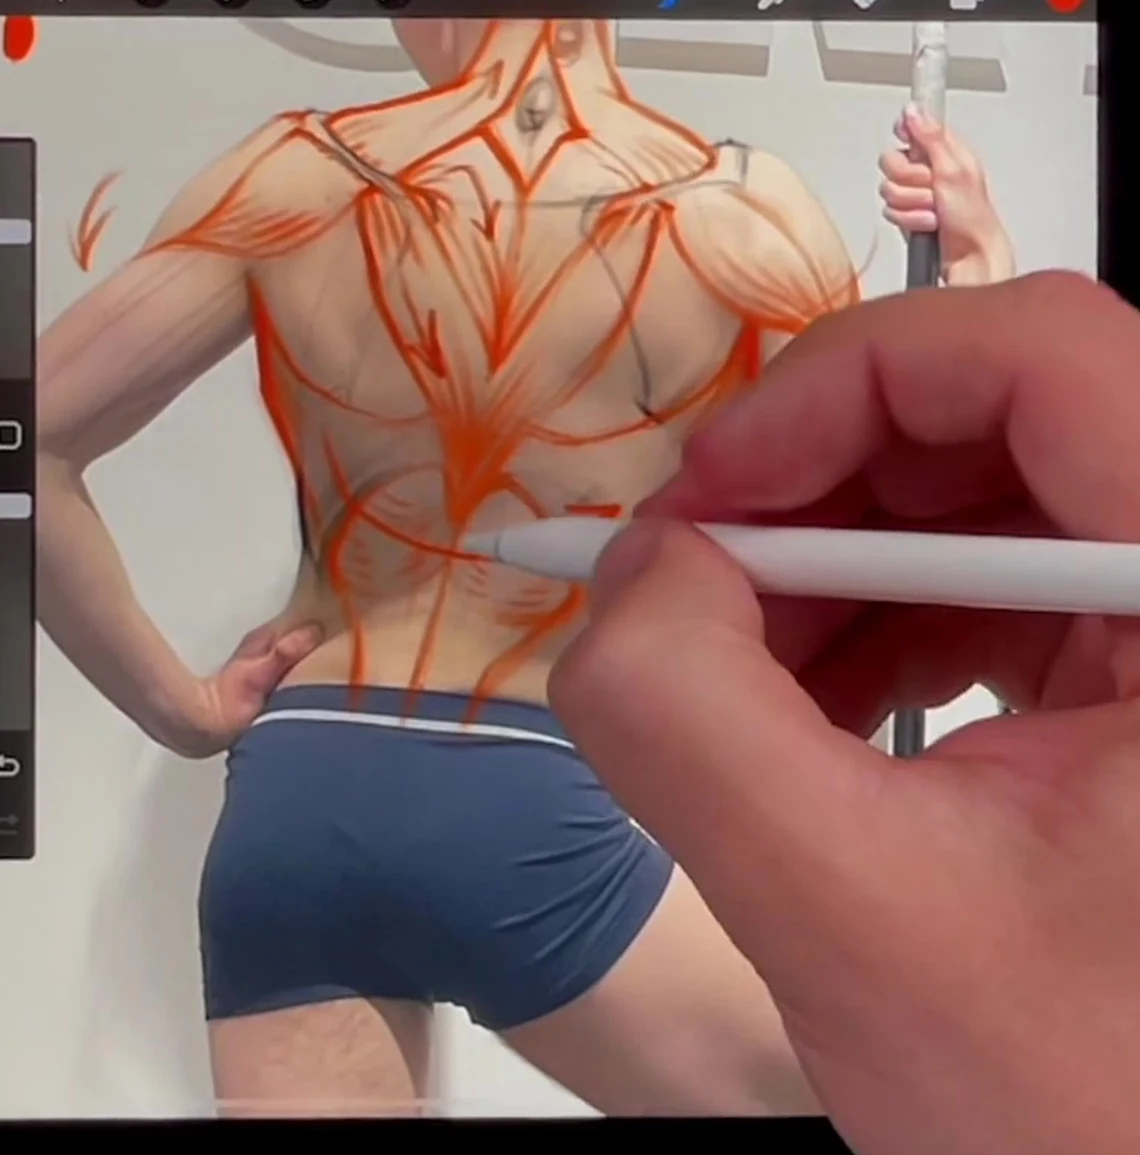
Learning to draw the back: I analyze the structure of the male figure from the back, bony landmarks (scapulae, seventh cervical vertebra) and muscles, the trapezius, latissimus dorsi, deltoid, and erector spinae. Drawing the back step by step with Azat Nurgaleev in Procreate.
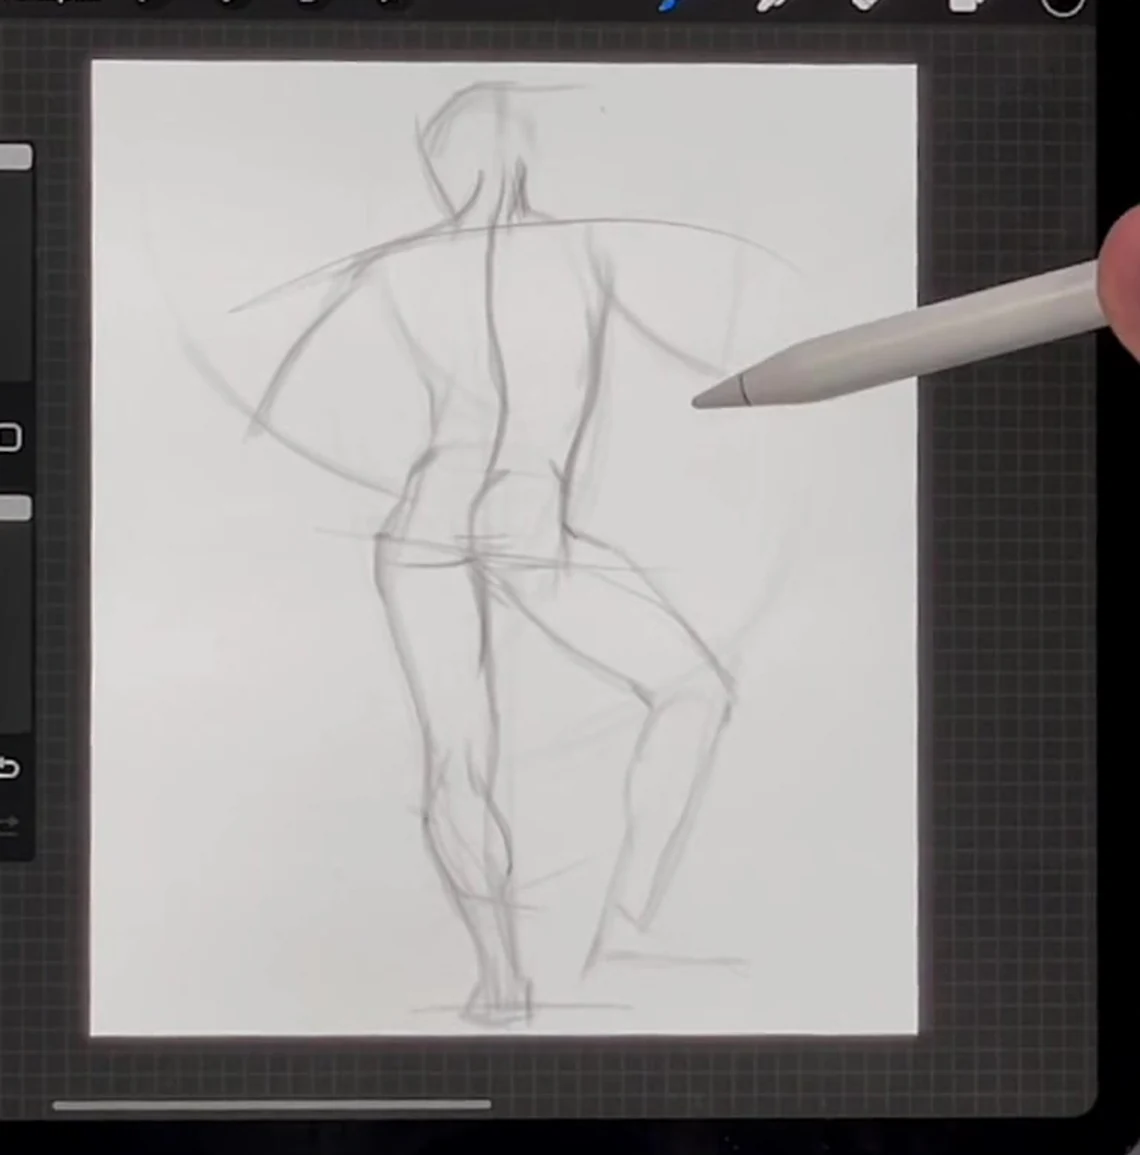
Starting with the structure, not the muscles
I never start drawing the back with the muscles. First, I divide the entire figure in half: the greater trochanter is usually the middle of the figure, and I place the supporting leg under the vertical line, under the plumb line. Then I pull out the ribcage towards the pelvis and draw not the structure, but the overall silhouette: how the latissimus dorsi extend, how the ribcage flows. I outline the entire form with large masses directly from life: I see a bump in the silhouette, a volume, I take it and transfer it, and I think about what muscle it is and why it lies like that later.
It's important to guide the form along arcs and not be afraid of iconic drawing: if there's an arc on one side, I make it slightly straighter on the other, otherwise the form falls apart. And I don't place the arms symmetrically; the same angle on the left and right looks boring; it's better when one arm is pressed, and the other goes differently. I immediately estimate the shoulder and forearm as cylinders and set their direction in space.
While I'm outlining the silhouette from life, I'm also thinking about the composition and rhythm. Usually, around the middle, two things converge: compositional expressiveness and a beautiful, lively figure. I catch the rhymes right away: the ribcage moves away from the pelvis in one direction, and the trapezius and neck muscles repeat the same direction. Since the angle is almost frontal from the back, there won't be a strong arc; the arc is soft. These coincidences of movements make the drawing of the back look whole, not a collection of separate muscles.
Bony landmarks: the seventh cervical vertebra and the scapulae
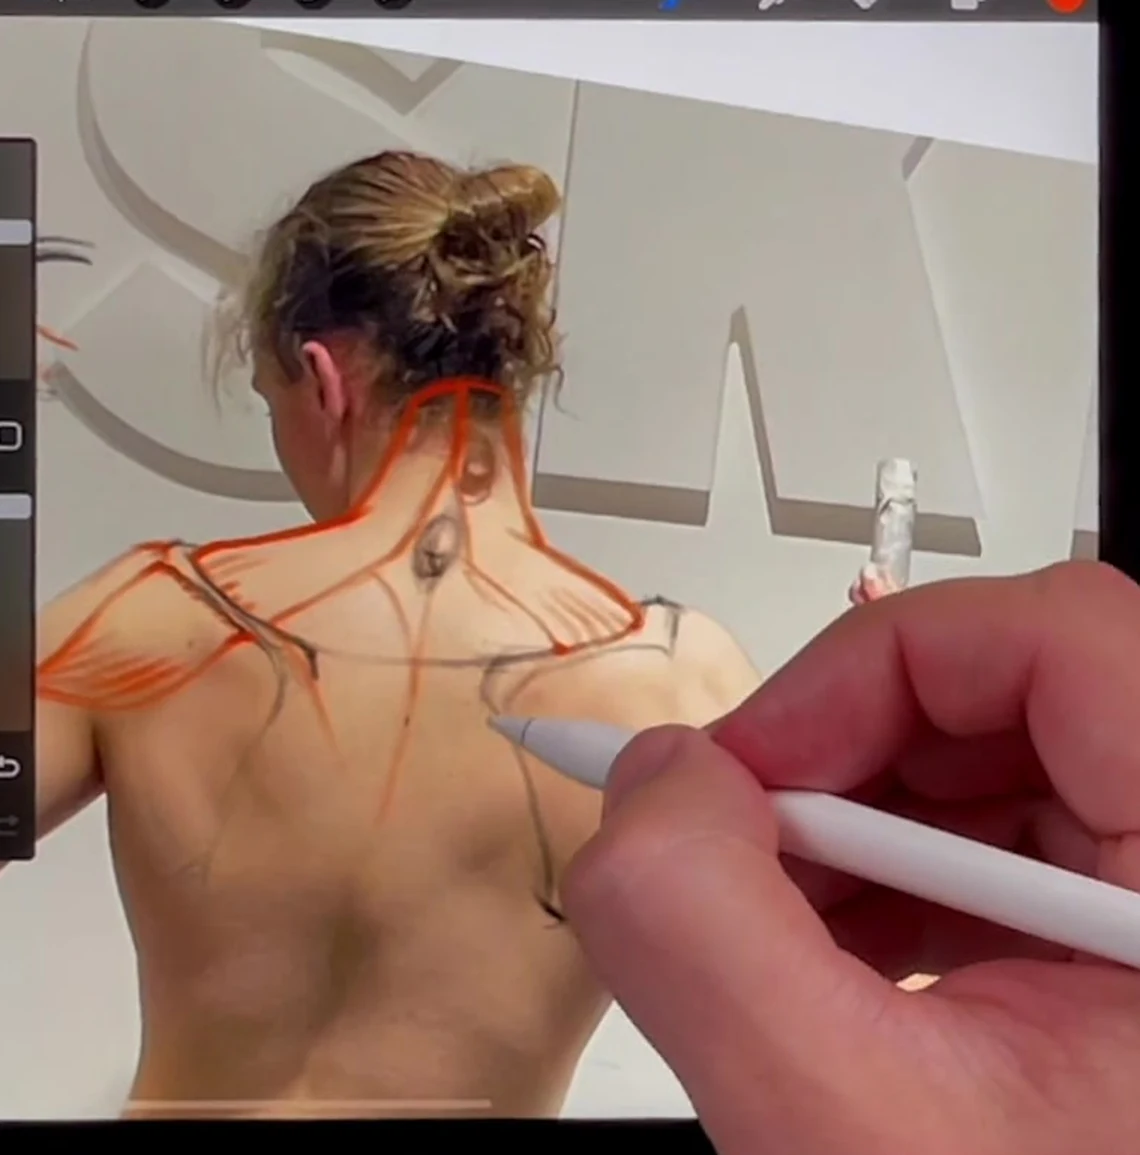
Next, I fix the bony landmarks; the entire back relies on them. The first one is the seventh cervical vertebra. It always protrudes a little more than the others because the shapemaking muscles are not attached to it; it is surrounded by the tendinous rhombus. The shoulder girdle arc passes through the seventh cervical vertebra, and the neck cut is located in its projection. Many people place the seventh cervical vertebra too low, which makes the entire structure move away, so I always associate: the seventh cervical vertebra, the projection of the neck cut, and the shoulder girdle line through the upper trapezius.
The second landmark is the scapulae. The acromion is visible almost always, the scapular spine extends from it, but the lower angle is harder to find; it's often hidden by the latissimus dorsi or teres major. In linear-constructive drawing, I reveal the scapulae more actively than the muscles: the bones, although small, are shapemaking; many muscles are attached to them, so I pay special attention to them.
Related courses
All courses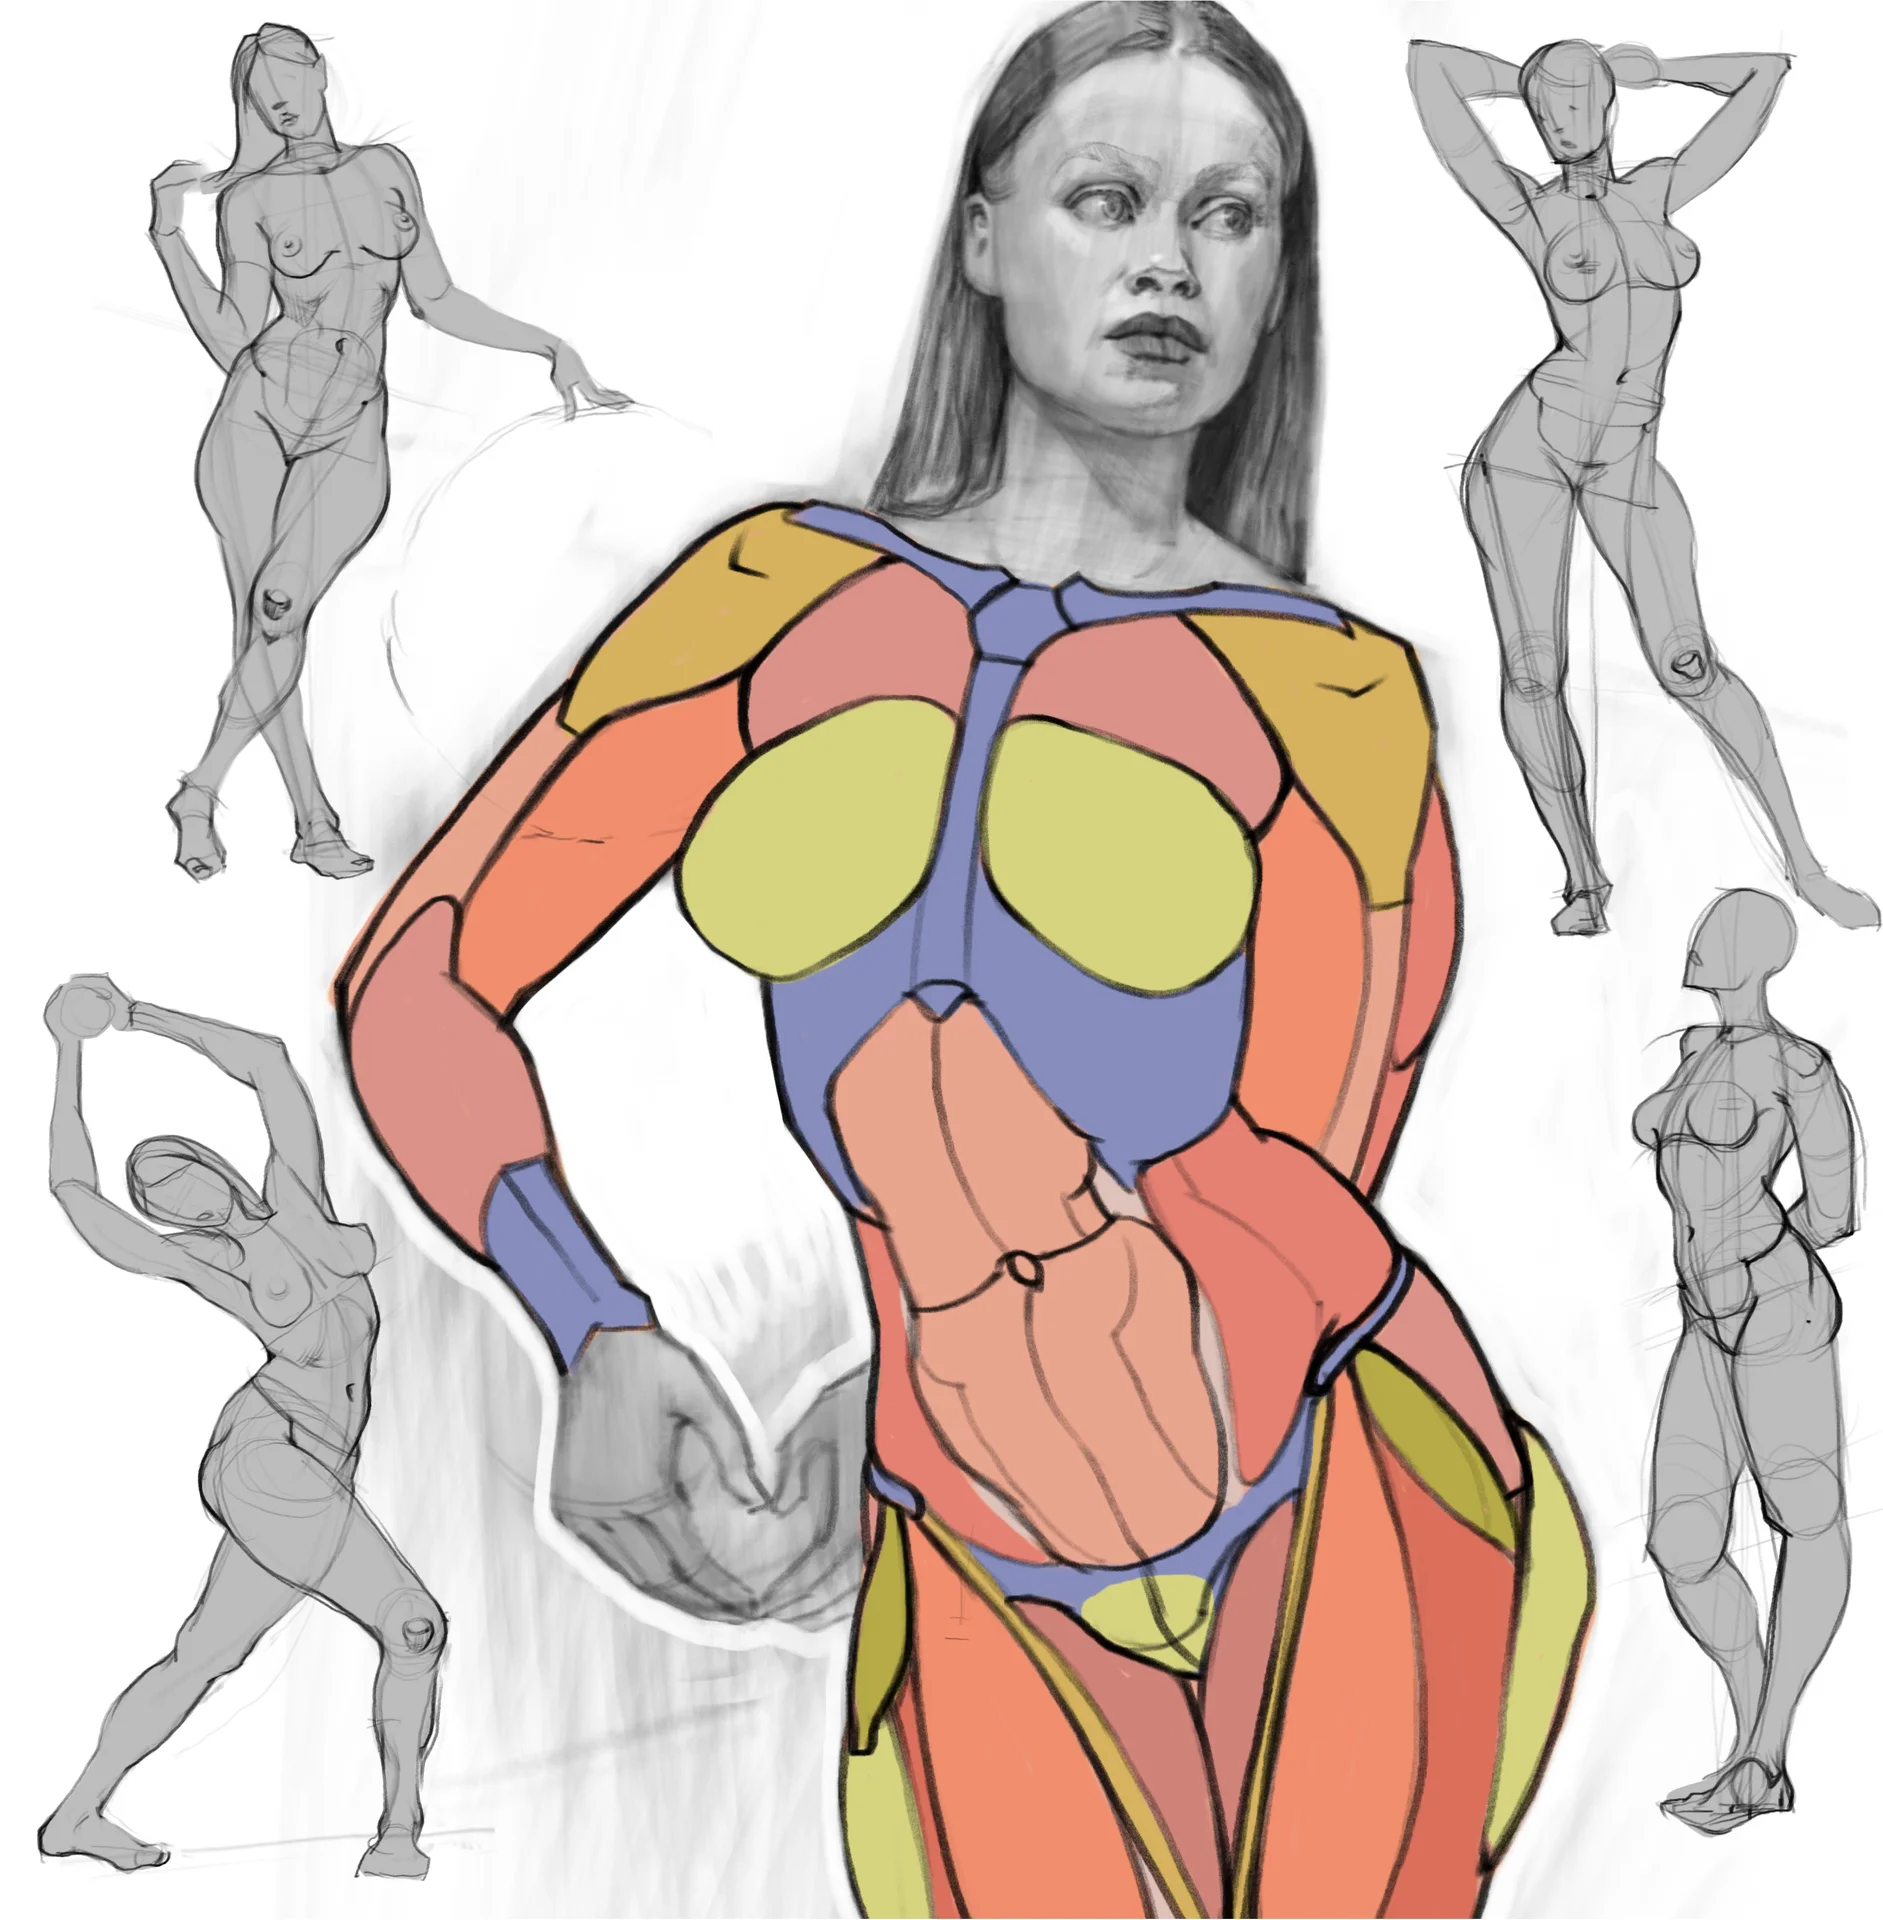
Моя первая фигура
5 000 ₽2 500 ₽
Prop concept: render and atmosphere
9 000 ₽3 900 ₽

Book illustration: The first page page
9 000 ₽3 900 ₽

Trapezius: monopoly on the upper back
The entire upper back is occupied by one muscle, the trapezius. It has a kind of monopoly on shaping in this area. It starts from the nuchal line on the back of the head, its tendons are attached to the spine and the seventh cervical vertebra, then to the scapulae, and extends down to the end of the ribcage, approximately to the twelfth rib. It has three portions: the upper one goes to the head, the middle one to the acromion and the spine of the scapula, and the lower one runs along the spine and slightly covers the angle of the scapula. In people with developed muscles, its tendinous end is not visible, and it ends in a V-shape, and the scapula often shows a dip, as if the muscle was scooped out with a spoon.
Deltoid and teres major: shoulder knot
I collect the shoulder knot from the deltoid and teres major muscles. The deltoid has three portions: the anterior one is attached to the clavicle, the middle one to the acromion, and the posterior one starts from the posterior third of the scapula, and due to the tendinous tissue, the muscle is not visible from the very edge, but a little further. All three portions converge and are attached to the humerus. The teres major originates from the lower angle of the scapula and goes to the shoulder, and it's very helpful: it's convenient to find the lower angle of the scapula itself by it because it overlaps it and turns towards the arm together with the latissimus dorsi.
Latissimus dorsi: the largest muscle
The latissimus dorsi is the largest muscle in the body. It covers the ribcage, and I always estimate it as an egg-shaped wrap, by the shape of the ribcage. It's attached to the humerus from above under the armpit, hides under the trapezius, and descends to the pelvis, the sacrum, and the iliac crests, turning into a large tendinous spot, the aponeurosis. The thickness of the latissimus dorsi cannot be lost: even in a lean person, it's visible how thick it is along the lateral edge, that's why it's called wings. An important point: the latissimus dorsi presses the lower angle of the scapula. If the scapula pops out beyond its limits, it's already an injury, so in the drawing, I keep the angle of the scapula within the latissimus dorsi.
Spinal muscles and lower back
Long muscles, the erector spinae, run along the spine. They are usually visible only in the lower lumbar region, and here's why: the lower back carries the entire upper part of the body, so the muscles there are the most loaded and voluminous. Higher, in the thoracic and cervical regions, the loads are less, the muscles are thinner, and they are overlapped by the trapezius and latissimus dorsi, so we almost don't see them. Below, they gain maximum volume at the lower inset of the ribs and dissolve towards the bony triangle of the sacrum.
Lower, I add the obliques; they occupy the space from the spinal muscles to the edge of the figure. Between the latissimus dorsi and the obliques, there's a small gap, a hole, where there are no muscles. Also, on the side from the fifth rib, the serratus muscles go: up to five heads are visible, but in ninety percent of cases, three, so there's no need to draw more than three. And I don't forget about the posterior ribs: after the eighth rib, the shape of the ribcage from the back declines, this bend must be estimated, even if it's not visible.
Hatching according to the form
The main rule: muscles always work on the larger form. Don't get carried away with copying muscles from life; each movement should tell about the volume you've already put down. That's why I hatch according to the form. In the lumbar region, there's a subtlety: from the side of the ribcage, the muscles work on its form, and I guide the hatch in one direction, but from the side of the pelvis, the form bends differently, and there the hatch is in the other direction. Meanwhile, I always reveal the scapulae slightly more actively than the muscles; they hold the entire structure of the upper part.
Common mistakes
- Starting with copying muscles. Until the larger form and movement are laid down, there's nothing to hang the muscles on. First, the structure, then anatomy.
- Placing the seventh cervical vertebra too low. The shoulder girdle arc runs through it. If it moves, the entire back will move.
- Drawing all the serratus muscles. Three heads are visible, maximum five. More than three overloads the drawing.
- Extending the scapula beyond the latissimus dorsi. In life, it's an injury; in the drawing, it's a mistake. Keep the angle of the scapula within the latissimus dorsi.
- Making the arms and arcs symmetrical. Identical angles on the left and right look lifeless. Look for different movement.
Short advice
Don't try to draw the back «by muscles» right away. First, catch the movement and the larger form, place the seventh cervical vertebra and the scapulae, and then lay the muscles on the ready volume. Learn where each large muscle is attached from and to, and remember the landmarks: the seventh cervical vertebra, the acromion, and the teres major will help you find the scapula in any angle. Then the back will stop seeming like a chaos of bumps.


