How to draw the human skeleton
Learning to draw the human skeleton from scratch: proportions of eight heads, ribcage, pelvis, arms and legs, skull. Step-by-step analysis and video lesson by artist Azat Nurgaleev.
So, friends. Where does drawing a person even start? Of course, with the skeleton. We all need to understand how it's constructed, otherwise the figure will go astray and fall apart. In this lesson, I suggest drawing together with me: step by step, we'll build a human skeleton from scratch, covering proportions, the ribcage, pelvis, arms, and legs, the skull. If you don't have much experience yet, just follow along with me like taking notes. The best learning method is when you gradually outline, understand, and reveal the form.
And right away, one principle for the entire drawing. Make all the lines very gray, light, not strongly pronounced at the beginning. This way, you'll always have the opportunity to refine the drawing and place accents at the end. Even Michelangelo, for all his genius, traced the line in several attempts: one, then the second, then the third. So making mistakes at the beginning is normal, everyone will make them.
What you'll need
Take an A4 or A3 sheet and a simple pencil. If you're drawing digitally, no questions asked, just enlarge the canvas as you work, I myself work digitally. On paper, immediately outline the top and bottom of the figure from edge to edge of the sheet to make the most of the space. A4 is best for our sketch.
And keep one more thing in mind. Everything in drawing a person consists of simple primitives: a cylinder, a truncated cone, a ball, an egg-like shape. We're not tracing the skeleton from a picture, we're constructing it. I only need a reference for a push, then I design rather than copy.
Proportions: figure of eight heads
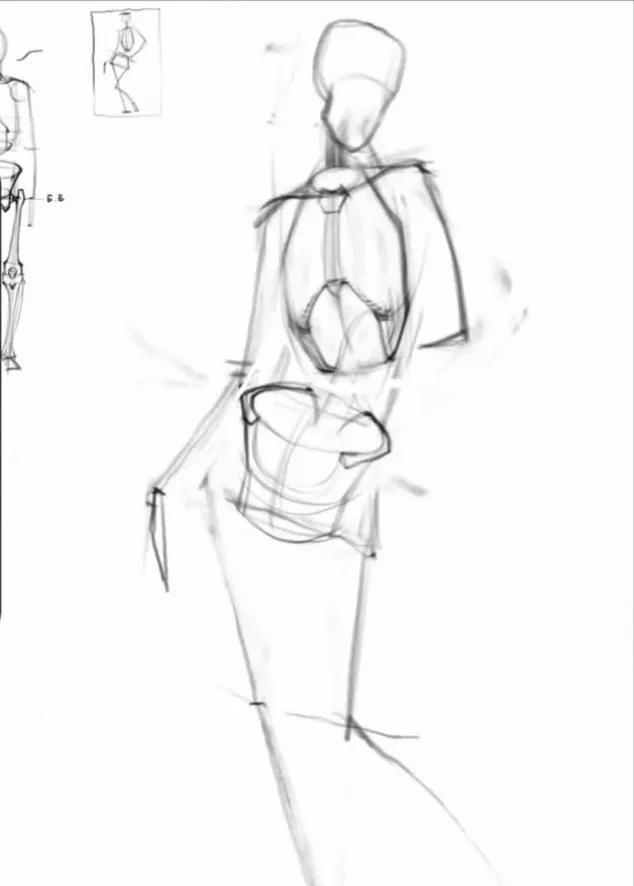
It all starts here. The skeleton, like the figure, is divided into two parts just below the middle, where the pelvis begins. Next, we divide the height into eight parts: take a segment, divide it in half, then in half again, and once more. We get one eighth, which is the height of the head. This is the head size for a fairly tall person; for an average person, it's a bit larger.
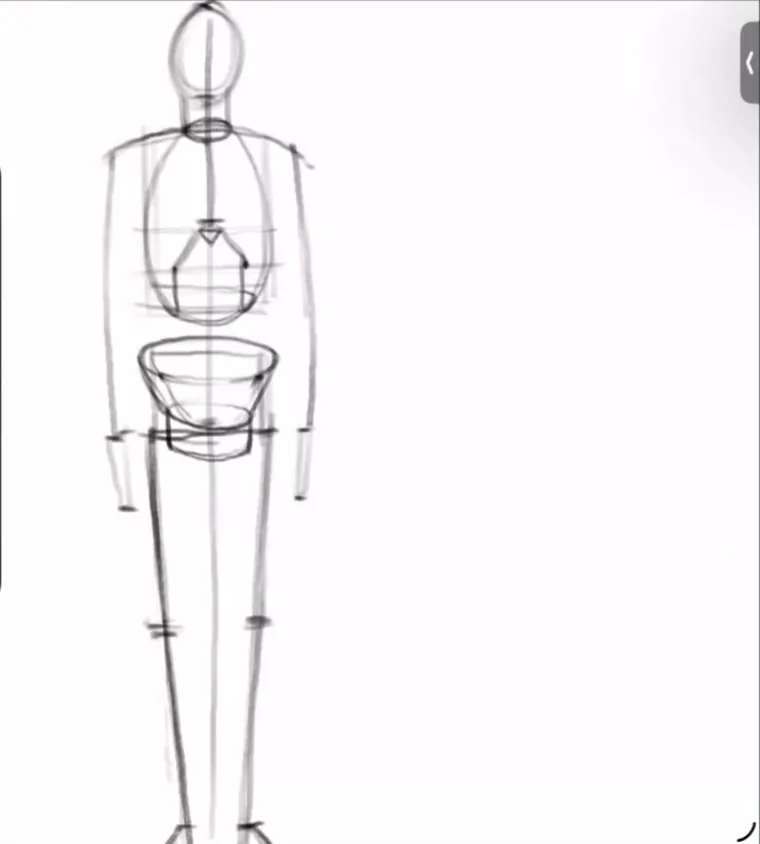
Now we go from top to bottom and place the whole figure according to these shares:
- Head occupies the top eighth.
- Neck is about a third of the head's height.
- Ribcage reaches the mark of three and one eighth.
- Between the ribcage and the pelvis, there's a palm's distance, about a third of the head.
- Arms consist of the shoulder and forearm and reach the end of the pelvis, where the hands begin.
- Hand occupies about one third of the thigh's length.
- Legs are divided into the thigh and lower leg, it's quite simple.
- Foot is about one third of the head's height.
That's the whole scheme. First, we draw it with light gray lines, and only then we move on to the volumes.
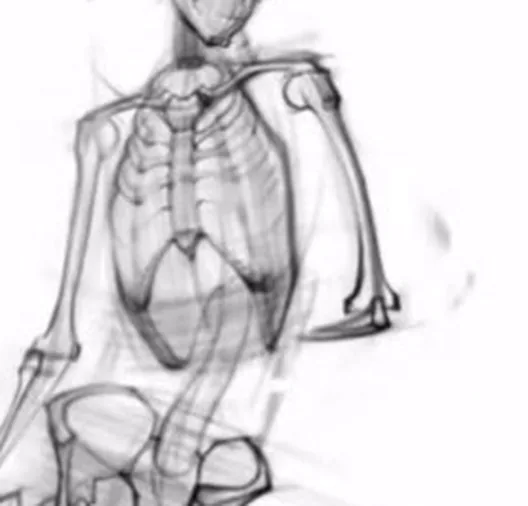
The chest
The chest is not just a cube, it's an egg-like shape. I call it a chopped egg because it has its own corners on each side. It fits into the figure, blends in, call it what you will.
The ribcage is one of the trickiest forms of the skeleton. If you want to break it down separately and step by step, watch our master class How to draw the ribcage.
At the top, we make the opening of the first ribs. The xiphoid process is located approximately in the middle of the chest. From it, we divide the lower part in half and find the costal arch and epigastric angles, these are the so-called seventh ribs. After them, the shape turns. A very common mistake is when these angles move to different distances from the midline. They need to be adjusted along the midline and made symmetrically, so that there is approximately the same distance between them.
The pelvis
I build the pelvis as a truncated cone plus a cylinder. Basically, you need to draw a truncated cone and a cylinder, this gives the overall shape. The pelvis has its own rotation, and pelvises come in different shapes. Today we are drawing a girl, a girl's skeleton, so we make the pelvis wide enough to depict all the pelvic nuances.
We outline the iliac crests and the notch of the pelvis. In the middle is the pubic bone, it's called the symphysis pubis, but the essence doesn't change. Here, two bones merge and transition to the ischial tuberosities, those pelvic ears. The sacrum fits into the pelvis from behind, and everything ends with the coccygeal department with a slight bend.
Related courses
All courses
Book illustration: The first page page
9 000 ₽3 900 ₽

Векторная иллюстрация для начинающих
15 000 ₽12 000 ₽

Character Concept: My First Hero
10 000 ₽4 500 ₽
And the most important point. The pelvis needs to be built in perspective, not just copied. Some artists just start copying the shape, but we need to catch all the directions, estimate the lines in perspective. That's why I draw auxiliary diagonals, they improve the understanding of volume.
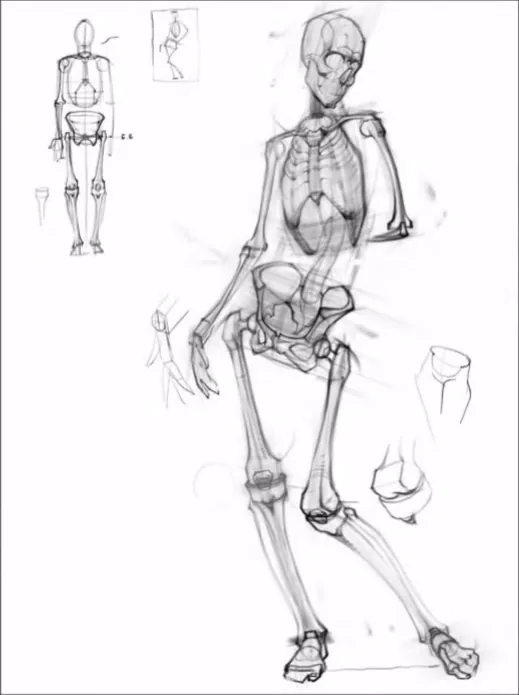
Legs: Femur, Shin, and Knee
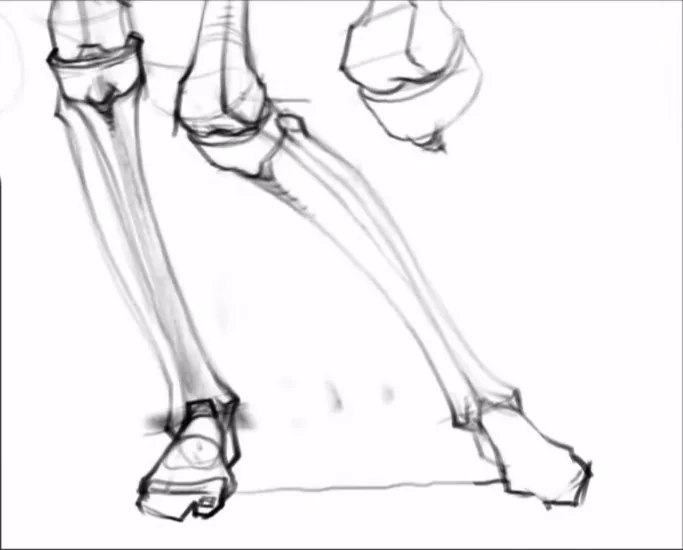
Let's move on to the femur bones. The femur has a head and a neck, and on the side, at the top, there's a large trochanter. By the way, you can feel it on the lateral surface of your thigh. When I first started studying anatomy, it was wild to me: you look at a skeleton and realize that you have the same things, there are iliac crests, there are the exits of the femurs. At the bottom, the femur ends with condyles, like little fists.

Next up is the shin. We start with the tibial capital, which is also a cylinder. The tibia runs along the inner side and is higher, the fibula runs along the outer edge, ends on the little toe side, and is slightly lower. This point is very important. Under the patella in the middle, there's the tibial tuberosity, which also needs to be indicated a bit. Don't make the capital too long, the femoral condyles and the capital should be compact, everything fits into a ball.
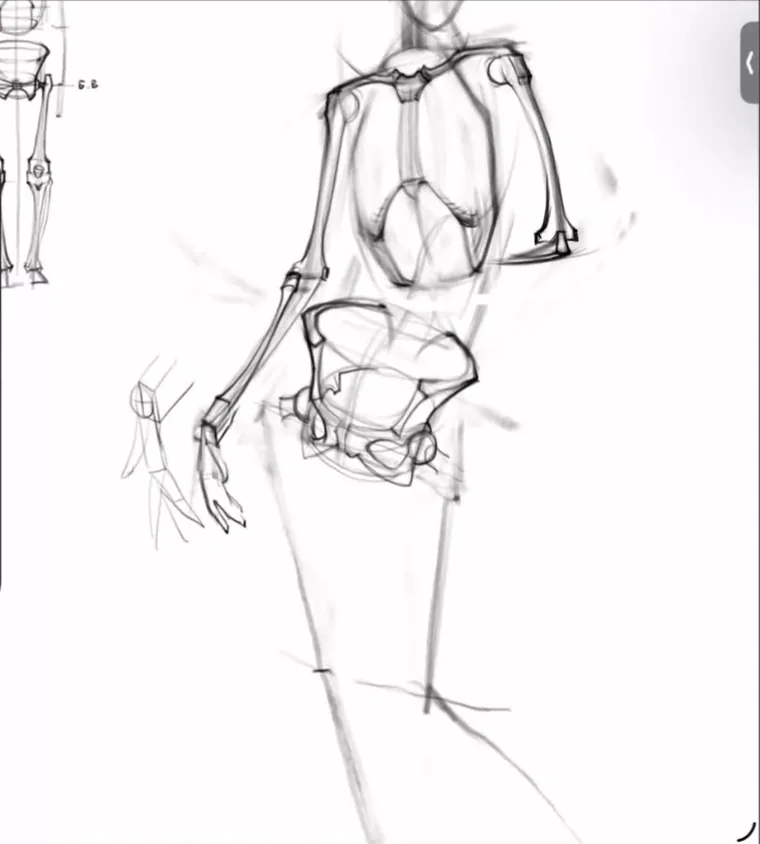
Shoulder Girdle and Clavicles
On the shoulder girdle at the top, there's the manubrium of the sternum. It's like a tie knot that goes down to the xiphoid process. The clavicles extend from it.
I draw the clavicles in a handlebar shape. I mean not a car steering wheel, but a bicycle steering wheel, I had a cool Kama bike with such a steering wheel when I was a kid, it looks very similar. The clavicles are paired parts, and you need to draw them not separately, but as a pair, with a common arc. Otherwise, the drawing will become fragmented, and the overall plasticity won't emerge. And another thing: the clavicle is very thin. A big mistake is to draw the clavicles thick, they're delicate, not strongly emphasized. Show the shoulder joints with balls.
Arms: shoulder, forearm and hand
What are arms made of? They consist of the humerus with a joint ball at the top and a ridge. At the bottom, the humerus splits into two parts, like a wrench. The ulna fits in here, and the radius is next to it. Remember the direction: the radius starts from the outside of the shoulder and goes to the thumb. If the thumb is here, then the radius comes here.
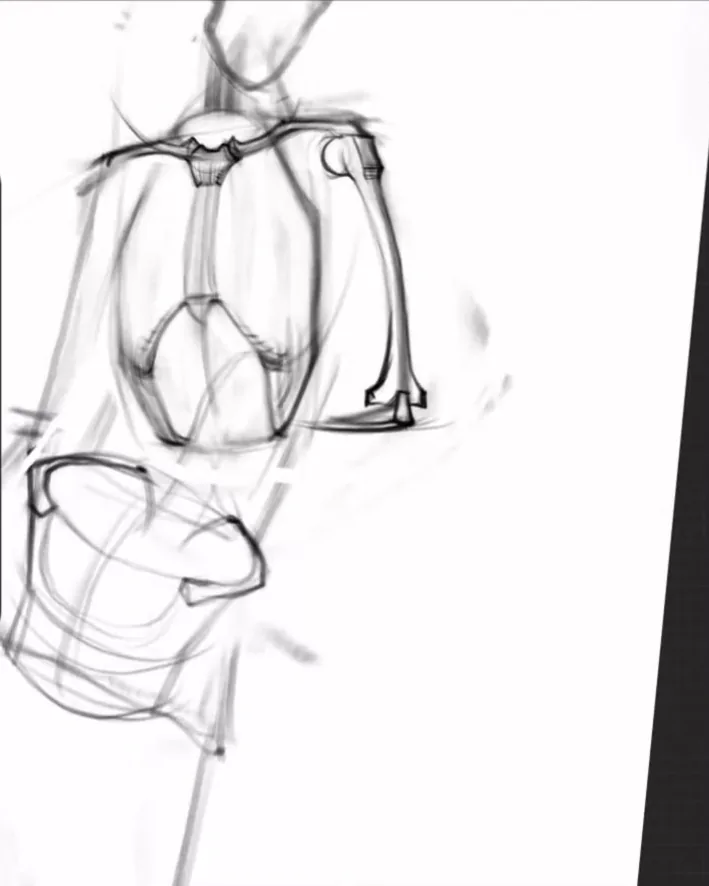
You don't need to assemble the hand bone by bone at first. We just need a sign, a beautiful silhouette, to understand how the toes are located in space. We roughly mark the thumb, give it a calm position, and for now, that's enough.
Spine
We don't need to redraw the entire spine; it's enough to outline it to understand how it goes. The sacrum fits into the pelvis from the back, followed by the lumbar and thoracic sections. We look for the seventh cervical vertebra opposite the jugular notch; it seems to penetrate the neck through and through and helps to feel the tilt of the head. We also slightly outline the thoracic part of the spine where the ribcage is. This will be enough for the figure to hold together as a whole.
Feet
I don't draw the feet in detail in the skeletal sketch, but you need to know them. The toes fit into the metatarsal bones. Behind them is the tarsus, which is not one bone, but a whole block of several bones, like a cylinder or a truncated cone. At the back is the calcaneus. A lot of time is devoted to the foot in a full skeletal analysis, but now it's important for you to get acquainted so that you understand the general principle.
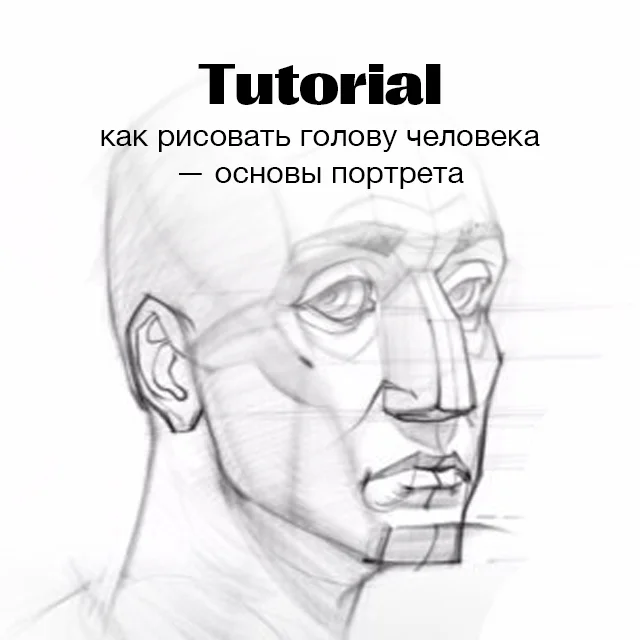
Skull and head
Now let's talk about the head. The skull is a complex structure; it has a frontal and a lateral side, and we shouldn't forget about that.
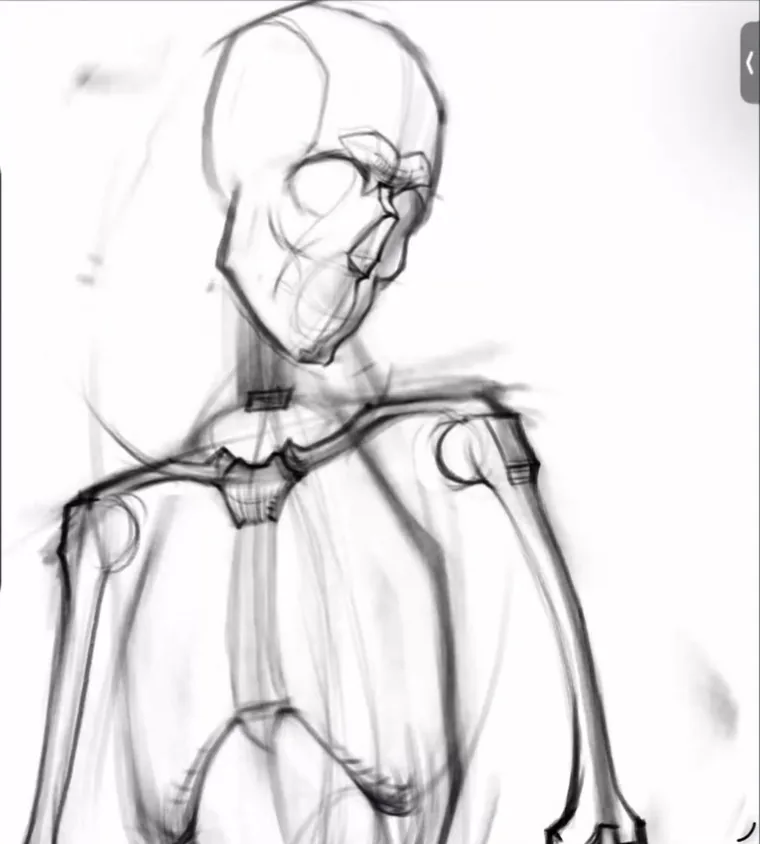
The orbit is located approximately in the middle of the skull. We outline the midline and the zygomatic bones. The nasal bone is inserted along the midline, forming a pear-shaped opening. Above are the brow ridges, and from them the frontal tubercles. The zygomatic arches are attached to the lower part of the orbit and turn back. Below we reveal the lower jaw, such a jaw block. Since we have a girl, we make the shapes softer: in the female skull, the brow ridges are not sharp, not strongly expressed. It turns out to be a kind, calm head, such a cute little skeleton.
All these things that I mention in passing were given to me by my teacher Alexander Sergeevich Spitsyn. I am very grateful for my education, because such things stay with you for many years.
Ribs: detailing
If you want to show the rib cage in more detail, we add the ribs. The first ribs are slightly hidden under the clavicles, they come from the handle of the sternum. Right behind them are the second ribs.
An important point about the material. Closer to the sternum, we have not bone, but cartilaginous tissue, such dense rounded cartilages. Further from the sternum is the real bone, the actual ribs. The shape of the ribs gradually turns down. It's not necessary to draw all twelve pairs, just outline at least a couple or three and keep the slopes so that nothing gets distorted.
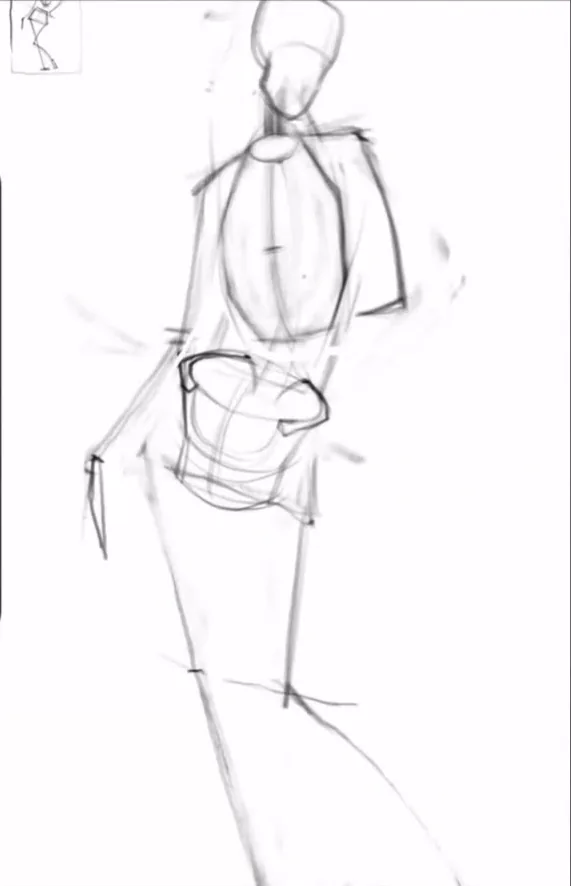
Dynamics and Contrapposto: Large Movement
This, folks, is the heart of the whole lesson. How does a scheme differ from a lively, dynamic figure? In a dynamic figure, we need to immediately set a large movement.
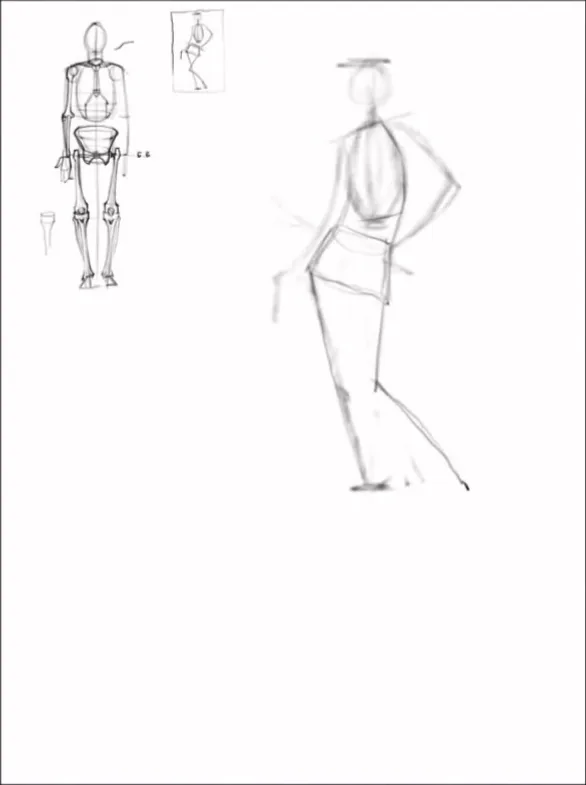
This is done through counter tilts. The tilt of the pelvis goes one way, the tilt of the chest goes the opposite way, and the head can be tilted in a third direction. This is contrapposto. When the pelvis is looking one way, the chest is looking another, and the head is looking yet another, the movement begins to flow from one to the other, and the pose comes to life.
First, draw a small icon, slightly larger than a matchbox. Use the matchbox to represent the chest, a trapezoid for the pelvis, and play with the angles of tilt, looking for a beautiful rhythm. We don't need a boring photoreference, we need super cool dynamics. An artist is a bit of an illusionist: we gradually create the illusion of space, volume, and form. The most important thing in the entire human form is how we attach the pelvis to the chest, head, and legs.
Tone, Accents, and Space
At the end, we work with tone. We place accents on the nodes: the epigastric angles, knee nodes, shoulder nodes are made a little more contrasting to attract the eye. We keep everything else soft and light.
To create space, we play with plans. We work on the near knee node a little better, we slightly reduce the far one, we mute it. Things in the distance are softer and less contrasting. Add a little gray spot inside the pelvis and chest so that not only the line works, but also the tone. I like it when the drawing is like in a silver cloud: somewhere you rubbed your hand, somewhere it erased a little, a solid soft tone turned out. And be sure to step away from your work, look at it from afar, from a distance all the flaws are immediately visible.
Common mistakes
- Tracing instead of constructing. Without perspective, the pelvis and ribcage spread apart. Construct, don't copy.
- Asymmetric epigastric angles. Align them with the midline, otherwise one will shift to the side.
- Thick clavicles. Clavicles are thin and delicate, draw them as a paired arch.
- Too contrasting lines from the very beginning. At first, everything is gray and light, accents only at the end.
- Long capital of the tibia. Keep it and the condyles compact, within the ball.
Where knowledge of the skeleton comes in handy
The skeleton is the foundation on which everything else rests. When you understand the structure of bones, the figure in any pose stops falling apart, a sense of real volume appears. Muscles lie on the skeleton, and without it, you will draw muscles at random. Proportions, angles, and dynamics depend on it. It's the base for academic drawing, concept art, and characters in games and animation. Once you understand the skeleton, you'll greatly simplify all your future work with the human figure.
Briefly about the main thing
Friends, the skeleton is the foundation of the entire figure. Build according to proportions of eight heads, assemble shapes from simple primitives, keep perspective, and set large movement through contraposto. Draw regularly, at least once every two or three days, and develop systematicity in yourself, then progress will come naturally. And when you're ready to go deeper, watch the full lesson, there I dissect the skeleton slowly and in detail.
Frequently Asked Questions
How many heads are in a human figure?
Eight. A tall person's head is slightly smaller in relation to the body, while a person of average height's head is slightly larger, but as a working scheme, we take eight heads.
Where to start drawing a skeleton?
With proportions and a general scheme, using light gray lines. First, sketch the entire figure from the top of the head to the feet, then refine the parts.
Is perspective needed to draw a skeleton?
Yes. We construct a skeleton, we don't copy it, and construction requires perspective: we estimate the directions of the pelvis and chest, otherwise the shapes will spread out.
How does the tibia differ from the fibula?
The tibia runs along the inner side of the lower leg and is located higher, while the fibula runs along the outer edge, on the little toe side, and is located slightly lower.
What is contrapost in a figure?
It's reciprocal tilts: the pelvis is tilted in one direction, the chest in the opposite. This technique gives the figure a lively, large movement.
What to read on anatomy for artists?
I highly recommend Gottfried Bammes, he describes everything very well and interestingly.