TutorialUpdated: July 2, 2026
How to draw a human head
In short
Learn how to draw a human head from scratch! Step-by-step lesson on proportions and shading of the face for beginner artists.
2D artist (illustrator)
How to learn to draw a human head? Don't be afraid to try! Rely on this detailed tutorial for beginners and смело take the first steps in studying a portrait.
And, of course, come to study at Skills Up School: anatomy, facial structure and plasticity we study step by step in the course Portrait sketching — it is suitable for those who have basic pencil drawing skills.
The author of the tutorial is an artist and founder of the school Azat Nurgaleev.
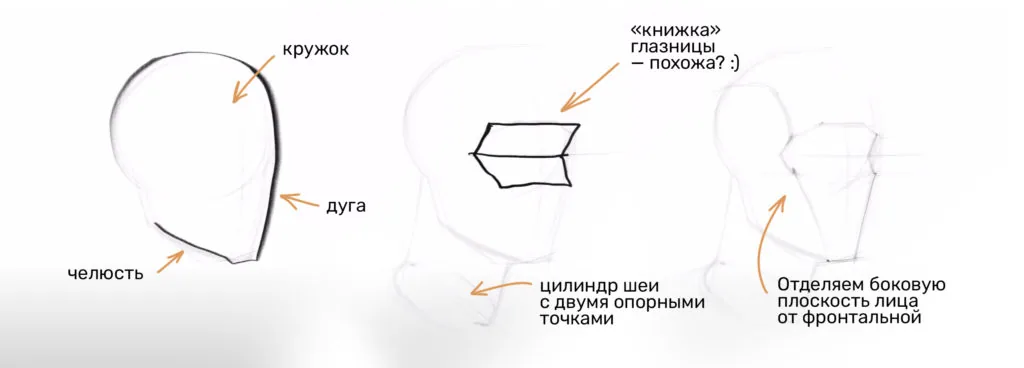
1. Draw a circle, add an arc and a jaw to it. Add a neck cylinder, look for its two reference points — the jugular notch and the seventh cervical vertebra.
2. Divide the height of the head in half. The center is the middle of the “eye socket book”, the shape in which the eyes are located. Visually it resembles a book with a binding.
3. Show where the fracture goes to the side face plane from the “eye socket book”. Separate the side face plane from the frontal one.
We recommend a free lesson - how to draw a human face
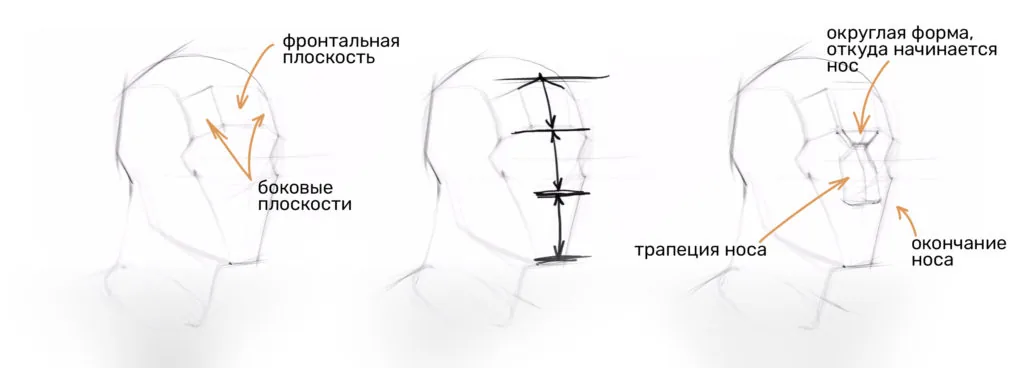
 4. Build the head, divide the forehead into three planes: one frontal and two inclined.
5. Check the proportions — find three main modules on the face: the first is from the hairline to the eyebrows, the second is from the eyebrows to the base of the nose, the third is from the base of the nose to the chin.
6. Insert a rounded shape into the upper part of the “eye socket book”, from which the nose will go. Mark its length and shape, show the trapezoid of the nose — its frontal and side parts.
4. Build the head, divide the forehead into three planes: one frontal and two inclined.
5. Check the proportions — find three main modules on the face: the first is from the hairline to the eyebrows, the second is from the eyebrows to the base of the nose, the third is from the base of the nose to the chin.
6. Insert a rounded shape into the upper part of the “eye socket book”, from which the nose will go. Mark its length and shape, show the trapezoid of the nose — its frontal and side parts.
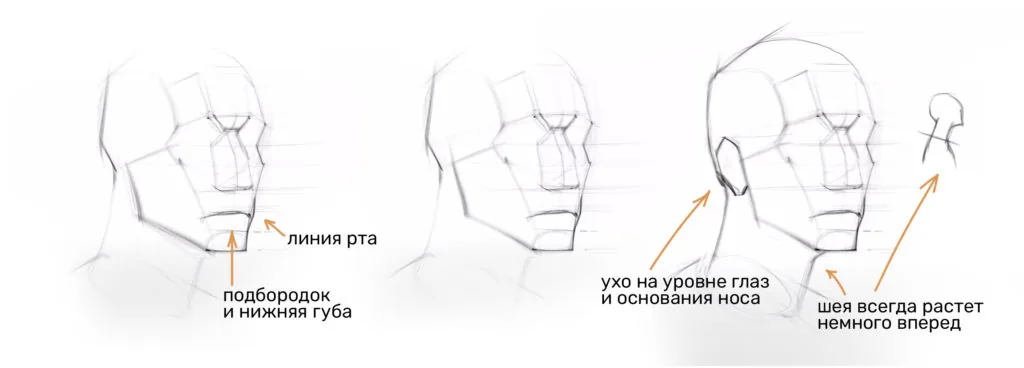
 7. Divide into three parts the segment that remains from the base of the nose to the chin — the mouth line will be at the end of the first part, below — the lower lip and chin. Make the face silhouette more complicated due to the circular muscle of the mouth and specify the chin.
8. At the level of the eyes and the base of the nose, we outline the ear. Specify the neck shape — it is always drawn at a slight angle: so, if we look at a person in profile, we will see that the neck grows a little forward.
7. Divide into three parts the segment that remains from the base of the nose to the chin — the mouth line will be at the end of the first part, below — the lower lip and chin. Make the face silhouette more complicated due to the circular muscle of the mouth and specify the chin.
8. At the level of the eyes and the base of the nose, we outline the ear. Specify the neck shape — it is always drawn at a slight angle: so, if we look at a person in profile, we will see that the neck grows a little forward.
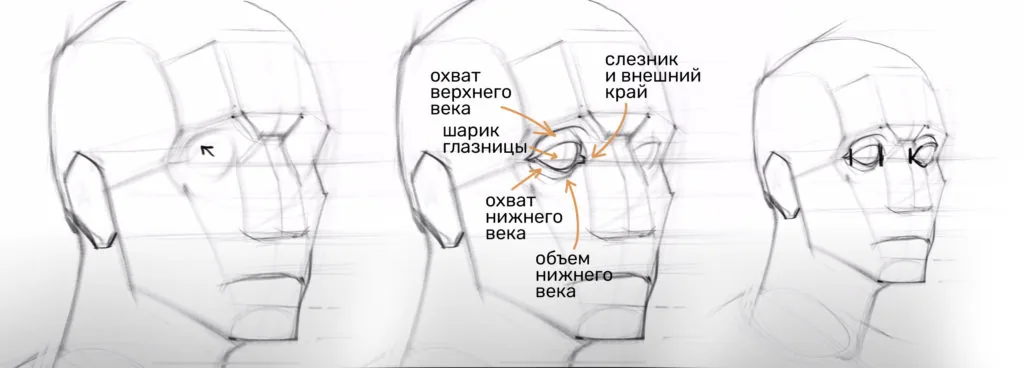
 9. Outline the eyes, starting with the eyeballs — they are located not in the center of the eye socket, but are shifted slightly upward to its outer edge.
10. Show the coverage of the upper and lower eyelids — they should have their own thickness, insert an eye socket ball. Do not forget that the eye has a tear sack and outer edge, and the lower eyelid has volume.
11. Draw the far eye. An important point: the distance between the eyes is approximately equal to the size of one eye.
We recommend a free lesson - how to draw human eyes
9. Outline the eyes, starting with the eyeballs — they are located not in the center of the eye socket, but are shifted slightly upward to its outer edge.
10. Show the coverage of the upper and lower eyelids — they should have their own thickness, insert an eye socket ball. Do not forget that the eye has a tear sack and outer edge, and the lower eyelid has volume.
11. Draw the far eye. An important point: the distance between the eyes is approximately equal to the size of one eye.
We recommend a free lesson - how to draw human eyes
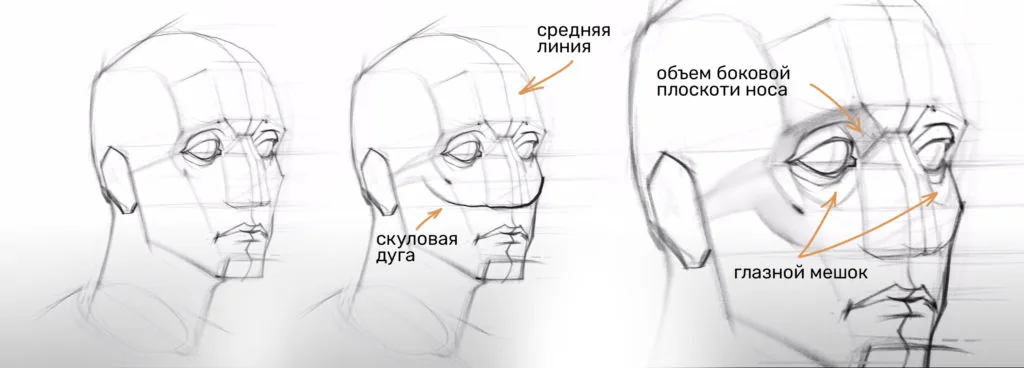
 12. Specify the middle line, the shape of the lips and chin, show the zygomatic arch to show the fracture of the shape on the zygomatic bones.
13. Show the volume of the side plane of the nose and the eye bag, which beautifully outlines the shape of the eye sockets.
12. Specify the middle line, the shape of the lips and chin, show the zygomatic arch to show the fracture of the shape on the zygomatic bones.
13. Show the volume of the side plane of the nose and the eye bag, which beautifully outlines the shape of the eye sockets.
 14. Show how the brow ridges go, their volume.
15. Outline the eyebrow — its shape starts on the brow ridge and only then turns to the transition of the eye socket. Because of this, it is illuminated in different ways: it is darker at the base, and then brightens.
14. Show how the brow ridges go, their volume.
15. Outline the eyebrow — its shape starts on the brow ridge and only then turns to the transition of the eye socket. Because of this, it is illuminated in different ways: it is darker at the base, and then brightens.
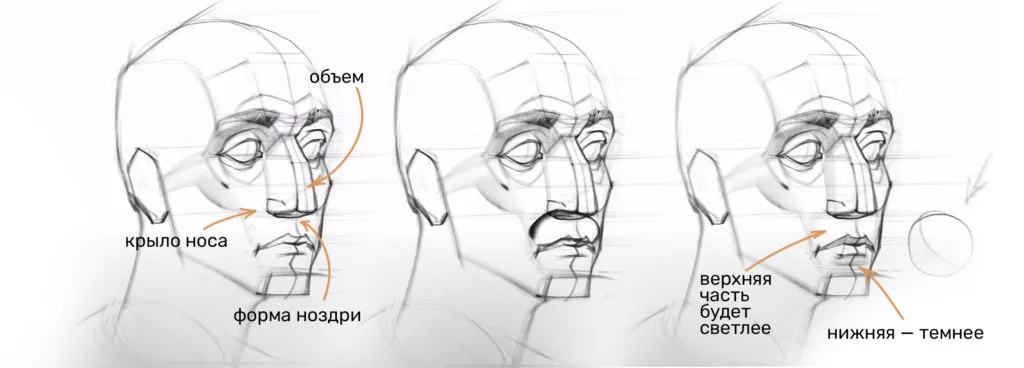
 16. Show the wing of the nose, its volume and the shape of the nostril.
17. In the mouth area, we visually imagine a ball and how shadows fall on it: it turns out that the upper part remains in the light, and the lower part is closed from the light.
We recommend a free lesson - how to draw a human nose
16. Show the wing of the nose, its volume and the shape of the nostril.
17. In the mouth area, we visually imagine a ball and how shadows fall on it: it turns out that the upper part remains in the light, and the lower part is closed from the light.
We recommend a free lesson - how to draw a human nose
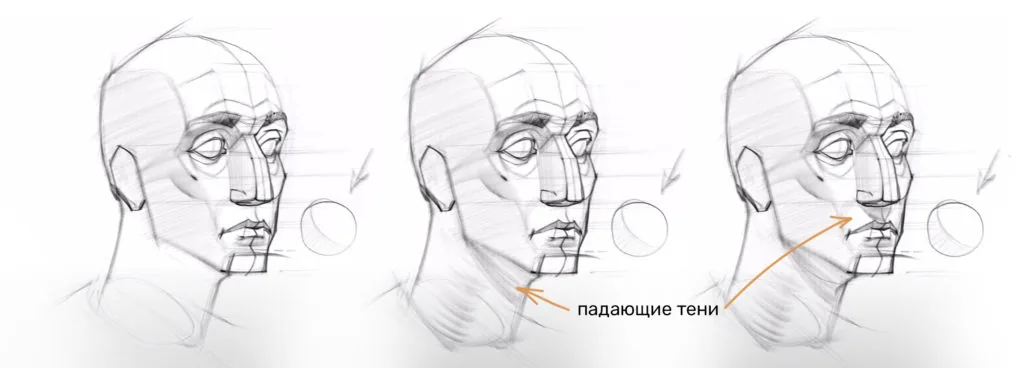
 18. Close the side planes of the nose and head with tone. Outline the volume of the neck cube, shadows falling from the chin and nose.
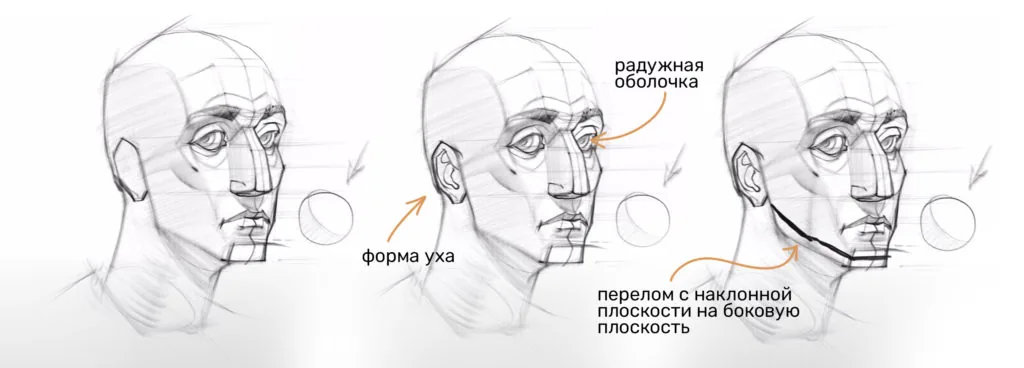
 19. Insert the iris with the pupil, specify the shape of the ear.
20. The head has not only frontal and lateral planes, but also an inclined plane. Show the fracture from the inclined to the lateral plane to clarify the direction of the shape.
19. Insert the iris with the pupil, specify the shape of the ear.
20. The head has not only frontal and lateral planes, but also an inclined plane. Show the fracture from the inclined to the lateral plane to clarify the direction of the shape.
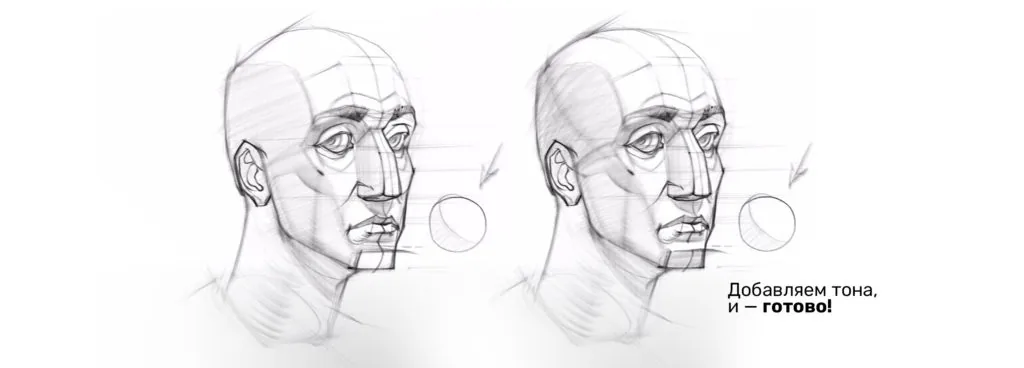
 21. Add tones. Done! We have drawn a human head step by step, we did a great job!
 Skills Up School courses on drawing a portrait and the human figure:
Sketches
Human hands
Portrait sketching
Human figure
Figure in dynamics
Skills Up School courses on drawing a portrait and the human figure:
Sketches
Human hands
Portrait sketching
Human figure
Figure in dynamics
4. Build the head, divide the forehead into three planes: one frontal and two inclined.
5. Check the proportions — find three main modules on the face: the first is from the hairline to the eyebrows, the second is from the eyebrows to the base of the nose, the third is from the base of the nose to the chin.
6. Insert a rounded shape into the upper part of the “eye socket book”, from which the nose will go. Mark its length and shape, show the trapezoid of the nose — its frontal and side parts.
7. Divide into three parts the segment that remains from the base of the nose to the chin — the mouth line will be at the end of the first part, below — the lower lip and chin. Make the face silhouette more complicated due to the circular muscle of the mouth and specify the chin.
8. At the level of the eyes and the base of the nose, we outline the ear. Specify the neck shape — it is always drawn at a slight angle: so, if we look at a person in profile, we will see that the neck grows a little forward.
9. Outline the eyes, starting with the eyeballs — they are located not in the center of the eye socket, but are shifted slightly upward to its outer edge.
10. Show the coverage of the upper and lower eyelids — they should have their own thickness, insert an eye socket ball. Do not forget that the eye has a tear sack and outer edge, and the lower eyelid has volume.
11. Draw the far eye. An important point: the distance between the eyes is approximately equal to the size of one eye.
We recommend a free lesson - how to draw human eyes
12. Specify the middle line, the shape of the lips and chin, show the zygomatic arch to show the fracture of the shape on the zygomatic bones.
13. Show the volume of the side plane of the nose and the eye bag, which beautifully outlines the shape of the eye sockets.
14. Show how the brow ridges go, their volume.
15. Outline the eyebrow — its shape starts on the brow ridge and only then turns to the transition of the eye socket. Because of this, it is illuminated in different ways: it is darker at the base, and then brightens.
16. Show the wing of the nose, its volume and the shape of the nostril.
17. In the mouth area, we visually imagine a ball and how shadows fall on it: it turns out that the upper part remains in the light, and the lower part is closed from the light.
We recommend a free lesson - how to draw a human nose
18. Close the side planes of the nose and head with tone. Outline the volume of the neck cube, shadows falling from the chin and nose.
19. Insert the iris with the pupil, specify the shape of the ear.
20. The head has not only frontal and lateral planes, but also an inclined plane. Show the fracture from the inclined to the lateral plane to clarify the direction of the shape.
21. Add tones. Done! We have drawn a human head step by step, we did a great job!
Skills Up School courses on drawing a portrait and the human figure:
Sketches
Human hands
Portrait sketching
Human figure
Figure in dynamics
A good next step after head construction is how to draw a plaster head step by step, from composition to tone.
Related materials

Tutorial
How to draw a human nose
August 15, 2024
Tutorial
How to draw magical fire
September 18, 2023

Tutorial
How to learn to draw a person
January 18, 2024

Tutorial
How to draw a person's eyes
December 26, 2023

Tutorial
How to draw a person's face
December 22, 2023

Article
3 tips for a beginner character artist. How to draw emotions
September 18, 2023

News
Создание 3D-модели нарисованного вручную человека с роботизированной рукой
March 2, 2026