TutorialUpdated: July 2, 2026
How to draw a person's eyes
In short
Remember that to masterfully draw a person's eyes, you need to devote time to practice. Drawing eyes requires attention to detail, nuances of light and shadow, form.
Artist, founder and ideologist of Skills Up School
Today we will delve into the study of one of the most amazing elements of the human face — the eye. Before we start drawing, let's look at its structure. We will begin by **studying the eye diagram** and its volumetric characteristics in order to eventually create a complete image of the eye, filling it with all the nuances and details.
Let's get started!
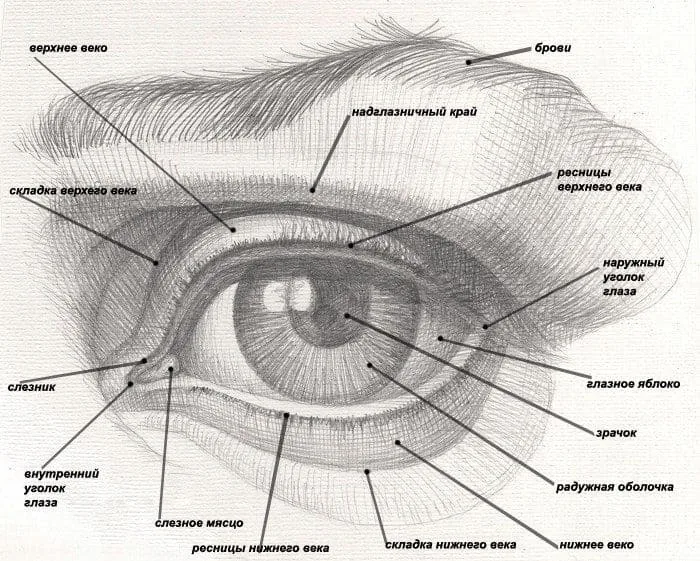
 From a biological point of view, the structure of the eye may seem rather confusing to us, so we will list only those elements that will be useful to us in the drawing process.
 ```
In the center, draw a smaller circle (about 2 cm) — this will be the iris, its diameter is half the size of the eyeball.
```
```
In the center, draw a smaller circle (about 2 cm) — this will be the iris, its diameter is half the size of the eyeball.
``` ```
Now, along the horizontal line, draw the upper and lower arcs to get the silhouette of the eye. The width of the eye slit is slightly less than the width of the eyeball, and it's important that the eyelids slightly overlap the iris. At the same time, draw the pupil in the center of the iris.
```
```
Now, along the horizontal line, draw the upper and lower arcs to get the silhouette of the eye. The width of the eye slit is slightly less than the width of the eyeball, and it's important that the eyelids slightly overlap the iris. At the same time, draw the pupil in the center of the iris.
``` ```
Now let's add volume to the eyelids and the tear duct. To do this, draw the thickness of the eyelids, stepping a couple of millimeters from the lines of the eye slit, at the same time you can outline the tear duct in the corner of the eye and outline it with a line of the eyelid as well. Then, stepping 5-7 mm from the eye slit down and up, you can outline the folds of the eyelids to indicate their height.
```
```
Now let's add volume to the eyelids and the tear duct. To do this, draw the thickness of the eyelids, stepping a couple of millimeters from the lines of the eye slit, at the same time you can outline the tear duct in the corner of the eye and outline it with a line of the eyelid as well. Then, stepping 5-7 mm from the eye slit down and up, you can outline the folds of the eyelids to indicate their height.
``` ```
Now on top we can outline the shape of the eye socket, which will slightly overlap the surface of the upper eyelid. And completing the eye scheme, we can draw the silhouette of the eyebrow above the eye socket. The length of the eyebrow is greater than the length of the eye slit, and its beginning, which is closer to the nose, is usually lower than the outer edge.
```
```
Now on top we can outline the shape of the eye socket, which will slightly overlap the surface of the upper eyelid. And completing the eye scheme, we can draw the silhouette of the eyebrow above the eye socket. The length of the eyebrow is greater than the length of the eye slit, and its beginning, which is closer to the nose, is usually lower than the outer edge.
``` ```
```
```
```
From a biological point of view, the structure of the eye may seem rather confusing to us, so we will list only those elements that will be useful to us in the drawing process.
- The eyeball is the part that represents a spherical body of white color located in the eye socket.
- The iris is a slightly concave shape on the surface of the spherical body, it is a kind of diaphragm that regulates the flow of light into the eyeball.
- The pupil is a black hole in the iris through which light enters the retina.
- The eyelids are movable folds of skin around the eyes with a thin muscular layer, due to which they close when a person blinks. The upper and lower eyelids form the palpebral fissure, and at the edges, the eyelids are attached to each other and to the eye socket.
- The caruncle (lacrimal papilla) is an element of the eye located in the inner corner of the eye slit. It is believed that it does not have any direct function, but it is very important for us to make the drawing of the eye look realistic. It has a slightly elongated shape and because of it, the inner corner of the eye in the silhouette looks like a dolphin's head.
- Eyelashes are hairs growing from the upper and lower eyelids. Upper eyelashes are longer than lower ones and more numerous.
- The eye socket is the cavity in which the eyeball is located. The eye can be set deep or, conversely, protruding to the edge. This must be taken into account when drawing a person's face. Also, often we see the part of the eye socket overhanging the eye from above, sometimes the skin sags and lies in a fold directly on the upper eyelid.
- Eyebrows are an arched strip of hair above the eye socket. They have a protective function, and also help a person express emotions. The shape of eyebrows of each person is unique, so when drawing them, you can emphasize the character and features of the character.
- The cornea is the transparent part of the eye covering the surface of the iris and has a convex shape, so when drawing eyes, we need to take this feature into account.
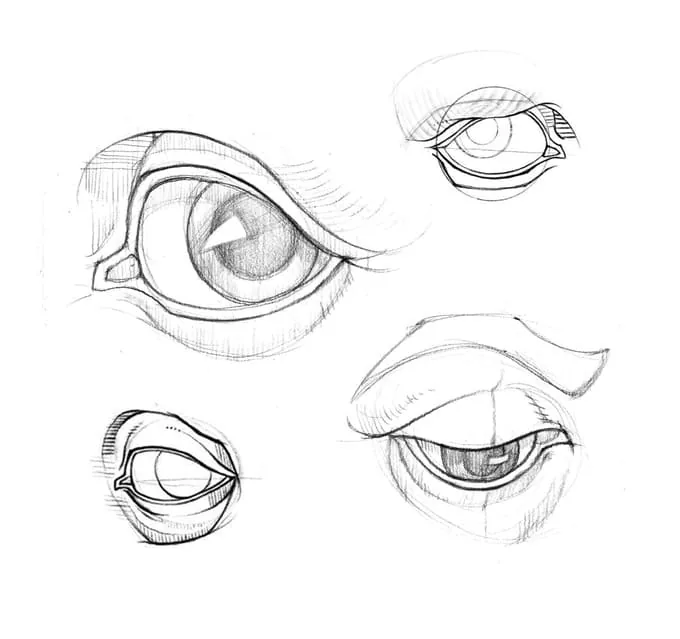
Now let's start drawing the eye diagram
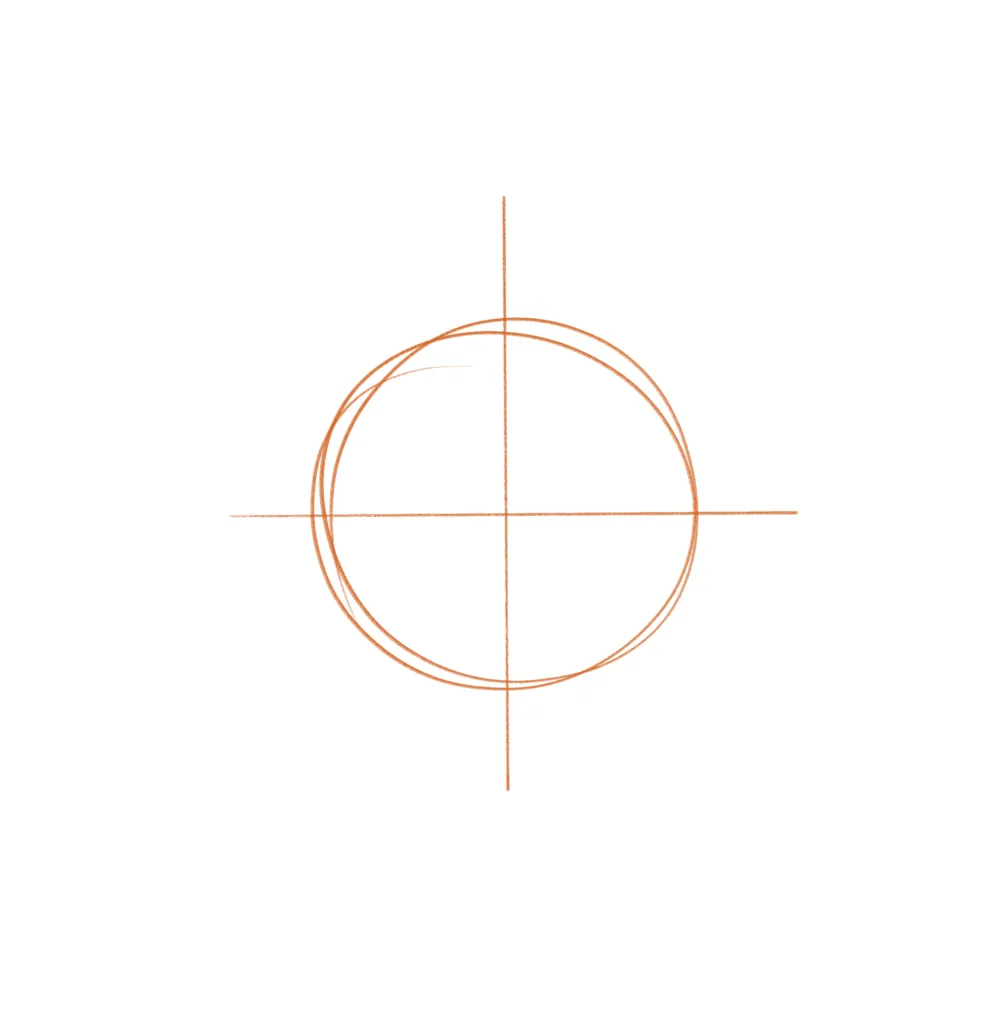
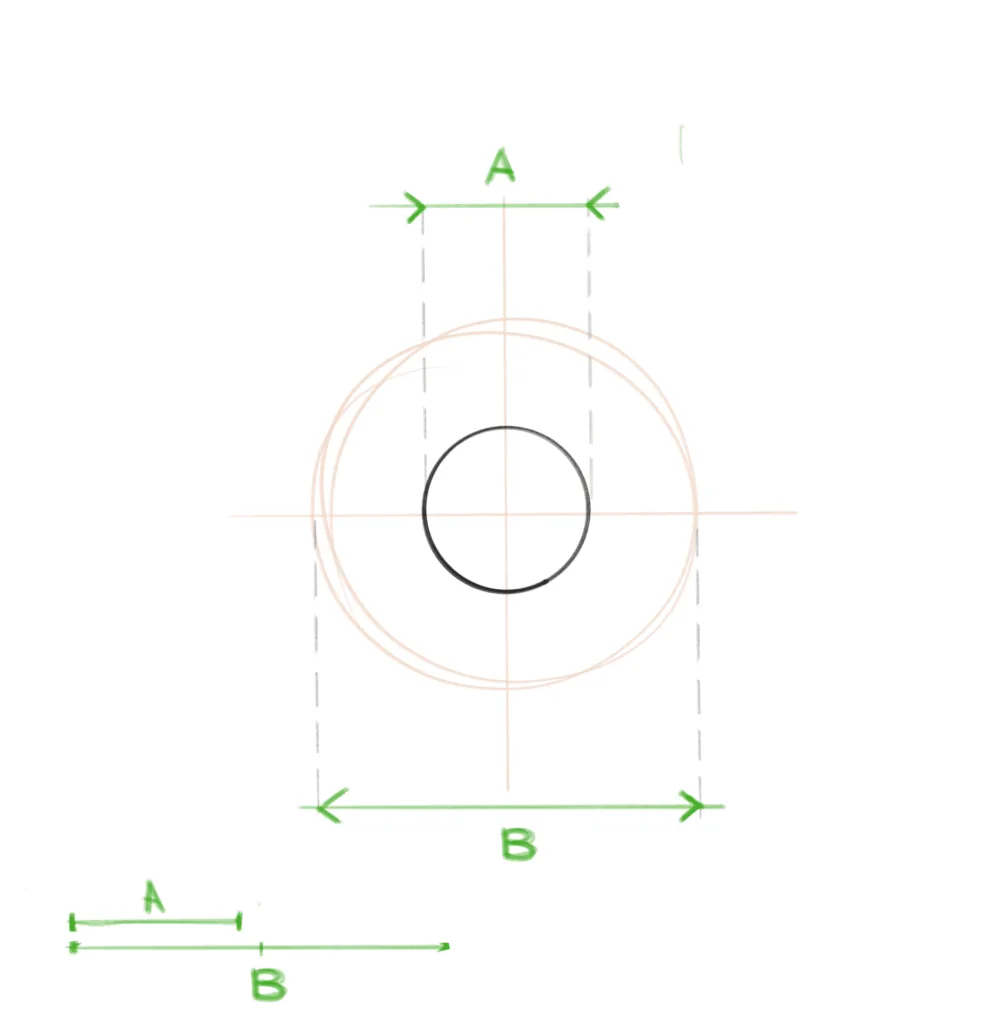
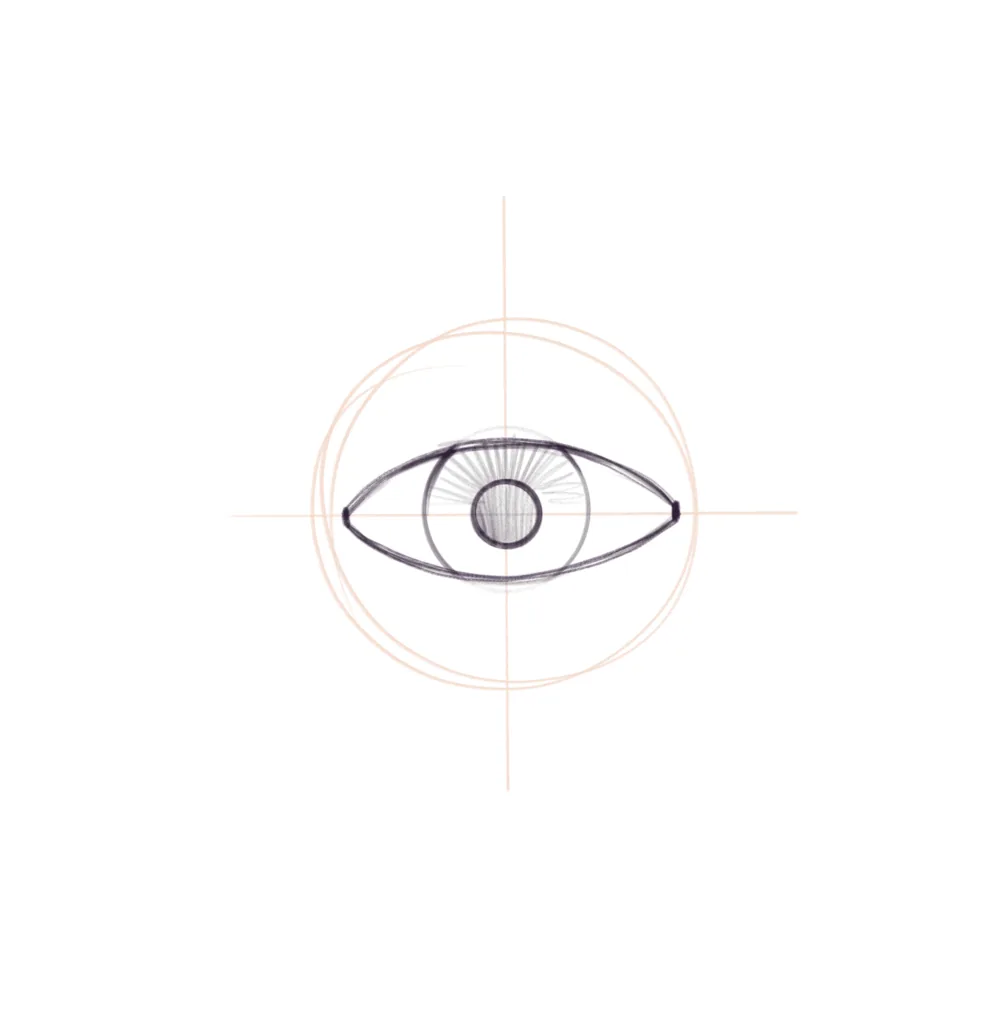
Draw an outline of the eyeball by drawing a circle (about 5-6 cm), then draw horizontal and vertical lines through the center. ``````
In the center, draw a smaller circle (about 2 cm) — this will be the iris, its diameter is half the size of the eyeball.
``````
Now, along the horizontal line, draw the upper and lower arcs to get the silhouette of the eye. The width of the eye slit is slightly less than the width of the eyeball, and it's important that the eyelids slightly overlap the iris. At the same time, draw the pupil in the center of the iris.
``````
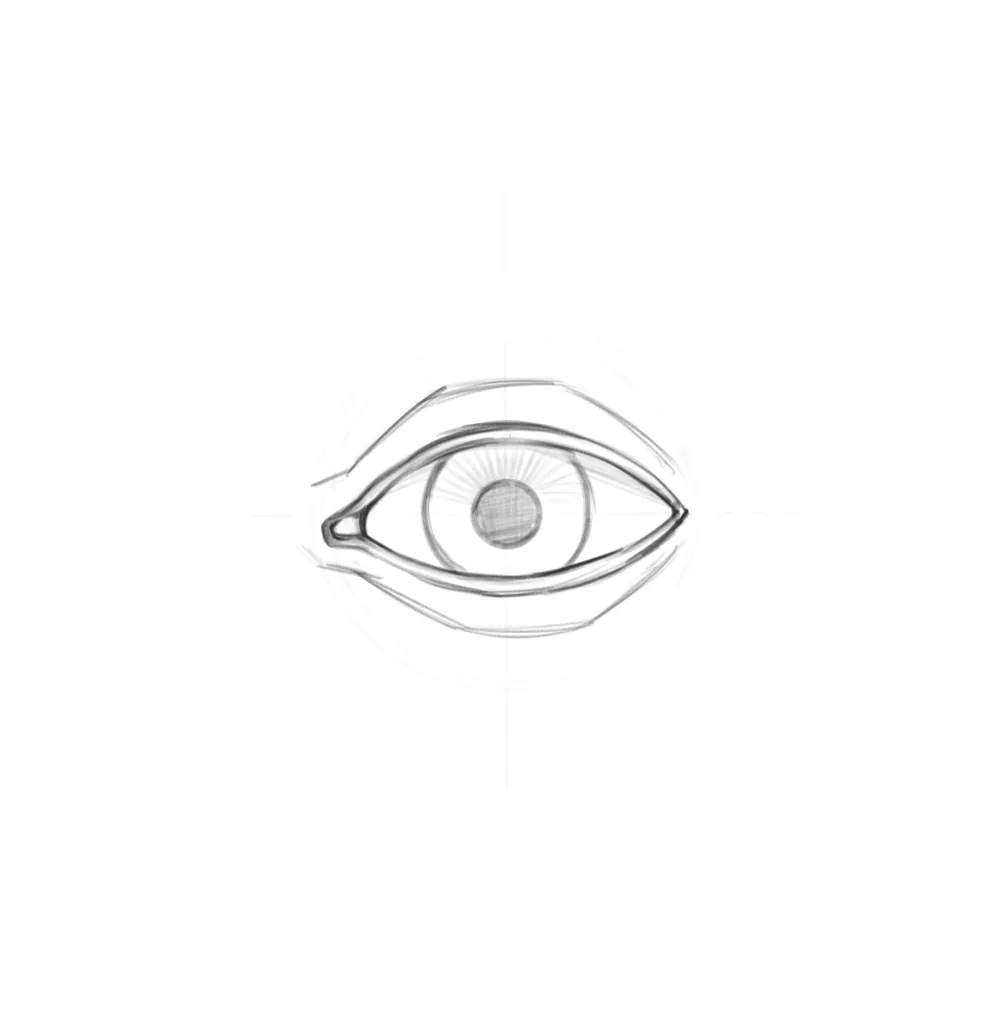
Now let's add volume to the eyelids and the tear duct. To do this, draw the thickness of the eyelids, stepping a couple of millimeters from the lines of the eye slit, at the same time you can outline the tear duct in the corner of the eye and outline it with a line of the eyelid as well. Then, stepping 5-7 mm from the eye slit down and up, you can outline the folds of the eyelids to indicate their height.
``````
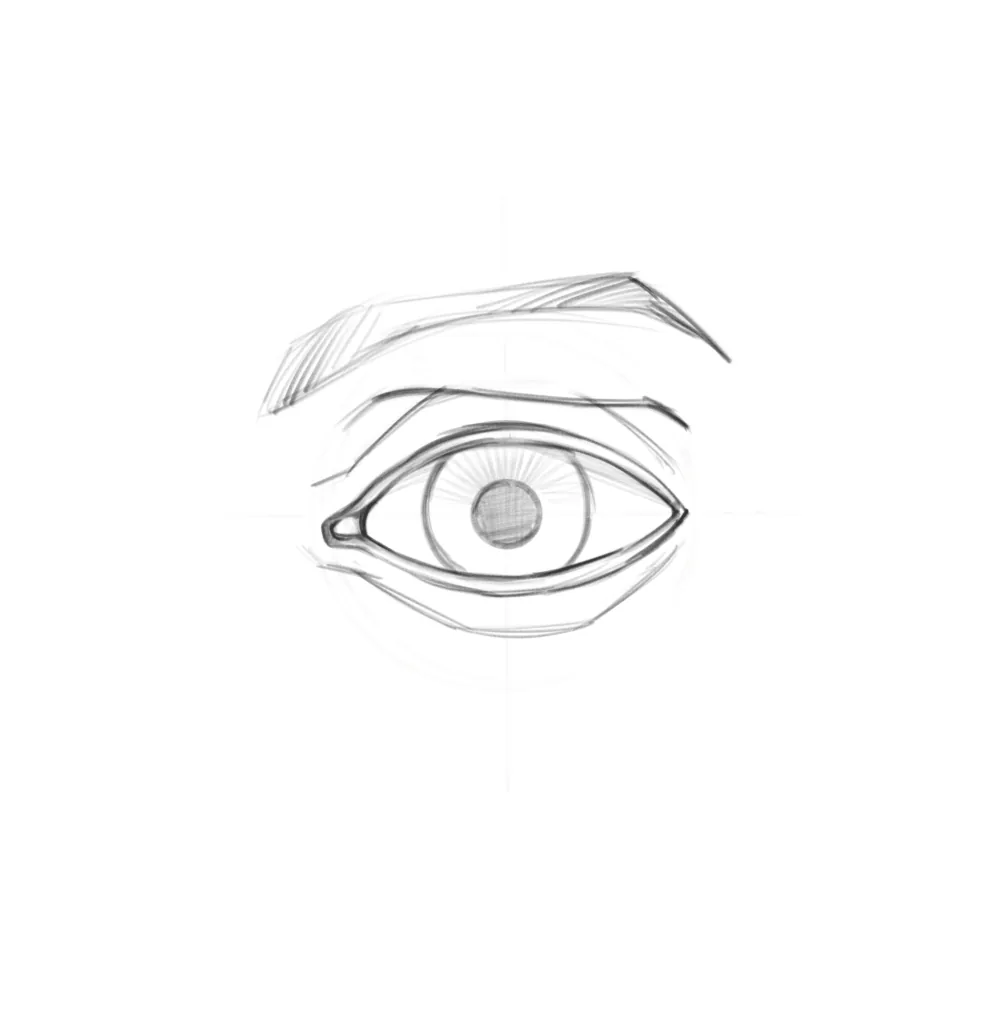
Now on top we can outline the shape of the eye socket, which will slightly overlap the surface of the upper eyelid. And completing the eye scheme, we can draw the silhouette of the eyebrow above the eye socket. The length of the eyebrow is greater than the length of the eye slit, and its beginning, which is closer to the nose, is usually lower than the outer edge.
``````
```Eye shape
Related courses
All courses
from 2 500 ₽
-50%
Моя первая фигура
5 000 ₽2 500 ₽
Learn more

from 3 900 ₽
-57%
Book illustration: The first page page
9 000 ₽3 900 ₽
Learn more

from 3 900 ₽
-57%
Prop concept: render and atmosphere
9 000 ₽3 900 ₽
Learn more
```
Next, let's move on to the shape of the eye. It's important to have skills in drawing basic shapes, particularly a sphere. Understanding the structure of the eye as a spherical shape is key. You need to learn how to draw simple shapes such as a sphere, cube, and cylinder, so don't be lazy and practice this extra time.
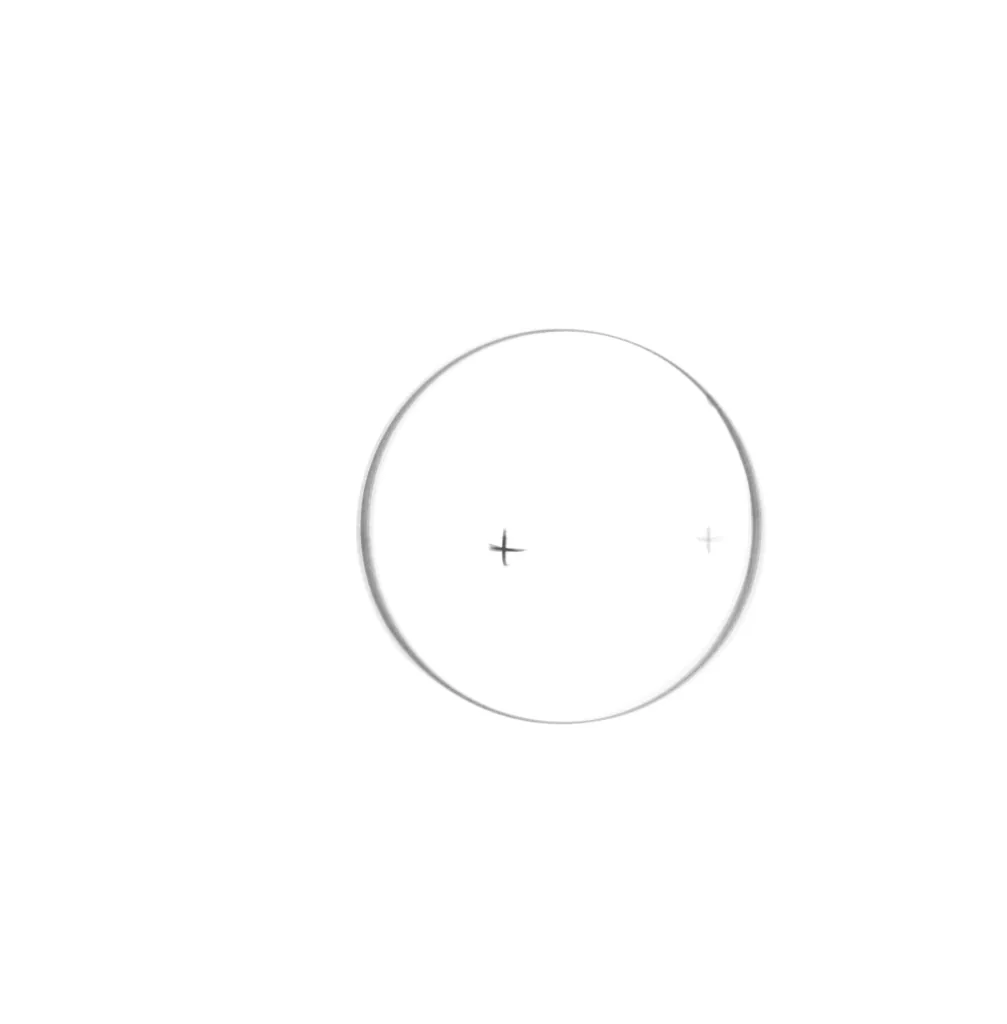
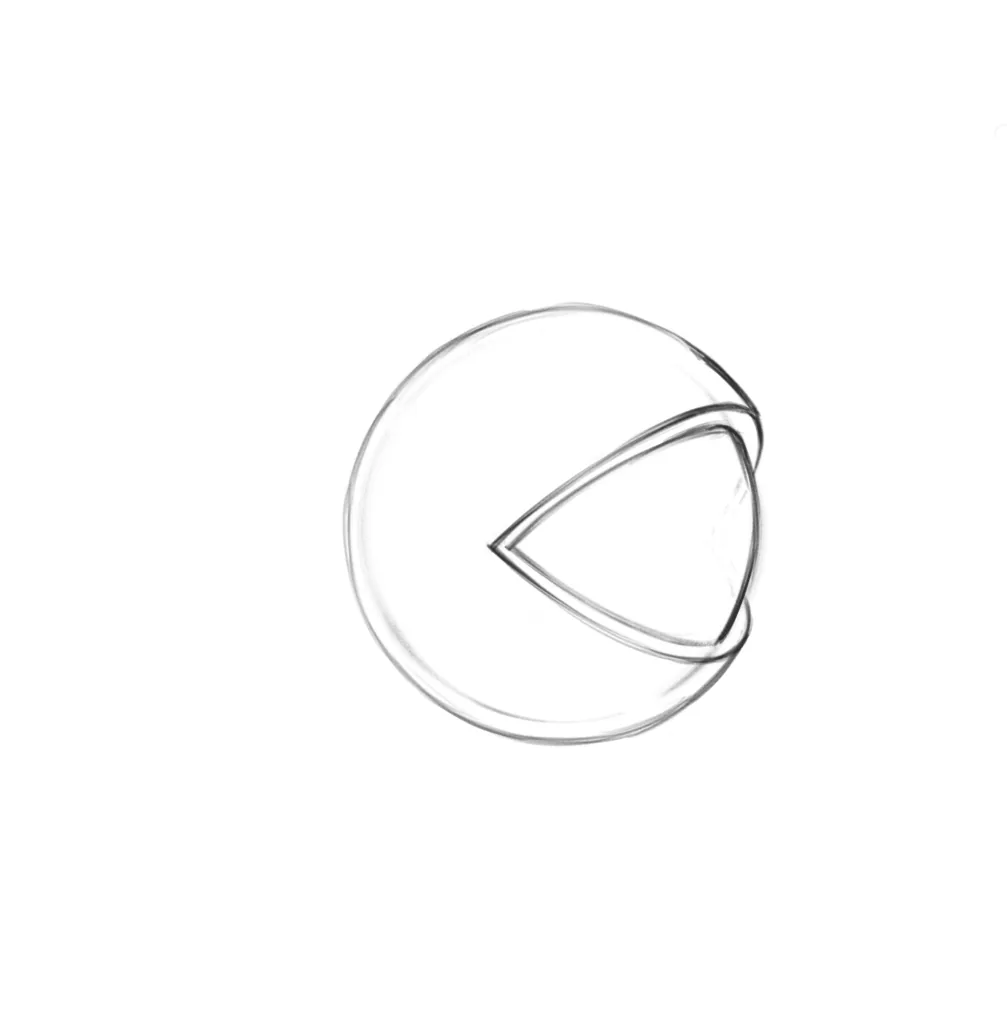
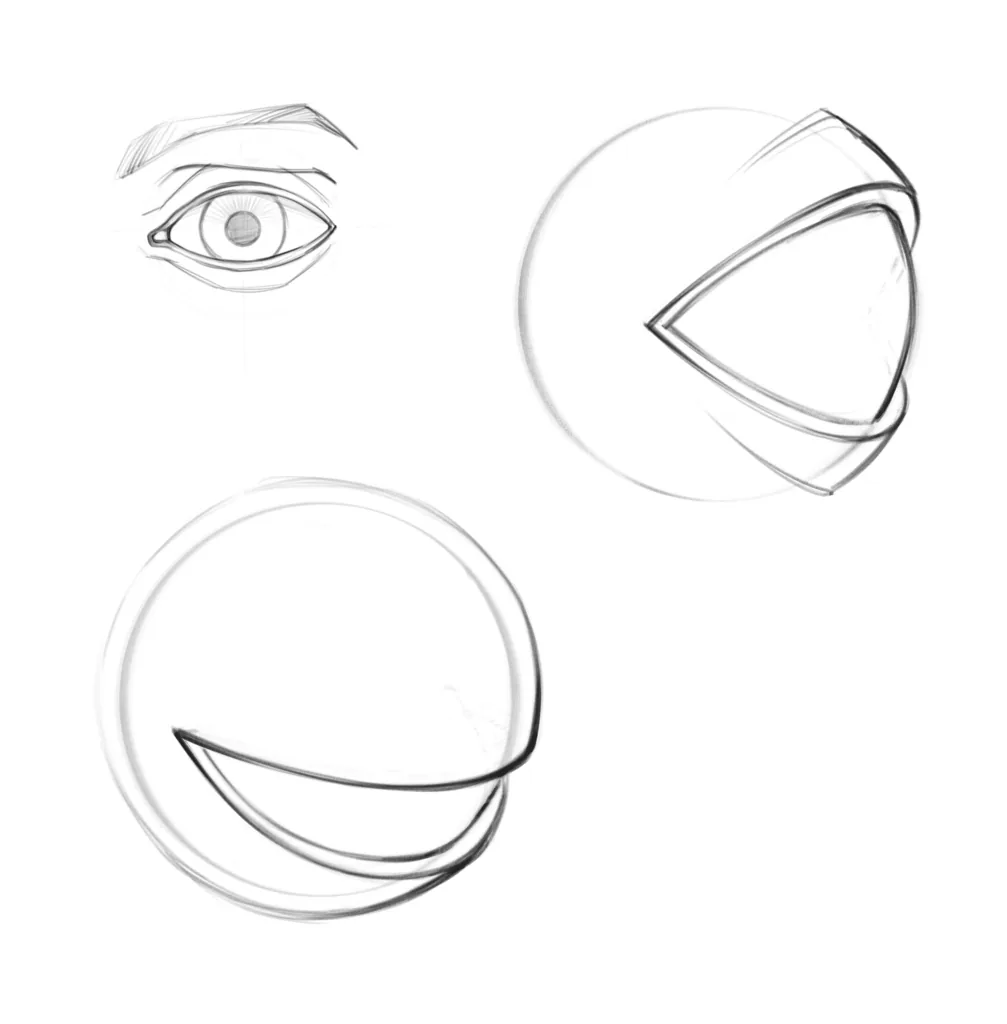
 Yes, as you already understood, in reality, the eye is close to the shape of a sphere. You need to understand this and make some simplified sketches before we start complicating the shape of the eye and proceed to drawing details. Let's imagine that our ball is an orange with a cut-out part of the peel. And we will get something similar to an eye cut. Now let's practice drawing this figure from different angles.
First, draw a circle that will represent our eyeball and place two dots marking the corners of the eye cut. We will only see one point on the surface of the sphere, but we also need to mark the second point to construct the lines of the eye cut.
Yes, as you already understood, in reality, the eye is close to the shape of a sphere. You need to understand this and make some simplified sketches before we start complicating the shape of the eye and proceed to drawing details. Let's imagine that our ball is an orange with a cut-out part of the peel. And we will get something similar to an eye cut. Now let's practice drawing this figure from different angles.
First, draw a circle that will represent our eyeball and place two dots marking the corners of the eye cut. We will only see one point on the surface of the sphere, but we also need to mark the second point to construct the lines of the eye cut.
 Then draw the upper and lower arcs from one point to another.
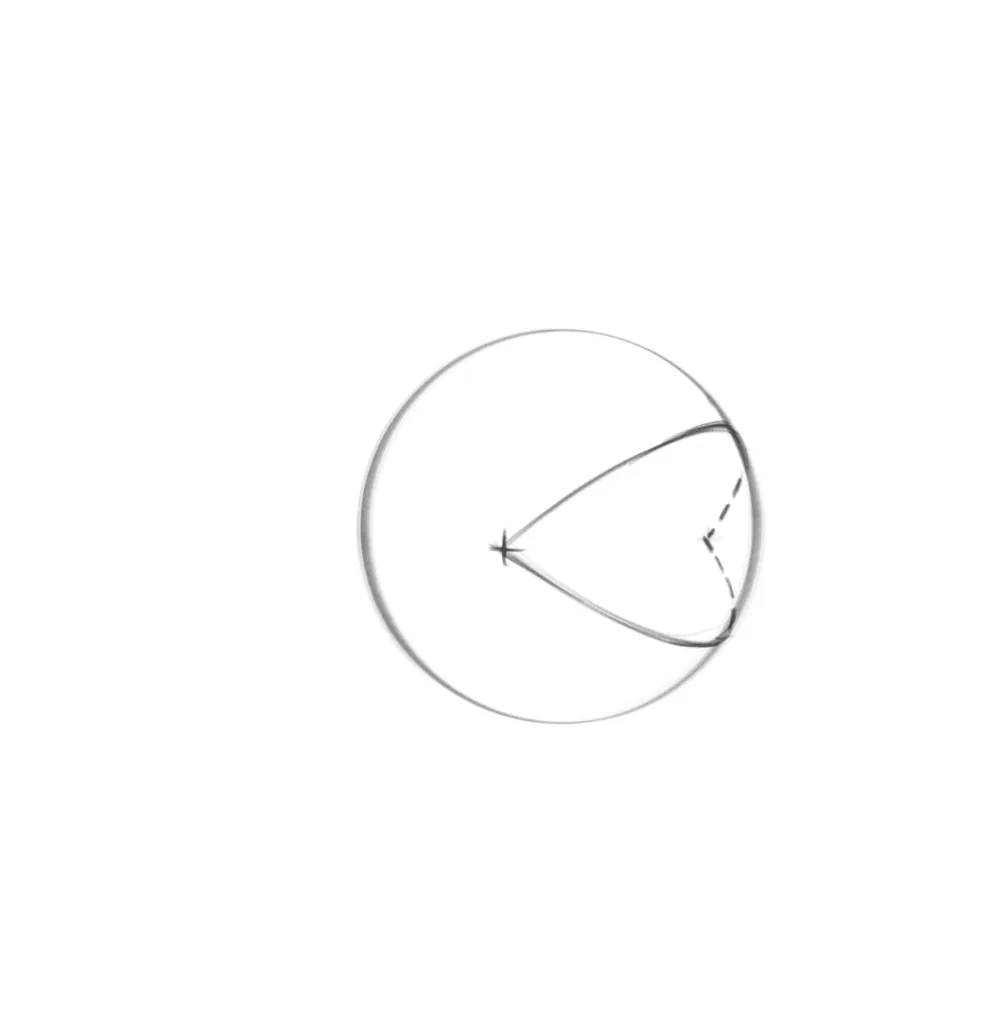 Next, immediately draw повторные arcs to show the thickness of the eyelids.
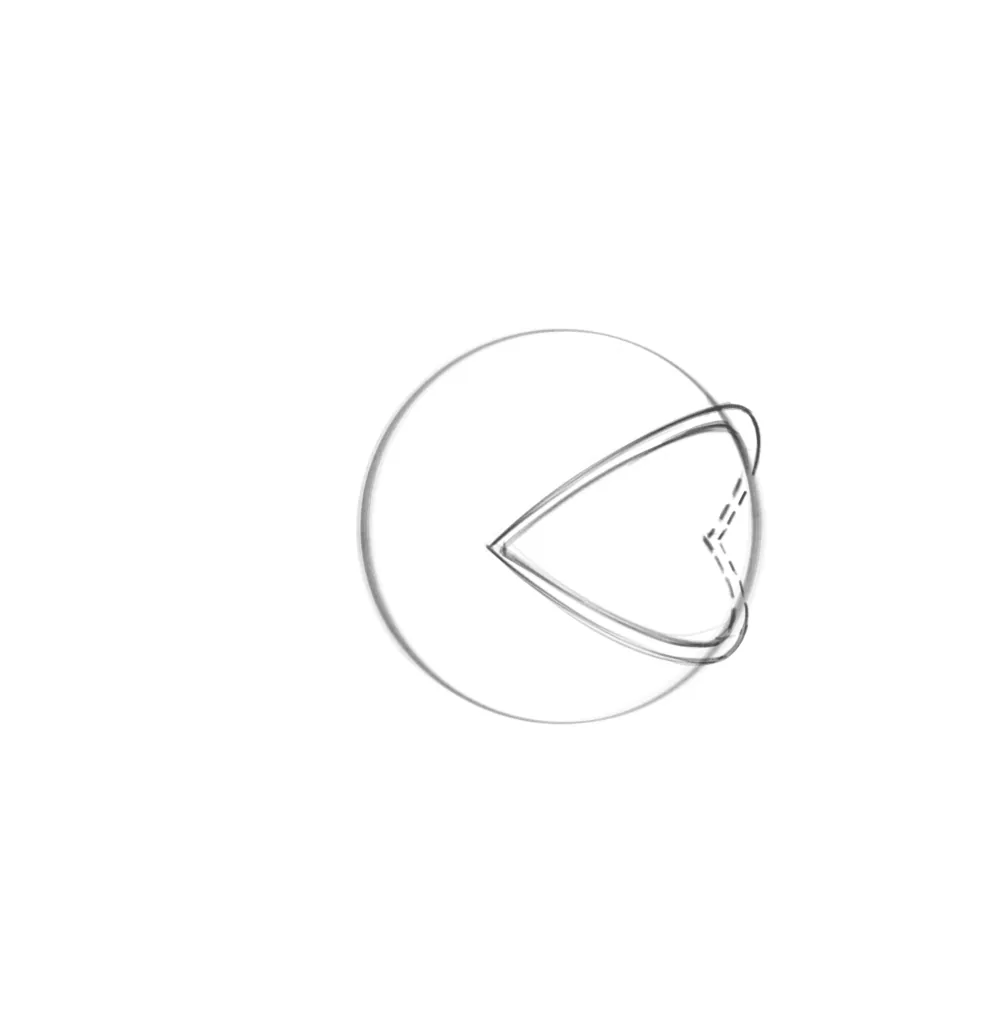 Now, based on this resulting scheme, complete the «orange eye» by cleaning the drawing of unnecessary lines.
 And do several more such drawings independently from different angles.
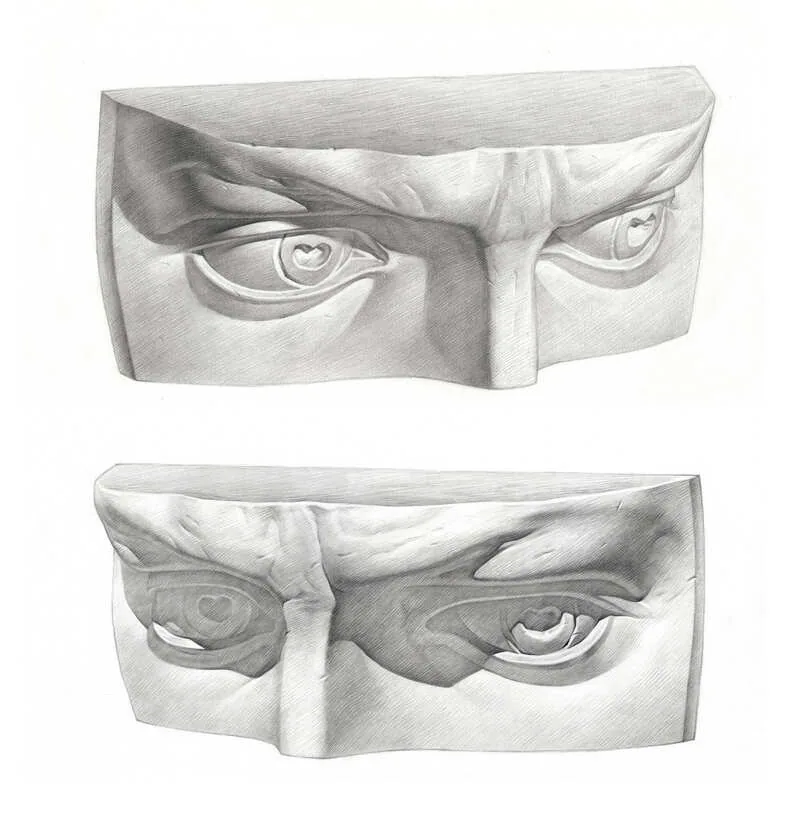
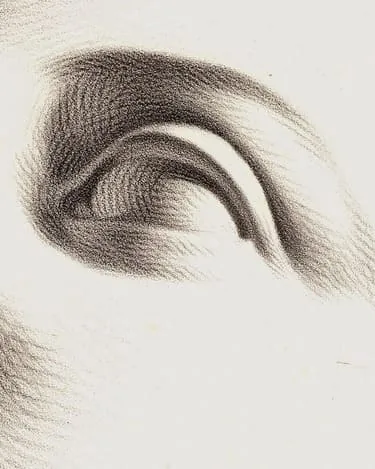
 Additionally, you can look at the drawing of a plaster face, in which the shape is manifested by the chiaroscuro pattern.
We recommend: study the cool free lesson «chiaroscuro in drawing».
Additionally, you can look at the drawing of a plaster face, in which the shape is manifested by the chiaroscuro pattern.
We recommend: study the cool free lesson «chiaroscuro in drawing».
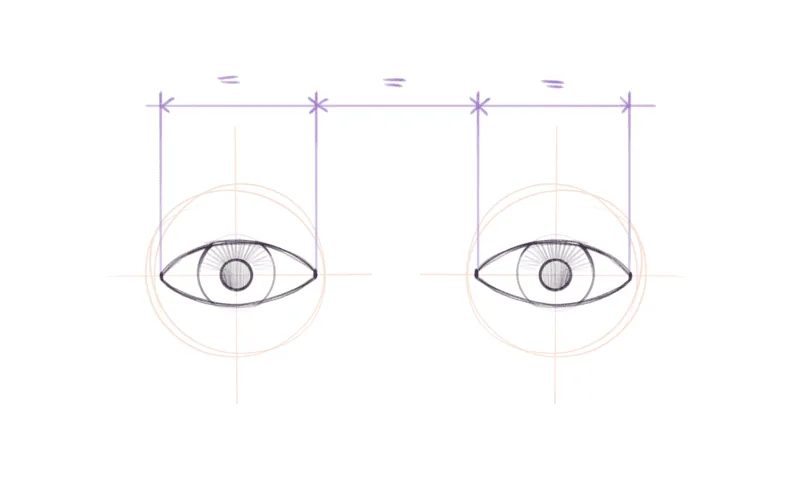
 Next, use arcs to mark the eye slits on the spheres. And right in the middle, you can outline the irises. The distance between a person's eyes is equal to the length of one eye, but it can vary more or less, so when drawing a specific person, keep this in mind.
 Complete the thickness of the eyelids and show the height of the upper and lower eyelids with folds. And you need to show that the eye socket overlaps part of the upper eyelid.
 If everything worked out at this stage, then now you can add eyebrows, add shadows and show the modeling of the form with a stroke.
Also, don't forget about the falling shadows from the eye socket on the upper eyelid and from the upper eyelid on the eyeball. And also, if you want your drawing of the eye to look more realistic, you can darken the iris of the eye from above, and then draw a highlight on the cornea of the eye.
A highlight is a reflected light source, so it can be of different shapes, if the light source is a window, the highlight is rectangular, if it's a light bulb, it's round).
We recommend: check out a cool free lesson «how to draw highlights».
If everything worked out at this stage, then now you can add eyebrows, add shadows and show the modeling of the form with a stroke.
Also, don't forget about the falling shadows from the eye socket on the upper eyelid and from the upper eyelid on the eyeball. And also, if you want your drawing of the eye to look more realistic, you can darken the iris of the eye from above, and then draw a highlight on the cornea of the eye.
A highlight is a reflected light source, so it can be of different shapes, if the light source is a window, the highlight is rectangular, if it's a light bulb, it's round).
We recommend: check out a cool free lesson «how to draw highlights».
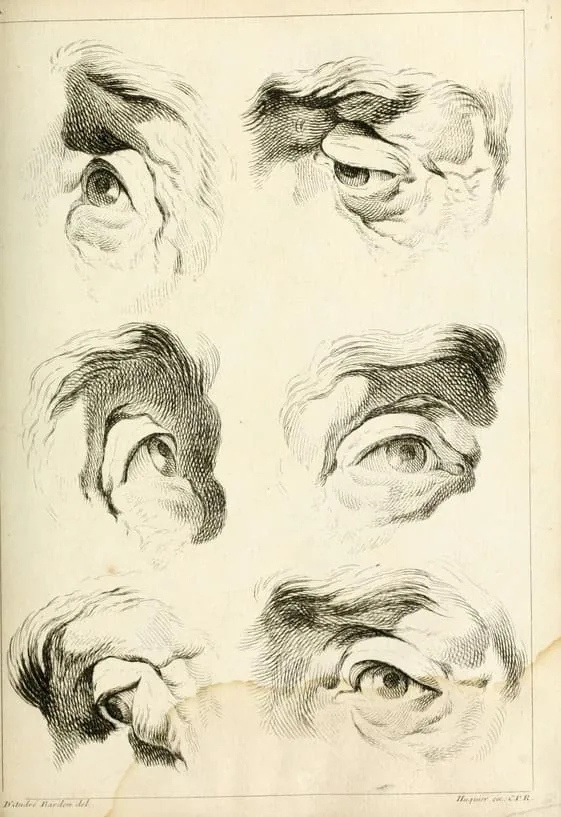
 Continue to practice drawing eyes on your own. See how other artists do it, especially pay attention to the drawings of old masters. It's very useful to make copies of such drawings, and it's not necessary to copy them completely, you can make a copy of just the eye.
 Remember, to skillfully draw human eyes, you need to devote time to practice. Drawing eyes requires attention to detail, nuances of light and shadow, shape and expression, and the only way to achieve perfection is through constant practice. Don't be afraid to experiment, learn new techniques and observe different styles.
You can also check out a free lesson on how to draw a human face on our website.
Remember, to skillfully draw human eyes, you need to devote time to practice. Drawing eyes requires attention to detail, nuances of light and shadow, shape and expression, and the only way to achieve perfection is through constant practice. Don't be afraid to experiment, learn new techniques and observe different styles.
You can also check out a free lesson on how to draw a human face on our website.
Yes, as you already understood, in reality, the eye is close to the shape of a sphere. You need to understand this and make some simplified sketches before we start complicating the shape of the eye and proceed to drawing details. Let's imagine that our ball is an orange with a cut-out part of the peel. And we will get something similar to an eye cut. Now let's practice drawing this figure from different angles.
First, draw a circle that will represent our eyeball and place two dots marking the corners of the eye cut. We will only see one point on the surface of the sphere, but we also need to mark the second point to construct the lines of the eye cut.
Then draw the upper and lower arcs from one point to another.
Next, immediately draw повторные arcs to show the thickness of the eyelids.
Now, based on this resulting scheme, complete the «orange eye» by cleaning the drawing of unnecessary lines.
And do several more such drawings independently from different angles.
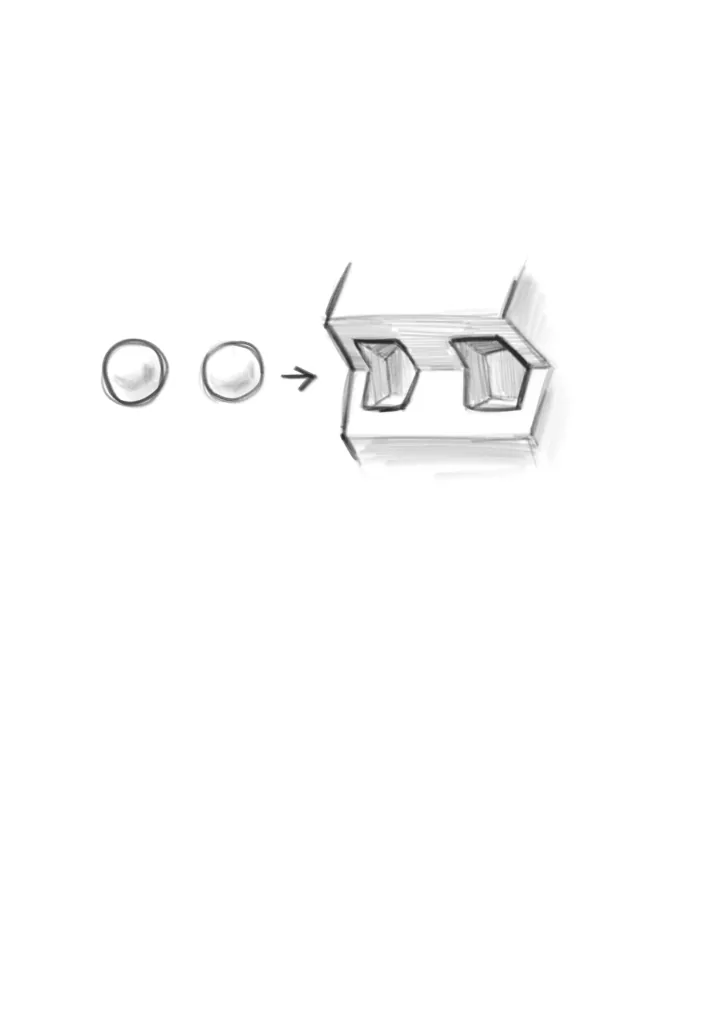
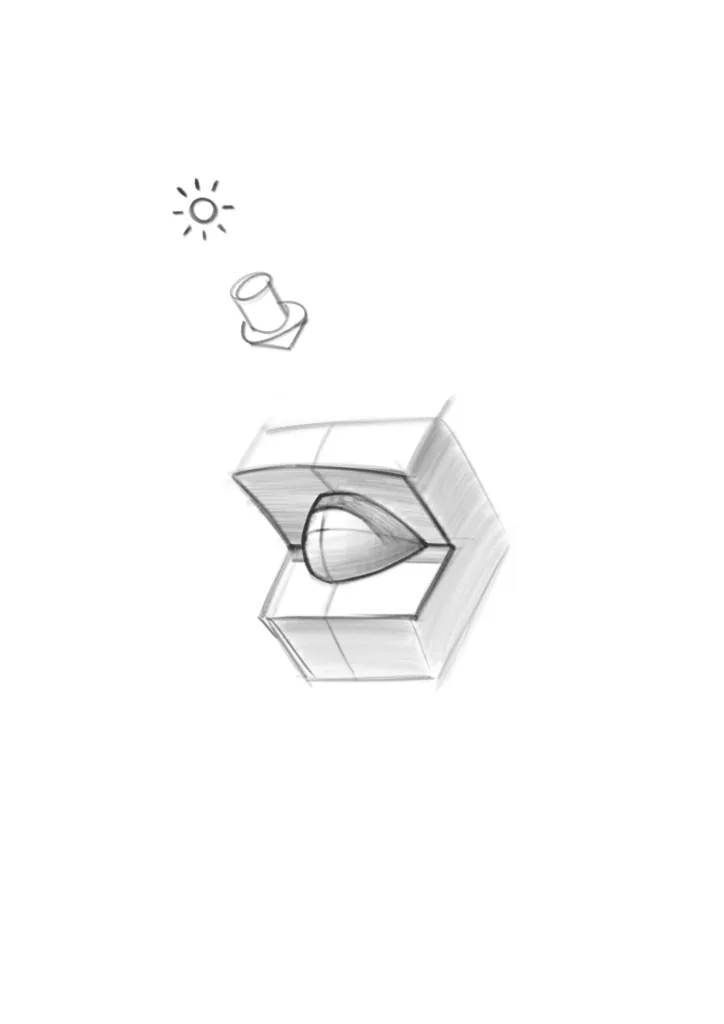
Eye sockets and eye spheres
Now let's place the eye spheres in the eye sockets and see how the light falls on the shape. We see that the upper part of the eye socket is shaded, and the lower part is lit. The light on the protruding part of the sphere, on the contrary, is from above. Also, note that the shadow from the eye socket falls on the sphere.
Additionally, you can look at the drawing of a plaster face, in which the shape is manifested by the chiaroscuro pattern.
We recommend: study the cool free lesson «chiaroscuro in drawing».
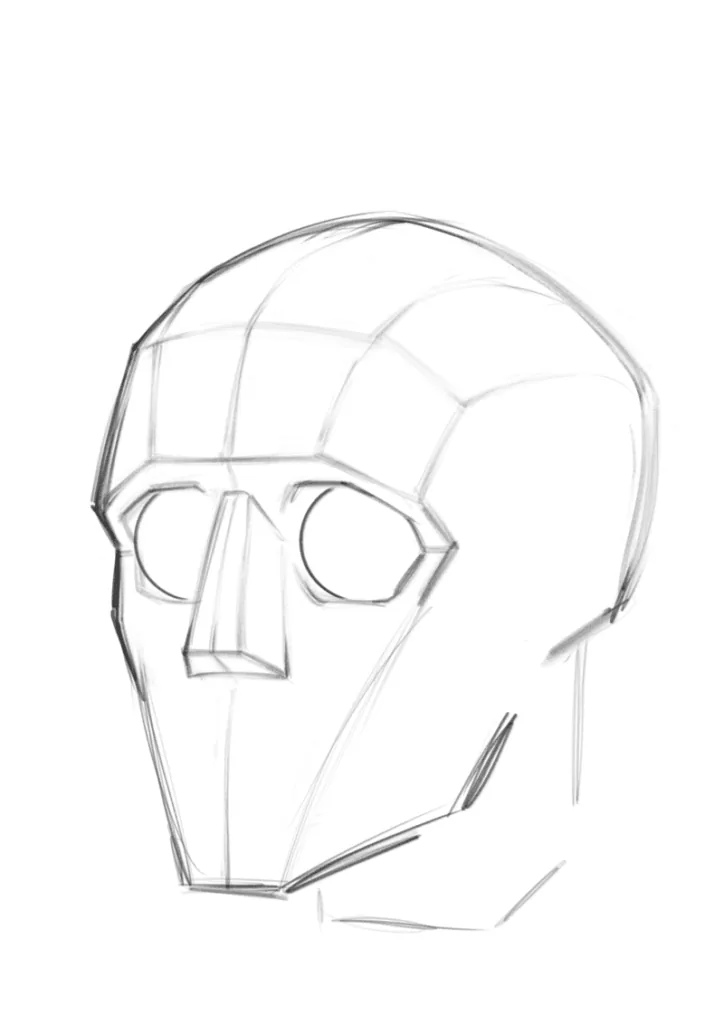
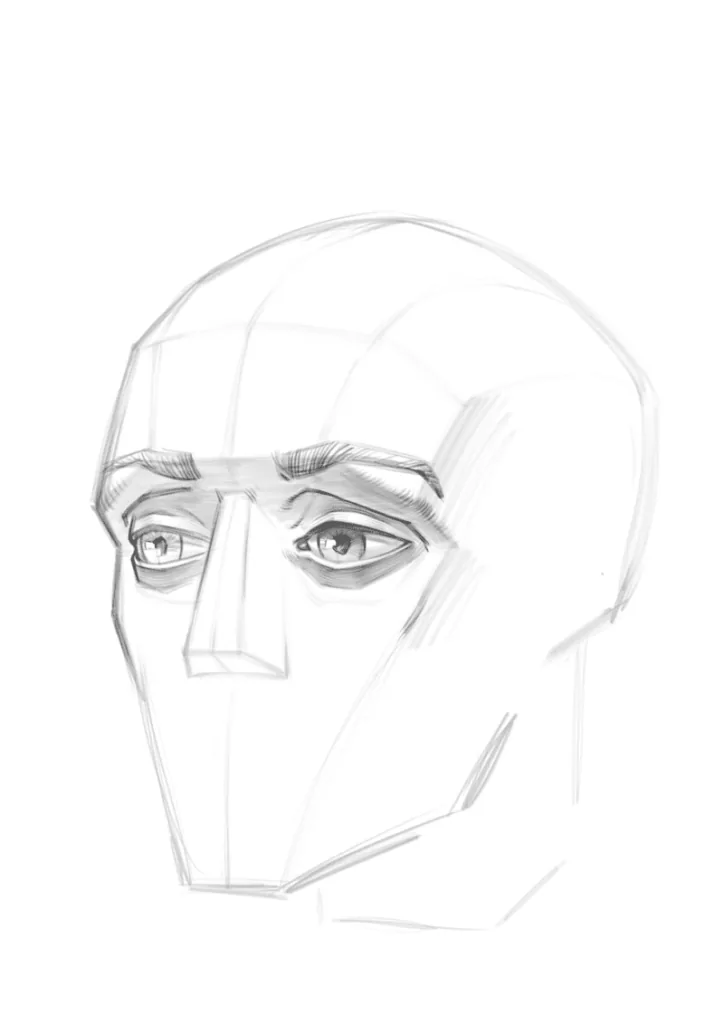
Drawing eyes with a chopped head
``` Now, based on the schemes we've looked at, let's draw a couple of eyes set in eye sockets. We need to draw a simplified head shape with eye sockets and insert spheres into them. You can make the same head shape as shown in the picture or just draw the eye sockets with spheres inside. We recommend: check out a cool free lesson «how to draw a human head».
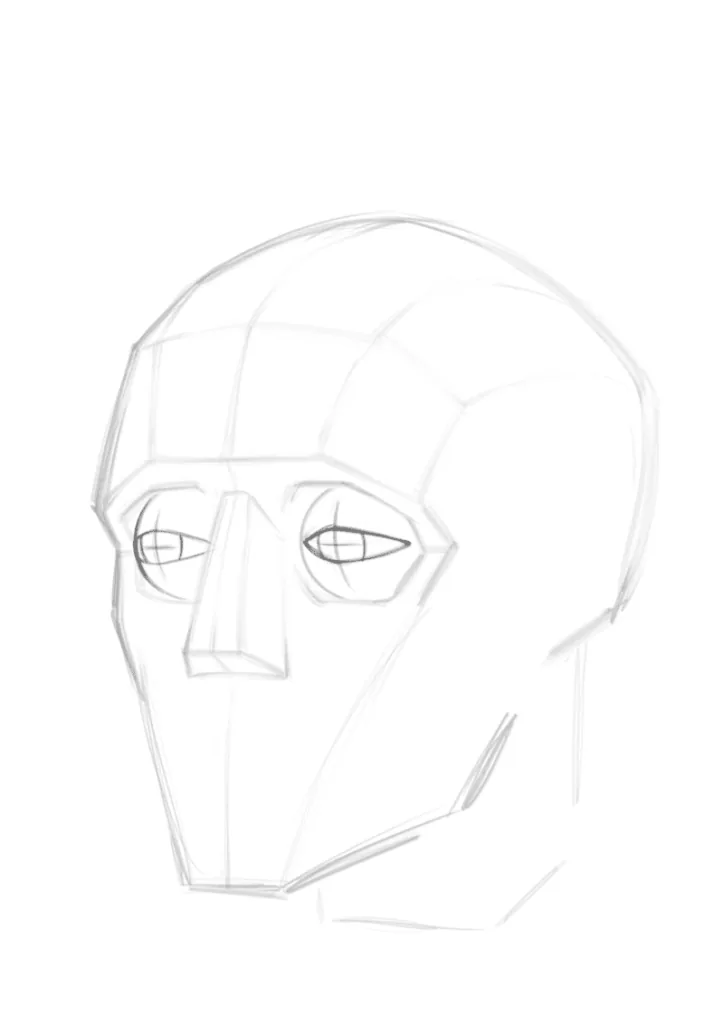
Next, use arcs to mark the eye slits on the spheres. And right in the middle, you can outline the irises. The distance between a person's eyes is equal to the length of one eye, but it can vary more or less, so when drawing a specific person, keep this in mind.
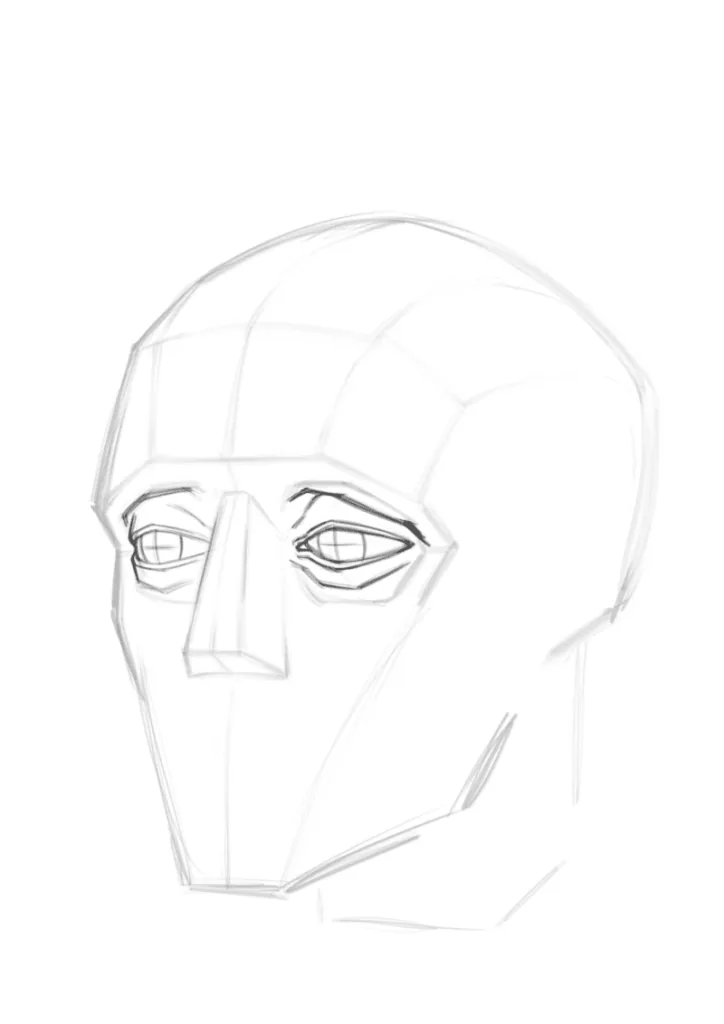
Complete the thickness of the eyelids and show the height of the upper and lower eyelids with folds. And you need to show that the eye socket overlaps part of the upper eyelid.
If everything worked out at this stage, then now you can add eyebrows, add shadows and show the modeling of the form with a stroke.
Also, don't forget about the falling shadows from the eye socket on the upper eyelid and from the upper eyelid on the eyeball. And also, if you want your drawing of the eye to look more realistic, you can darken the iris of the eye from above, and then draw a highlight on the cornea of the eye.
A highlight is a reflected light source, so it can be of different shapes, if the light source is a window, the highlight is rectangular, if it's a light bulb, it's round).
We recommend: check out a cool free lesson «how to draw highlights».
Continue to practice drawing eyes on your own. See how other artists do it, especially pay attention to the drawings of old masters. It's very useful to make copies of such drawings, and it's not necessary to copy them completely, you can make a copy of just the eye.
Remember, to skillfully draw human eyes, you need to devote time to practice. Drawing eyes requires attention to detail, nuances of light and shadow, shape and expression, and the only way to achieve perfection is through constant practice. Don't be afraid to experiment, learn new techniques and observe different styles.
You can also check out a free lesson on how to draw a human face on our website.
Detailed video lesson «How to draw human eyes»
``````Continue learning how to draw a human
- How to draw a human head — step-by-step lesson on constructing the head
- How to draw a female face — step-by-step lesson on drawing a girl's face
- How to learn to draw a human — a complete lesson on anatomy and figure
Related materials

Tutorial
How to draw a human nose
August 15, 2024
Tutorial
How to draw a nut
September 18, 2023

Tutorial
How to learn to draw a person
January 18, 2024

Tutorial
How to draw a person's face
December 22, 2023
Tutorial
How to draw a human head
September 18, 2023

Article
3 tips for a beginner character artist. How to draw emotions
September 18, 2023

News
Создание 3D-модели нарисованного вручную человека с роботизированной рукой
March 2, 2026