TutorialUpdated: July 2, 2026
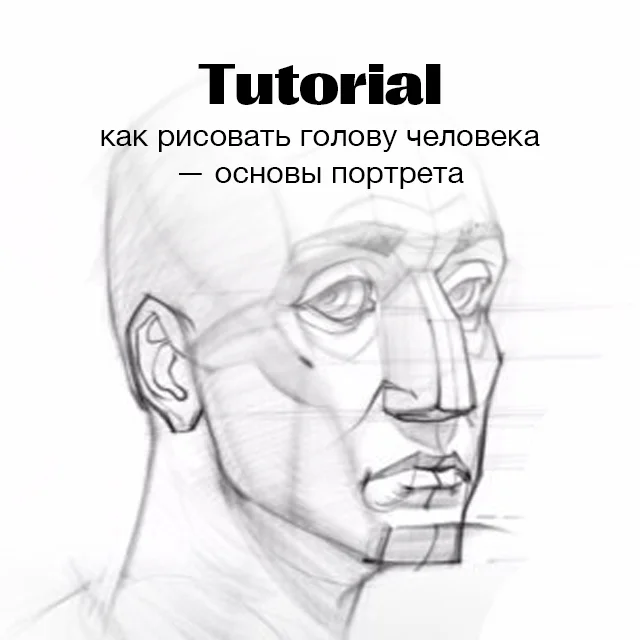
How to draw a person's face
In short
How to properly learn to draw a person's face with a pencil, facial proportions, drawing scheme, hair, facial oval, drawing of lips, eyes and nose. In detail about the facial features.
Artist, founder and ideologist of Skills Up School
Dream of learning to draw portraits and don't know where to start? Start by mastering proportions! These two small tutorials will help you figure out how a person's face is structured in full face and three-quarter views.
Recommended: check out the cool article from our curators «Proportions in drawing».
The shape of the face rests entirely on the skull, so we recommend studying its structure separately in the master class How to Draw a Skull.
We will draw several условных figures step by step, which will help you determine the size and shape of the head, then we will mark the height and width of the face to make it easier for us to deal with the location of the facial features (eyes, nose, mouth, ears). After marking, we will make a light sketch of the face and based on it we will refine the details and complete the drawing.
 Find the middle of the entire vertical segment — this will be the eye level. Draw a smaller circle from the eye line to the lower edge of the segment.
 Connect the upper and lower circles into one silhouette by sketching with a light sketch line.
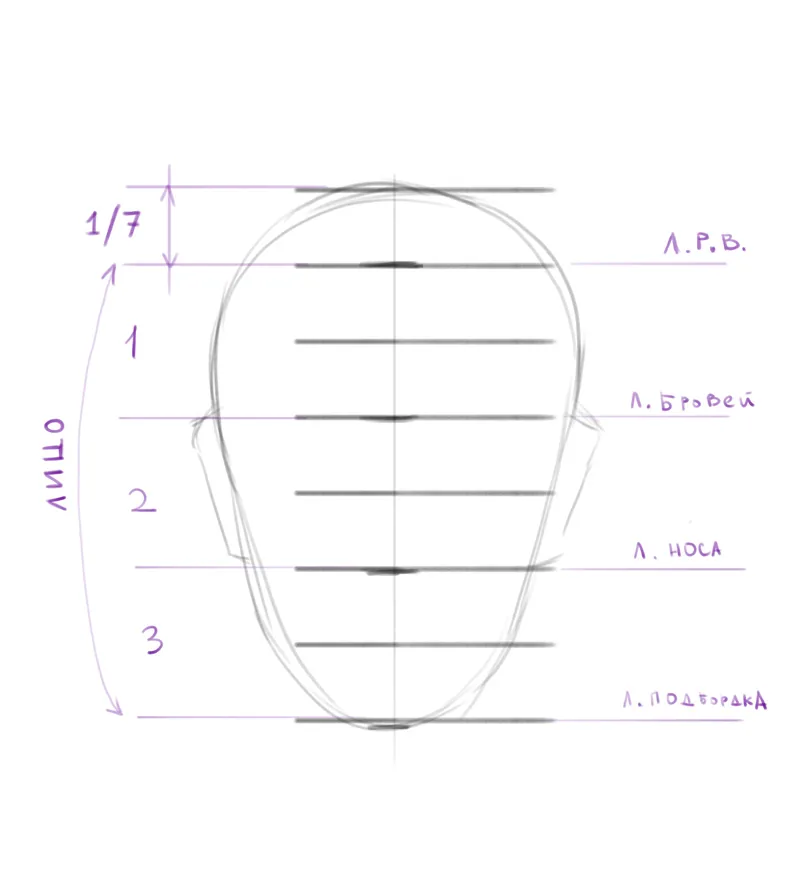
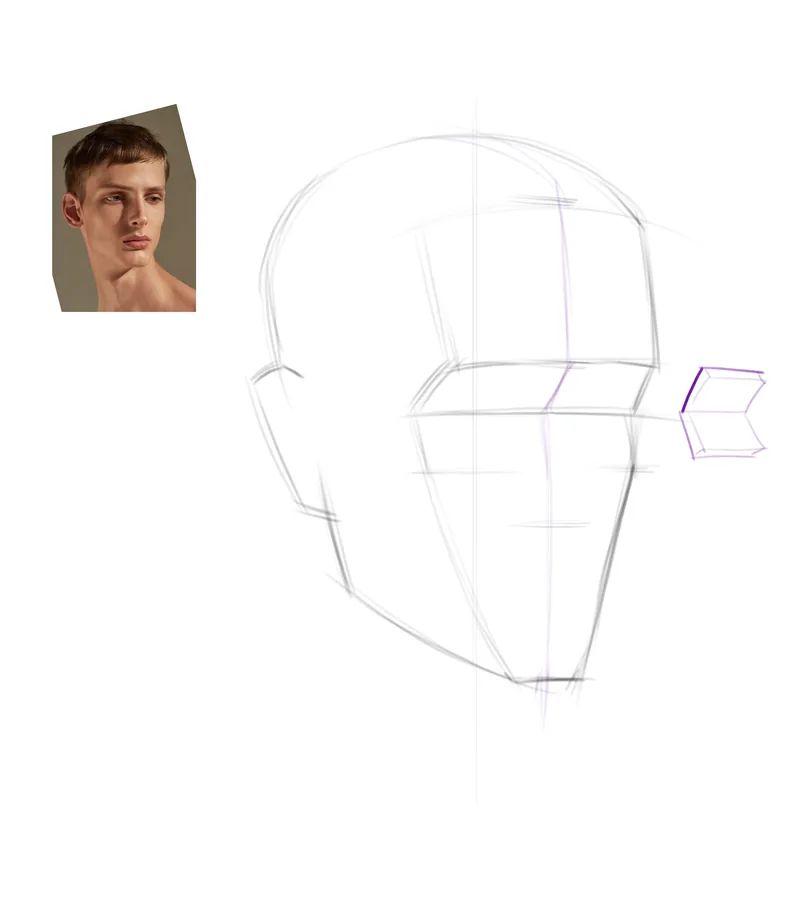
 So, we have found the size of the head, now we need to find the face size — it will be smaller in height. To do this, we retreat from the top by about 1/7 of the entire height of the head — this is the hairline, the rest is the face.
Recommended: check out the free lesson «How to draw a human head».
The face in the vertical plane is also divided into three equal segments: the upper segment is from the hairline to the eyebrows, the second is from the eyebrow line to the base of the nose, the third is from the base of the nose to the lower line of the chin. The ears will be equal in height to the second segment.
So, we have found the size of the head, now we need to find the face size — it will be smaller in height. To do this, we retreat from the top by about 1/7 of the entire height of the head — this is the hairline, the rest is the face.
Recommended: check out the free lesson «How to draw a human head».
The face in the vertical plane is also divided into three equal segments: the upper segment is from the hairline to the eyebrows, the second is from the eyebrow line to the base of the nose, the third is from the base of the nose to the lower line of the chin. The ears will be equal in height to the second segment.
 We are looking for the size of the eyes and their location: the width of the head horizontally is divided into five segments. The middle segment is the distance between the eyes and the width of the nose in its lower part, two segments on the sides are the width of the eyes themselves.
Recommended: check out the free lesson «How to draw human eyes»
We are looking for the size of the eyes and their location: the width of the head horizontally is divided into five segments. The middle segment is the distance between the eyes and the width of the nose in its lower part, two segments on the sides are the width of the eyes themselves.
Recommended: check out the free lesson «How to draw human eyes»
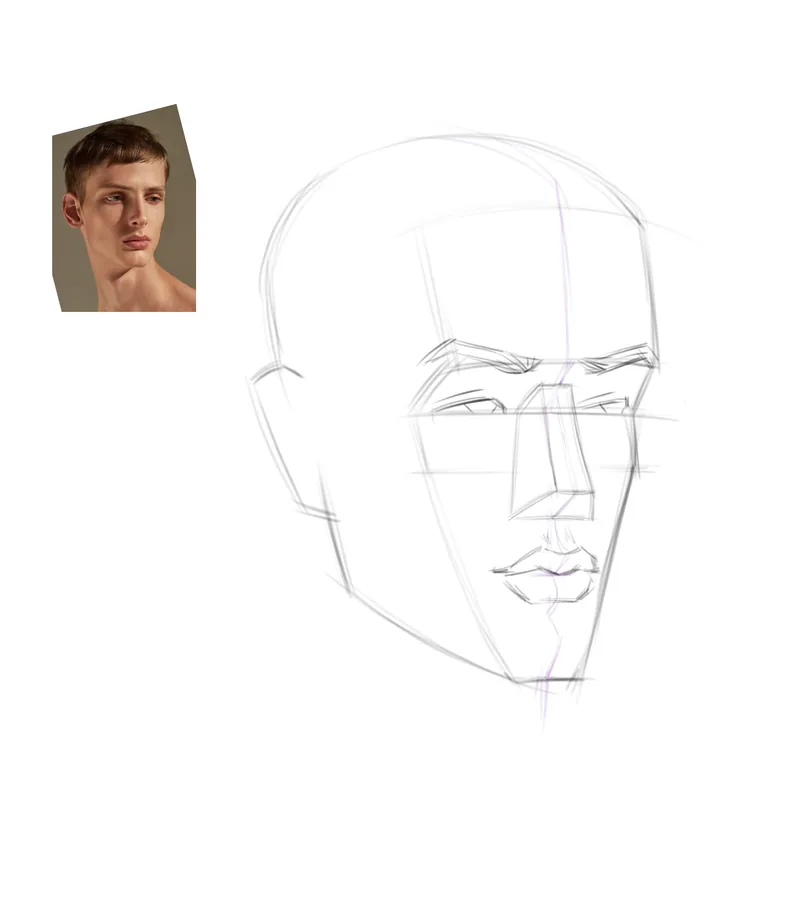
 We outline the outlines of the nose and eyes and make a marking of the lower segment: divide it into three parts, and the lower line of the first segment will be the lip line.
Recommended: check out the free lesson «How to draw a human nose»
We outline the outlines of the nose and eyes and make a marking of the lower segment: divide it into three parts, and the lower line of the first segment will be the lip line.
Recommended: check out the free lesson «How to draw a human nose»
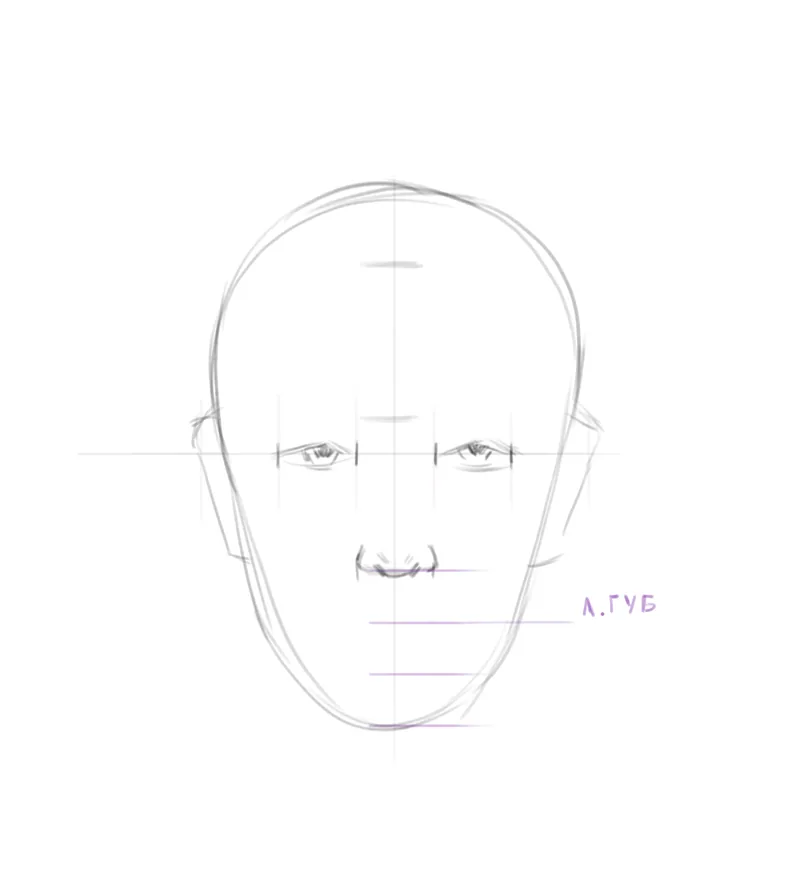 We outline the outlines of the lips, ears and eyebrows.
Recommended: check out the free lesson «How to draw lips»
We outline the outlines of the lips, ears and eyebrows.
Recommended: check out the free lesson «How to draw lips»
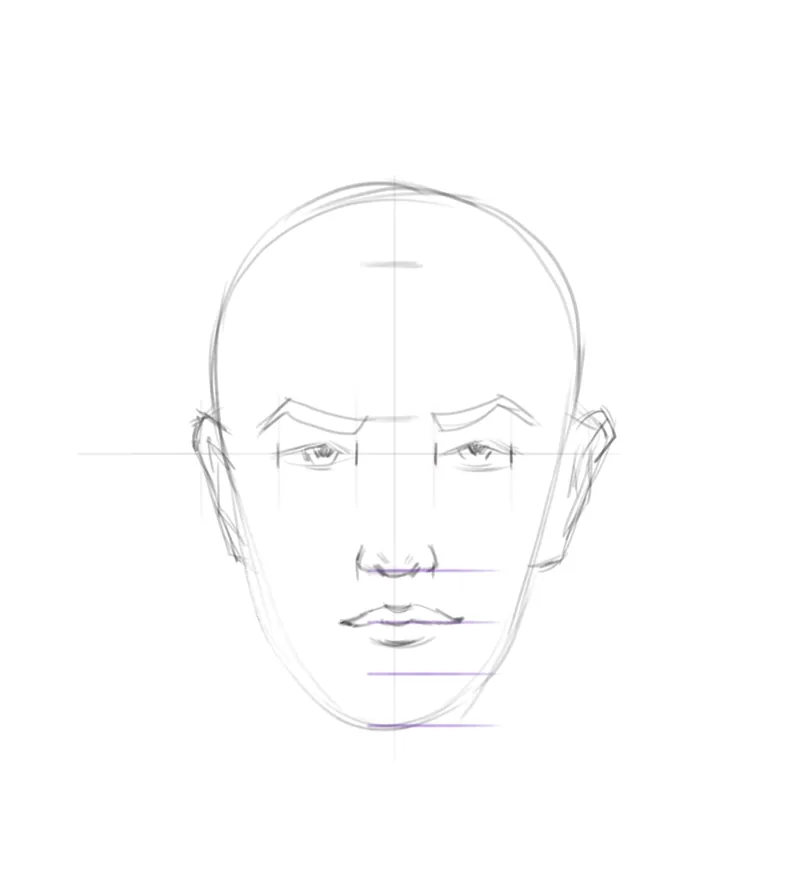 We outline the hairstyle. Please note that the hairstyle has additional volume, so we need to step back a little from the line of the head silhouette and draw the hair silhouette with a slightly ragged line.
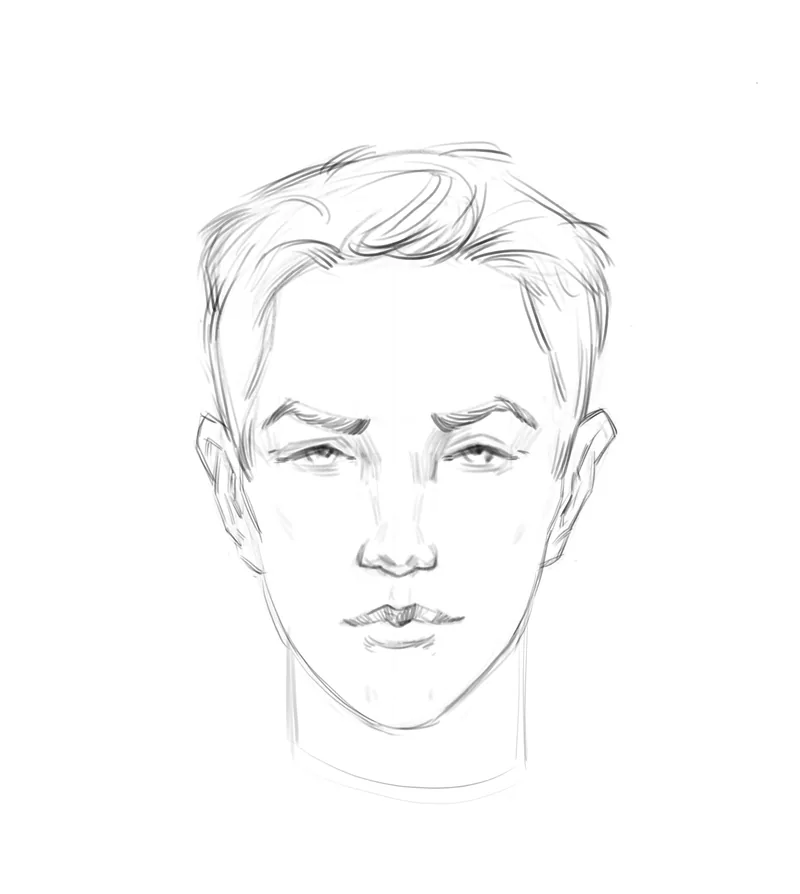
 We have got a sketch version of the portrait, light and conditional. You can start the final part — refine the face silhouette, draw the parts of the face in more detail, outline the shadows.
This method is universal, it can be taken as a basis when drawing any person, adding to it small clarifications in accordance with the proportions of the person you are drawing.
We have got a sketch version of the portrait, light and conditional. You can start the final part — refine the face silhouette, draw the parts of the face in more detail, outline the shadows.
This method is universal, it can be taken as a basis when drawing any person, adding to it small clarifications in accordance with the proportions of the person you are drawing.
Portrait in full face
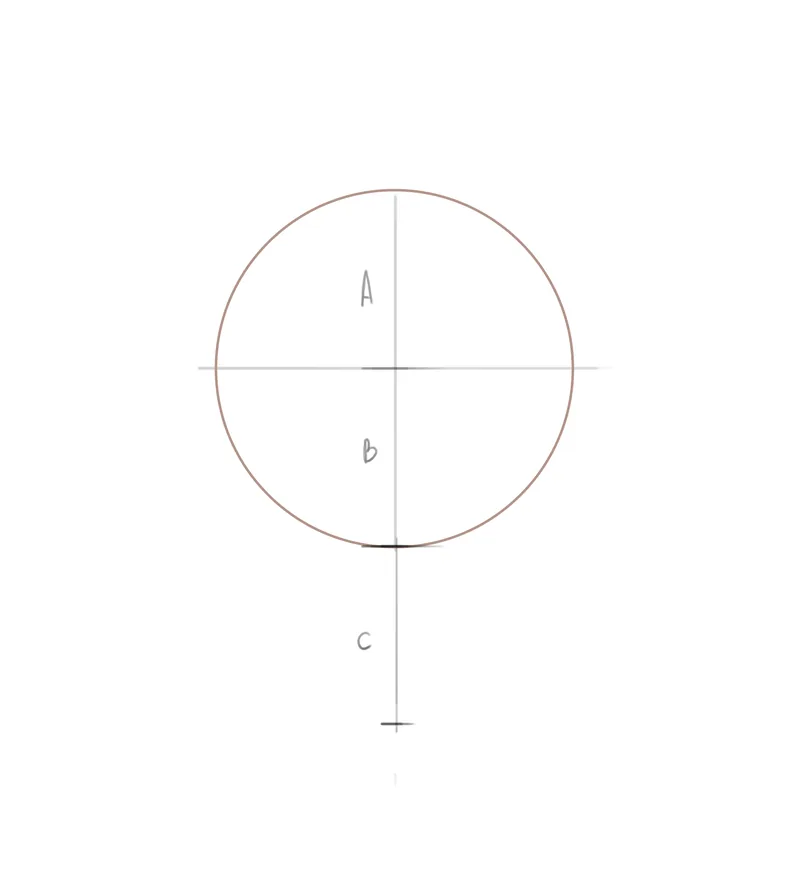
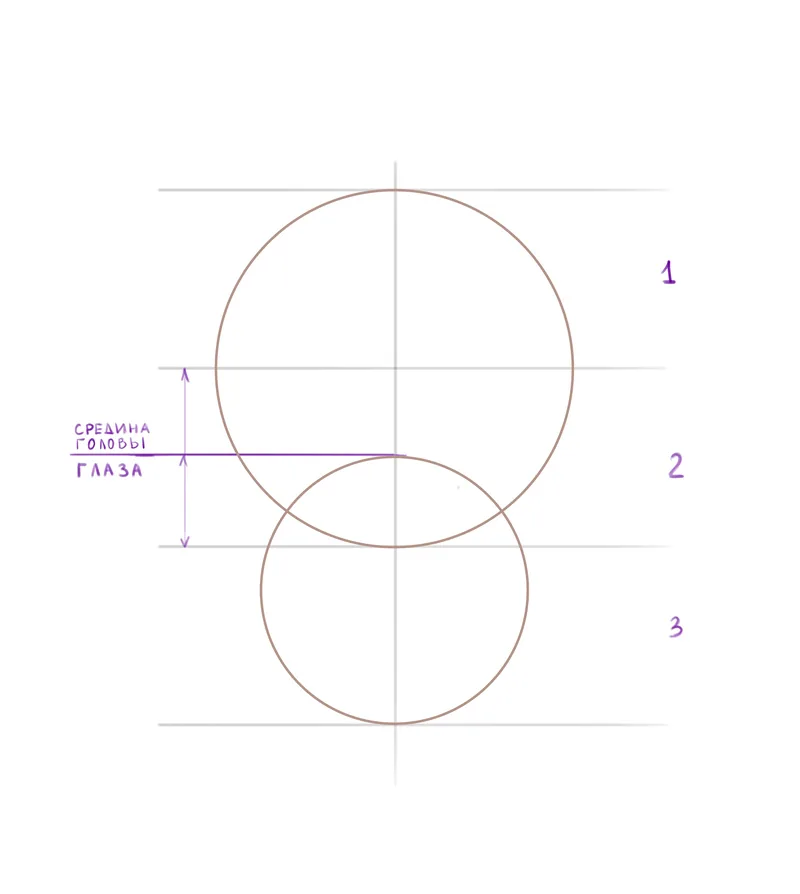
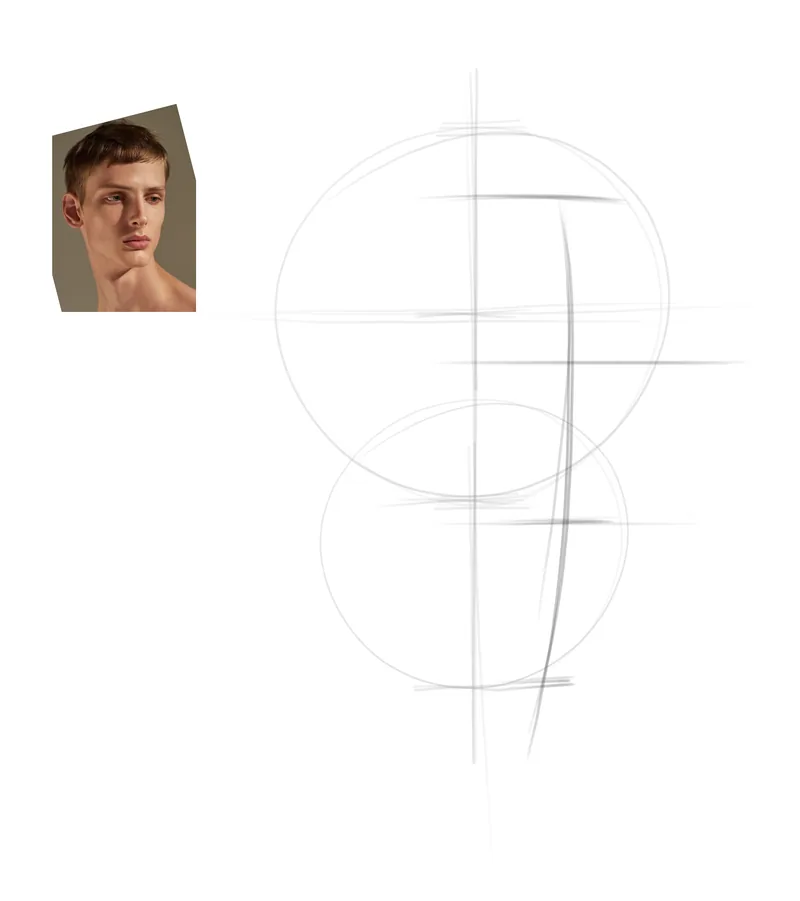
Our first drawing will be in full face. Since we will be using guide lines in the first stages, draw very lightly, without much pressure, so that the lines do not become too black. Draw a vertical line in the middle of the sheet and divide it into three equal segments. Two of them will be the diameter of the circle we need to draw.
Find the middle of the entire vertical segment — this will be the eye level. Draw a smaller circle from the eye line to the lower edge of the segment.
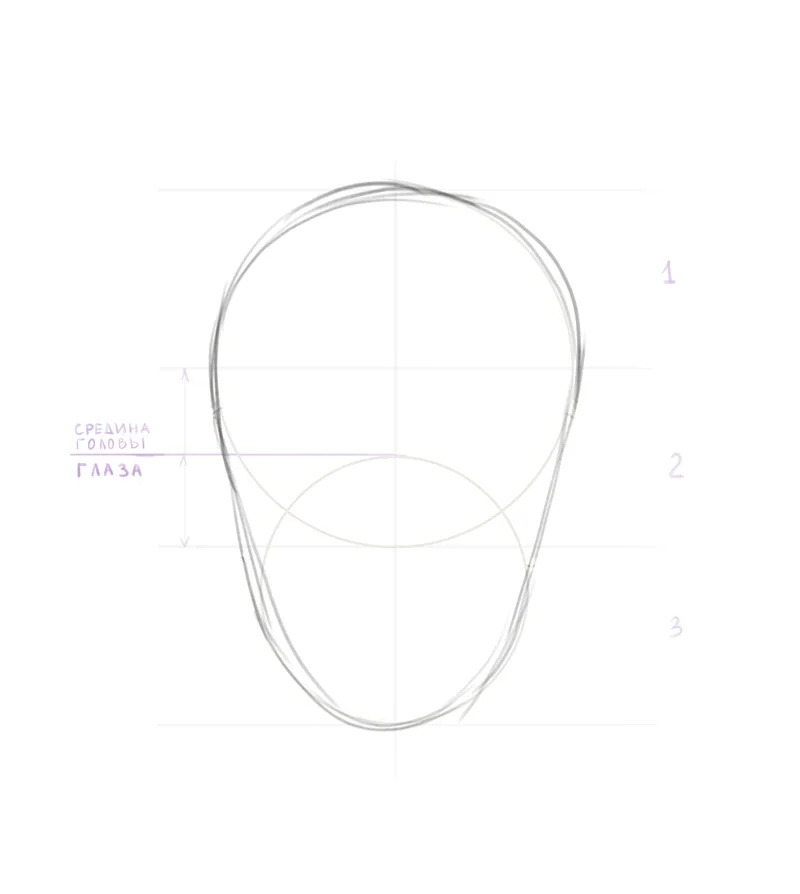
Connect the upper and lower circles into one silhouette by sketching with a light sketch line.
So, we have found the size of the head, now we need to find the face size — it will be smaller in height. To do this, we retreat from the top by about 1/7 of the entire height of the head — this is the hairline, the rest is the face.
Recommended: check out the free lesson «How to draw a human head».
The face in the vertical plane is also divided into three equal segments: the upper segment is from the hairline to the eyebrows, the second is from the eyebrow line to the base of the nose, the third is from the base of the nose to the lower line of the chin. The ears will be equal in height to the second segment.
We are looking for the size of the eyes and their location: the width of the head horizontally is divided into five segments. The middle segment is the distance between the eyes and the width of the nose in its lower part, two segments on the sides are the width of the eyes themselves.
Recommended: check out the free lesson «How to draw human eyes»
We outline the outlines of the nose and eyes and make a marking of the lower segment: divide it into three parts, and the lower line of the first segment will be the lip line.
Recommended: check out the free lesson «How to draw a human nose»
We outline the outlines of the lips, ears and eyebrows.
Recommended: check out the free lesson «How to draw lips»
We outline the hairstyle. Please note that the hairstyle has additional volume, so we need to step back a little from the line of the head silhouette and draw the hair silhouette with a slightly ragged line.
We have got a sketch version of the portrait, light and conditional. You can start the final part — refine the face silhouette, draw the parts of the face in more detail, outline the shadows.
This method is universal, it can be taken as a basis when drawing any person, adding to it small clarifications in accordance with the proportions of the person you are drawing.
Portrait in three-quarter view
Related courses
All courses
from 3 900 ₽
-57%
Book illustration: The first page page
9 000 ₽3 900 ₽
Learn more

from 12 000 ₽
-20%
Векторная иллюстрация для начинающих
15 000 ₽12 000 ₽
Learn more

from 4 500 ₽
-55%
Character Concept: My First Hero
10 000 ₽4 500 ₽
Learn more
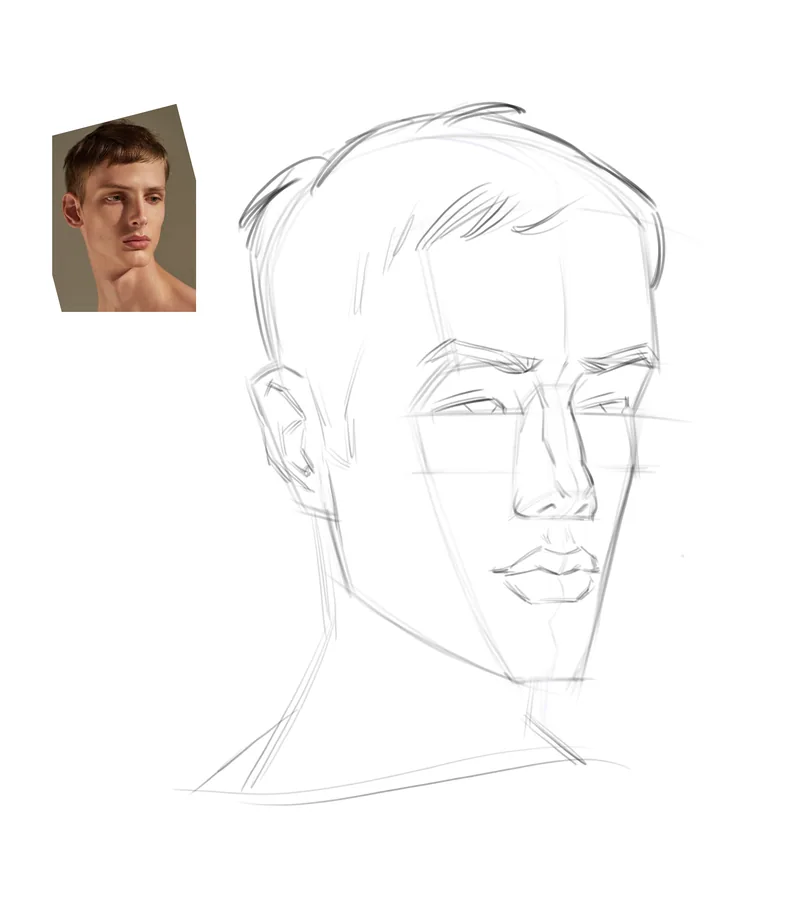
Now let's try to draw a portrait of a person in a three-quarter view. Since this view is more complicated, we will need to make a little more calculations in order to build the constructive part of the head and face well. To begin with, we will again use the method of two circles — it will help us roughly calculate the masses in the silhouette.
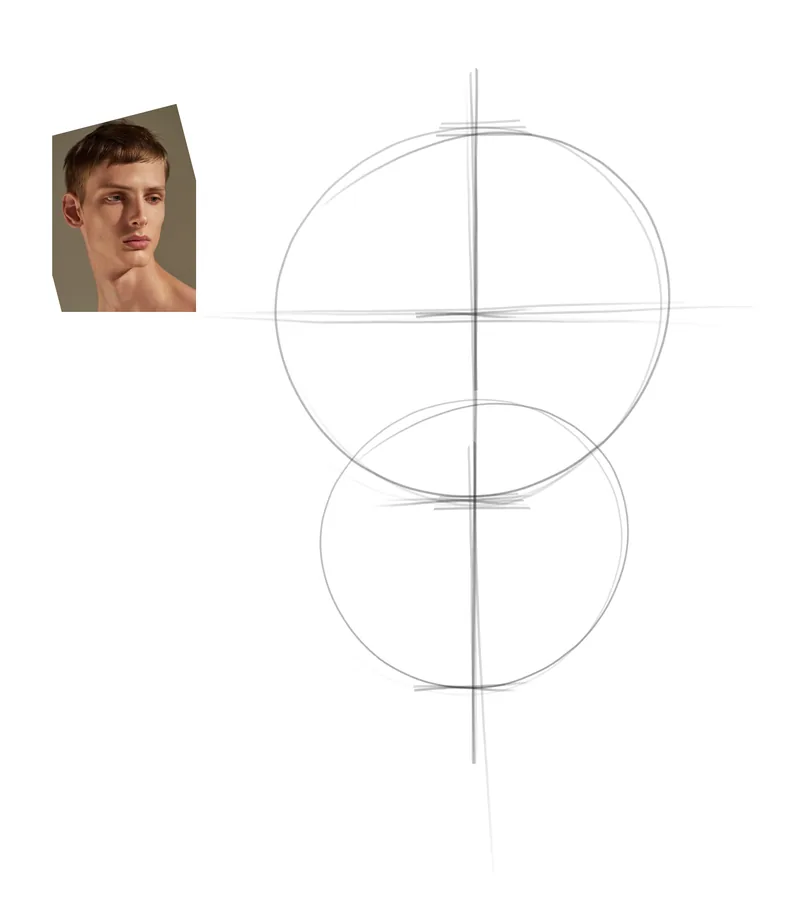 Now you need to show on the drawing the middle line of the face — it will be shifted slightly to the right. Using the method you are already familiar with — dividing the height of the head into seven segments, find the hairline and, just as when drawing a portrait in full face, mark three segments to determine the eyebrow line and the base of the nose line.
 Now the most important thing — you must correct the middle line of the face: it will change from the eyebrow line. We must draw an "eye socket book", showing the inward depth in this way. The spine of the "book" will be the eye level (remember that this is the middle of the head vertically).
 In this view, we see that the nose has a rather prominent independent volume, so you need to constructively outline it, not forgetting to clarify the middle line. In the same way, we mark the lower segment (from the base of the nose to the chin) and find the location of the lips. Do not forget to clarify the middle line, do not leave it unattended — it is very capricious.
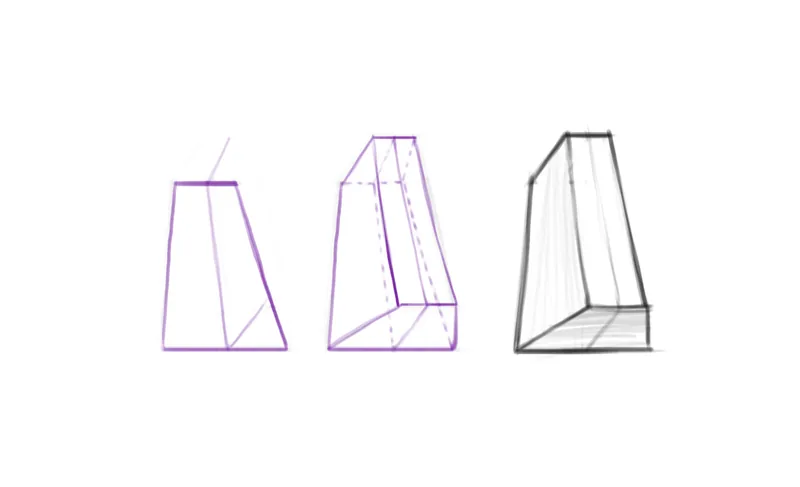
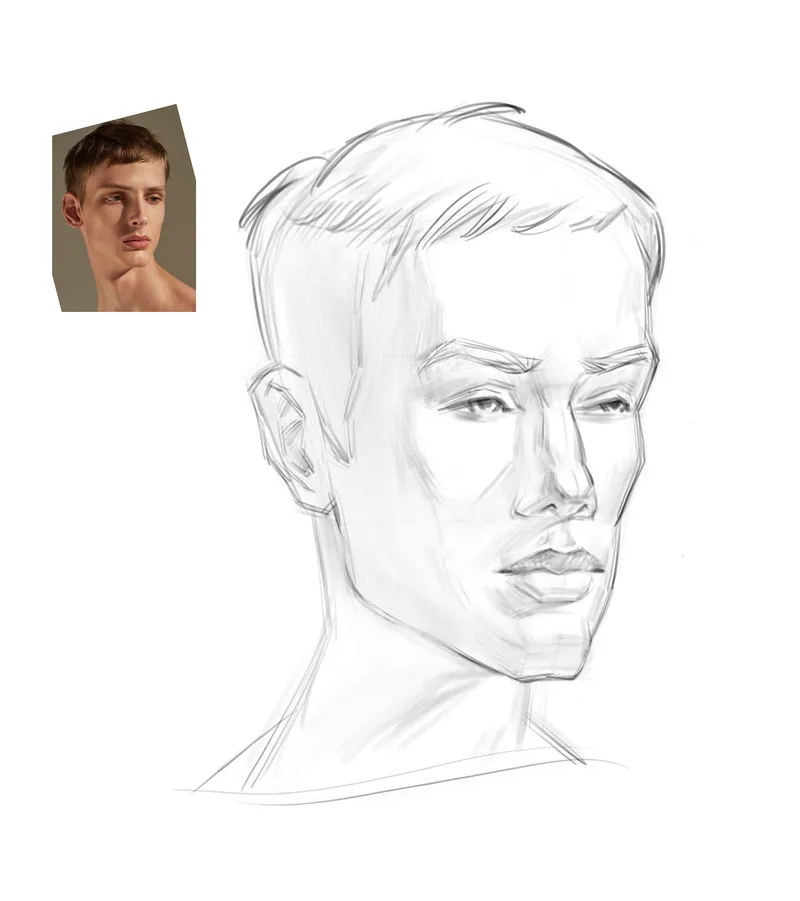
 The nose at the base has the silhouette of an elongated trapezoid and expands to the bottom. In the end part of the nose, we can see the silhouette of a trapezoid, tapering to the tip of the nose.
 Roughly show lips, eyes and eyebrows. Remember that the distance between the eyes is equal to the width of the eye itself, although in this view it is already difficult to simply divide the head into five equal parts horizontally, as we did in the view in full face. It's time to pump up your eye — this is the most important skill!
 We outline the line of the hair silhouette, create a hairstyle, rhythmically and slightly raggedly sketching the lines. We outline the neck and the beginning of the shoulder girdle, the nose can be slightly clarified and made more anatomical.
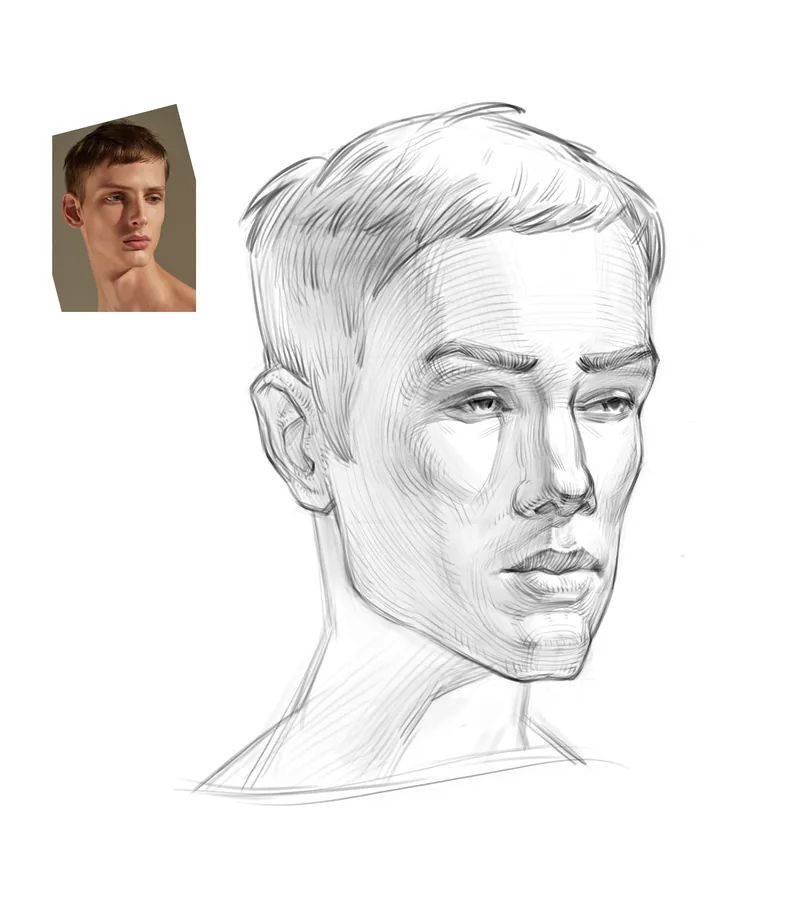
 Almost everything is ready, but the face silhouette remained too constructive, so we refine the silhouette, showing the cheekbone, the upper выступающий angle of the eye socket, a small volume of the cheek and the выступающую mass of the chin.
 In the final stage, we work with shadows, place accents and clarify details. At the initial stage, it is advisable not to sit for too long with one portrait — it is better to draw more short drawings than one long one.
 If you still want to draw the face in more detail, refine it using a stroke by shape and drawing the anatomy of the parts of the face. This way the drawing will be more detailed, contrasting and constructively expressed.
 We figured out how to draw a man's face in full face and three-quarter view. Now let's talk about how drawing a female portrait differs from a male one.
The proportions of a woman's face are very similar to those of a man, but the drawing technique should be much softer, the strokes more accurate and light, the general character of the face — less constructive and detailed. There is no need to draw the anatomy of the parts of the face in too much detail, and then we will be able to convey the soft surface of a woman's skin.
Recommended: check out the free lesson «How to draw a woman's face»
We figured out how to draw a man's face in full face and three-quarter view. Now let's talk about how drawing a female portrait differs from a male one.
The proportions of a woman's face are very similar to those of a man, but the drawing technique should be much softer, the strokes more accurate and light, the general character of the face — less constructive and detailed. There is no need to draw the anatomy of the parts of the face in too much detail, and then we will be able to convey the soft surface of a woman's skin.
Recommended: check out the free lesson «How to draw a woman's face»
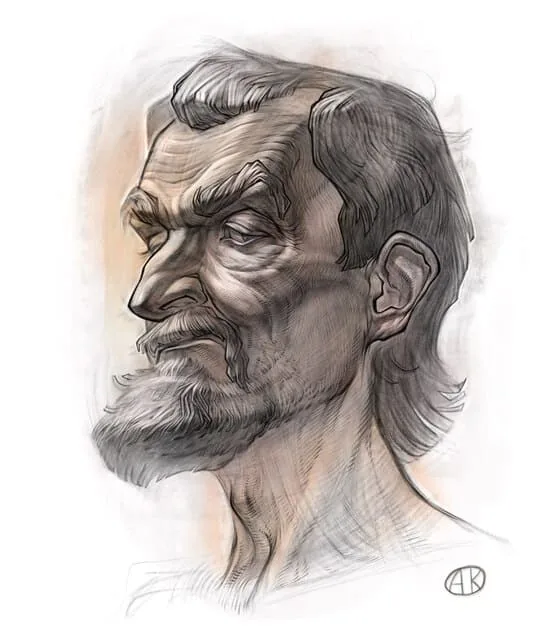 There are special features in drawing portraits of elderly people. For example, muscles become exhausted with age and, together with the skin, form noticeable folds. The cheekbones and chin are more prominent, and the face looks more bony.
The cartilage of the nose and ears become larger with age, and facial wrinkles appear. Hair also thins out and gray hair appears.
The methods of constructing the head and drawing the face that we have learned are universal — you can start any drawing from them and adjust them to your style, proportions and individual features of the person you wanted to draw.
In this article, we подробно рассказали "How to draw human eyes".
There are special features in drawing portraits of elderly people. For example, muscles become exhausted with age and, together with the skin, form noticeable folds. The cheekbones and chin are more prominent, and the face looks more bony.
The cartilage of the nose and ears become larger with age, and facial wrinkles appear. Hair also thins out and gray hair appears.
The methods of constructing the head and drawing the face that we have learned are universal — you can start any drawing from them and adjust them to your style, proportions and individual features of the person you wanted to draw.
In this article, we подробно рассказали "How to draw human eyes".
Now you need to show on the drawing the middle line of the face — it will be shifted slightly to the right. Using the method you are already familiar with — dividing the height of the head into seven segments, find the hairline and, just as when drawing a portrait in full face, mark three segments to determine the eyebrow line and the base of the nose line.
Now the most important thing — you must correct the middle line of the face: it will change from the eyebrow line. We must draw an "eye socket book", showing the inward depth in this way. The spine of the "book" will be the eye level (remember that this is the middle of the head vertically).
In this view, we see that the nose has a rather prominent independent volume, so you need to constructively outline it, not forgetting to clarify the middle line. In the same way, we mark the lower segment (from the base of the nose to the chin) and find the location of the lips. Do not forget to clarify the middle line, do not leave it unattended — it is very capricious.
The nose at the base has the silhouette of an elongated trapezoid and expands to the bottom. In the end part of the nose, we can see the silhouette of a trapezoid, tapering to the tip of the nose.
Roughly show lips, eyes and eyebrows. Remember that the distance between the eyes is equal to the width of the eye itself, although in this view it is already difficult to simply divide the head into five equal parts horizontally, as we did in the view in full face. It's time to pump up your eye — this is the most important skill!
We outline the line of the hair silhouette, create a hairstyle, rhythmically and slightly raggedly sketching the lines. We outline the neck and the beginning of the shoulder girdle, the nose can be slightly clarified and made more anatomical.
Almost everything is ready, but the face silhouette remained too constructive, so we refine the silhouette, showing the cheekbone, the upper выступающий angle of the eye socket, a small volume of the cheek and the выступающую mass of the chin.
In the final stage, we work with shadows, place accents and clarify details. At the initial stage, it is advisable not to sit for too long with one portrait — it is better to draw more short drawings than one long one.
If you still want to draw the face in more detail, refine it using a stroke by shape and drawing the anatomy of the parts of the face. This way the drawing will be more detailed, contrasting and constructively expressed.
We figured out how to draw a man's face in full face and three-quarter view. Now let's talk about how drawing a female portrait differs from a male one.
The proportions of a woman's face are very similar to those of a man, but the drawing technique should be much softer, the strokes more accurate and light, the general character of the face — less constructive and detailed. There is no need to draw the anatomy of the parts of the face in too much detail, and then we will be able to convey the soft surface of a woman's skin.
Recommended: check out the free lesson «How to draw a woman's face»
There are special features in drawing portraits of elderly people. For example, muscles become exhausted with age and, together with the skin, form noticeable folds. The cheekbones and chin are more prominent, and the face looks more bony.
The cartilage of the nose and ears become larger with age, and facial wrinkles appear. Hair also thins out and gray hair appears.
The methods of constructing the head and drawing the face that we have learned are universal — you can start any drawing from them and adjust them to your style, proportions and individual features of the person you wanted to draw.
In this article, we подробно рассказали "How to draw human eyes".
As a bonus, our detailed video lesson "How to draw a human skull"
Do you want to learn how to draw a face correctly? Then be sure to sign up for our cool Free course «Basics of portrait». We promise: after the course, you will нежно fall in love with drawing a person's face and will never call this topic complicated or boring!Related materials

Tutorial
How to draw a human nose
August 15, 2024
Tutorial
How to draw a human head
September 18, 2023

Tutorial
How to draw a female face
April 19, 2024

Tutorial
How to learn to draw a person
January 18, 2024

Tutorial
How to draw a person's eyes
December 26, 2023

Article
3 tips for a beginner character artist. How to draw emotions
September 18, 2023

News
Создание 3D-модели нарисованного вручную человека с роботизированной рукой
March 2, 2026