TutorialUpdated: July 2, 2026
How to draw a chest
In short
Instructions for artists - how to draw a treasure chest step by step. Get your pencils and styluses ready!
2D artist (illustrator)
Well, friends, in order to draw a chest and any object in general, you need to become aware of the transience of everything that exists, abandon the visible silhouettes of the object and expand the boundaries of your consciousness. Years of training, meditative contemplative practices and pollotarianism will open the chakras that lead to an understanding of the essence of the chest, and then you will begin to feel it. To comprehend the chest, you must become a chest.
Oh, what a beautiful path it would be: through time and space… If we, of course, went along it with you, and all this, of course, would not be a joke ;). But in reality, everything is much simpler than it seems. Prepare your pencils and styluses, paper and tablets and let's draw a chest!
Do not use a pencil that is too soft, it is better to take H/HB - for construction and markup lines, and B/2B - for laying the tone and final lines.
 Skills Up course Figure Basic, authors: Nikita Lopatin, Anton Artikov, Alina Kobets.
 3 Step
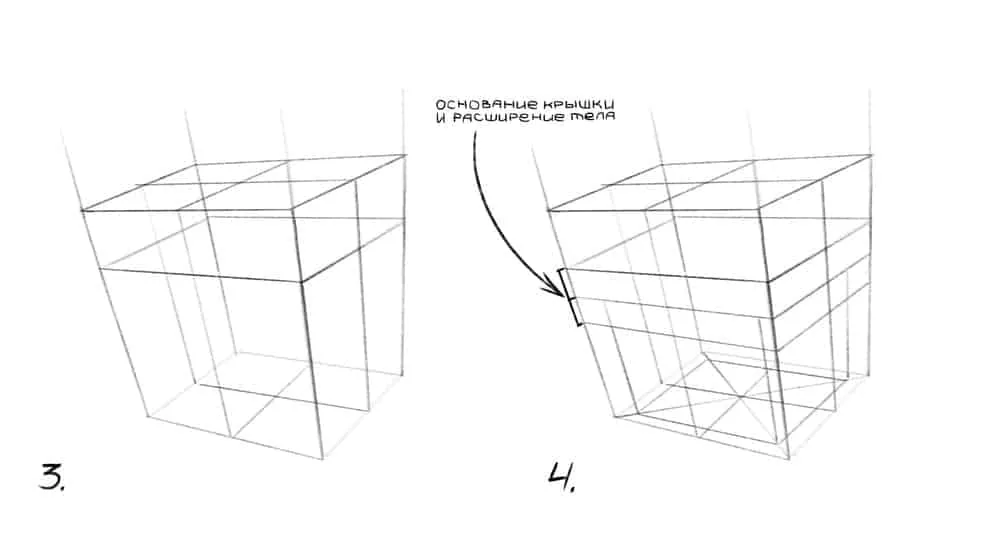
Let's mark vertical axes on the faces. They will help us make the lid rounded and center the lock.
4 Step
We will make the body of the chest smaller to create a dynamic silhouette with an emphasis on the future lid. Therefore, we draw diagonals from corner to corner at the bottom face. This way we can create a reduced copy of the base, with the center at the same point as the existing bottom face. From the resulting angles, we raise the lines up parallel to the original faces - these are our new chest walls. And we also mark the base of the lid and the expansion of the chest body with lines.
3 Step
Let's mark vertical axes on the faces. They will help us make the lid rounded and center the lock.
4 Step
We will make the body of the chest smaller to create a dynamic silhouette with an emphasis on the future lid. Therefore, we draw diagonals from corner to corner at the bottom face. This way we can create a reduced copy of the base, with the center at the same point as the existing bottom face. From the resulting angles, we raise the lines up parallel to the original faces - these are our new chest walls. And we also mark the base of the lid and the expansion of the chest body with lines.
 5 Step
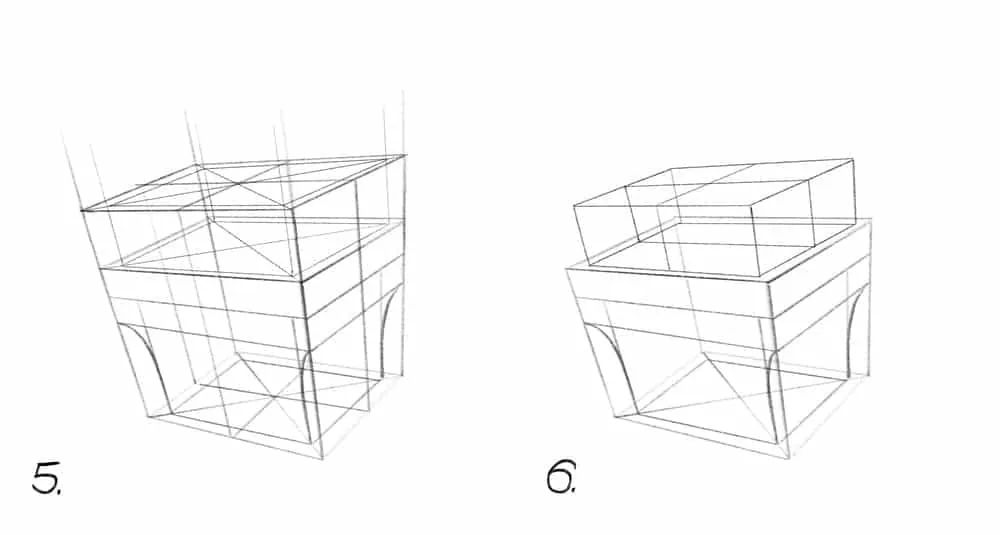
We round the walls of our reduced body in such a way as to show how our chest expands upward. The base of the lid and its top are also cut by diagonals. We draw new reduced parallelograms from above and below and connect their corners with vertical walls.
6 Step
Now we erase all the extra construction lines and leave only the volumes of the lid and body that interest us. You can exhale - now, without a lot of lines, we understand the shape of our chest and continue to knead and cut it, achieving a better silhouette.
5 Step
We round the walls of our reduced body in such a way as to show how our chest expands upward. The base of the lid and its top are also cut by diagonals. We draw new reduced parallelograms from above and below and connect their corners with vertical walls.
6 Step
Now we erase all the extra construction lines and leave only the volumes of the lid and body that interest us. You can exhale - now, without a lot of lines, we understand the shape of our chest and continue to knead and cut it, achieving a better silhouette.
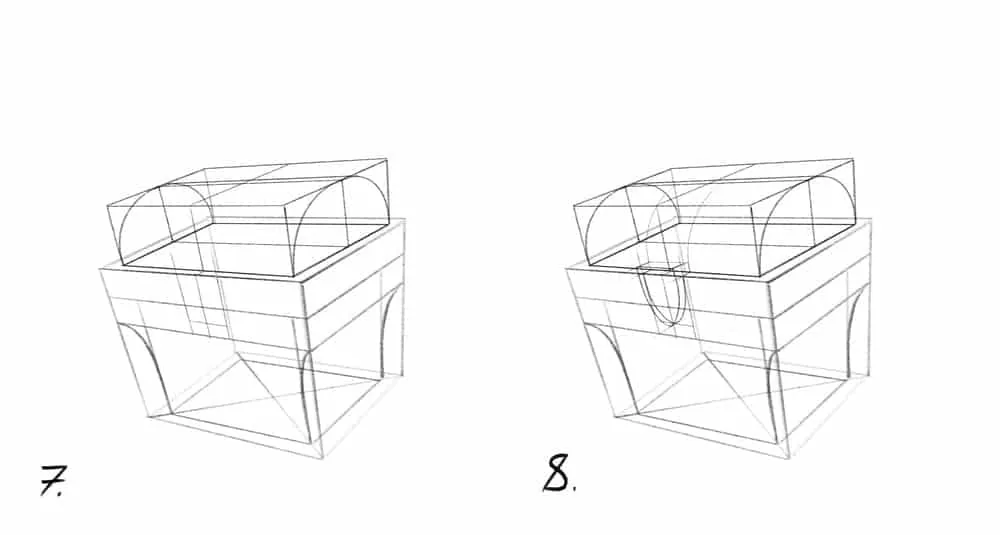
 7 Step
We inscribe semicircles along the side walls of the lid. At this stage, the vertical axes that we designated earlier will be very useful to us. The centers of the arcs must coincide with each other and fall on the axis of the upper face. And also in the front part we mark the area of the future lock.
8 Step
Many rounded lines appeared in the design of our chest, so the lock will also be rounded. We inscribe a half ellipse into a rectangular area and push it forward - that's our lock. from the edges of our lock we let rounded arcs on the lid of the chest. No separate construction is needed for them, we just focus on the arcs we have already found.
7 Step
We inscribe semicircles along the side walls of the lid. At this stage, the vertical axes that we designated earlier will be very useful to us. The centers of the arcs must coincide with each other and fall on the axis of the upper face. And also in the front part we mark the area of the future lock.
8 Step
Many rounded lines appeared in the design of our chest, so the lock will also be rounded. We inscribe a half ellipse into a rectangular area and push it forward - that's our lock. from the edges of our lock we let rounded arcs on the lid of the chest. No separate construction is needed for them, we just focus on the arcs we have already found.
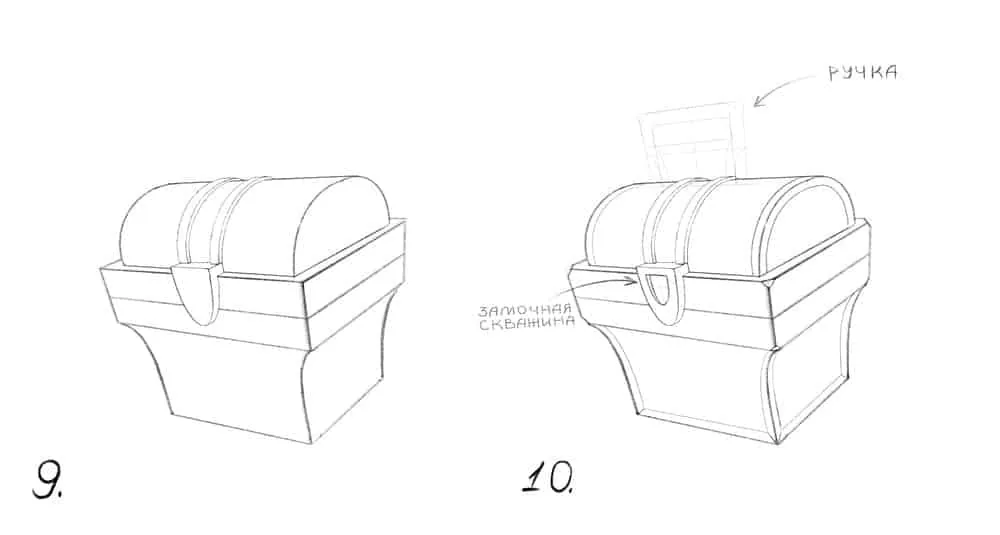
 9 Step
Something a lot of auxiliary lines have appeared... This means we clean them up again. We leave only a neat light contour from the chest, which will allow us to add new details to our dummy box.
10 Step
Inside the lock we draw a recess - a reduced copy of the outer contour of the lock. Inside we put 2 axes for the future keyhole. But how to carry our box? It needs a handle! In the center of the lid above the two metal arcs we mark a rectangle with perspective distortions with light lines. We will make the handle from semicircular elements repeating the movement of the walls of the chest and the lid. The edges of the chests are lined with strips of metal - and our chest is no exception, we add thin edges along the edges of the lid and body. And we also give a slight bevel to the protruding corners.
9 Step
Something a lot of auxiliary lines have appeared... This means we clean them up again. We leave only a neat light contour from the chest, which will allow us to add new details to our dummy box.
10 Step
Inside the lock we draw a recess - a reduced copy of the outer contour of the lock. Inside we put 2 axes for the future keyhole. But how to carry our box? It needs a handle! In the center of the lid above the two metal arcs we mark a rectangle with perspective distortions with light lines. We will make the handle from semicircular elements repeating the movement of the walls of the chest and the lid. The edges of the chests are lined with strips of metal - and our chest is no exception, we add thin edges along the edges of the lid and body. And we also give a slight bevel to the protruding corners.
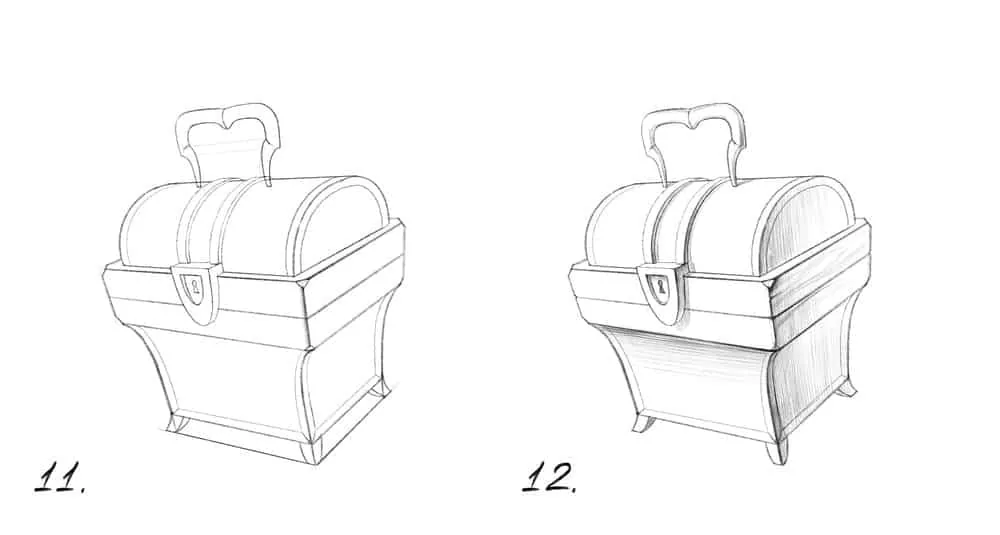
 11 Step
We draw the silhouette of the handle with brighter lines and add small graceful legs. Our chest will now stand on them coquettishly.
12 Step
Well, we have reached the most delicious part: drawing volume and textures. Let's imagine that the light source is located on the top left. This means that with vertical homogeneous hatching we will hide in the shadow all the right vertical faces of the chest. Closer to the front face, the strokes are a little more intense and denser, and further from us - lighter. This way we will create the effect of deep space. Do not forget to erase the remaining construction lines.
11 Step
We draw the silhouette of the handle with brighter lines and add small graceful legs. Our chest will now stand on them coquettishly.
12 Step
Well, we have reached the most delicious part: drawing volume and textures. Let's imagine that the light source is located on the top left. This means that with vertical homogeneous hatching we will hide in the shadow all the right vertical faces of the chest. Closer to the front face, the strokes are a little more intense and denser, and further from us - lighter. This way we will create the effect of deep space. Do not forget to erase the remaining construction lines.
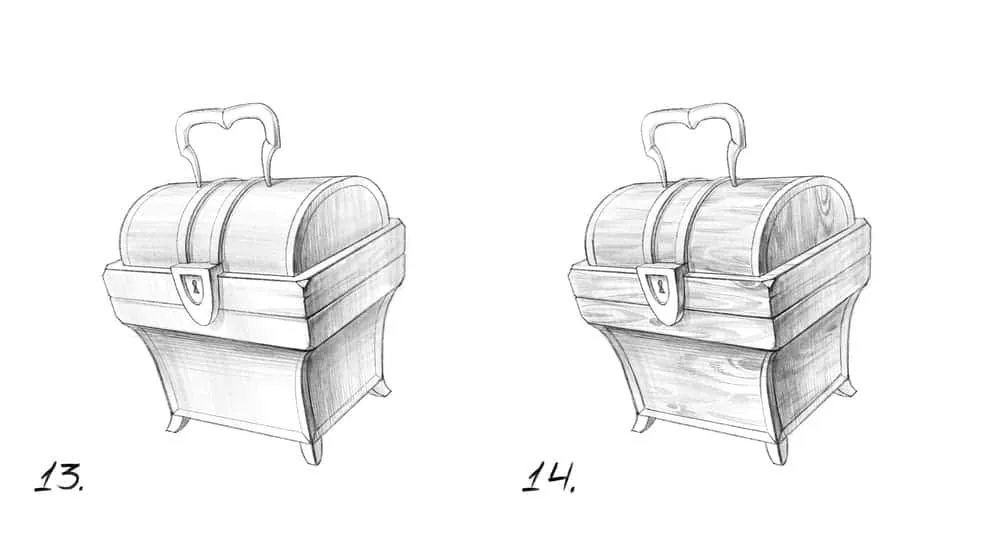
 13 Step
We put the pencil more sideways and with wide strokes we summarize and strengthen the shadows: we darken the right sides and the expansion of the chest body closer to the top. We set the volume of the cylindrical lid.
14 Step
When the volume is collected, you can add the texture of the wood. For this, sharpen the pencil well or turn on the small size of the stylus brush. We try to alternate short and long strokes with semicircular ones, imitating the wood pattern. The main thing is to give not strong pressure, so that the strokes turn out to be translucent and light. Volume and shape are more important than texture and patterns.
13 Step
We put the pencil more sideways and with wide strokes we summarize and strengthen the shadows: we darken the right sides and the expansion of the chest body closer to the top. We set the volume of the cylindrical lid.
14 Step
When the volume is collected, you can add the texture of the wood. For this, sharpen the pencil well or turn on the small size of the stylus brush. We try to alternate short and long strokes with semicircular ones, imitating the wood pattern. The main thing is to give not strong pressure, so that the strokes turn out to be translucent and light. Volume and shape are more important than texture and patterns.
 15 Step
Our metal will be dark, so we darken the metal fittings. We use a gradient from dark to light and back to dark. This technique will create the effect of material shine and highlights.
16 Step
We have almost finished, it remains to add small details: cracks between wooden planks, scratches and abrasions. This way our chest will not look new, but видавшим виды. Again we put a generalizing shadow over all the elements in the unlit areas. If you draw on a tablet, then you can use a soft brush with a scattered edge, and if with a graphite pencil, then with a very fine and thin hatching, which can then be wiped off with a napkin. This way you will be able to create a light haze of shadow.
15 Step
Our metal will be dark, so we darken the metal fittings. We use a gradient from dark to light and back to dark. This technique will create the effect of material shine and highlights.
16 Step
We have almost finished, it remains to add small details: cracks between wooden planks, scratches and abrasions. This way our chest will not look new, but видавшим виды. Again we put a generalizing shadow over all the elements in the unlit areas. If you draw on a tablet, then you can use a soft brush with a scattered edge, and if with a graphite pencil, then with a very fine and thin hatching, which can then be wiped off with a napkin. This way you will be able to create a light haze of shadow.
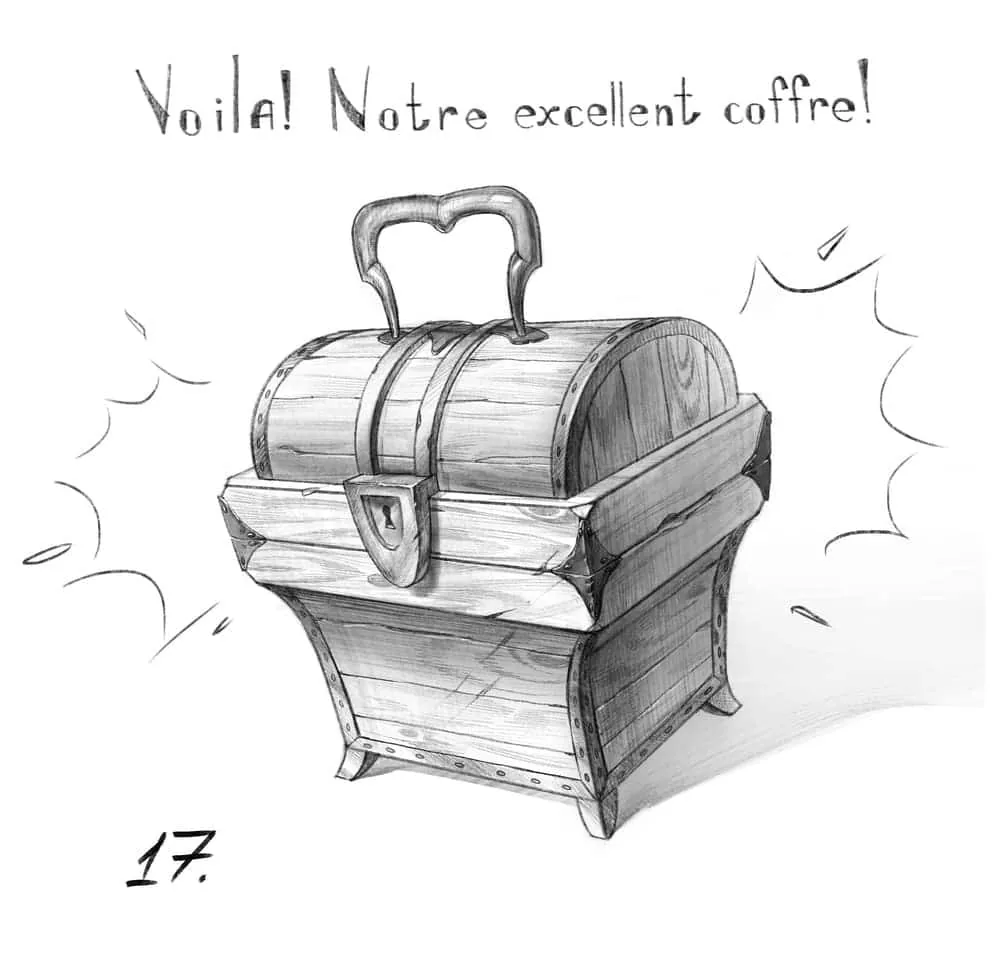
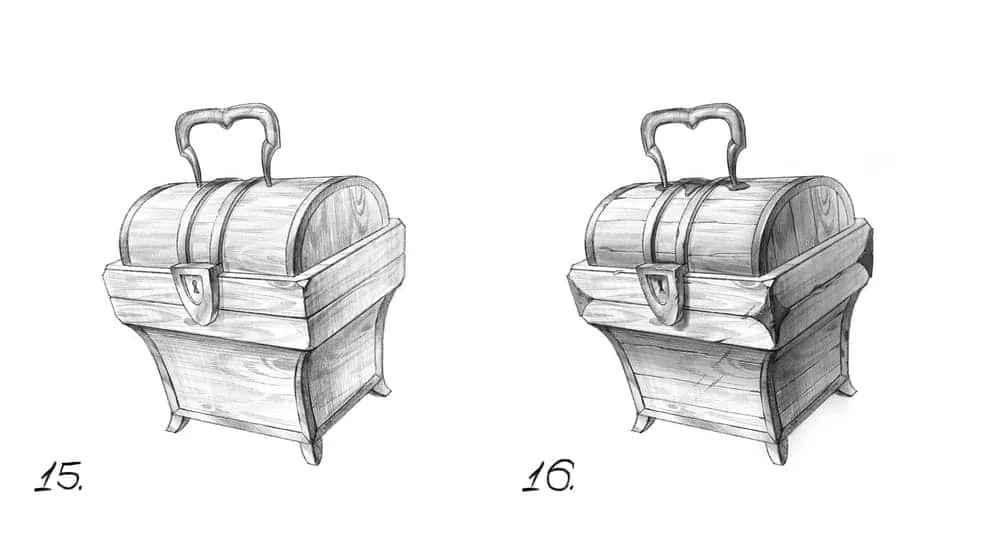 17 Step
Let's add a falling shadow so that the chest does not float in the air. We put lines of separation on the angular rhombuses, otherwise our chest will not be able to open. And the cherry on the cake is small rounded clamps on the metal elements. As you can see, it was not scary at all, and we got a wonderful chest!
17 Step
Let's add a falling shadow so that the chest does not float in the air. We put lines of separation on the angular rhombuses, otherwise our chest will not be able to open. And the cherry on the cake is small rounded clamps on the metal elements. As you can see, it was not scary at all, and we got a wonderful chest!
 Drawing the combination of geometric figures will be an excellent training. The chest is also a kind of insertion and interface of different elements. Therefore, we want to share a useful lesson with you:
Skills Up course Figure Basic, authors: Nikita Lopatin, Anton Artikov, Alina Kobets.
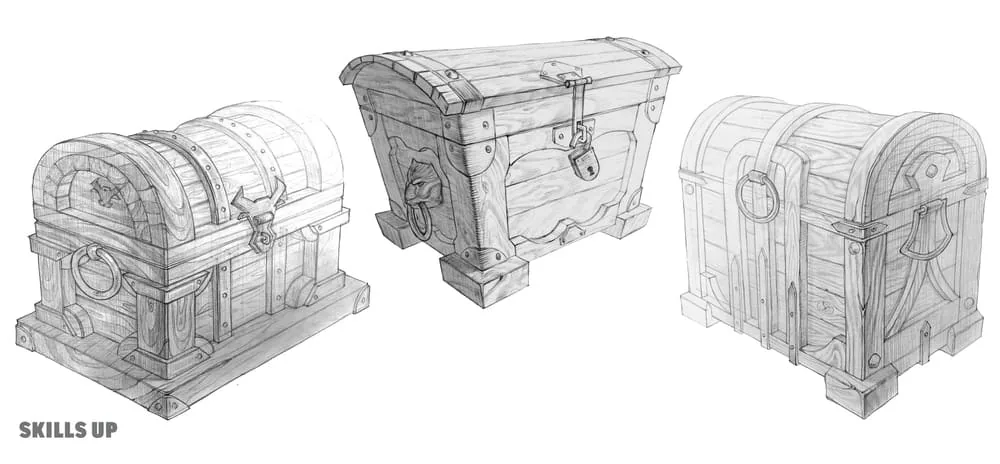
How to draw a chest step by step
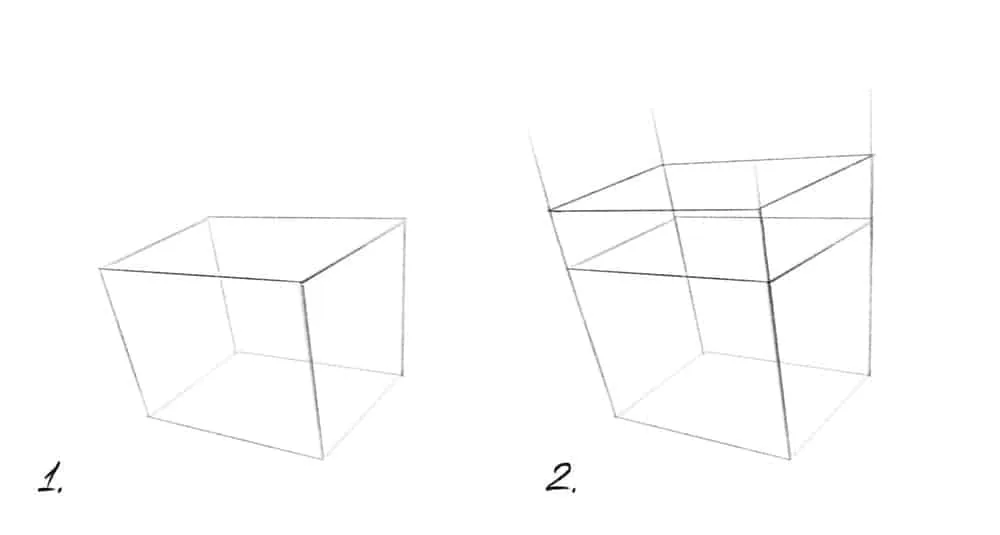
And yet, we will have to abstract a little and imagine our chest not immediately as a complex object with textured curly handles, cracked barrels and a complex lock. But to start with simplification. Gradually complicating the simple, we will draw an invented chest with you. Any object, living or not, consists of simple geometry: our familiar and beloved spheres, cubes, cylinders, cones and prisms. Our chest will be more rectangular in silhouette, so we take the first steps: 1 Step Draw a parallelepiped with perspective distortions. I have 3 vanishing points. 2 Step Extend the walls of the chest body and draw a flatter parallelepiped covering the first one. This will be the lid. Make sure that the scales of the chest body and the lid are different, this way we get a more interesting silhouette. So far, it seems to be not difficult and not scary. Let's move on to the next steps.
3 Step
Let's mark vertical axes on the faces. They will help us make the lid rounded and center the lock.
4 Step
We will make the body of the chest smaller to create a dynamic silhouette with an emphasis on the future lid. Therefore, we draw diagonals from corner to corner at the bottom face. This way we can create a reduced copy of the base, with the center at the same point as the existing bottom face. From the resulting angles, we raise the lines up parallel to the original faces - these are our new chest walls. And we also mark the base of the lid and the expansion of the chest body with lines.
5 Step
We round the walls of our reduced body in such a way as to show how our chest expands upward. The base of the lid and its top are also cut by diagonals. We draw new reduced parallelograms from above and below and connect their corners with vertical walls.
6 Step
Now we erase all the extra construction lines and leave only the volumes of the lid and body that interest us. You can exhale - now, without a lot of lines, we understand the shape of our chest and continue to knead and cut it, achieving a better silhouette.
7 Step
We inscribe semicircles along the side walls of the lid. At this stage, the vertical axes that we designated earlier will be very useful to us. The centers of the arcs must coincide with each other and fall on the axis of the upper face. And also in the front part we mark the area of the future lock.
8 Step
Many rounded lines appeared in the design of our chest, so the lock will also be rounded. We inscribe a half ellipse into a rectangular area and push it forward - that's our lock. from the edges of our lock we let rounded arcs on the lid of the chest. No separate construction is needed for them, we just focus on the arcs we have already found.
9 Step
Something a lot of auxiliary lines have appeared... This means we clean them up again. We leave only a neat light contour from the chest, which will allow us to add new details to our dummy box.
10 Step
Inside the lock we draw a recess - a reduced copy of the outer contour of the lock. Inside we put 2 axes for the future keyhole. But how to carry our box? It needs a handle! In the center of the lid above the two metal arcs we mark a rectangle with perspective distortions with light lines. We will make the handle from semicircular elements repeating the movement of the walls of the chest and the lid. The edges of the chests are lined with strips of metal - and our chest is no exception, we add thin edges along the edges of the lid and body. And we also give a slight bevel to the protruding corners.
11 Step
We draw the silhouette of the handle with brighter lines and add small graceful legs. Our chest will now stand on them coquettishly.
12 Step
Well, we have reached the most delicious part: drawing volume and textures. Let's imagine that the light source is located on the top left. This means that with vertical homogeneous hatching we will hide in the shadow all the right vertical faces of the chest. Closer to the front face, the strokes are a little more intense and denser, and further from us - lighter. This way we will create the effect of deep space. Do not forget to erase the remaining construction lines.
13 Step
We put the pencil more sideways and with wide strokes we summarize and strengthen the shadows: we darken the right sides and the expansion of the chest body closer to the top. We set the volume of the cylindrical lid.
14 Step
When the volume is collected, you can add the texture of the wood. For this, sharpen the pencil well or turn on the small size of the stylus brush. We try to alternate short and long strokes with semicircular ones, imitating the wood pattern. The main thing is to give not strong pressure, so that the strokes turn out to be translucent and light. Volume and shape are more important than texture and patterns.
15 Step
Our metal will be dark, so we darken the metal fittings. We use a gradient from dark to light and back to dark. This technique will create the effect of material shine and highlights.
16 Step
We have almost finished, it remains to add small details: cracks between wooden planks, scratches and abrasions. This way our chest will not look new, but видавшим виды. Again we put a generalizing shadow over all the elements in the unlit areas. If you draw on a tablet, then you can use a soft brush with a scattered edge, and if with a graphite pencil, then with a very fine and thin hatching, which can then be wiped off with a napkin. This way you will be able to create a light haze of shadow.
17 Step
Let's add a falling shadow so that the chest does not float in the air. We put lines of separation on the angular rhombuses, otherwise our chest will not be able to open. And the cherry on the cake is small rounded clamps on the metal elements. As you can see, it was not scary at all, and we got a wonderful chest!
Drawing the combination of geometric figures will be an excellent training. The chest is also a kind of insertion and interface of different elements. Therefore, we want to share a useful lesson with you:
How to draw a chest with treasures
Related courses
All courses
from 3 900 ₽
-57%
Book illustration: The first page page
9 000 ₽3 900 ₽
Learn more

from 12 000 ₽
-20%
Векторная иллюстрация для начинающих
15 000 ₽12 000 ₽
Learn more

from 4 500 ₽
-55%
Character Concept: My First Hero
10 000 ₽4 500 ₽
Learn more
We already have a chest, it remains to add treasures. But just spreading them around would be too banal and boring. Treasures should lie inside the casket, and for this we need to open the lid. If you choose the path of drawing with a regular pencil on paper, then you will have to start the journey from the beginning, but make some changes to the process of drawing the lid, which we will go through now. Well, if you drew on a tablet with me, then just hide the top part of the chest with a layer with a white background. Let's continue our steps, because it's fun to walk together through the expanses of the drawing field.
18 Step
Add a new layer with white color. Let's make it slightly transparent, we still need to take the dimensions of the elements from it. This way we will not distort the lid and make it similar.
19 Step
Again we designate the volume of the lid and its expansion with simple geometry.
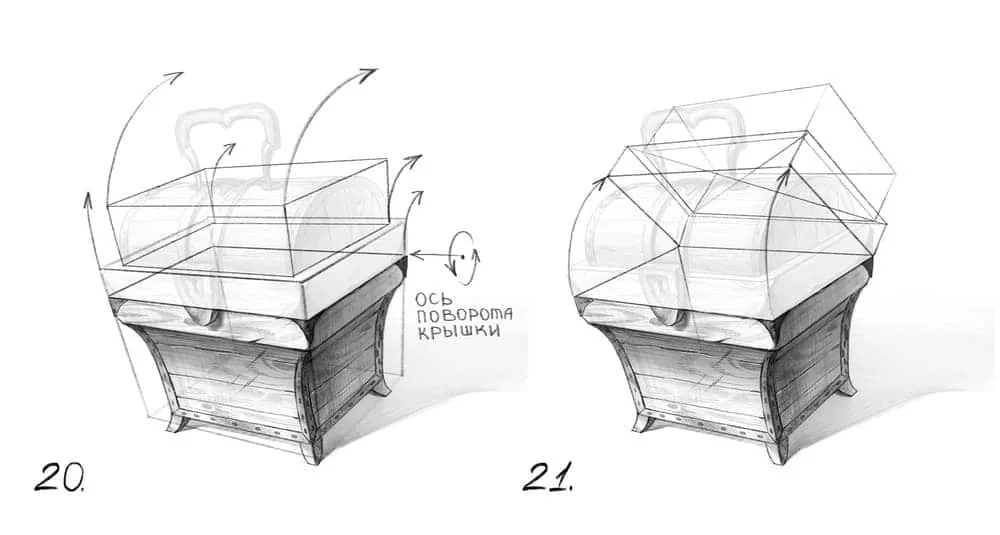
 20 Step
Our task is to open the lid, so we start again with cubic volumes. The axis of rotation will be located along the back wall at the junction of the lid and the body. And the arrows indicate the direction of opening.
21 Step
We lift both volumes and draw 2 parallelepipeds at an angle. We observe the same heights of the lid forms as in the first drawing. For this we left it barely visible.
20 Step
Our task is to open the lid, so we start again with cubic volumes. The axis of rotation will be located along the back wall at the junction of the lid and the body. And the arrows indicate the direction of opening.
21 Step
We lift both volumes and draw 2 parallelepipeds at an angle. We observe the same heights of the lid forms as in the first drawing. For this we left it barely visible.
 22 Step
Again we put a longitudinal axis along the upper larger parallelepiped. We re-enter the arches of the bend of our lid and make sure that the centers of the arcs fall on the designated axis. Let's mark the rhombic corners at the edges of the lid.
23 Step
Immediately we mark the rectangle of the handle. The dimensions of the walls of this rectangle are taken from the parameters of the already drawn handle.
22 Step
Again we put a longitudinal axis along the upper larger parallelepiped. We re-enter the arches of the bend of our lid and make sure that the centers of the arcs fall on the designated axis. Let's mark the rhombic corners at the edges of the lid.
23 Step
Immediately we mark the rectangle of the handle. The dimensions of the walls of this rectangle are taken from the parameters of the already drawn handle.
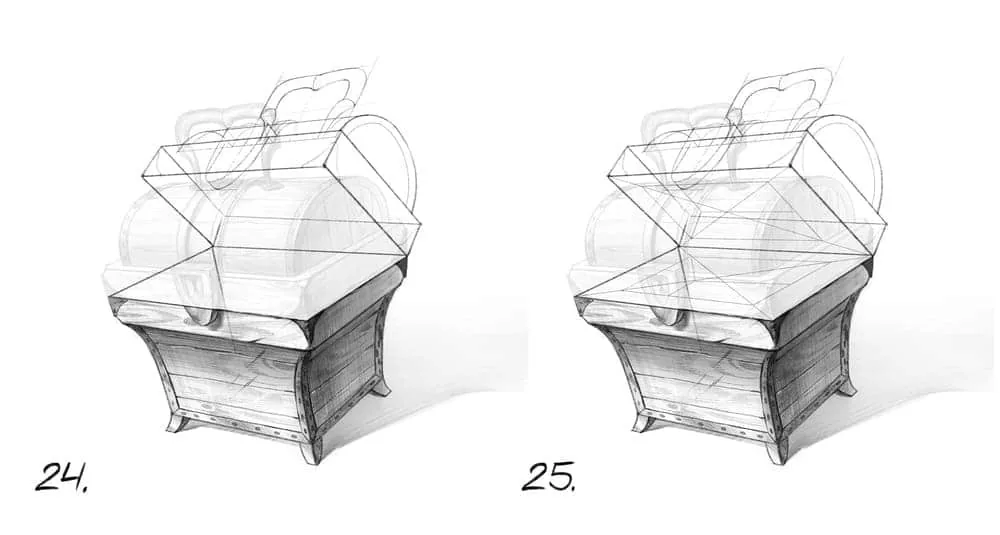
 24 Step
With a more noticeable and bright line we put the contour of the handle. Under the new turn we build a semicircular volume of the lock in the same way that we used last time.
25 Step
Inside the lid and body we will see empty cavities where the treasures will be stored. We draw the diagonals that we already like and mark reduced parallelograms of the same size. Let the wall thicknesses be large. Our chest is small, but very durable!
24 Step
With a more noticeable and bright line we put the contour of the handle. Under the new turn we build a semicircular volume of the lock in the same way that we used last time.
25 Step
Inside the lid and body we will see empty cavities where the treasures will be stored. We draw the diagonals that we already like and mark reduced parallelograms of the same size. Let the wall thicknesses be large. Our chest is small, but very durable!
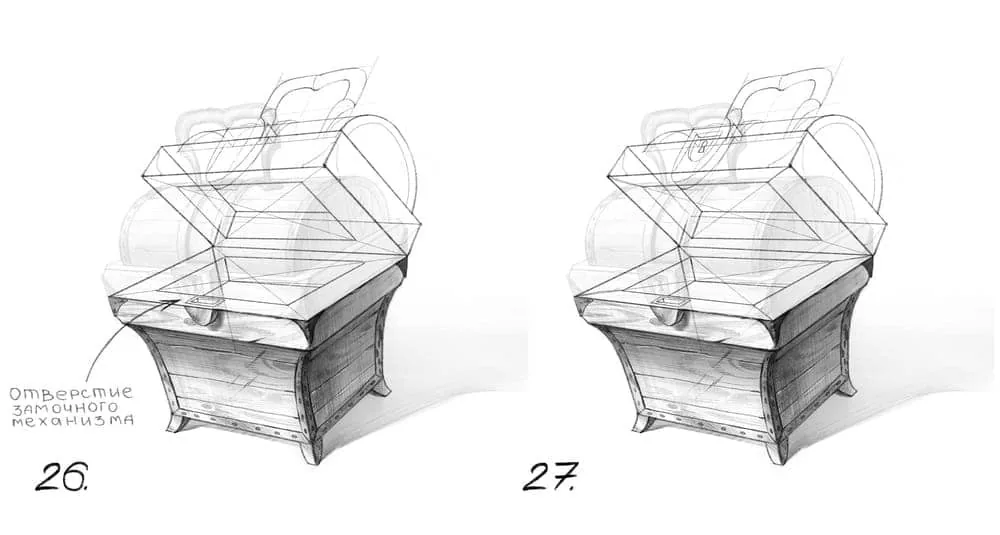
 26 Step
The lock must lock both halves of the chest. To do this, we need to show the hole into which the locking mechanism of the lock will be lowered. On the lower thick part of the chest exactly in the center of the front face we show a rectangular niche with a rectangular frame. And we also show the voids inside the lid and body with more distinct lines.
27 Step
Do not forget such a tiny but important nuance - the keyhole in a small niche. We add it in a new perspective. The chest is open and waiting for its treasures. Did you know that lisping pirates are looking for hazelnuts?
26 Step
The lock must lock both halves of the chest. To do this, we need to show the hole into which the locking mechanism of the lock will be lowered. On the lower thick part of the chest exactly in the center of the front face we show a rectangular niche with a rectangular frame. And we also show the voids inside the lid and body with more distinct lines.
27 Step
Do not forget such a tiny but important nuance - the keyhole in a small niche. We add it in a new perspective. The chest is open and waiting for its treasures. Did you know that lisping pirates are looking for hazelnuts?
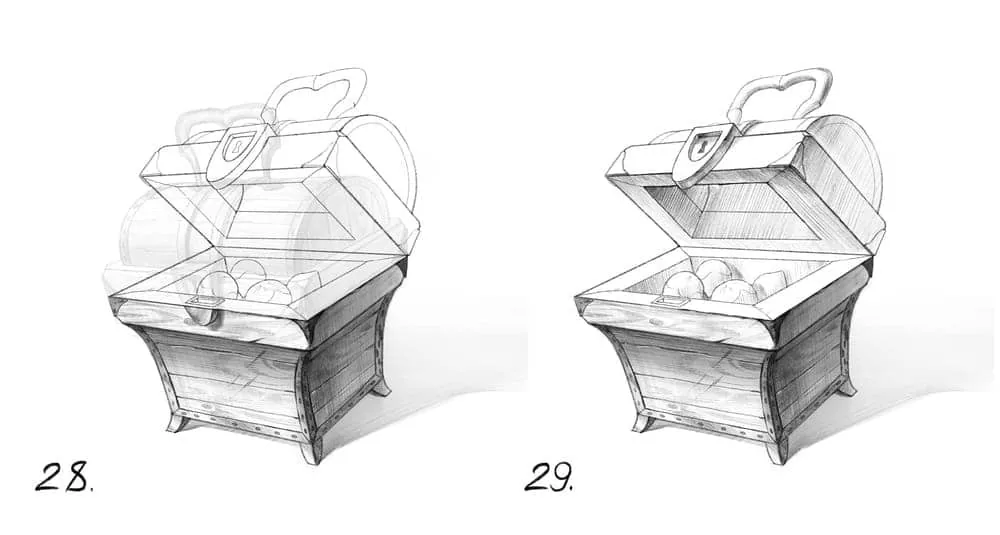
 28 Step
“A jar of earth, guess what's in it!” And it seems that a hazelnut appeared in this hazelnut! Probably the owner of this casket is not a lisping pirate, but a squirrel. Everyone has their own idea of treasures. Well, we put the nuts in a beautiful bunch and leave only the contour lines. Traditionally erasing everything related to the construction.
29 Step
At this stage we return full opacity to the layer hiding the top part of the first drawing. Add shadow along the edges turned away from the light. Do not forget to erase part of the lock on the front part of the casket - an atavism from the closed state.
28 Step
“A jar of earth, guess what's in it!” And it seems that a hazelnut appeared in this hazelnut! Probably the owner of this casket is not a lisping pirate, but a squirrel. Everyone has their own idea of treasures. Well, we put the nuts in a beautiful bunch and leave only the contour lines. Traditionally erasing everything related to the construction.
29 Step
At this stage we return full opacity to the layer hiding the top part of the first drawing. Add shadow along the edges turned away from the light. Do not forget to erase part of the lock on the front part of the casket - an atavism from the closed state.
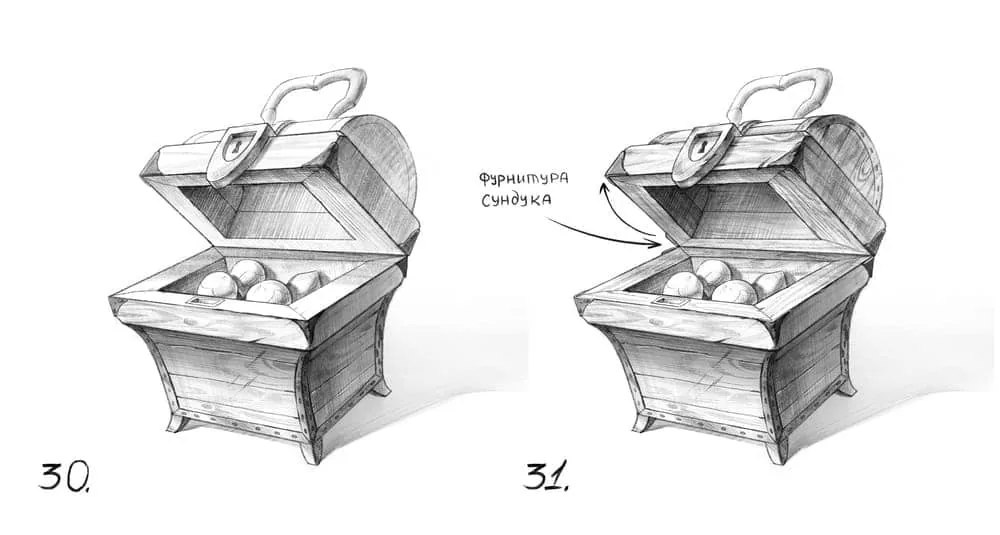
 30 Step
We begin to gradually darken the dark metal details and make the shadow in the depths of the voids more active, make the shadows of the nuts falling and own brighter, with a darker tone we highlight the protruding corner of the lid.
31 Step
We draw a similar pattern of wood on the lid, mark the cracks between the boards and make the turns of the metal arcs on the lid and at the lock darker. And we leave the handle the same light. Otherwise it will compete with the foreground.
30 Step
We begin to gradually darken the dark metal details and make the shadow in the depths of the voids more active, make the shadows of the nuts falling and own brighter, with a darker tone we highlight the protruding corner of the lid.
31 Step
We draw a similar pattern of wood on the lid, mark the cracks between the boards and make the turns of the metal arcs on the lid and at the lock darker. And we leave the handle the same light. Otherwise it will compete with the foreground.
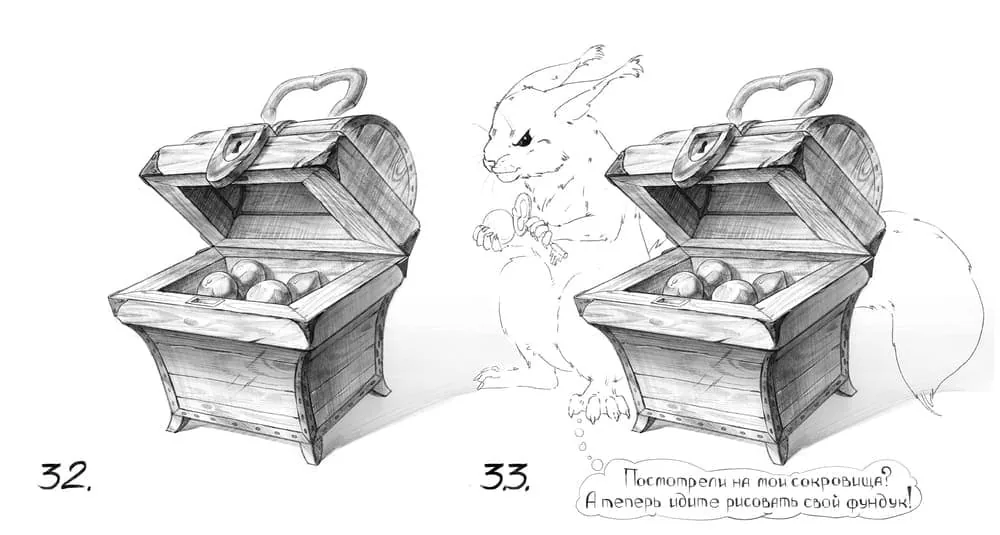
 32 Step
Inside the lid we will also add metal contours along the seams. This will give our chest more power.
33 Step
And why not draw the owner of the box? Especially since she is carrying a new nut to her hiding place.
32 Step
Inside the lid we will also add metal contours along the seams. This will give our chest more power.
33 Step
And why not draw the owner of the box? Especially since she is carrying a new nut to her hiding place.
 Do not forget to write down the recipe for the chest, in case you need it:
20 Step
Our task is to open the lid, so we start again with cubic volumes. The axis of rotation will be located along the back wall at the junction of the lid and the body. And the arrows indicate the direction of opening.
21 Step
We lift both volumes and draw 2 parallelepipeds at an angle. We observe the same heights of the lid forms as in the first drawing. For this we left it barely visible.
22 Step
Again we put a longitudinal axis along the upper larger parallelepiped. We re-enter the arches of the bend of our lid and make sure that the centers of the arcs fall on the designated axis. Let's mark the rhombic corners at the edges of the lid.
23 Step
Immediately we mark the rectangle of the handle. The dimensions of the walls of this rectangle are taken from the parameters of the already drawn handle.
24 Step
With a more noticeable and bright line we put the contour of the handle. Under the new turn we build a semicircular volume of the lock in the same way that we used last time.
25 Step
Inside the lid and body we will see empty cavities where the treasures will be stored. We draw the diagonals that we already like and mark reduced parallelograms of the same size. Let the wall thicknesses be large. Our chest is small, but very durable!
26 Step
The lock must lock both halves of the chest. To do this, we need to show the hole into which the locking mechanism of the lock will be lowered. On the lower thick part of the chest exactly in the center of the front face we show a rectangular niche with a rectangular frame. And we also show the voids inside the lid and body with more distinct lines.
27 Step
Do not forget such a tiny but important nuance - the keyhole in a small niche. We add it in a new perspective. The chest is open and waiting for its treasures. Did you know that lisping pirates are looking for hazelnuts?
28 Step
“A jar of earth, guess what's in it!” And it seems that a hazelnut appeared in this hazelnut! Probably the owner of this casket is not a lisping pirate, but a squirrel. Everyone has their own idea of treasures. Well, we put the nuts in a beautiful bunch and leave only the contour lines. Traditionally erasing everything related to the construction.
29 Step
At this stage we return full opacity to the layer hiding the top part of the first drawing. Add shadow along the edges turned away from the light. Do not forget to erase part of the lock on the front part of the casket - an atavism from the closed state.
30 Step
We begin to gradually darken the dark metal details and make the shadow in the depths of the voids more active, make the shadows of the nuts falling and own brighter, with a darker tone we highlight the protruding corner of the lid.
31 Step
We draw a similar pattern of wood on the lid, mark the cracks between the boards and make the turns of the metal arcs on the lid and at the lock darker. And we leave the handle the same light. Otherwise it will compete with the foreground.
32 Step
Inside the lid we will also add metal contours along the seams. This will give our chest more power.
33 Step
And why not draw the owner of the box? Especially since she is carrying a new nut to her hiding place.
Do not forget to write down the recipe for the chest, in case you need it:
First take a little pencil,
Draw a few planks,
Then take a ruler,
Use this cunning loophole.
Draw squiggles
And a handle on the top.
Add a couple of strokes,
And the chest is ready!
We will rephrase the phrase by Pablo Picasso: “When art critics gather together, they talk about form, structure and meaning. When artists gather together, they talk about” how to draw a cool chest. So we gathered and drew a chest in two states: closed and open with treasures. You can apply a similar scheme to any type of chests: huge interior chest-dressers, graceful cassoni, practical chests, magical caskets and otherworldly caskets. The form and content can be absolutely anything. By the way, in our courses Figure Basic and 2D Graphics Basic they study the constructive construction of objects and elements of architecture using perspective distortions. And they also
Related materials

Tutorial
Drawing stones
March 10, 2025
Tutorial
How to draw a house
October 25, 2024

Tutorial
How to draw a child?
January 13, 2025

Tutorial
How to draw a torso
December 18, 2024

Tutorial
How to draw highlights
December 17, 2024

Article
3 tips for a beginner character artist. How to draw emotions
September 18, 2023

News
Прекрасные цветы в стиле аркейн, нарисованные вручную и воплощённые в 3D
May 15, 2026