TutorialUpdated: July 2, 2026
How to draw teenagers
In short
Learn how to draw teenagers considering proportions, growth features and appearance. Step-by-step instructions and practical tips.
2D artist
```
Teenagers are changeable, both in character and in proportions. And adolescence lasts quite a long time, as much as 8 years (from 10 to 18). All this time they grow, change and develop into adults. Let's try to catch these fleeting transformations. Let's be young naturalists for a while, observing the metamorphosis of a caterpillar turning into a butterfly.
The difference between the male and female ribcage matters a lot for teenage figures — a detailed breakdown is in the master class How to draw the ribcage.
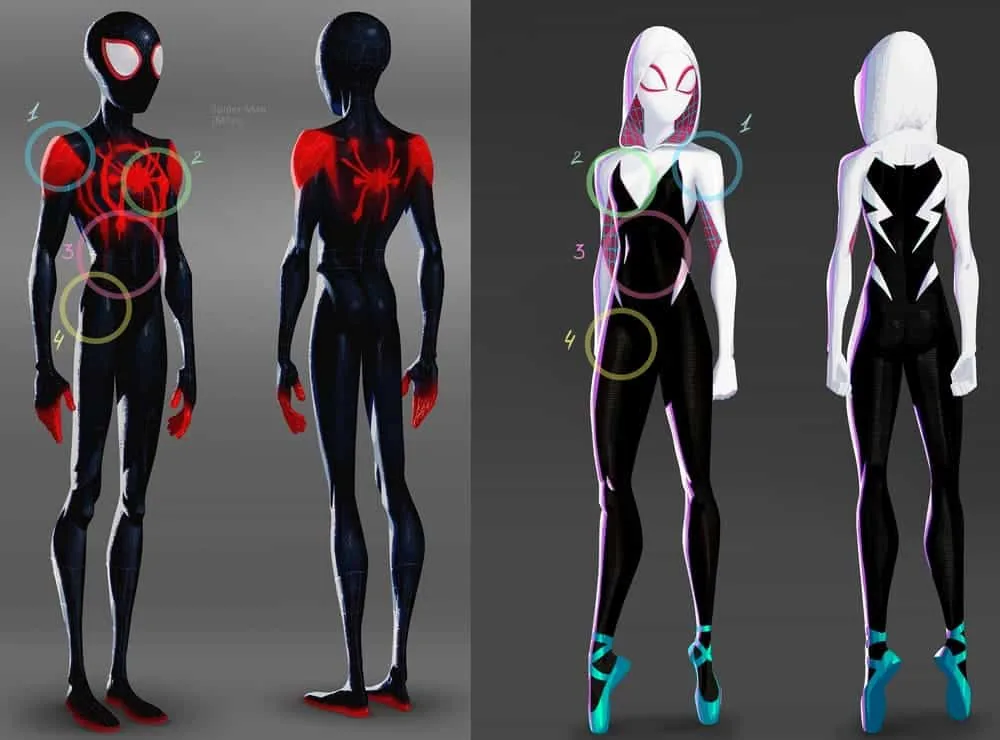 Not only in the world of traditional art is knowledge about the features of the teenage figure in demand, but also in the field of games and animation. In the animated film "Spider-Man: Into the Spider-Verse," the main characters are teenagers. We noted the key differences between Miles and Gwen:
 Not only does a teenager's body transform, but a rebellious spirit awakens in them. And not only in character: the body begins hormonal changes, causing imperfections to appear on the skin, hair to grow in intimate areas, armpits, and legs. Especially thick “fur” grows in young men towards the end of adolescence - moustaches and beards begin to grow, as well as hair on the chest, shoulders, and back. Hmm, if you catch and shave a few of these individuals, you could even make a hat! Just kidding.
Distinctive features of teenagers
Recently we looked at how to draw children and explored their proportions. However, children's proportions are no longer suitable for drawing a teenager's figure: around the age of 10, the process of growing up begins, children start to grow taller and develop gender differences (curvaceous silhouettes typical of women and bulkiness in men). By the way, adolescence is divided into two parts: early adolescence from 10 to 14, and late adolescence from 15 to 18. Naturally, everyone's biological clock is set differently, so for some children it starts a little later, and for others exactly on schedule.Appearance, weight, height
Young children are chubby and plump. As they become teenagers, they gain even more weight, but visually they become slimmer. All this happens due to the increase in body height. And the former chubby kids suddenly become lean athletes.
Silhouette features
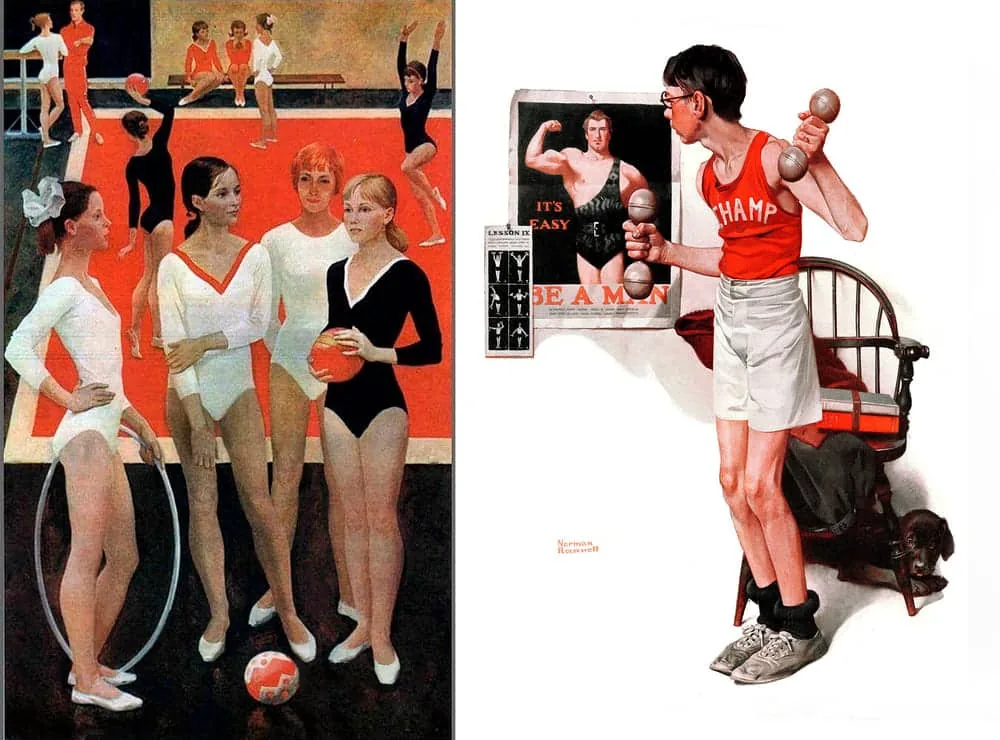
The young gymnasts in Ivan Shatsky's painting have a slender silhouette with thin waists, small chests and slightly rounded hips. And Norman Rockwell's young man, on the contrary, is tall and lean. This funny plot illustrates a comical situation of the late stage of growing up. The young man has grown up and dreams of muscles, looking at the poster of his idol on the wall. Usually boys mature a little later than girls, closer to 16-18, and girls by 15-18. Did you notice how good the composition is for both authors? We can't help mentioning such a delicious aspect: Shatsky has a lot of statics and theatricality, while Rockwell has dynamics and emotionality. We're drooling, oh... and moving on!
Not only in the world of traditional art is knowledge about the features of the teenage figure in demand, but also in the field of games and animation. In the animated film "Spider-Man: Into the Spider-Verse," the main characters are teenagers. We noted the key differences between Miles and Gwen:
- the blue circle — Miles' shoulders are wide, with noticeable muscle relief. Gwen's shoulders are narrower and more elegant.
- the green circle — the pectoral muscles and chest of the young man are broad and also wide, while Gwen's chest is narrower and has breast prominence.
- the pink circle — the young man's waist flows smoothly into the breadth of his shoulders, while the girl's waist is thin like a wasp's.
- the yellow circle — the pelvis and hips of Miles are quite narrow, while Gwen's have a strong widening. The gluteal muscles of the girl also have greater volume and more oval shapes.
Face and appearance
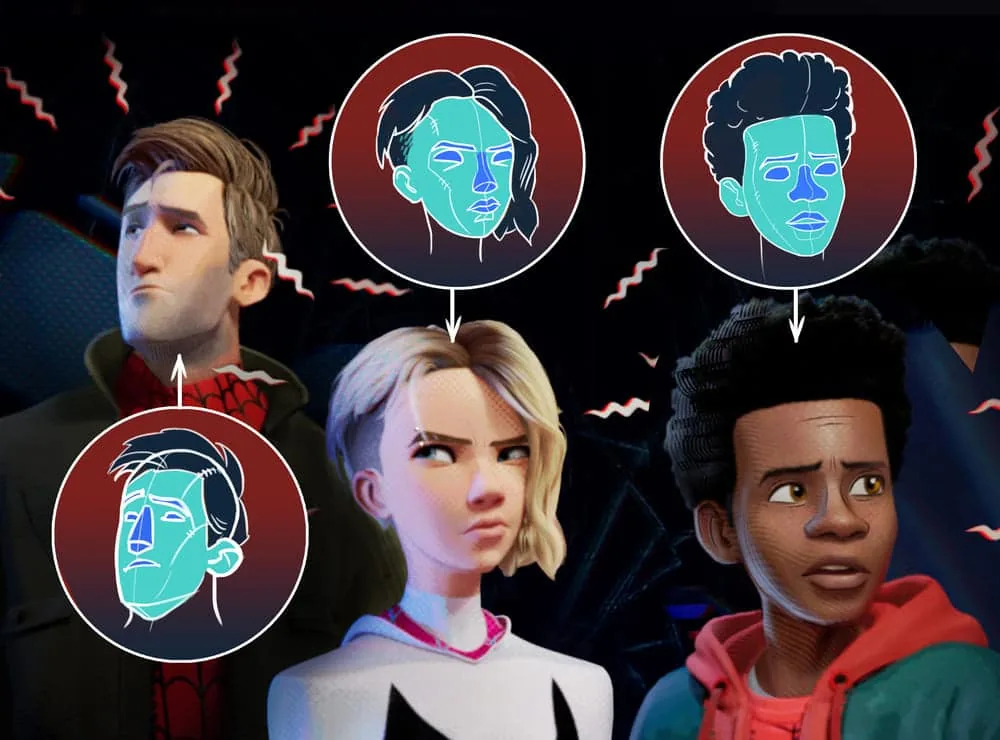
`````` Imagine the face of a very young child: the eyes, nose, and mouth occupy almost the entire facial mask. At the same time, the ears and nose are miniature. As the child grows, the facial proportions change, and the features spread further and further apart from each other. It's clear that cartoons use stylization, but we can see harmonious proportionality in a teenage face. Let's take a frame from the same cartoon “Spider-Man: Into the Spider-Verse”. We highlighted the faces in turquoise, and the nose, eyes, and mouth in blue. For Miles and Gwen, the blue features are larger compared to Peter. In an adult, the length of the nose is approximately equal to two times the width of the eye, and another eye width fits between the eyes. The corners of the mouth are at the level of the middle of the same eyes. At the same time, we see that in the cartoon teenagers these proportions are slightly distorted. The nose and ears are cartilages, and cartilaginous tissues grow until old age, without stopping. Therefore, in adolescence, they begin to lengthen and enlarge. Very often we can meet lop-eared boys and girls. And do you know what we have? We have a video lesson on drawing a head, it will be very useful for everyone who has drawn it more than once, or maybe even many times: In general, the facial proportions of teenagers are close to those of an adult, so you can safely use them, you won't go wrong!
Not only does a teenager's body transform, but a rebellious spirit awakens in them. And not only in character: the body begins hormonal changes, causing imperfections to appear on the skin, hair to grow in intimate areas, armpits, and legs. Especially thick “fur” grows in young men towards the end of adolescence - moustaches and beards begin to grow, as well as hair on the chest, shoulders, and back. Hmm, if you catch and shave a few of these individuals, you could even make a hat! Just kidding.
Body proportions
Related courses
All courses
from 3 900 ₽
-57%
Book illustration: The first page page
9 000 ₽3 900 ₽
Learn more

from 12 000 ₽
-20%
Векторная иллюстрация для начинающих
15 000 ₽12 000 ₽
Learn more

from 4 500 ₽
-55%
Character Concept: My First Hero
10 000 ₽4 500 ₽
Learn more
``````
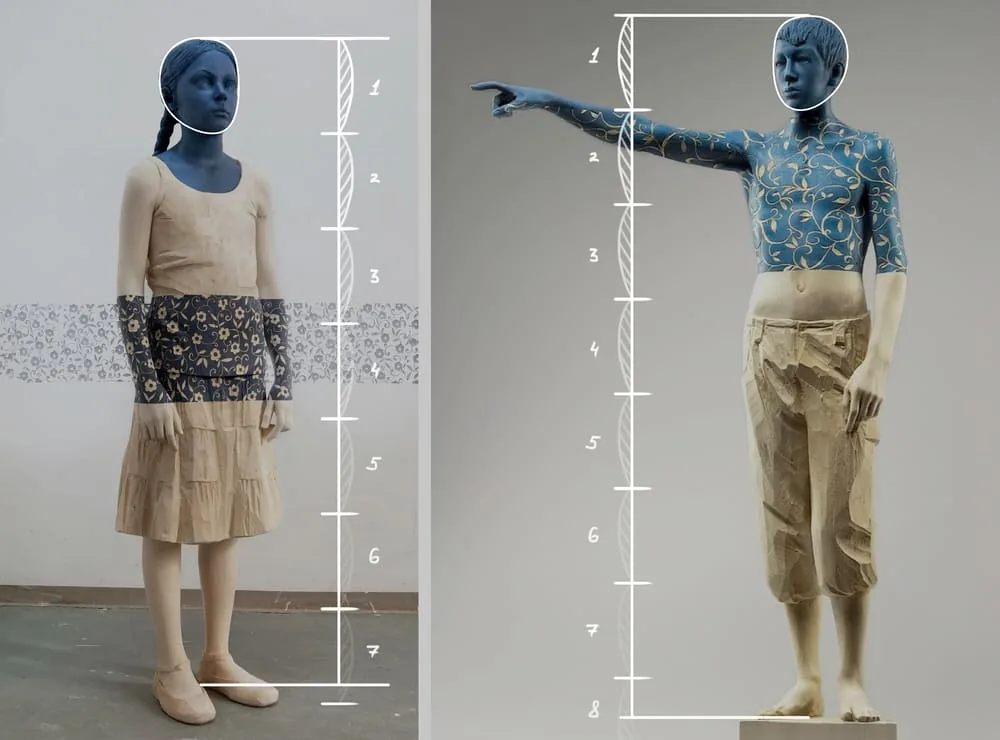
Let's change the subject and not always talk about Spider-Man. Let's take new teenagers at about the midpoint of their adolescence, aged 14-15, and analyze the proportions of their body volumes. And our reference will be photographs of sculptures by the contemporary Italian sculptor Willy Virgignera. So, our favorite activity in this matter is to measure the head-to-height ratio. On average, for a teenager of this age, this proportion is 1 to 7. And we get very similar measurement results: the girl's head fits into her body height almost 7 times, and the boy's a little more. We can say that the arithmetic mean gives us a neat seven.
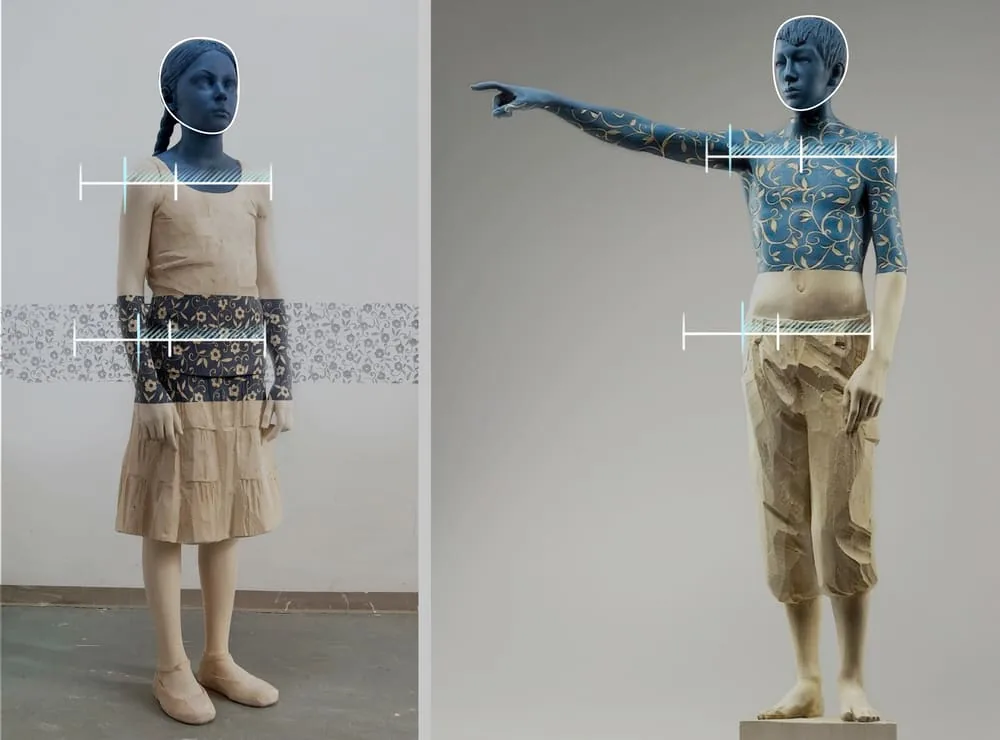
 It's important to measure the width of the shoulders and pelvis, as well as the ratio of these lengths to the head. For both teenagers, the head fits into the width of the pelvis about 1.5-1.2 times. With the shoulders, we notice a slight discrepancy: the girl's shoulders are equal to 1.5 head sizes, and the boy's about 1.8. Our characters are just at the stage of emerging physiological differences between men and women, which we mentioned in the silhouettes. In an adult, this proportion is: the head fits twice into the width of the shoulders.
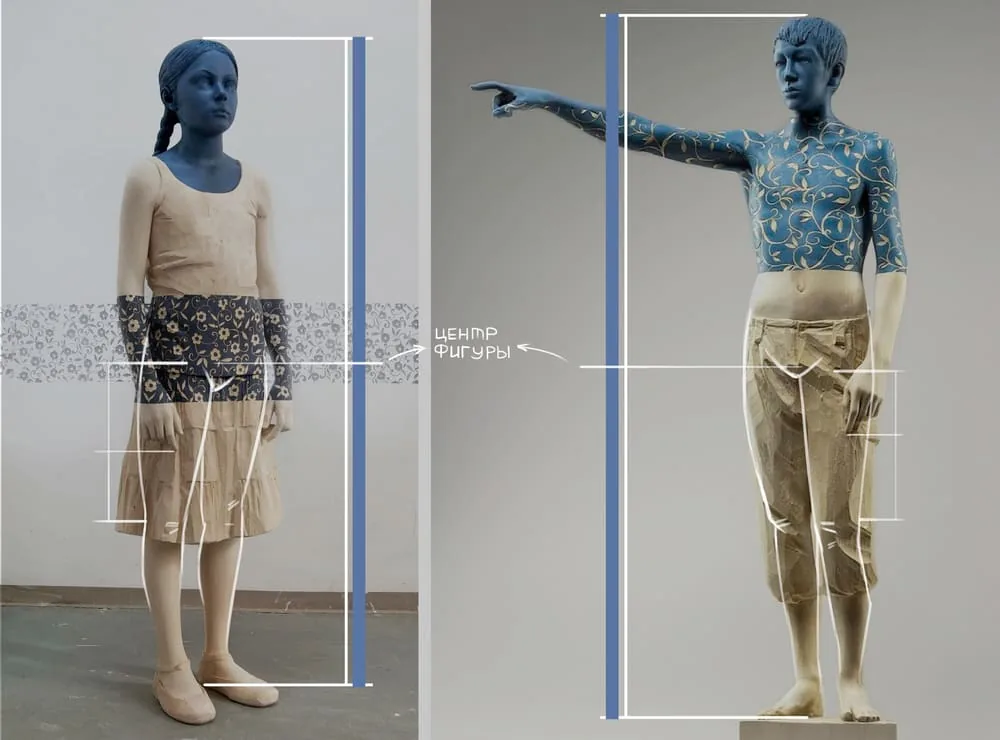
 Well, now let's determine the center of the figures. For both sculptures, it turned out to be almost in the center of the pubic bone. A little more and our children will stop being children. And then the center of their figures will coincide with the center of the bone. But the length of the arms of both has already become adult: the hands reach the middle of the thigh.
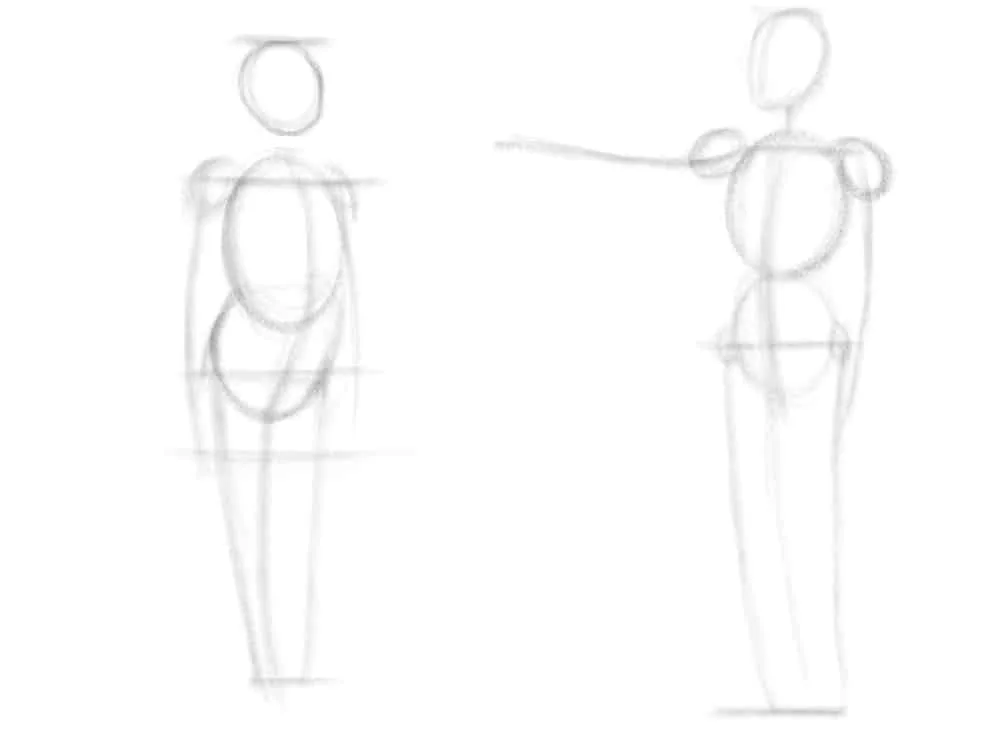
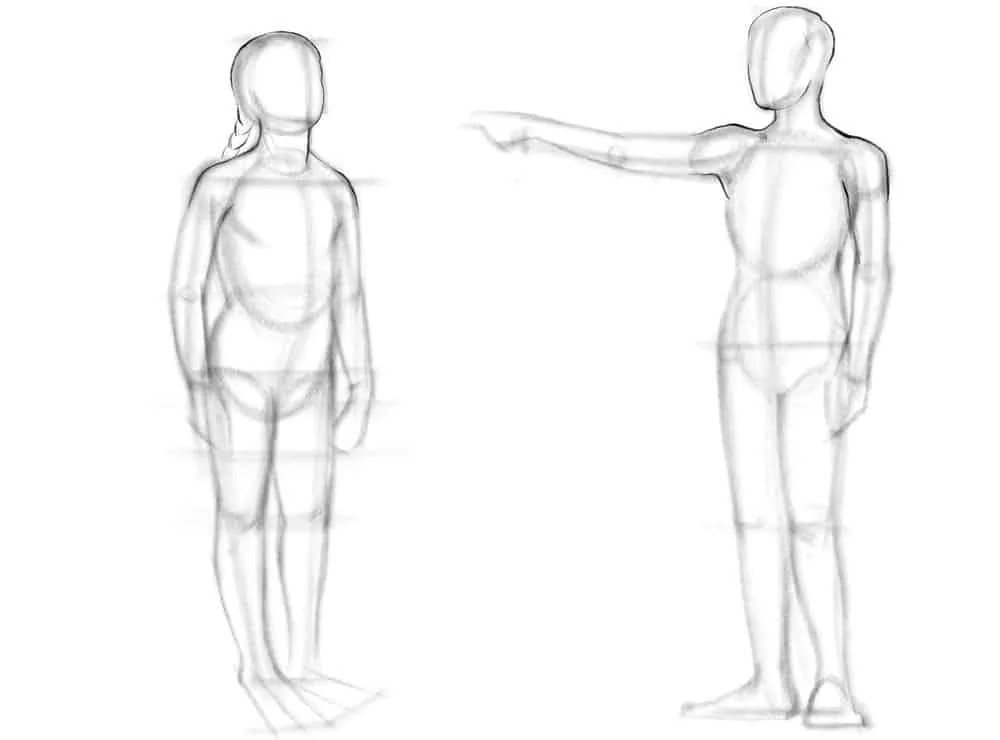
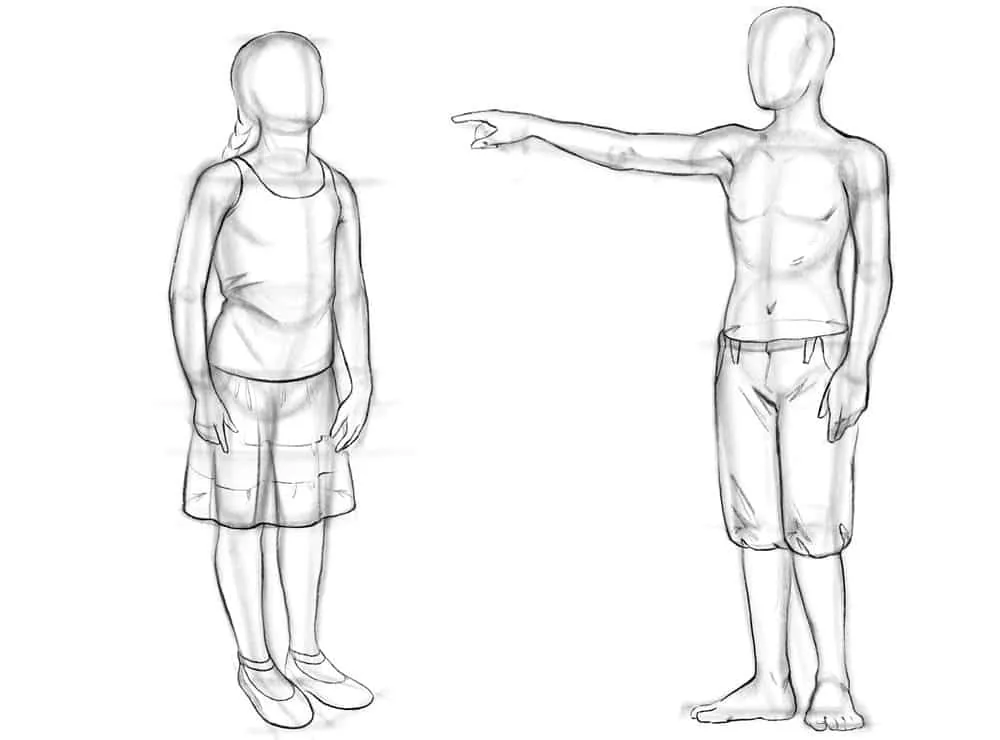
 Stage 2
We outline the directions of the arms and legs with lines. We measure the width of the shoulders, proportional to the head, and place balls — these are our deltoid muscles. We make sure that our arms and legs are the same length, this is very important!
Stage 2
We outline the directions of the arms and legs with lines. We measure the width of the shoulders, proportional to the head, and place balls — these are our deltoid muscles. We make sure that our arms and legs are the same length, this is very important!
 Stage 3
We mark the locations of the elbows, wrist joints, and knees on the lines of the future limbs with small notches. For the young man, we also indicate the feet; they do not have the opening that the girl has, so they will be a bit simpler. We begin to draw the silhouette, connecting the volumes of our circles. We follow the curves of the sculptures' bodies, trying to replicate them. We move to the legs and also draw the silhouette around the line.
Stage 3
We mark the locations of the elbows, wrist joints, and knees on the lines of the future limbs with small notches. For the young man, we also indicate the feet; they do not have the opening that the girl has, so they will be a bit simpler. We begin to draw the silhouette, connecting the volumes of our circles. We follow the curves of the sculptures' bodies, trying to replicate them. We move to the legs and also draw the silhouette around the line.
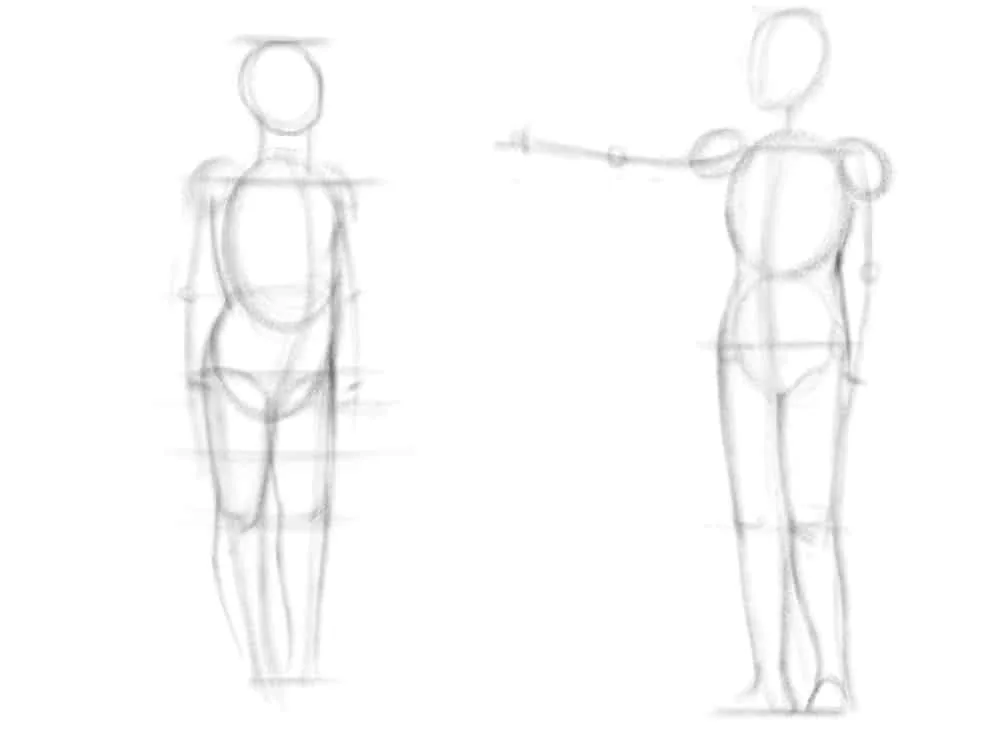 Stage 4
We move higher and add mass to the arms. We make sure that our arms do not become as thick as the legs. The hips and calves are always larger than the upper block of the limbs. Unless, of course, the person works out in the gym and puts special emphasis on training the arms.
Stage 4
We move higher and add mass to the arms. We make sure that our arms do not become as thick as the legs. The hips and calves are always larger than the upper block of the limbs. Unless, of course, the person works out in the gym and puts special emphasis on training the arms.
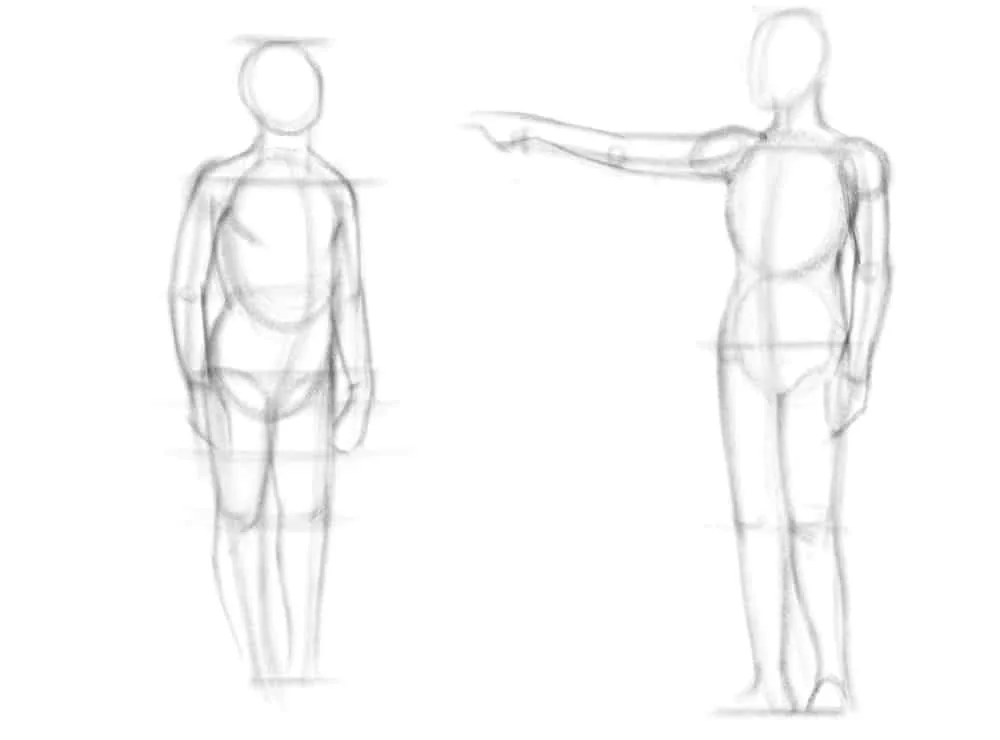 Stage 5
We refine the size and shape of the heads, marking the central axis of the head from the front. We draw rectangles with axes for the girl. They are approximately equal in length to the height of the head. We will use them to arrange the feet in sandals. And for the boy, we can immediately outline the silhouettes of the feet with light lines.
Stage 5
We refine the size and shape of the heads, marking the central axis of the head from the front. We draw rectangles with axes for the girl. They are approximately equal in length to the height of the head. We will use them to arrange the feet in sandals. And for the boy, we can immediately outline the silhouettes of the feet with light lines.
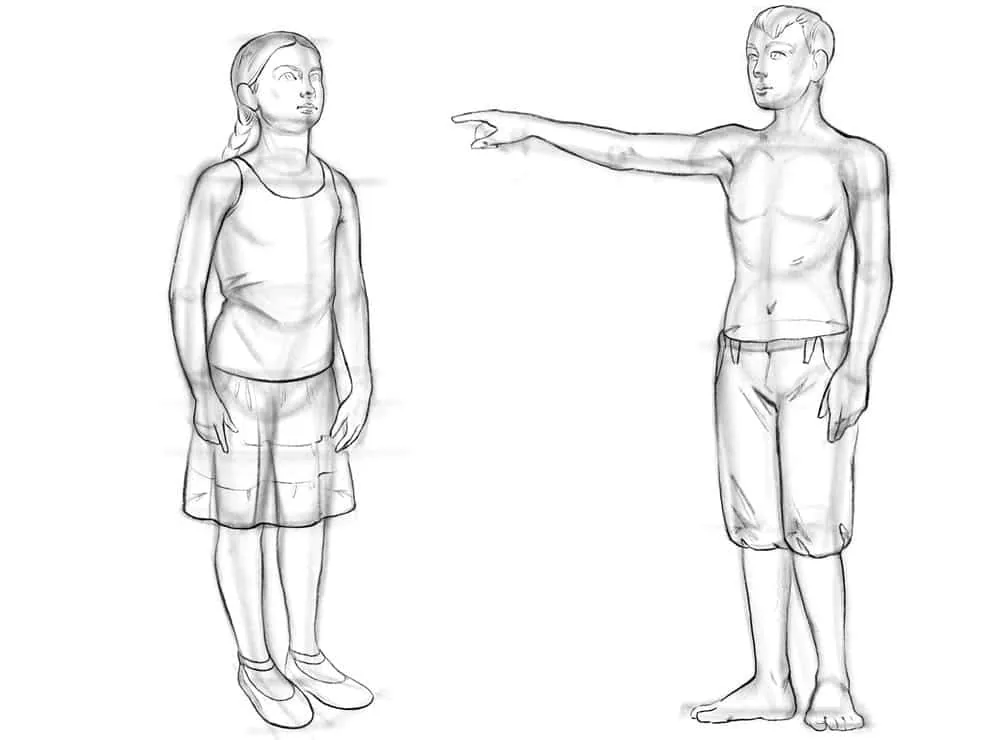
 Stage 6
We have now made light search sketches of the figures. Now we will put a more beautiful contour line on the bodies. We start with the head and shoulders. We press hard and confidently on the pencil or stylus so that the line is clear and noticeable.
Stage 6
We have now made light search sketches of the figures. Now we will put a more beautiful contour line on the bodies. We start with the head and shoulders. We press hard and confidently on the pencil or stylus so that the line is clear and noticeable.
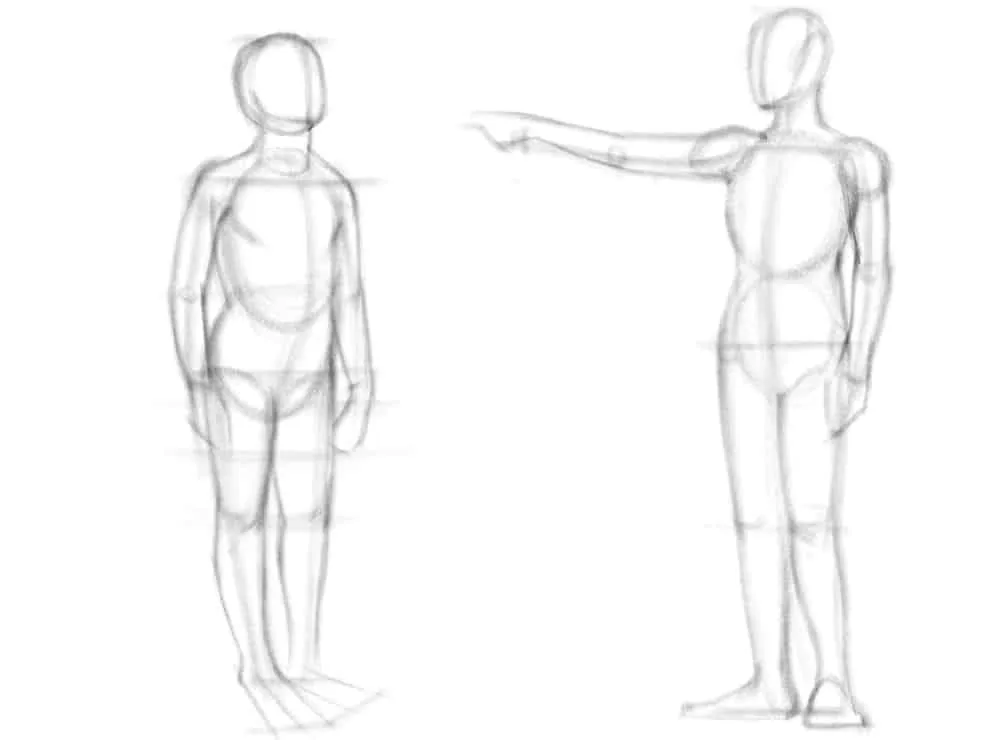
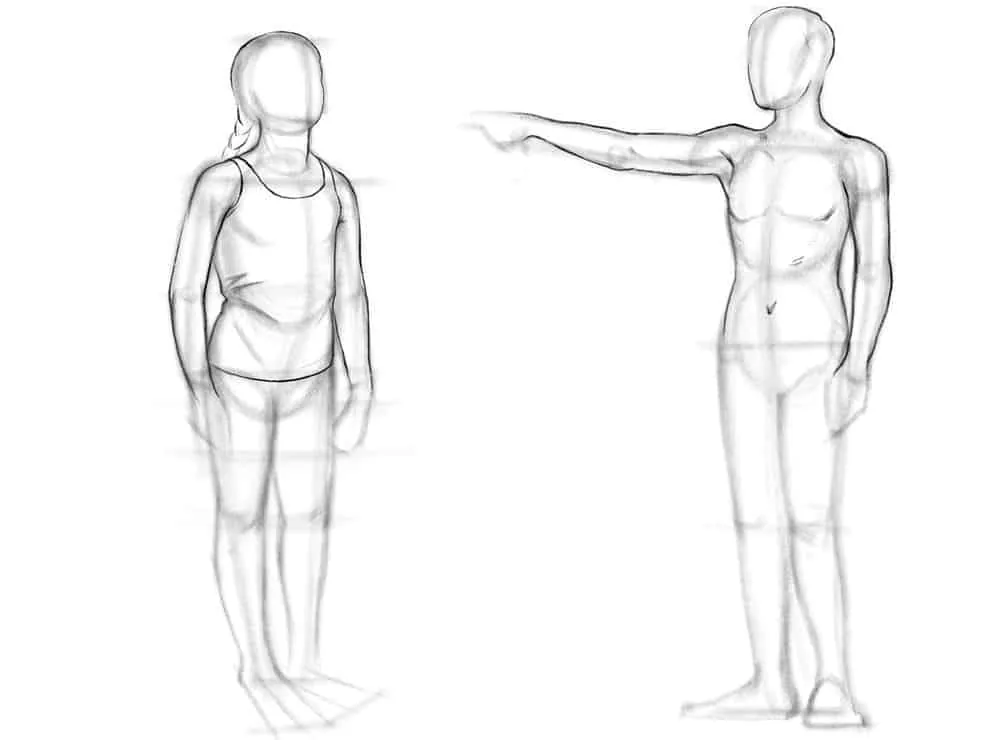
 Stage 7
We continue to go down the figure, drawing the teenagers immediately in their clothes as they are. Our initial drawing will guide us on the shape of the body from the inside. The girl is wearing a tank top, so the muscles of the torso and shoulder area are not visible to us; we only note the folds at the waist. For the young man, we draw light hints of pectoral muscles, the edge of the ribs, and the navel with light strokes. At the same stage, we draw the line of the arms.
Stage 7
We continue to go down the figure, drawing the teenagers immediately in their clothes as they are. Our initial drawing will guide us on the shape of the body from the inside. The girl is wearing a tank top, so the muscles of the torso and shoulder area are not visible to us; we only note the folds at the waist. For the young man, we draw light hints of pectoral muscles, the edge of the ribs, and the navel with light strokes. At the same stage, we draw the line of the arms.
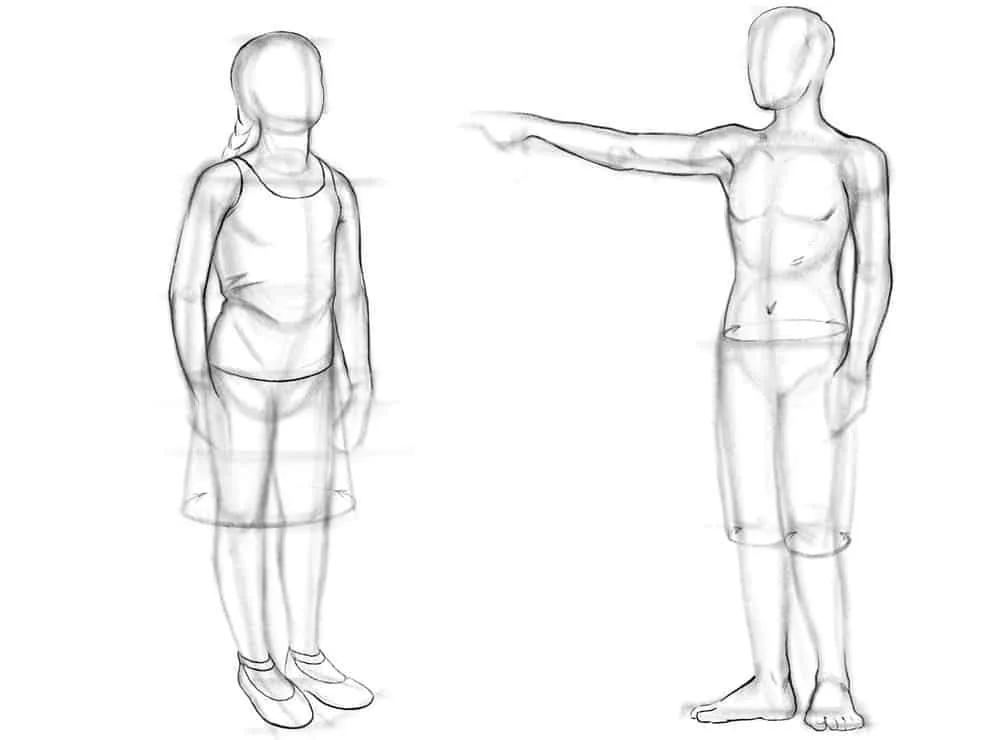
 Stage 8
We go lower, the legs are waiting for us. The skirt is a cone; we note its shape with translucent lines. And the shorts are two cylinders; we also easily note this shape on the sketch. It's time for the feet: inside the marked rectangles for the girl, we draw the shoes. We try to direct the noses of the sandals according to the movement of the axes of the rectangles. The base of the sandal should not extend beyond the border of the rectangle, otherwise our foot will become too wide. For the young man, we mark the toes with dashes and draw a clear outer contour of the feet.
Stage 8
We go lower, the legs are waiting for us. The skirt is a cone; we note its shape with translucent lines. And the shorts are two cylinders; we also easily note this shape on the sketch. It's time for the feet: inside the marked rectangles for the girl, we draw the shoes. We try to direct the noses of the sandals according to the movement of the axes of the rectangles. The base of the sandal should not extend beyond the border of the rectangle, otherwise our foot will become too wide. For the young man, we mark the toes with dashes and draw a clear outer contour of the feet.
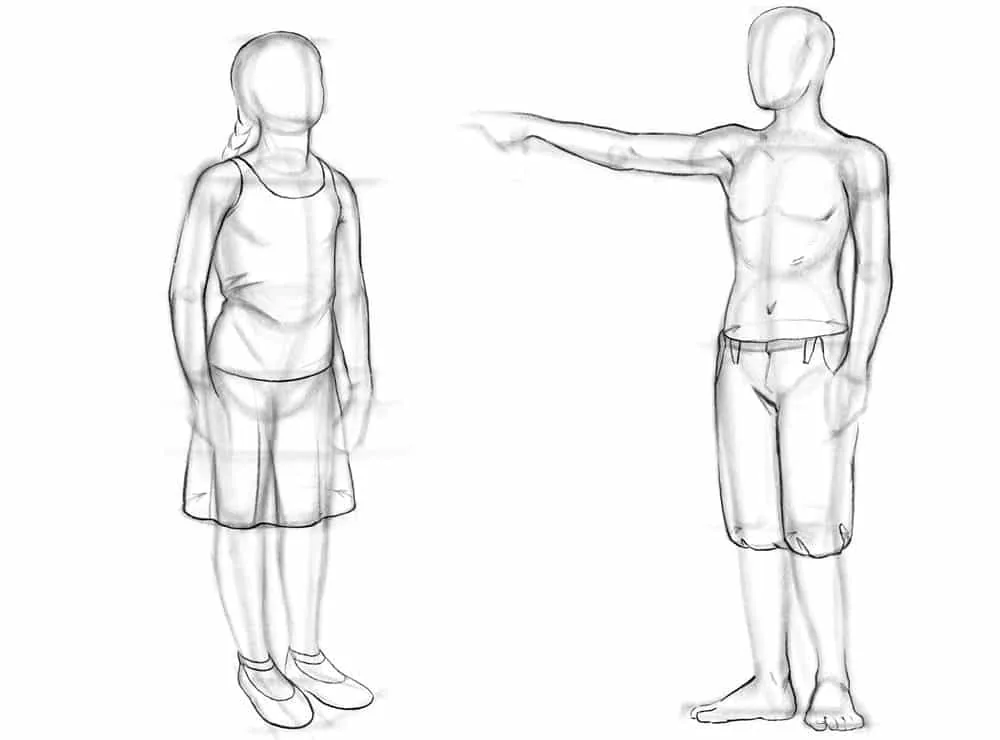
 Stage 9
We bend the hem of the skirt and thus create folds in the skirt. For the young man, we draw some details on the shorts: a V-shaped fold in the groin area, pockets, belt loops, and slight wrinkling of the leg at the bottom near the calves.
Stage 9
We bend the hem of the skirt and thus create folds in the skirt. For the young man, we draw some details on the shorts: a V-shaped fold in the groin area, pockets, belt loops, and slight wrinkling of the leg at the bottom near the calves.
 Stage 10
We outline the final line of the legs, connecting our feet with the shorts and skirt. We also draw the hands. Our task is to convey a similar gesture but not go into too much detail. If the contour of the hands conveys its movement and the viewer understands how the hand looks, then the task is completed. We add a scattering of very small folds on the skirt and shorts, thus creating the right impression of the character of the fabric.
Stage 10
We outline the final line of the legs, connecting our feet with the shorts and skirt. We also draw the hands. Our task is to convey a similar gesture but not go into too much detail. If the contour of the hands conveys its movement and the viewer understands how the hand looks, then the task is completed. We add a scattering of very small folds on the skirt and shorts, thus creating the right impression of the character of the fabric.
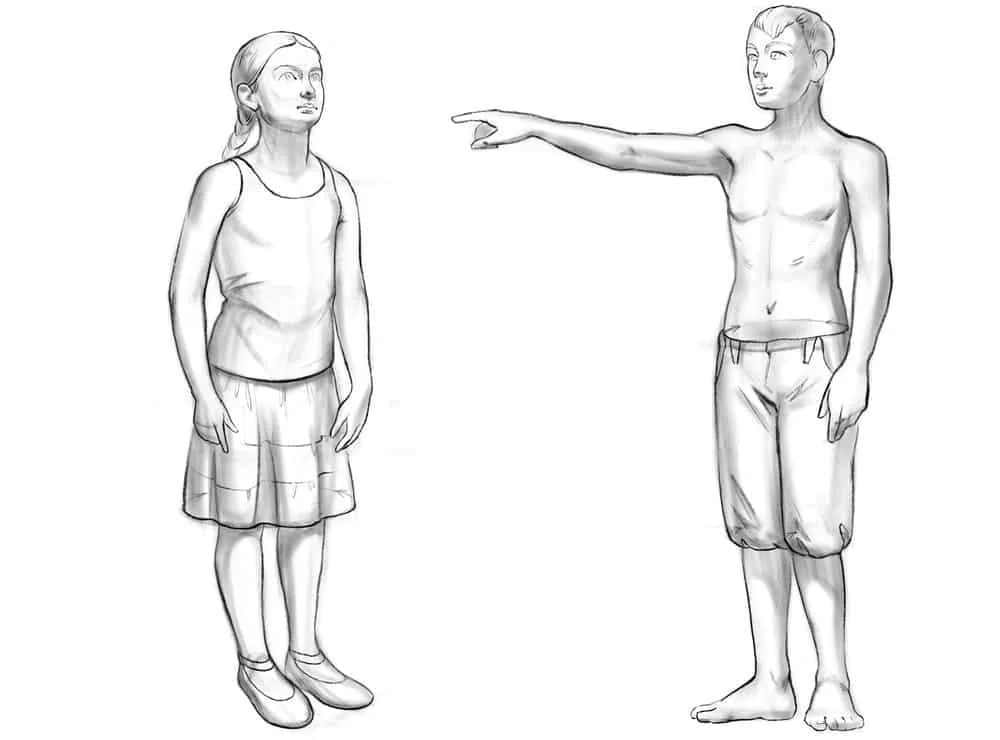
 Stage 11
We draw faces and hairstyles with simple lines, without complications. Since we focus more on the figure, we can skip this stage or add very simple hints of a face — a shadow under the nose, an ear, shading in place of the eyes. This will be enough to understand the direction of the volume of the head; many artists use this technique.
Stage 11
We draw faces and hairstyles with simple lines, without complications. Since we focus more on the figure, we can skip this stage or add very simple hints of a face — a shadow under the nose, an ear, shading in place of the eyes. This will be enough to understand the direction of the volume of the head; many artists use this technique.
 Stage 12
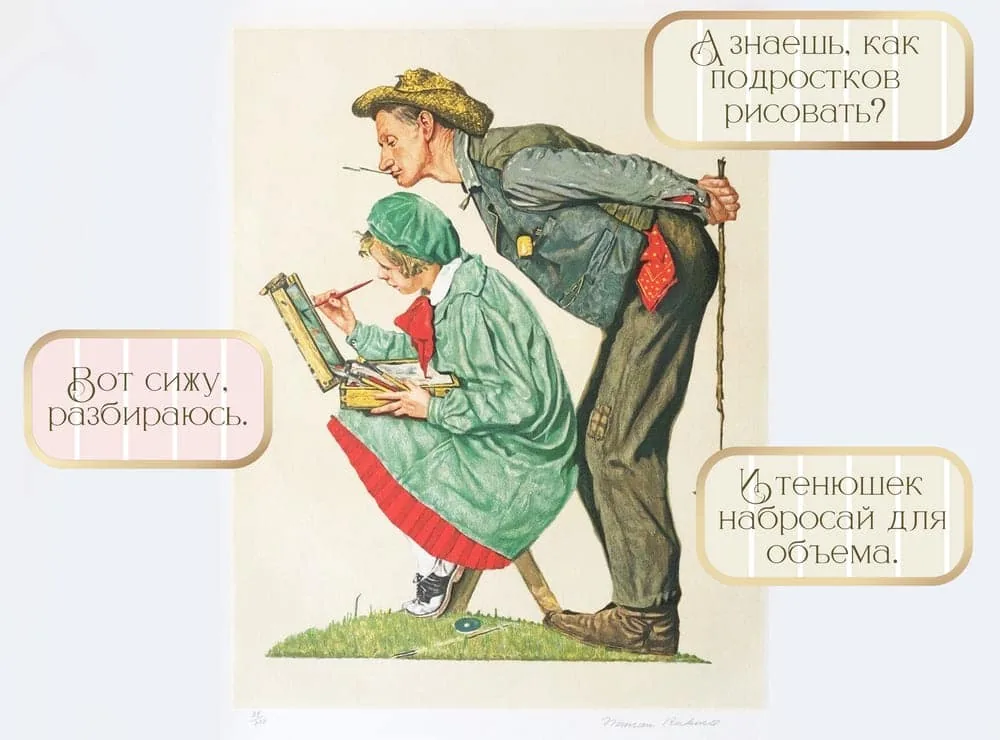
Now let's add some shadows, as advised by the illustration of Norman Rockwell at the beginning of the man's joke to the little girl in our humor piece. We erase all the extra construction lines where they go beyond the boundaries of our figures and in the light areas. And with a light, bright tone, we uniformly shade the own and falling shadows.
Stage 12
Now let's add some shadows, as advised by the illustration of Norman Rockwell at the beginning of the man's joke to the little girl in our humor piece. We erase all the extra construction lines where they go beyond the boundaries of our figures and in the light areas. And with a light, bright tone, we uniformly shade the own and falling shadows.
 Stage 13
At this stage, we add contrast to the shadows on the abdomen, on the turns of the body volumes on the sides, and on the limbs. With arc-shaped strokes, we shade the young man's shorts and the legs of both characters. We place falling shadows under the feet to make our teenagers stand firmly on the ground.
Stage 13
At this stage, we add contrast to the shadows on the abdomen, on the turns of the body volumes on the sides, and on the limbs. With arc-shaped strokes, we shade the young man's shorts and the legs of both characters. We place falling shadows under the feet to make our teenagers stand firmly on the ground.
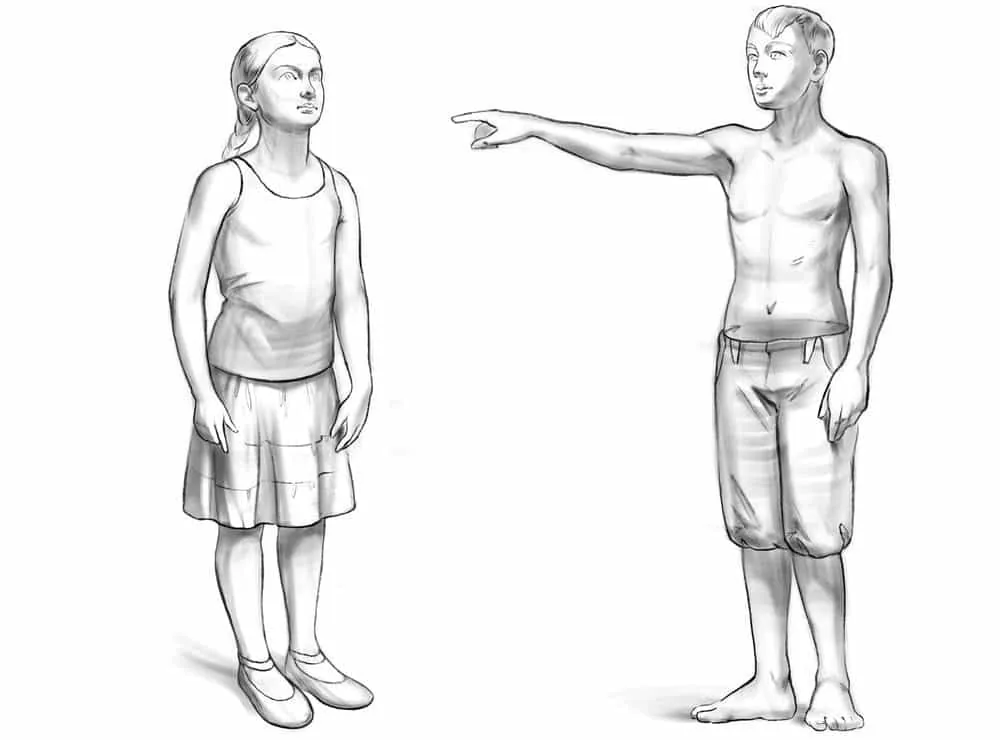 Stage 14
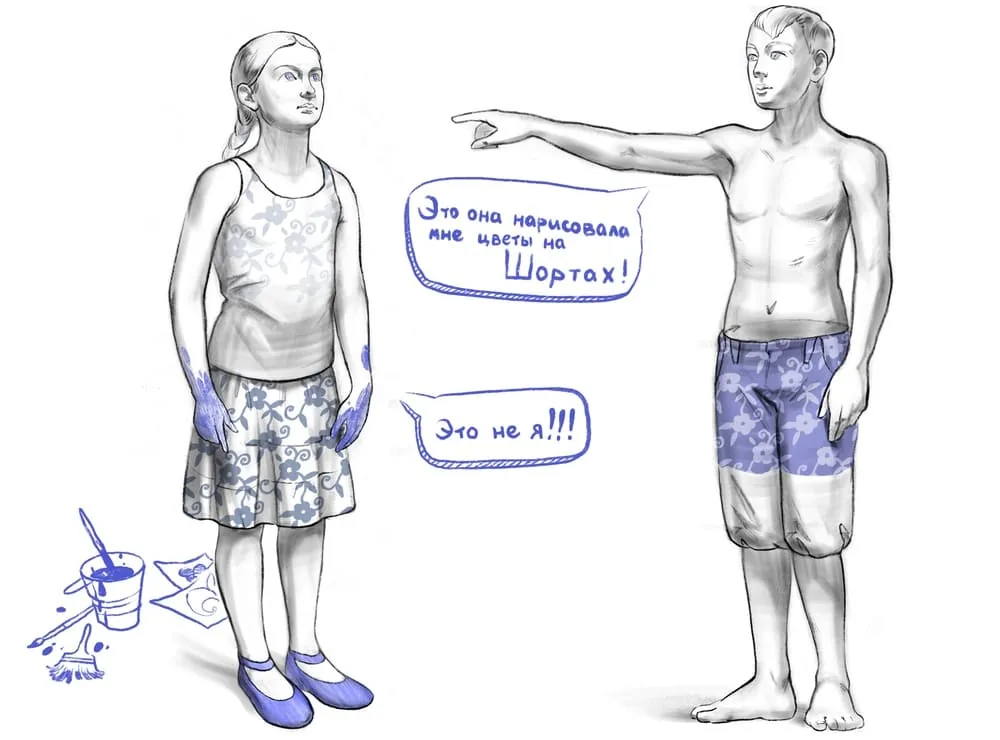
The positions of the boy and the girl are rather comical, as if they are accusing each other. Let's take a blue pencil and add a floral pattern to the clothes. Willie Verginer's technique is beautiful, so let's create similar curls of flowers and leaves. And let's add quotes to the characters. With that, we boldly complete both teenagers, finita!
Stage 14
The positions of the boy and the girl are rather comical, as if they are accusing each other. Let's take a blue pencil and add a floral pattern to the clothes. Willie Verginer's technique is beautiful, so let's create similar curls of flowers and leaves. And let's add quotes to the characters. With that, we boldly complete both teenagers, finita!
It's important to measure the width of the shoulders and pelvis, as well as the ratio of these lengths to the head. For both teenagers, the head fits into the width of the pelvis about 1.5-1.2 times. With the shoulders, we notice a slight discrepancy: the girl's shoulders are equal to 1.5 head sizes, and the boy's about 1.8. Our characters are just at the stage of emerging physiological differences between men and women, which we mentioned in the silhouettes. In an adult, this proportion is: the head fits twice into the width of the shoulders.
Well, now let's determine the center of the figures. For both sculptures, it turned out to be almost in the center of the pubic bone. A little more and our children will stop being children. And then the center of their figures will coincide with the center of the bone. But the length of the arms of both has already become adult: the hands reach the middle of the thigh.
Free lesson: drawing a person in the adolescent period
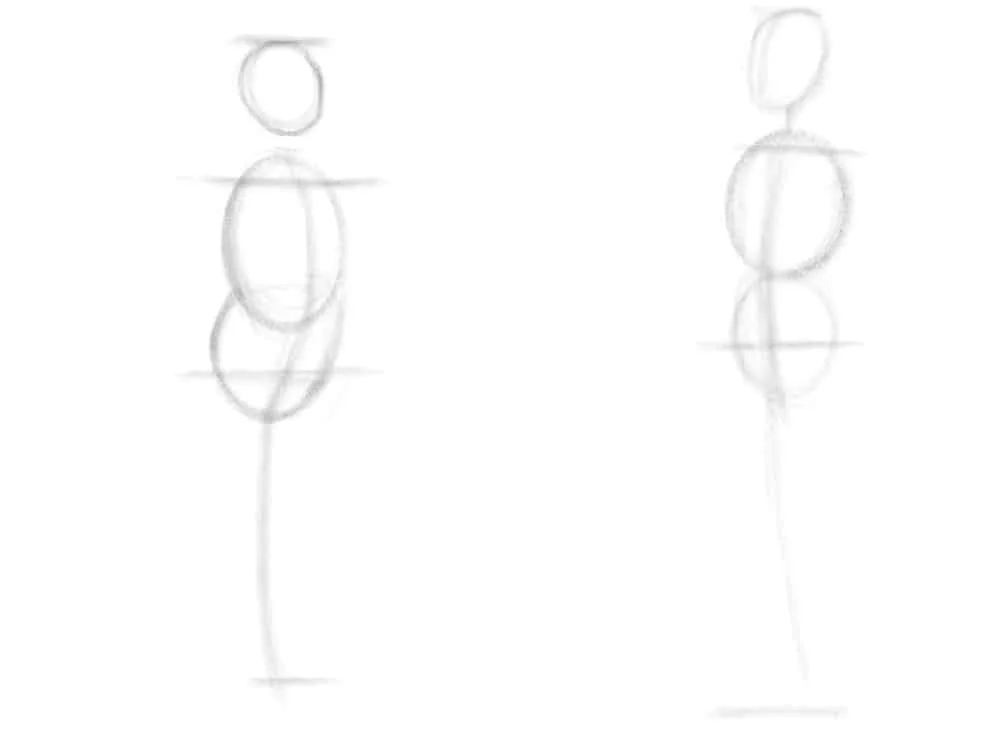
`````` Why not draw both of them, since the hardest part is behind us? We can say that we are practically acquainted. I feel like singing "I remember all your cracks" from Zemfira's song! Grab your HB/B pencils and styluses, paper and tablet, and let's get started. Stage 1 We outline the volumes of the head, chest, and pelvis. We compare them with references to make sure they are similar in volume to the parts of the body of the sculptures. We draw a vertical line, bending it along the movement of the chest and abdomen. We mark the axes of the shoulders and pelvis. The midline of the body will be very close to the horizontal of the pelvis.
Stage 2
We outline the directions of the arms and legs with lines. We measure the width of the shoulders, proportional to the head, and place balls — these are our deltoid muscles. We make sure that our arms and legs are the same length, this is very important!
Stage 3
We mark the locations of the elbows, wrist joints, and knees on the lines of the future limbs with small notches. For the young man, we also indicate the feet; they do not have the opening that the girl has, so they will be a bit simpler. We begin to draw the silhouette, connecting the volumes of our circles. We follow the curves of the sculptures' bodies, trying to replicate them. We move to the legs and also draw the silhouette around the line.
Stage 4
We move higher and add mass to the arms. We make sure that our arms do not become as thick as the legs. The hips and calves are always larger than the upper block of the limbs. Unless, of course, the person works out in the gym and puts special emphasis on training the arms.
Stage 5
We refine the size and shape of the heads, marking the central axis of the head from the front. We draw rectangles with axes for the girl. They are approximately equal in length to the height of the head. We will use them to arrange the feet in sandals. And for the boy, we can immediately outline the silhouettes of the feet with light lines.
Stage 6
We have now made light search sketches of the figures. Now we will put a more beautiful contour line on the bodies. We start with the head and shoulders. We press hard and confidently on the pencil or stylus so that the line is clear and noticeable.
Stage 7
We continue to go down the figure, drawing the teenagers immediately in their clothes as they are. Our initial drawing will guide us on the shape of the body from the inside. The girl is wearing a tank top, so the muscles of the torso and shoulder area are not visible to us; we only note the folds at the waist. For the young man, we draw light hints of pectoral muscles, the edge of the ribs, and the navel with light strokes. At the same stage, we draw the line of the arms.
Stage 8
We go lower, the legs are waiting for us. The skirt is a cone; we note its shape with translucent lines. And the shorts are two cylinders; we also easily note this shape on the sketch. It's time for the feet: inside the marked rectangles for the girl, we draw the shoes. We try to direct the noses of the sandals according to the movement of the axes of the rectangles. The base of the sandal should not extend beyond the border of the rectangle, otherwise our foot will become too wide. For the young man, we mark the toes with dashes and draw a clear outer contour of the feet.
Stage 9
We bend the hem of the skirt and thus create folds in the skirt. For the young man, we draw some details on the shorts: a V-shaped fold in the groin area, pockets, belt loops, and slight wrinkling of the leg at the bottom near the calves.
Stage 10
We outline the final line of the legs, connecting our feet with the shorts and skirt. We also draw the hands. Our task is to convey a similar gesture but not go into too much detail. If the contour of the hands conveys its movement and the viewer understands how the hand looks, then the task is completed. We add a scattering of very small folds on the skirt and shorts, thus creating the right impression of the character of the fabric.
Stage 11
We draw faces and hairstyles with simple lines, without complications. Since we focus more on the figure, we can skip this stage or add very simple hints of a face — a shadow under the nose, an ear, shading in place of the eyes. This will be enough to understand the direction of the volume of the head; many artists use this technique.
Stage 12
Now let's add some shadows, as advised by the illustration of Norman Rockwell at the beginning of the man's joke to the little girl in our humor piece. We erase all the extra construction lines where they go beyond the boundaries of our figures and in the light areas. And with a light, bright tone, we uniformly shade the own and falling shadows.
Stage 13
At this stage, we add contrast to the shadows on the abdomen, on the turns of the body volumes on the sides, and on the limbs. With arc-shaped strokes, we shade the young man's shorts and the legs of both characters. We place falling shadows under the feet to make our teenagers stand firmly on the ground.
Stage 14
The positions of the boy and the girl are rather comical, as if they are accusing each other. Let's take a blue pencil and add a floral pattern to the clothes. Willie Verginer's technique is beautiful, so let's create similar curls of flowers and leaves. And let's add quotes to the characters. With that, we boldly complete both teenagers, finita!
Tips and tricks for drawing teenagers
`````` Everyone always wants to know the secret techniques that will magically turn us from just artists into super artists. Oh, if only everything were as simple as growing bigger and smaller in the tale of Alice in Wonderland. You drink a bottle of potion, eat a piece of cake, and suddenly you can draw like Geirrod Van Dyke. By the way, check out his graphic sheets, they're simply wonderful! But we can give you some tips on what to pay attention to when drawing teenagers:- Head size
- Muscle definition
- Always measure proportions
- Characteristic movements
Related materials

Tutorial
How to draw a crystal. Step-by-step guide for artists
March 24, 2025
Tutorial
How to draw a house
October 25, 2024

Tutorial
Learning to draw glow
March 21, 2025

Tutorial
Drawing stones
March 10, 2025

Tutorial
How to draw basic emotions
February 12, 2025

Article
How to draw armor
December 27, 2024

News
Эта уютная игра-рисовалка позволяет исследовать созданные вами пейзажи
May 22, 2026