TutorialUpdated: July 2, 2026
How to draw a stone in a stylized form
In short
Learn how to draw stones in Photoshop. The lesson will help you master stylized shapes, textures, and layer techniques to create realistic images.
2D artist
User:
Lesson from the Skills Up School team on drawing a stylized stone. We included tips on blending modes and brushes in the tutorial.
Drawing stylized objects is an exciting process that allows an artist to be creative and experiment with shapes and textures. Today we will look at how to create a stylized stone with runes, cracks and chips using various techniques and layer blending modes.
Step-by-step lesson
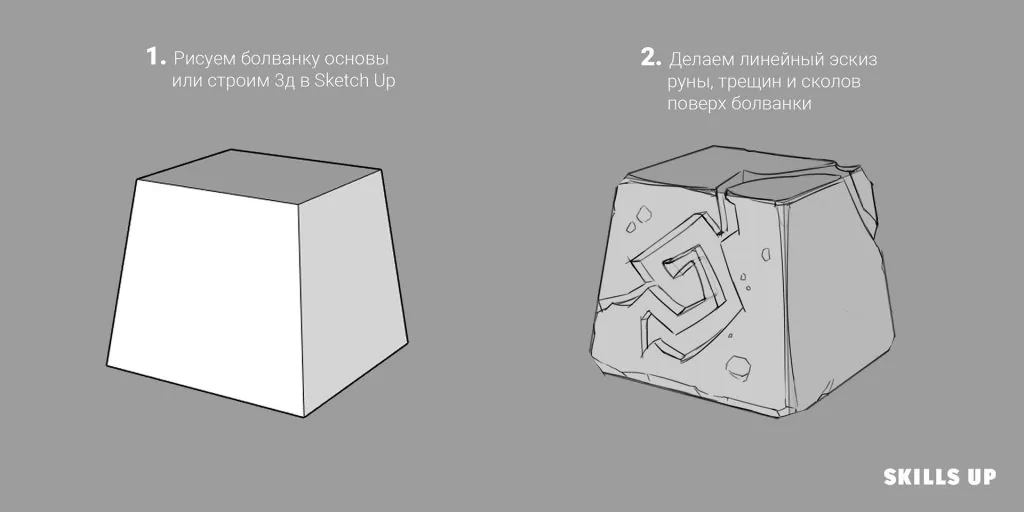
Step 1: Creating the base
Start with a simple sketch of the stone shape. You can draw it by hand or use a 3D program like SketchUp to create a basic shape. This will help you determine the main proportions and perspective of the object.Step 2: Linear sketch of details
Add a linear sketch of details on top of the base: runes, cracks, chips. Use thin lines to indicate the places of damage and decorative elements. This will give the stone character and uniqueness.
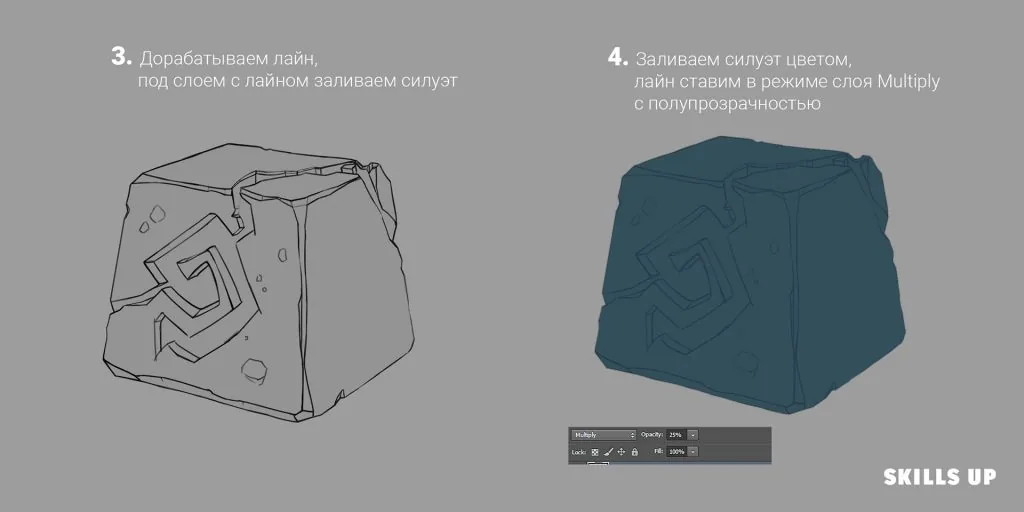
Step 3: Cleaning up the lines and filling in the silhouette
Refine the lines, making them more clear and neat. Then, under the layer with the line, fill in the silhouette of the stone with a base color. Gray or brown shades are usually suitable for stone.Step 4: Adjusting the layer with lines
Related courses
All courses
from 3 900 ₽
-57%
Book illustration: The first page page
9 000 ₽3 900 ₽
Learn more

from 12 000 ₽
-20%
Векторная иллюстрация для начинающих
15 000 ₽12 000 ₽
Learn more

from 4 500 ₽
-55%
Character Concept: My First Hero
10 000 ₽4 500 ₽
Learn more
Translate the layer with the lines to the "Multiply" blending mode and set the translucency. This will allow the lines to harmoniously combine with the base color and subsequent shadows.
 After completing all the steps, you will have a stylized stone with a detailed surface and expressive elements. Do not forget to experiment with colors and textures to achieve the desired effect and add uniqueness to your work. For a deeper study of styling and the development of your own style, you can take a look at the course "Stylization" from Skills Up School.
Also, if you want to expand your skills in digital painting, we recommend the free course "Digital painting. Dive into illustration", which will help you master the basics of working in Photoshop or Procreate and create a complete illustration.
Remember that practice and experimentation are the key to improving your artistic skills. Do not be afraid to try new techniques and approaches to find your unique style and approach to creating stylized objects.
After completing all the steps, you will have a stylized stone with a detailed surface and expressive elements. Do not forget to experiment with colors and textures to achieve the desired effect and add uniqueness to your work. For a deeper study of styling and the development of your own style, you can take a look at the course "Stylization" from Skills Up School.
Also, if you want to expand your skills in digital painting, we recommend the free course "Digital painting. Dive into illustration", which will help you master the basics of working in Photoshop or Procreate and create a complete illustration.
Remember that practice and experimentation are the key to improving your artistic skills. Do not be afraid to try new techniques and approaches to find your unique style and approach to creating stylized objects.
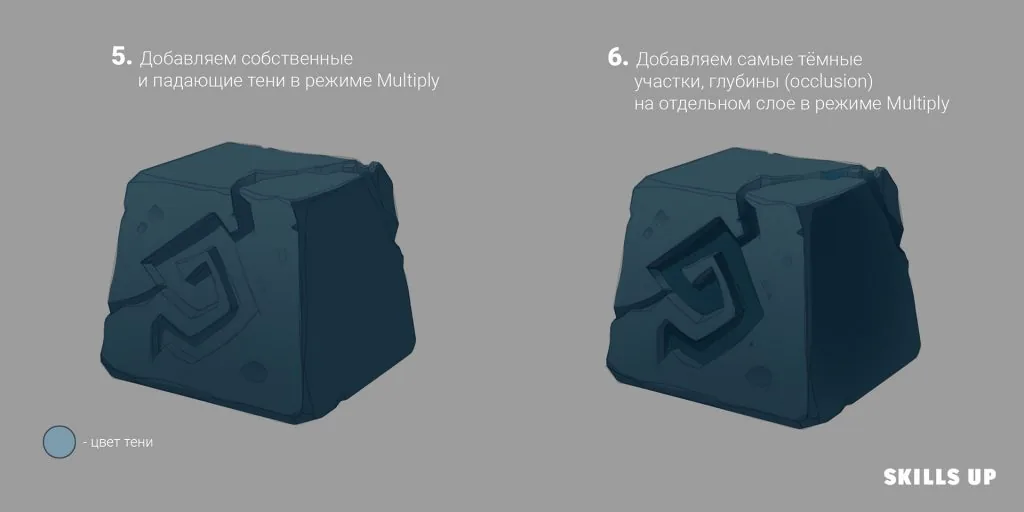
Step 5: Adding shadows
Create a new layer in "Multiply" mode and add own and cast shadows. Determine the light source and darken the areas that are in shadow. This will give the stone volume and depth.Step 6: Enhancing depth (Occlusion)
On a separate layer in "Multiply" mode, add the darkest areas — occlusion zones. These are the places where light practically does not penetrate: the joints of cracks, depressions around the runes and under chips. Such details make the image more realistic.
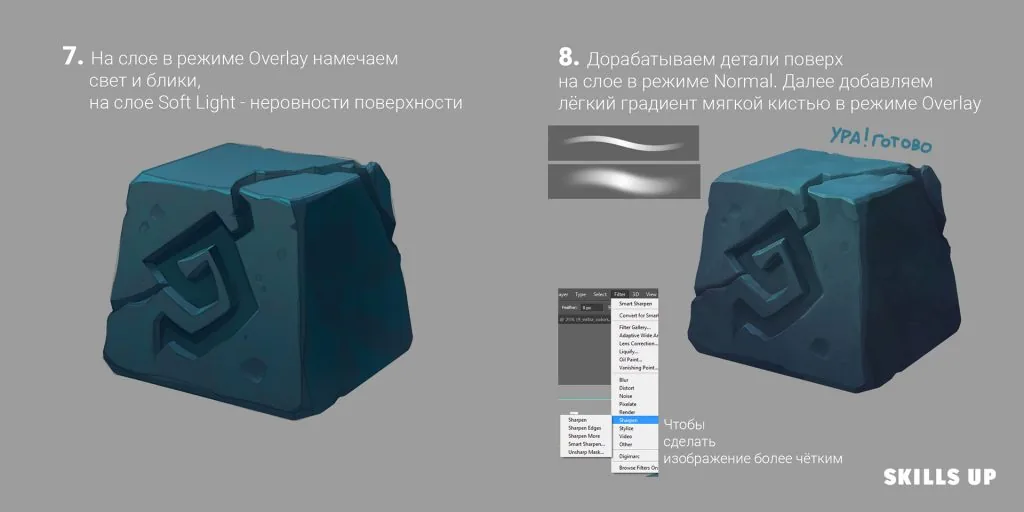
Step 7: Lighting and highlights
Create a layer in "Overlay" mode and add light and highlights on the illuminated areas of the stone. This will emphasize the shape and structure of the surface. To convey the unevenness of the surface, use a layer in "Soft Light" mode and a soft brush.Step 8: Detail
On a layer in "Normal" mode, refine small details: surface texture, additional cracks, small chips. Then add a light gradient with a soft brush in "Overlay" mode to create a lighting effect and atmosphere.Step 9: The work is done
After completing all the steps, you will have a stylized stone with a detailed surface and expressive elements. Do not forget to experiment with colors and textures to achieve the desired effect and add uniqueness to your work. For a deeper study of styling and the development of your own style, you can take a look at the course "Stylization" from Skills Up School.
Also, if you want to expand your skills in digital painting, we recommend the free course "Digital painting. Dive into illustration", which will help you master the basics of working in Photoshop or Procreate and create a complete illustration.
Remember that practice and experimentation are the key to improving your artistic skills. Do not be afraid to try new techniques and approaches to find your unique style and approach to creating stylized objects.Related materials

Tutorial
Drawing stones
March 10, 2025
Tutorial
How to draw a house
October 25, 2024

Tutorial
How to draw a stylized coin
September 18, 2023

Tutorial
How to draw a child?
January 13, 2025

Tutorial
How to draw a torso
December 18, 2024

Article
3 tips for a beginner character artist. How to draw emotions
September 18, 2023

News
Старший специалист по освещению ILM о вызовах в визуальных эффектах, создании освещения для голограмм в фильме «Трансформеры: Один» и начале карьеры в индустрии
June 23, 2026